At the beginning of 2021, few crypto experts expected NFTs on marketplaces such as OpenSea to be the “blast off” of the NFT craze. While some may want to seize the opportunity and become profitable by trading NFTs, the true goldmine awaits developers that create platforms and dApps where NFTs can be useful. OpenSea created such a platform, and their early move has been rewarded as they are one of the leading NFT marketplaces to date. However, keep in mind that we are still early in the game. Therefore, Moralis has made it available through their OpenSea plugin to create an OpenSea clone and list NFTs to gain an extra edge. As such, you can list NFTs with this OpenSea plugin quickly and easily, making it the leading OpenSea API alternative.
Moving forward, we will take on an example project, where we will use the OpenSea API alternative offered by the ultimate Web3 development platform – Moralis (a.k.a. Firebase for crypto). As such, you’ll be able to see how easy it is to implement an NFT marketplace functionality in any dApp. This includes listing NFTs on OpenSea and submitting offers for listed NFTs on OpenSea, all directly from your dApps. Moreover, while you may use an OpenSea API, the alternative you’re about to see in action makes the coding process a lot simpler. Once a proper initial setup is completed, and the OpenSea plugin is installed, your JavaScript proficiency and the MetaMask extension are all you need. Furthermore, since we believe in learning by taking action, we invite you to complete our example project yourself. As such, make sure to create your Moralis account before moving any further.
Using the OpenSea API Alternative
In order to use Moralis and its OpenSea plugin, which will serve as an OpenSea API alternative, you need to set things up correctly. To make this setup process as straightforward as possible, we decided to break things down into simple steps. Moving forward, you will first learn how to create your Moralis server and then how to add the OpenSea plugin. With these two aspects covered, you’ll be ready to start tweaking the code using a code editor of your choice (we use Visual Studio Code [VSC]). Of course, you will not be on your own; we will walk you through the code and even provide you with the entire finished code.
Access the OpenSea API alternative by Creating a Moralis Server
To get access to the best OpenSea API alternative, complete the following steps:
- Create Your Moralis Account – If you haven’t created your free Moralis account yet, make sure to do so now. Just follow the above link, enter your email address, decide your password, and confirm your email address by clicking on the confirmation link sent to your address. If you already have an active Moralis account, log in to access your admin area right away.
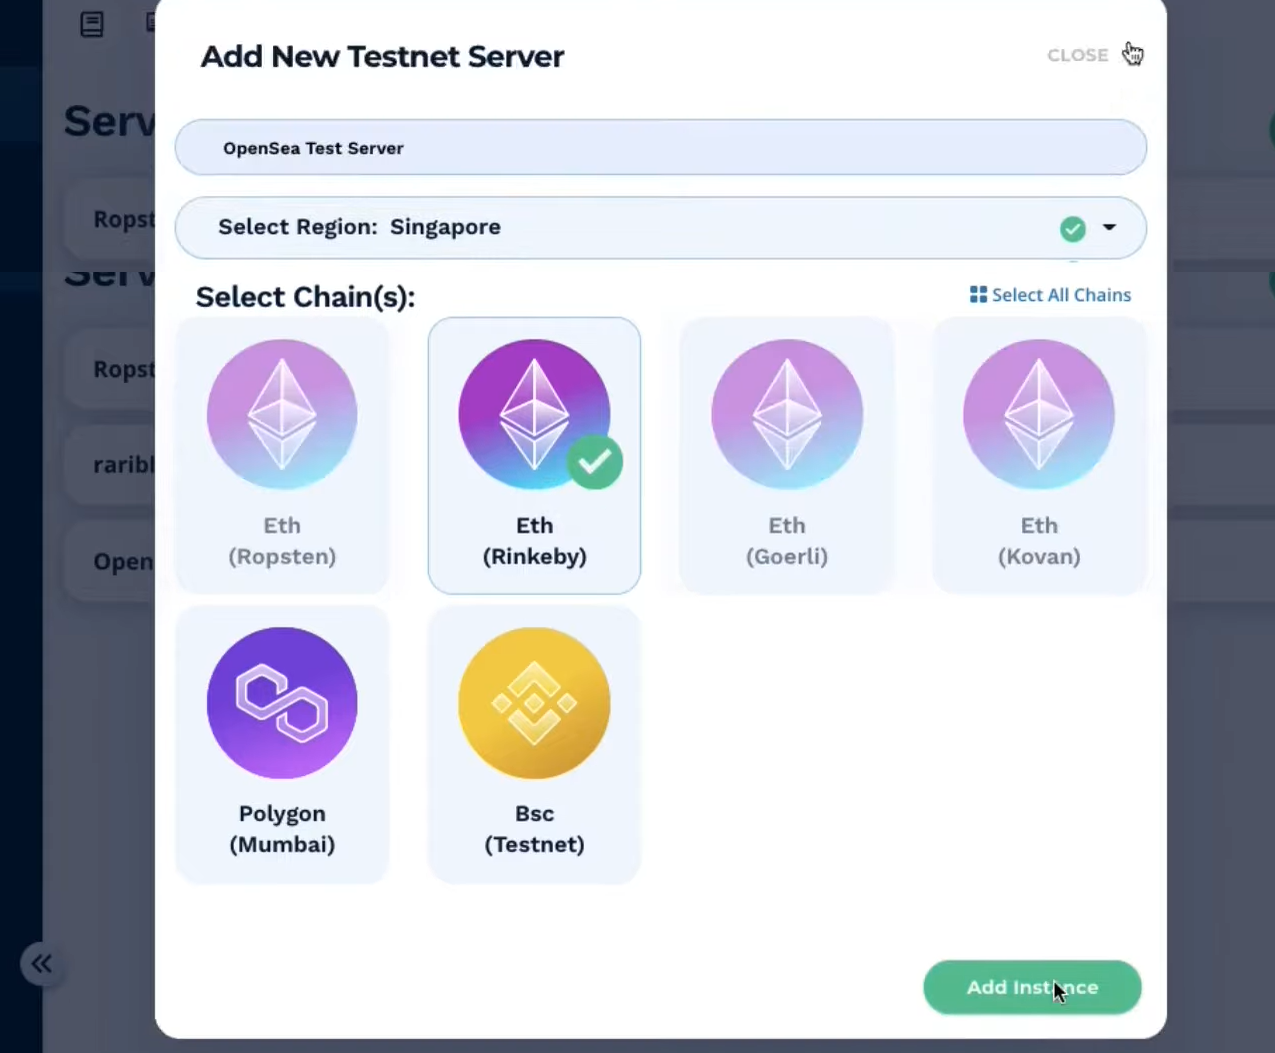
- Create a Moralis Server – After logging in, you’ll be inside your Moralis admin area. Make sure that you are on the “Server” tab and click on the “+ Create a new Server” button in the top-right corner. A drop-down menu offering different types of networks will appear (see the image below). Given the fact that this is an example project, we’ll use the “Testnet Server” option. However, once you are ready to deploy fully functional Web3 apps, you’ll need to select the “Mainnet Server” option.

Next, a pop-up window will ask for your server’s details. Thus, enter the server name (this can be anything you want), select your region, network type (in our case, the testnet), and chain(s) (for our example, we will use Ethereum’s Rinkeby testnet). Finally, click on the “Add Instance” button. Note that it can take several minutes for the server to spin up.
- Access Server Details – Once your server is up and running, you get to access its details by clicking on the “View Details” button next to your server name:

After clicking this button, you’ll see a pop-up window containing the information you need:

- Initialize Moralis – Copy your server’s details to your code file to obtain the required backend functionality covered by Moralis. Skip this step for now since we’ll complete this in the “Code Walkthrough” section further down.

Install the OpenSea API Alternative
Once you have your Moralis server ready, you get to install the OpenSea plugin. As such, click on the “Plugins” button on your Moralis server (you can access it by expanding your server’s options) inside your admin area. Your next step requires you to click on the “Go to Plugin Store!” button:

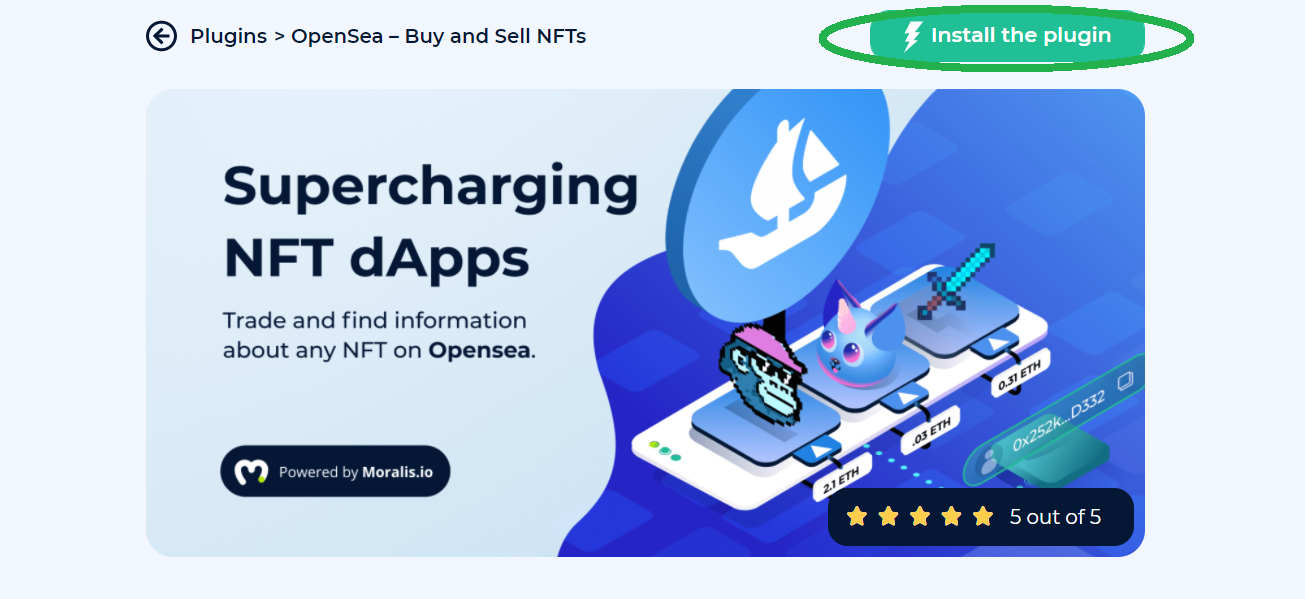
You’ll see all of the Moralis plugins; however, we’ll focus on the OpenSea plugin. To move forward, select that plugin by clicking on the “Read More” button on Moralis’ OpenSea plugin (see the image below):

On the next page, click on the “Install the plugin” button:
Moreover, you will then be redirected to your Moralis admin area, where you will complete the plugin’s installation process. This is the window that should appear to you:

Use the drop-down menu to select the server you’ve created in the previous section and click on ”Confirm”. Now you’ll get to use Moralis Speedy Nodes to enter the required details:

So, open the “Speedy Nodes” section in a new tab or window. If you’ve followed our lead, you are using Ethereum’s Rinkeby testnet; thus, click on “Endpoints” under the “ETH Network” option:


Now, copy the “Mainnet” and “Rinkeby” HTTPS addresses. You need to paste them to the corresponding fields in the opened “configure” window of our OpenSea plugin installation process. Next, click on the “Install” button. If you did everything as instructed, you should now have this window in front of you:
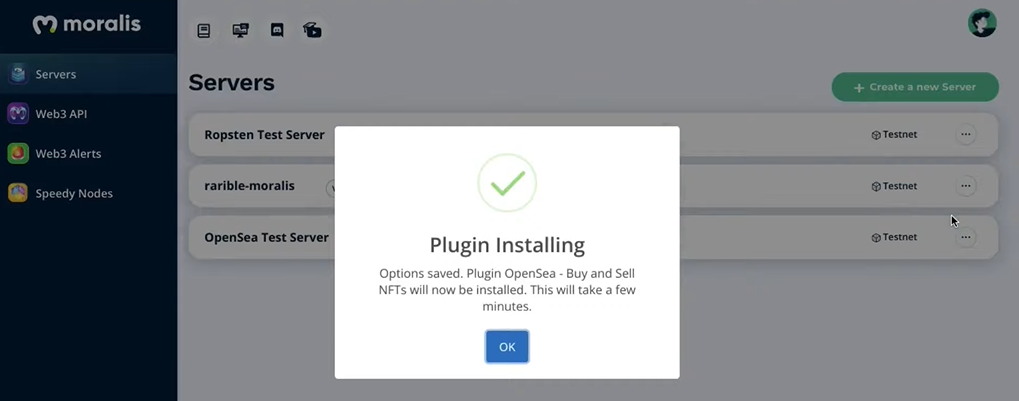
With the installation successfully completed, you should be able to see the OpenSea plugin listed by clicking on the “Plugins” button of your server.

With a Moralis server and the OpenSea plugin installed, you are ready to make use of this OpenSea API alternative.
OpenSea API Alternative in Action – Example Project
We’re almost ready to roll up our sleeves and take a closer look at the code required to create an example dApp that will use the OpenSea API alternative. However, let’s first do a preview of what you are going to create. In the screenshot taken of our OpenSea clone below, you can see that our dApp is plain, neat, and simple. That’s because we’ve focused on the backend functionality rather than on the UI (user interface). Keep in mind that the purpose of this example project is to show you how easy it is to use Moralis’ SDK to cover all blockchain-related backend aspects. Therefore, we strongly encourage you to take this example project to the next level by creating a stunning UI with your JavaScript skills.
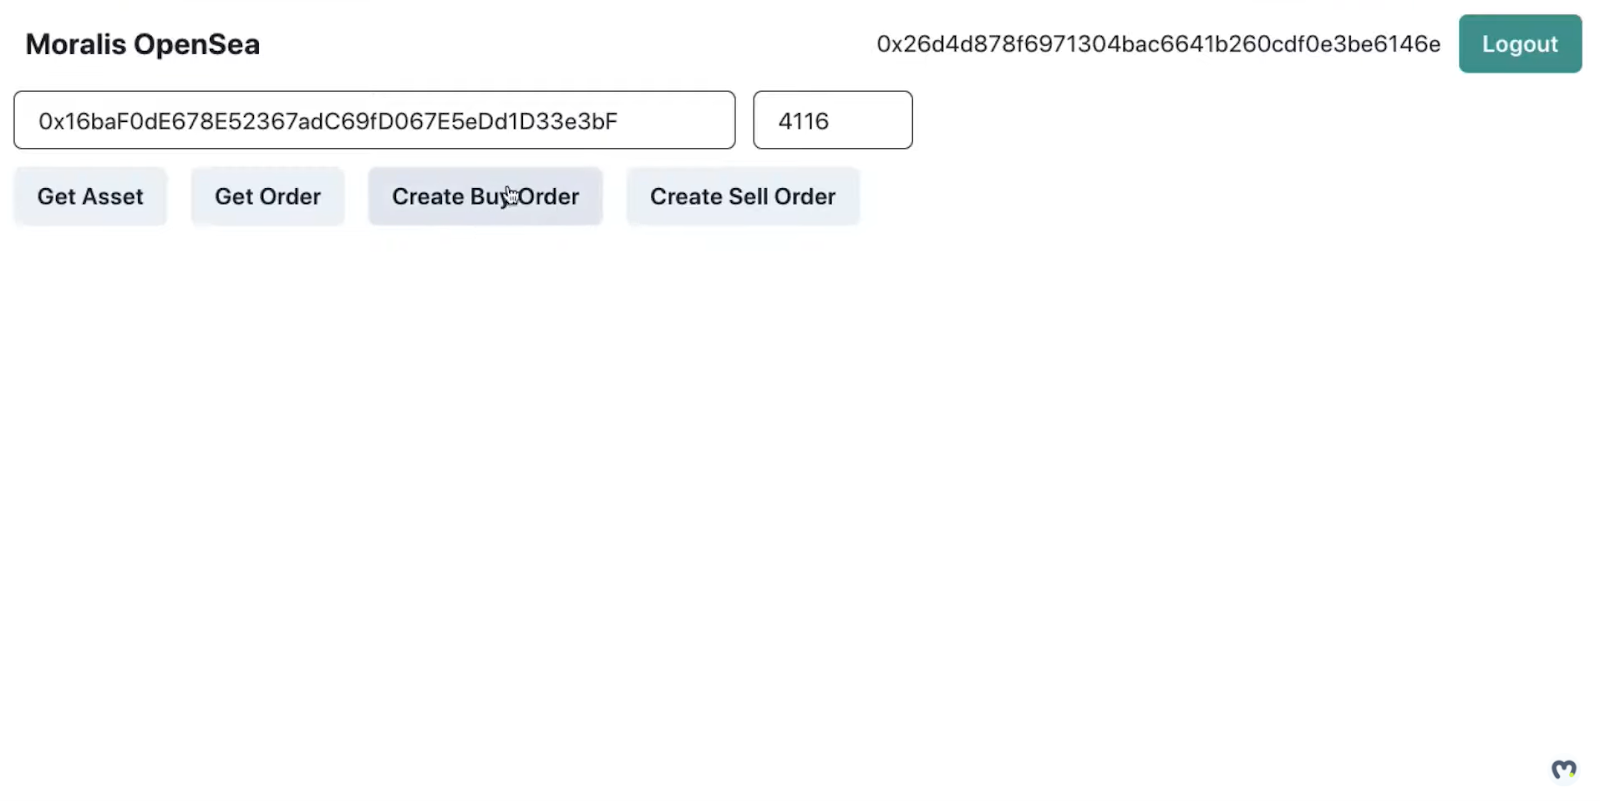
In the following, you can see the features that our Web3 example application includes:
- Ethereum Authentication – The dApp comes with a Web3 login and logout option by using Moralis’ MetaMask integration.
- Two Entry Fields – One field is intended for NFT contract addresses and the other for token IDs.
- Four Buttons:
- The “Get Asset” button.
- The “Get Order” button.
- The “Create Buy Order” button.
- The “Create Sell Order” button.
Code Walkthrough of the Example dApp
Before moving forward, please note that we will only cover certain parts of the code herein. However, the complete code is at your disposal on our GitHub page.
If you know about frontend development, you know that you have several options to create the interface presented above. In our case, we will accomplish this by creating a new “React” project in a code editor. Moreover, you want to create these three files: “index.js”, “App.js”, and “package.json”. Also, make sure to install the latest versions of Moralis. Additionally, do the same for the Moralis-React libraries and import those libraries inside the “index.js” file:
import React from "react";
import ReactDOM from "react-dom";
import { MoralisProvider } from "react-moralis";
import { ChakraProvider } from "@chakra-ui/react";
import "./index.css";
import App from "./App";
import reportWebVitals from "./reportWebVitals";
In addition, you finally get to complete the final (fourth) step of the “Access the OpenSea API Alternative by Creating a Moralis Server” section, which will initialize Moralis’ SDK. So, these are the lines of code where you need to insert your server URL and application ID:
<MoralisProvider
				appId={process.env.REACT_APP_MORALIS_APP_ID}
				serverUrl={process.env.REACT_APP_MORALIS_SERVER_URL}
			>
				<App />
			</MoralisProvider>
Furthermore, you also need to initialize the OpenSea API alternative (the plugin that we installed previously). You do this inside the “App.js” file. It is important not to forget to import the “useMoralis” hook at the top of the file:
import { useMoralis } from "react-moralis";
Here’s where you call that hook inside the “App()” function:
function App() {
	const {
		Moralis,
		user,
		logout,
		authenticate,
		enableWeb3,
		isInitialized,
		isAuthenticated,
		isWeb3Enabled,
	} = useMoralis();
With your “App.js” file ready, you can start using the Moralis plugin as the ultimate OpenSea alternative.
Adding Functionality to Our Example dApp
Now it’s time to focus on adding functionality. Specifically, that will enable us to use the “Get Asset”, “Get Order”, “Create Buy Order”, and “Create Sell Order” buttons. Start by using your code editor’s terminal to initialize the “yarn” (or “npm”) package manager by entering “yarn start”. Then, go to the web page for the OpenSea plugin since it provides you with all the details, including the code snippets. Thus, you essentially get to copy and paste the proper lines of code to cover the above buttons’ functionalities.

Furthermore, you can use your browser’s console to inspect your Web3 app in progress:

OpenSea API Alternative – “Get Asset”
To add functionality to your “Get Asset” button, use the lines of code available on the plugin’s web page (the “Get asset” section) and apply some minor changes:
	const getAsset = async () => {
		const res = await Moralis.Plugins.opensea.getAsset({
			network: "testnet",
			tokenAddress: values.tokenAddress,
			tokenId: values.tokenId,
		});
		console.log(res);
	};
The lines of code above show that you need to change the values next to “tokenAddress” and “tokenID”, which will be obtained from the two entry fields in our Web3 application. We’ve decided on this option for the sake of our example project since it enables you to avoid hardcoding token addresses and token IDs. The latter can be obtained on OpenSea:

Moreover, “Moralis.Plugins.opensea.getAsset” obtains the on-chain information relevant to a particular token address and token ID. To help you understand this properly, we encourage you to use an example asset and enter its contract address and token ID in the two prompt fields of our dApp. Your browser’s console will show you that your dApp properly obtains all the details regarding the asset in question:

By simply copying and pasting a few snippets of code, we ensured access to all the details available on OpenSea.
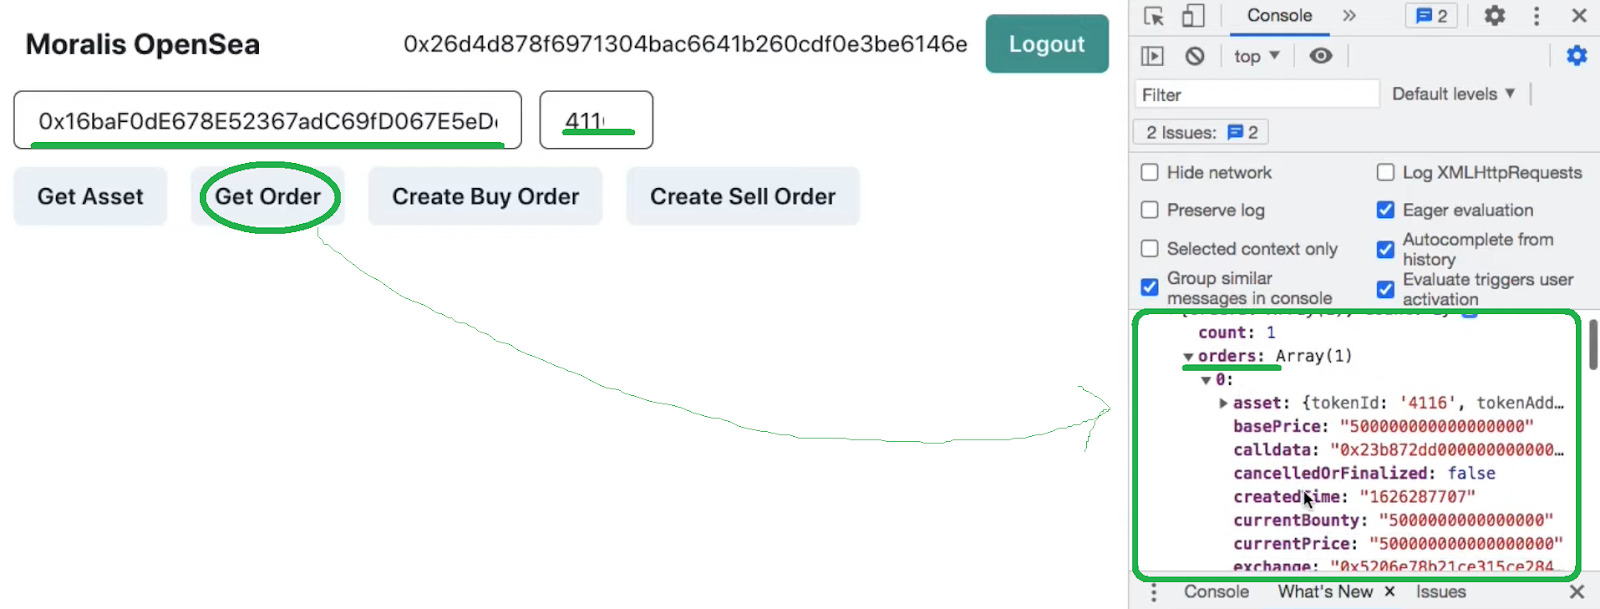
OpenSea API Alternative – “Get Order”
To implement the “Get Order” functionality, you need to follow the same steps as for the “Get Asset” button covered above. These are the lines of code (“App.js”) that cover that aspect:
	const getOrder = async () => {
		const res = await Moralis.Plugins.opensea.getOrders({
			network: "testnet",
			tokenAddress: values.tokenAddress,
			tokenId: values.tokenId,
			orderSide: 0, // 0 is for buy orders, 1 is for sell orders
			page: 1, // pagination shows 20 orders each page
		});
		console.log(res);
	};
If you use the browser’s console again to check the “Get Order” functionality, you can check that all data is fetched properly from OpenSea:
OpenSea API Alternative – “Create Buy Order”
Moving forward, you need to add functionality to the “Create Buy Order” button. You use the same principles as above (copy the lines of code from the plugins’ documentation page and apply small tweaks). This is the code you need to get:
const createBuyOrder = async () => {
		await Moralis.Plugins.opensea.createBuyOrder({
			network: "testnet",
			tokenAddress: values.tokenAddress,
			tokenId: values.tokenId,
			tokenType: "ERC721",
			amount: 0.0001,
			userAddress: web3Account,
			paymentTokenAddress: "0xc778417e063141139fce010982780140aa0cd5ab",
		});

		console.log("Create Buy Order Successful");
	};
The “tokenType” value needs to match the type of token you are using (“tokenAddress” and “tokenID”). Fortunately, the OpenSea API alternative supports both the ERC-1155 and the ERC-721 token standards.
Moreover, make sure you have the MetaMask extension ready and have a sufficient amount of tokens in your wallet for testing the “Create Buy Order” functionality as you need to complete the transaction.
OpenSea API Alternative – “Create Sell Order”
By now, you know the drill, so follow the same steps as you did previously to add functionality to the “Create Sell Order” button. These are the lines of code you need to end up with:
	const createSellOrder = async () => {
		const expirationTime = Math.round(Date.now() / 1000 + 60 * 60 * 24);
		const startAmount = 1;
		const endAmount = 1;

		await Moralis.Plugins.opensea.createSellOrder({
			network: "testnet",
			tokenAddress: values.tokenAddress,
			tokenId: values.tokenId,
			tokenType: "ERC1155",
			userAddress: web3Account,
			startAmount,
			endAmount,
			expirationTime: startAmount > endAmount && expirationTime, // Only set if you startAmount > endAmount
		});

		console.log("Create Sell Order Successful");
	};
Make sure to consider the “tokenType” value as it needs to match your NFT’s type. Moreover, please keep in mind that you can only create sell orders for NFTs that you own.
By adding the final functionality to the “Create Sell Order” button, you’ve successfully finished your example dApp and put the ultimate OpenSea API alternative to proper use. Nonetheless, we invite you to check out the video below, in which one of Moralis’ experts cover the same example project in more detail:
OpenSea API Alternative – List NFTs with this OpenSea Plugin – Summary
We hope that you’ve managed to follow our guidance and have created your own example dApp. If so, you now know how to make use of the best OpenSea API alternative to add NFT functionality to your dApps. In combination with Moralis’ ultimate NFT API, this provides you with all the tools you need to perfect your NFT development skills. Now you’ll be able to take on your own or your clients’ projects and benefit from this world-changing industry as much as possible.
However, in case you are not JavaScript-proficient yet, we recommend you enroll in the 2021 JavaScript Programming for Blockchain Developers course available at Moralis Academy. Moreover, numerous high-quality courses are available that can help you go full-time crypto markedly quicker. In addition, make sure to visit the Moralis YouTube channel and the Moralis blog, where a ton of educational and inspirational content is available for free and can help you become a blockchain developer. Some of our latest articles show you how to do gasless transactions on Ethereum, how to build a cross-chain bridge, how to create a DAO quickly, how to create a prediction market dApp, the ins and outs of MetaMask for developers, how to get Web3 events with SMS messages, how to create free token, how to create NFT on Binance Smart Chain, and much more.