NFT marketplaces like OpenSea are gaining popularity, as more people become familiar with the concept of blockchain technology and non-fungible tokens (NFTs). What’s more, there’s no shortfall of demand for OpenSea-like NFT marketplaces. Whether it’s people looking to scout out new tokens, or artists looking for an environment to display their artwork, a lot of people are on the lookout for the next big NFT marketplace. As such, it’s no surprise why programmers want to learn NFT token development to create an OpenSea clone.
Of course, OpenSea will likely remain larger than your own NFT platform. However, by learning how to create an NFT marketplace like OpenSea, a developer puts himself in a spot where he could potentially create a highly successful marketplace for NFTs. Moreover, developing a clone of OpenSea is a process that can be done easily with Moralis’ Web3 platform and various tools. As such, follow along as we show you how to build a marketplace for non-fungible tokens with one of Moralis’ plugins. In the end, you’ll have an OpenSea clone ready for deployment on Ethereum’s testnet.
Thanks to Moralis’ OpenSea plugin, you are able to create an NFT marketplace like OpenSea just by copying and pasting a few simple lines of code. Moreover, the plugin fully integrates with OpenSea, which means that your users can easily create buy and sell orders of assets on OpenSea from your dApp (decentralized application). Thus, let us educate and guide you as we take on an example project herein, where we create our OpenSea clone.

Create an NFT Marketplace Like OpenSea with Moralis
Moralis is the fastest-growing Web3 development platform in the industry. It covers a full spectrum of blockchain development needs across multiple chains. Aside from being one of the best Infura alternatives with Moralis Speedy Nodes, Moralis offers a comprehensive Web3 SDK. This includes the Ethereum API, Moralis’ ultimate NFT API, and all other functionality found in the Web3 API.
Moreover, Moralis also added plugins recently, which is one of the features we will exploit in our quest to create an NFT marketplace like OpenSea. The plugin that we will be using is the OpenSea plugin. The latter enables you to integrate the full power of OpenSea into your dApps with a few lines of code. To make use of this shortcut, you’ll need to install the plugin from Moralis’ plugins page. Fortunately, this can be done easily with a few clicks inside your Moralis admin area. However, you first need to create a Moralis server (see detailed instructions below).

OpenSea Clone Creation – Moralis Setup
You need to complete the following steps if you want to create an NFT marketplace like OpenSea with Moralis:
- Create Your Moralis Account – In case you haven’t created your free Moralis account yet, make sure to do so now. Follow the link above, enter your email address, and create your password. Next, make sure to complete the process by confirming your email address (you’ll receive an email with a confirmation link). If you already have an active Moralis account, just log in to access your admin area.
- Create a New Server – Once inside your Moralis admin area, click the “+ Create a new Server” button in the top-right corner. From the drop-down menu appearing, select the network type that best suits your needs (see the image below). Since this is an example project, we’ll use the “Testnet Server” option. However, you’ll need to select the “Mainnet Server” option once you’re ready to deploy fully functional dApps.

In the pop-up window that appears, enter the server name (this can be anything you want), select region, network (in our case, the testnet), chain(s) (for our example, use the “Eth (Rinkeby)” option), and click “Add Instance”. It can take some time for the server to spin up, so please be patient.

- Access Server Details – As soon as your server is ready, you get to access its details by clicking the “View Details” button next to your server name.

By doing so, you’ll see a pop-up window containing all the information you need:

- Initialize Moralis – Now populate your “.js” or “.html” file with the Moralis server details (application ID and server URL) to obtain the required backend functionality covered by Moralis:

Note: Make sure to use the details of your particular server and NOT the ones from the image above.
Create an NFT Marketplace Like OpenSea Using the OpenSea Plugin
Now that you’ve created your Moralis server, you get to install the OpenSea plugin. Start by clicking the “Plugins” button on your Moralis server. On the following step, click the “Go to Plugin Store!” button:

Then you need to install the OpenSea plugin. Start by selecting that plugin by clicking the “Read More” button on Moralis’ OpenSea plugin:

In the next step, you’ll see an option to install the plugin. Click the “Install the plugin” button:

Clicking the “Install the plugin” button will redirect you to your Moralis admin area to complete the plugin’s installation process. You’ll see this screen:
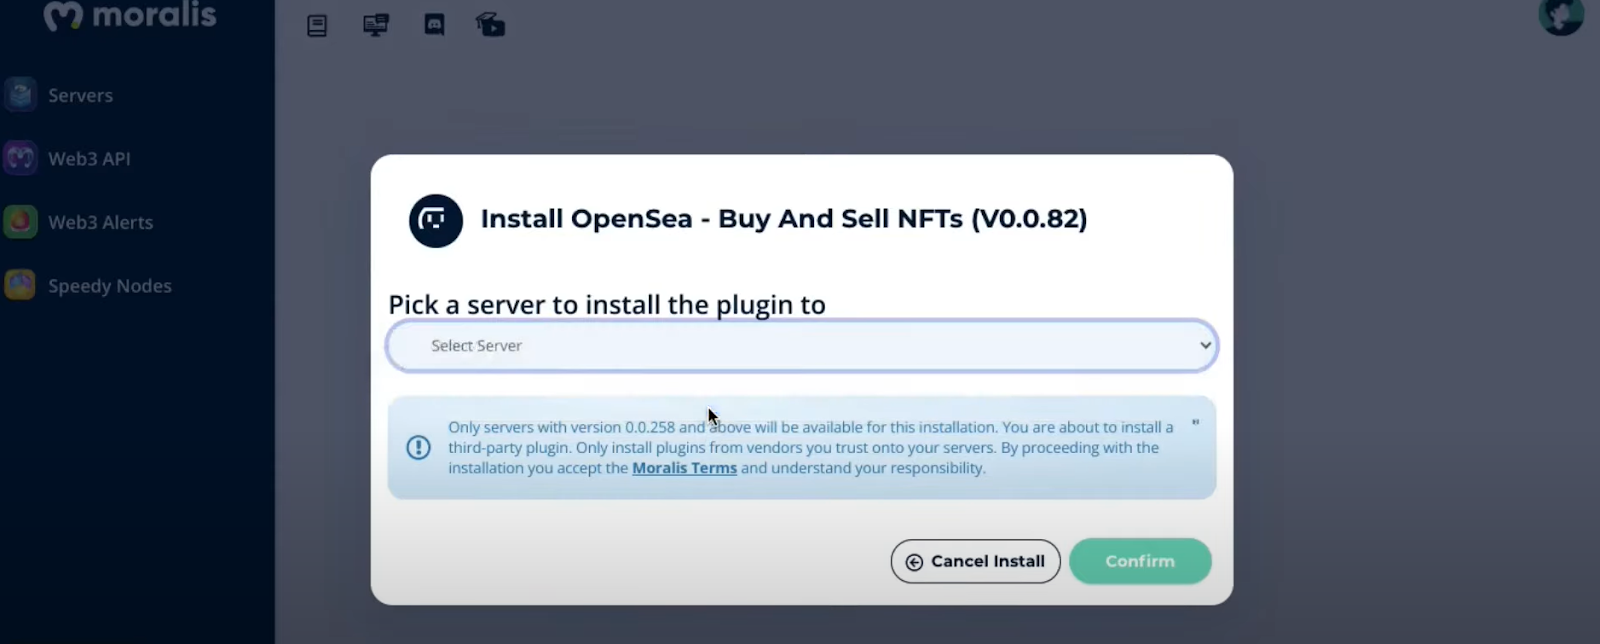
From the drop-down menu, select the server you’ve created for the purpose of our “OpenSea clone” project and click ”Confirm”, which will take you to the last step:

To obtain the necessary details, you need to open the “Speedy Nodes” section from the side menu in a new tab or window. There you’ll see various options. Since we are using Ethereum’s Rinkeby testnet, click the “Endpoints” button under the “ETH Network” option:
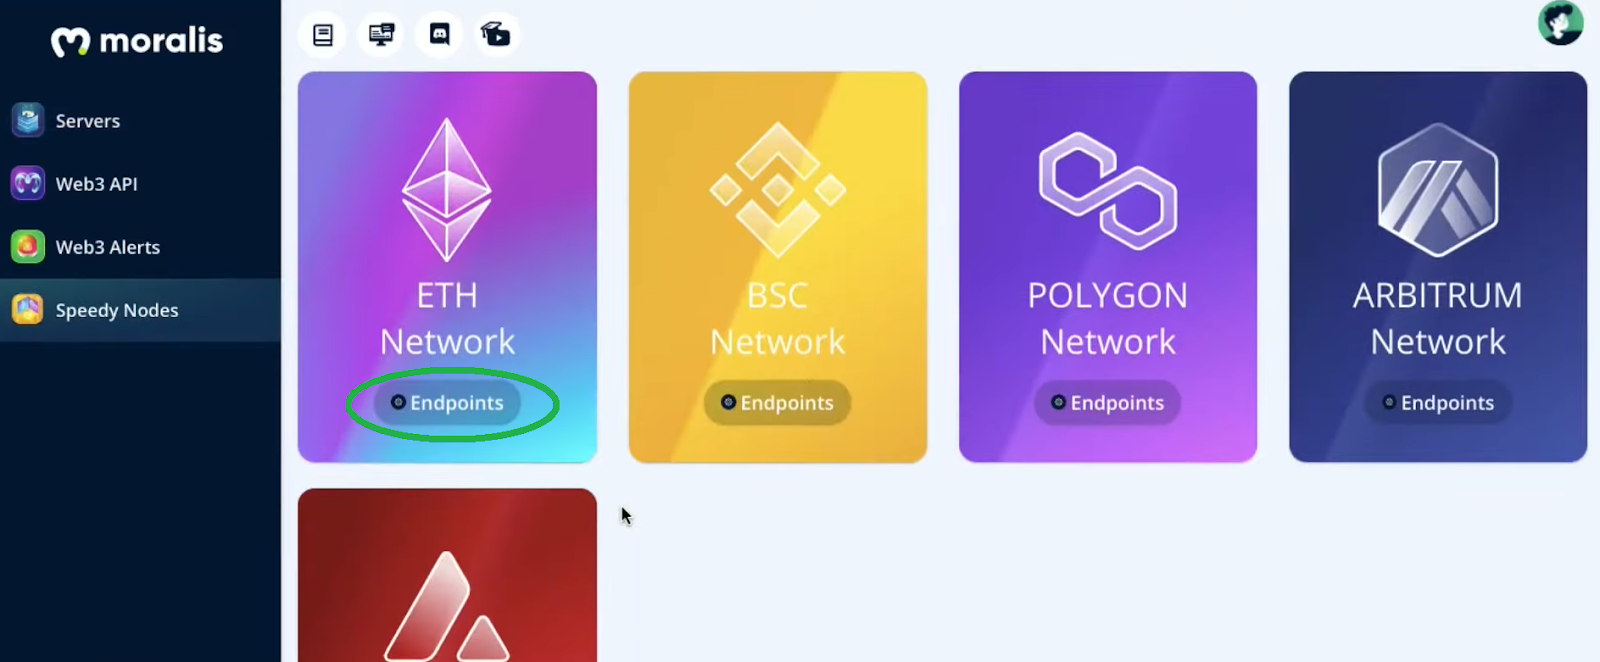

Next, copy the HTTPS addresses under the “Mainnet” and “Rinkeby” options and paste them to the designated fields in the opened window of our OpenSea plugin installation process. Then click the “Install” button. If you did everything right, you should see this screen:

Once you’ve completed the installation (you should be able to see the OpenSea plugin listed when you click the “Plugins” button of your server, as shown below), you’ll be able to create an OpenSea clone.

With a Moralis server and the OpenSea plugin installed, we are ready to take on our example project by using the server details and implementing the OpenSea plugin.
Example Project for an OpenSea Clone
Before we jump into the details of how to create an NFT marketplace such as OpenSea, we want to quickly show you what we are going to build. Looking at the image of our OpenSea clone, you can see that we will focus on the backend functionality rather than on the UI (user interface). Our goal is to show you how easy it is to implement all blockchain-related backend features, which you’ll then be able to take to the next level by creating an incredible user interface with your JavaScript skills.

Our Web3 example application will include the following features:
- Ethereum authentication (Web3 login and logout option).
- Two entry fields, one for NFT contract addresses and the other for token IDs.
- Buttons to get assets and orders.
- Buttons for buy and sell orders.
Create an NFT Marketplace Like OpenSea – Code Walkthrough
Note: We will only cover specific parts of the code herein; however, the complete code is available at GitHub.
To create the interface (presented above) where all of the backend functionality will be implemented, you need to set up a new “React” project in your code editor. There are three files that you want to create: “index.js”, “App.js”, and “package.json”. Moreover, you need to install the latest versions of Moralis and Moralis-React libraries (in the “package.json” file, or use your code editor’s terminal), and then import those libraries inside the “index.js” file:
import React from "react";
import ReactDOM from "react-dom";
import { MoralisProvider } from "react-moralis";
import { ChakraProvider } from "@chakra-ui/react";
import "./index.css";
import App from "./App";
import reportWebVitals from "./reportWebVitals";
Now is the time to complete the final step of the “OpenSea Clone Creation – Moralis Setup” section to initialize Moralis’ SDK by inserting your server URL and application ID:
<MoralisProvider
				appId={process.env.REACT_APP_MORALIS_APP_ID}
				serverUrl={process.env.REACT_APP_MORALIS_SERVER_URL}
			>
				<App />
			</MoralisProvider>
In addition, we also need to initialize the Moralis OpenSea plugin, which we do inside the “App.js” file. Of course, also remember to import the “useMoralis” hook at the top of the file:
import { useMoralis } from "react-moralis";
We then call that hook inside the “App” function:
function App() {
	const {
		Moralis,
		user,
		logout,
		authenticate,
		enableWeb3,
		isInitialized,
		isAuthenticated,
		isWeb3Enabled,
	} = useMoralis();
We set the plugin initialization inside the “useEffect()” function:
useEffect(() => {
		if (isInitialized) {
			Moralis.initPlugins();
		}
		// eslint-disable-next-line
	}, []);
You can now use the Moralis plugin for this example project.
OpenSea Clone – Adding Functionality
Let’s now focus on adding functionality to the “Get Asset”, “Get Order”, “Create Buy Order”, and “Create Sell Order” buttons of our OpenSea clone. First, we use the code editor’s terminal to start the “yarn package manager” (you may also use npm) by typing “yarn start”. Next, we make use of the Moralis OpenSea plugin’s webpage, where all details, including code snippets, are provided. This means that we can essentially just copy and paste those lines of code to cover our buttons’ functionality.

Moreover, we will use a browser’s console to inspect our Web3 app in progress:

OpenSea Clone – “Get Asset”
If we now want to add functionality to our “Get Asset” button, we simply start with the lines of code provided on the plugin’s website under the “Get asset” section and make some tweaks.
const getAsset = async () => {
		const res = await Moralis.Plugins.opensea.getAsset({
			network: "testnet",
			tokenAddress: values.tokenAddress,
			tokenId: values.tokenId,
		});
		console.log(res);
	};
Looking at the lines of code above, you can see that we changed the values next to “tokenAddress” and “tokenID”. These values are obtained from the two entry fields in our Web3 application. This is useful for the purpose of our example project since it enables us to avoid hardcoding token addresses and token IDs. We obtain those details on OpenSea:

Furthermore, as you can see, the “Moralis.Plugins.opensea.getAsset” snippet of code takes care of obtaining the on-chain information. If we now use an example asset to enter its contract address and token ID in the fields on our dApp, we can see that it works as it obtains all the details regarding the asset:

Do you see the power of this? We just copied and pasted a couple of lines of code, and we now have access to all the details available on OpenSea.
OpenSea Clone – “Get Order”
Following the “Get Asset” example, we cover the “Get Order” functionality with these lines of code inside “App.js”:
const getOrder = async () => {
		const res = await Moralis.Plugins.opensea.getOrders({
			network: "testnet",
			tokenAddress: values.tokenAddress,
			tokenId: values.tokenId,
			orderSide: 0, // 0 is for buy orders, 1 is for sell orders
			page: 1, // pagination shows 20 orders each page
		});
		console.log(res);
	};
Moreover, let’s use the browser’s console to check the added functionality:
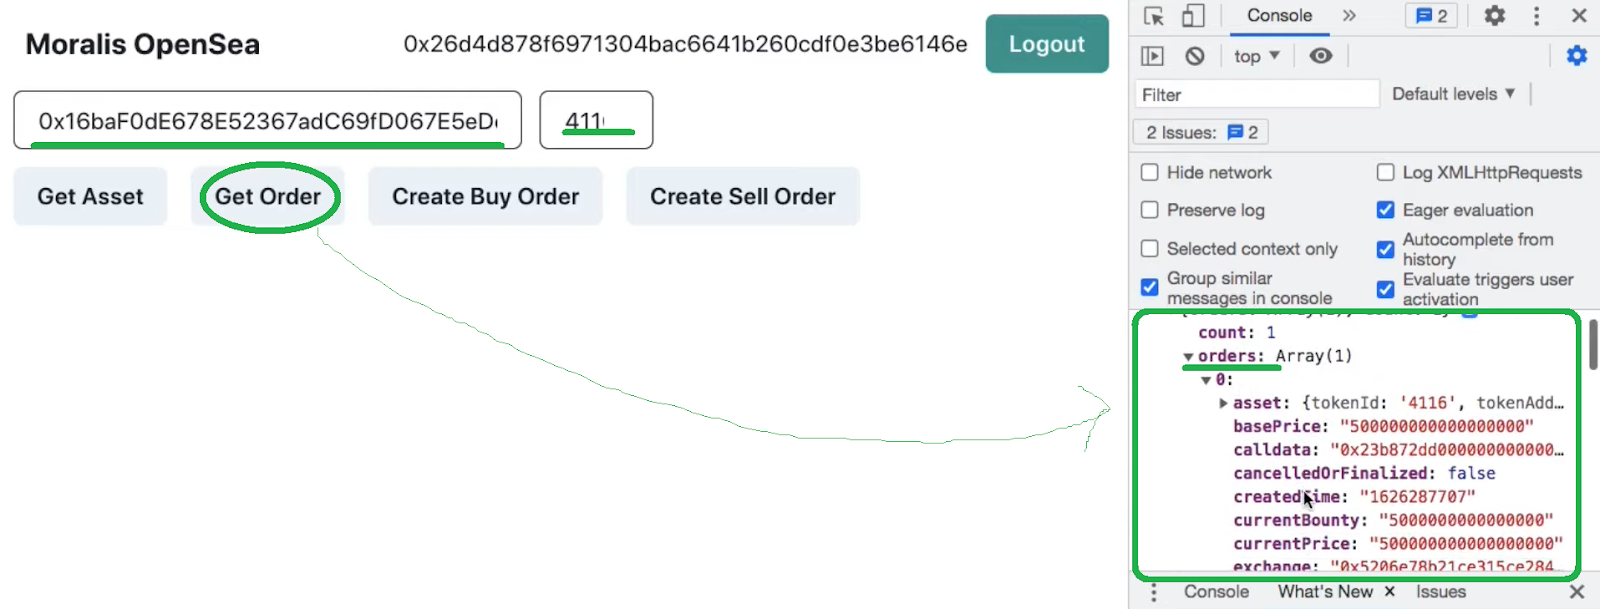
We can see that the data is fetched properly. As such, we are getting the details from OpenSea.
OpenSea Clone – “Create Buy Order”
Just like we did for the first two buttons, we now do for the “Create Buy Order” button. After copying the lines of code from the plugins’ documentation page and applying some tweaks, we get this:
const createBuyOrder = async () => {
		await Moralis.Plugins.opensea.createBuyOrder({
			network: "testnet",
			tokenAddress: values.tokenAddress,
			tokenId: values.tokenId,
			tokenType: "ERC721",
			amount: 0.0001,
			userAddress: web3Account,
			paymentTokenAddress: "0xc778417e063141139fce010982780140aa0cd5ab",
		});

		console.log("Create Buy Order Successful");
	};
Note: Consider the “tokenType” value. It is important to match the type of token we are using (details used in our dApp’s entry fields). The supported NFT types by the OpenSea plugin are the ERC721 token standard and the ERC1155 token standard.
When testing this functionality, we need to use MetaMask to complete the transaction. In addition, you also need to ensure that you have a sufficient amount of tokens in your wallet.
OpenSea Clone – “Create Sell Order”
To add functionality for the “Create Sell Order” button, we once again follow the same steps as previously. We end up with the following lines of code:
const createSellOrder = async () => {
		const expirationTime = Math.round(Date.now() / 1000 + 60 * 60 * 24);
		const startAmount = 1;
		const endAmount = 1;

		await Moralis.Plugins.opensea.createSellOrder({
			network: "testnet",
			tokenAddress: values.tokenAddress,
			tokenId: values.tokenId,
			tokenType: "ERC1155",
			userAddress: web3Account,
			startAmount,
			endAmount,
			expirationTime: startAmount > endAmount && expirationTime, // Only set if you startAmount > endAmount
		});

		console.log("Create Sell Order Successful");
	};
Note: Again, make sure to consider the “tokenType” value. It should match your NFT’s type. Also, be aware that you can only create sell orders for NFTs that you own.
With that, we conclude our example project, which means that you now know how to create an NFT marketplace like OpenSea. Moreover, note that there are additional functionalities available when using Moralis’ OpenSea plugin, which we encourage you to test on your own.
Furthermore, in case you are more of a video person, make sure to watch the video below, where one of Moralis’ experts takes on the same example project that we’ve covered above:
OpenSea Clone – Create an NFT Marketplace Like OpenSea – Summary
Thanks to the OpenSea plugin and Moralis’ SDK, you get to develop your own NFT marketplace that fetches all the data both from and orders to OpenSea in minutes. After the initial setup (creating the Moralis server and installing the plugin), you basically just need to copy and paste a few lines of code to cover all advanced functionalities. Of course, it is up to you to get creative and build the best user experience around those features.
Moreover, aside from using Moralis to create an NFT marketplace like OpenSea, you may use this ultimate Web3 development platform for all sorts of blockchain development projects. Whether you are just looking to build your first dApp, learn about BEP20 tokens, or want to create a DeFi dashboard, Moralis has your back. It can also help you generate NFTs, bulk mint NFTs, or even create a mobile Ethereum dApp. Furthermore, for those looking for maximum simplicity, we recommend using the ultimate Ethereum dApp boilerplate. Also, make sure to check out Moralis’ YouTube channel and Moralis’ blog. Both outlets provide a ton of valuable content, including many insightful and inspiring example projects. The latter will help you master a wider range of cross-chain development.

