Non-fungible tokens, or NFTs, are essentially digital collectibles, and they have risen in popularity in the last couple of years. Not only have the number of NFTs on the market grown substantially, but some of them are selling for absurd amounts of money. As they are becoming increasingly sought-after, it becomes compelling to know more about how they work and how to acquire these tokens. Moreover, listing, auctioning, and selling NFTs, are all possible through NFT marketplaces. If you’re already familiar with how to create your own NFT, then you might even have one ready to sell. As such, you’re going to appreciate learning more about the process of creating a marketplace for non-fungible tokens in this step-by-step guide. So, follow along in this article as we look closer at how you can develop your own NFT marketplace with Moralis.
Moralis is the number one operating system for Web3 development, making blockchain development more accessible. With Moralis, we can quickly develop an NFT marketplace, and the platforms’ tools make this possible in about 20 minutes. One of the many benefits of Moralis’ platform is the infinitely scalable backend infrastructure available to all users. This allows you to avoid parts of the most pressing task with blockchain development so that you can focus on creating smart contracts and a compelling user experience.
Moralis offers a vast selection of Web3 tools aiding in all sorts of development projects. For example, users get immediate access to native support for IPFS, Moralis Speedy Nodes, the Moralis Price API and NFT API, etc. For example, Moralis is the premier Infura for BSC and Infura for Avalanche alternative.
Furthermore, signing up with Moralis is entirely free, and it only takes a couple of seconds. So, if you are looking to become a dApp developer, then join the platform right away, and you’ll have your first blockchain project launched in no time!
Non-Fungible Tokens – What are NFTs?
NFT is an abbreviation for “non-fungible token”, and they are, as the name suggests, a type of token. Moreover, within the realm of crypto, two different main types of tokens exist, non-fungible and fungible tokens. So, to understand what both of these are, we must discover what the term ”fungible” means.

Fungible is a traditional economic term to describe interchangeable assets. As such, it is possible to exchange an individual unit of a fungible asset for another as they are of the same type and value. An example here is the dollar that is a fungible asset as a specified number of dollars equals another set of the same amount of dollars. Furthermore, within the crypto industry, currencies such as Ethereum and Bitcoin are considered fungible tokens. Meaning that one Bitcoin is equal to another Bitcoin, as they have the same value. Essentially, this shows that the concept of fungibility is vital when it comes to money.
Moreover, non-fungible assets are, therefore, assets that don’t follow the same principles. This means that NFTs are tokens that aren’t interchangeable since they have unique properties. To exemplify what a non-fungible asset is, we can take house. All houses are unique, meaning that it isn’t possible to change one house for another as they have different values and characteristics.
As NFTs are non-fungible, they are ideal for representing assets due to their uniqueness. Therefore, they are digital collectibles that can represent ownership of either a unique physical or digital asset.
NFTs exist on the blockchain, where each block is protected by cryptography, meaning that it is impossible to change a block once it has formed. As such, this distributed public ledger ensures a straight record of who owns these assets.
What is an NFT Marketplace?
Now that we have a better understanding of NFTs, the next step is to discover where we can buy and sell these digital collectibles. One way of trading NFTs is through an NFT marketplace. Essentially, an NFT marketplace is just a platform or website to acquire and sell NFTs; it is as simple as that. However, other features of such platforms could be to display the NFTs, store them, and even mint new ones. As such, there is a multitude of functionalities that makes trading NFTs a whole lot more accessible.

There are often a few things that you’ll need in advance to use an NFT marketplace. First of all, you are going to need a wallet such as MetaMask. MetaMask is the number one crypto wallet on the market, and it acts as a gateway to Ethereum’s extensive ecosystem of dApps. Second, you’ll also, in many instances, need some cryptocurrencies that you can use to pay for the NFTs. Finally, you might also need to create an account for the marketplace. This is often relatively easy and only takes a couple of seconds if you already have a MetaMask wallet.
There are already established marketplaces out there, and some of the most popular ones are OpenSea, Rarible, SuperRare, Foundation, and many more. On these platforms, you’re able to purchase NFTs representing ownership of virtually anything. As such, these platforms sell tokens that represent everything from digital/virtual to physical assets.
How to Develop Your Own NFT Marketplace in 5 Steps
With a better understanding of how to sell digital collectibles and what an NFT marketplace is, we can take a closer look at how to develop your own NFT marketplace dApp. Since we are working with Moralis, it becomes possible to do so in just five steps by doing the following:
- Create a Moralis Server
- Set Up a Smart Contract
- Create an HTML File
- Create the Logic for the dApp
- Set Up Subscriptions
As Moralis provides an already managed backend infrastructure, this process becomes relatively straightforward. However, it is favorable to have prior development knowledge when it comes to Solidity and JavaScript, as these are the blockchain development languages we will use when creating the NFT marketplace.
Moreover, if you’d prefer to watch a video explaining the process, then tune in to the following clip from the Moralis YouTube channel. Here you’ll find one of Moralis’ developers diving deeper into the complete process of how to develop your own NFT marketplace:
Step 1: Develop Your Own NFT Marketplace – Creating a Moralis Server
The first step in creating an NFT marketplace where it is possible to trade digital collectibles is to set up a Moralis server. To do so, if you haven’t already, you’ll need to create a Moralis account. Creating an account is easy and once logged in, we can initiate a new Moralis instance.
To get the process going, you’ll need to click the button at the top right of the admin panel, which says ”+ Create a new Server”. This will provide a selection of options for you to choose from, and this should depend on which chain and network you would like to build your dApp on. However, once either of the alternatives is clicked, a new window will appear where you need to input the server name, select a region, and choose the networks of your choice.
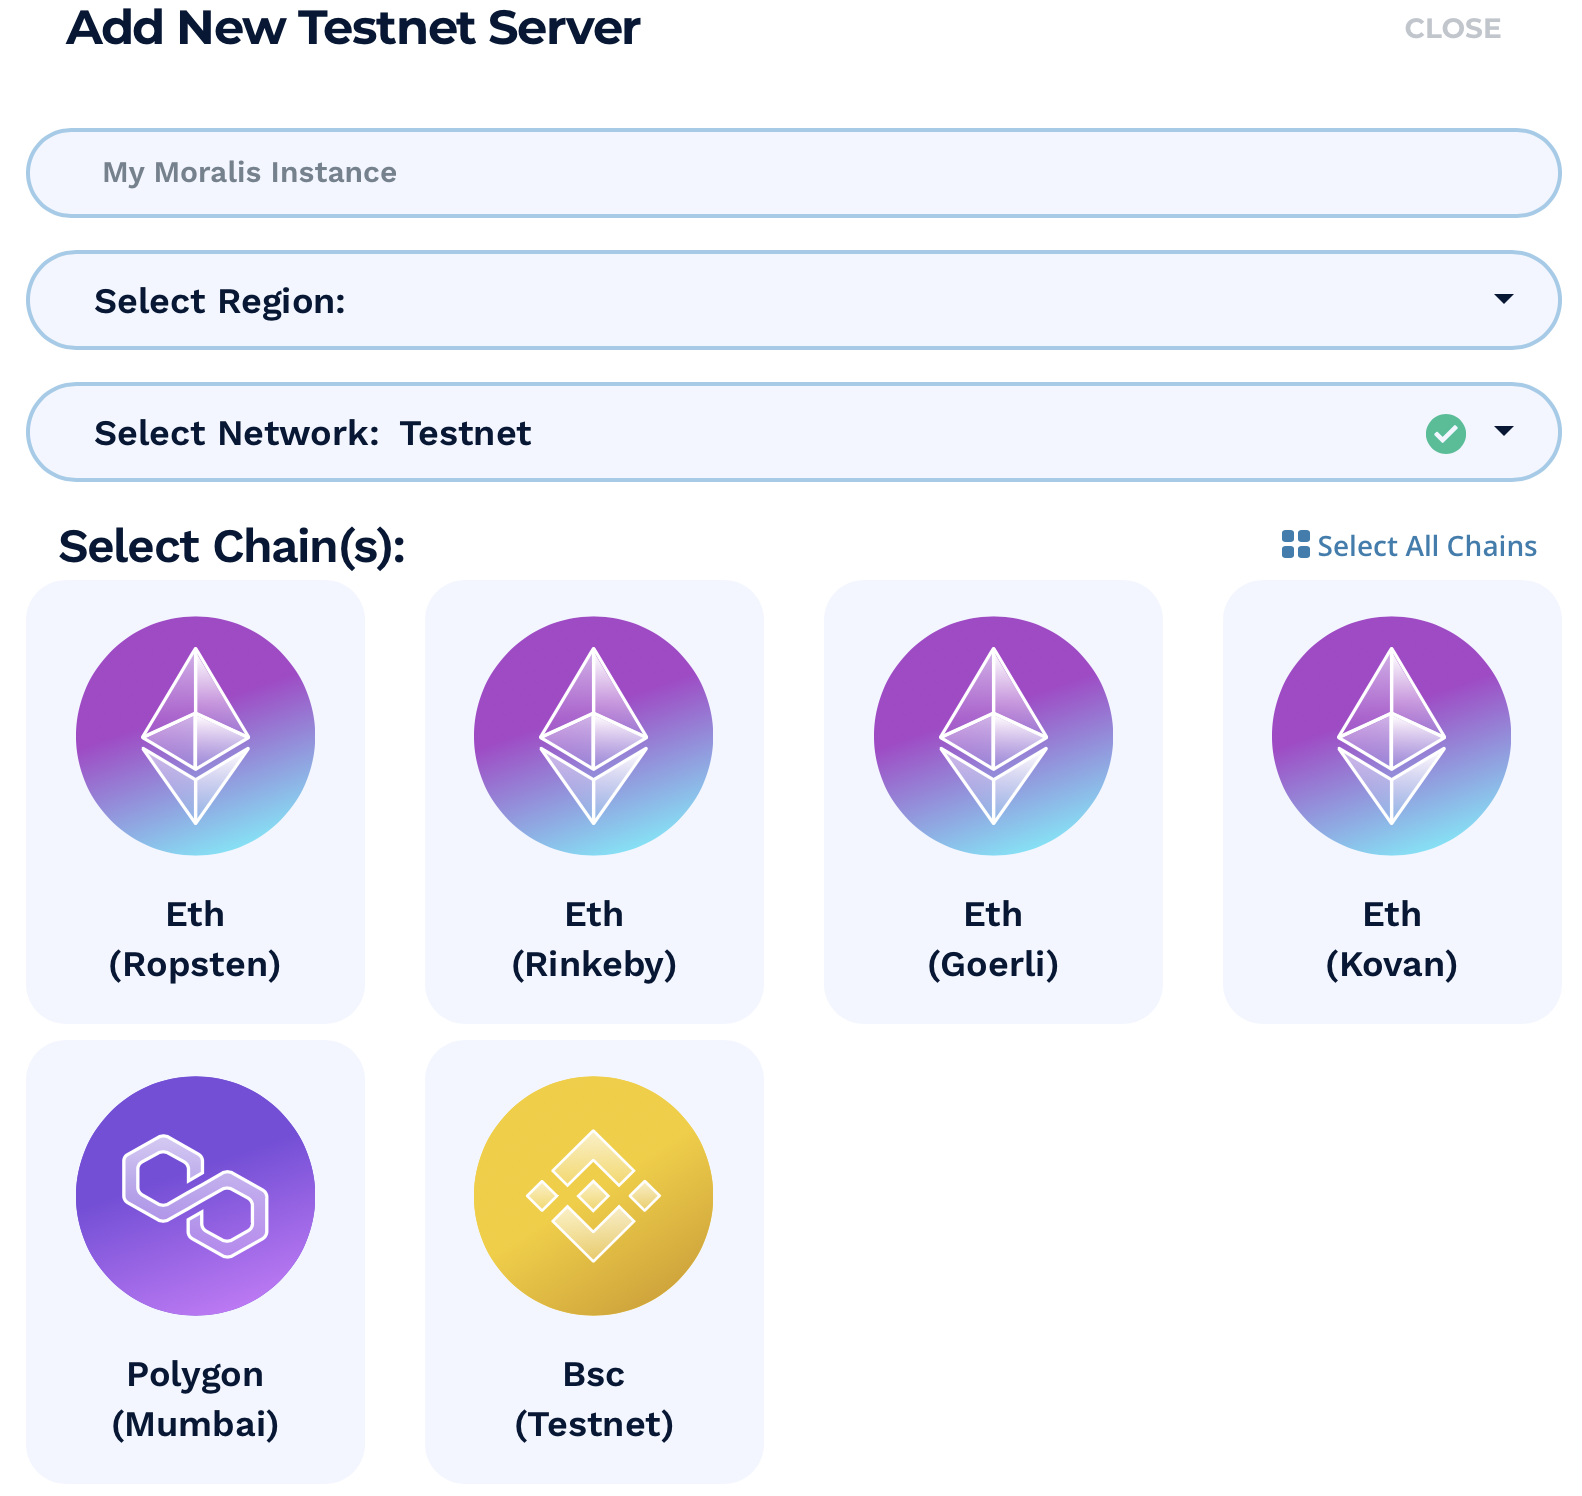
Once done with the selections, you can go ahead and click the ”Add Instance” button at the bottom left to spin up the server. This might take a couple of seconds, but don’t worry; the server will be up and running momentarily.
With a server up and running, there are a number of different actions that can be taken. For example, for this dApp, we added some sync events for the smart contract that manages the marketplace (we’ll get to the contract in the next step). One of the events is a “listener” that “listens” whenever someone adds a new offering to the marketplace. Additionally, there is a second event that “listens” to whenever an offering closes. These listeners are continuously active to ensure that the dApp/marketplace knows whenever someone puts an NFT up for sale or when a user purchases a token. Furthermore, they also populate the database of your Moralis server.
Step 2: Develop Your Own NFT Marketplace – Creating a Smart Contract
With a Moralis instance up and running, we can construct the smart contract that operates the marketplace. We will be writing this contract in Solidity’s programming language, which is ideal for smart contract development.

First and foremost, the contract consists of the following four events: ”OfferingPlaced()”, ”OfferingClosed()”, ”BalanceWithdrawn()”, and ”OperatorChanged()”. These events are then triggered once a user executes an action on the marketplace. For example, whenever an offering is placed by the operator, the ”OfferingPlaced()” event will trigger. Moreover, you’ll find the complete code on the following GitHub page: “market_place.sol”.
Another critical aspect of the smart contract is to allow the marketplace dApp to make NFT transactions on the users’ behalf. As we’ll see in the ”placeOffering()” function of the contract, it is a requirement that the ”operator” executes this function. In this instance, it will be a trusted operator, which is the dApp that we are building.
Moreover, the contact further consists of six simple functions:
- placeOffering() – This is the function for making offerings, and it allows the dApp to make offerings on the users’ behalf.
- closeOffering() – This is the function for when someone buys an NFT on the marketplace. Here, another transaction is sent to the contract to transfer the NFT once the price is paid.
- withdrawBalance() – This is simply to withdraw the balance from the marketplace dApp.
- changeOperator() – A function that allows us to change the operator.
- viewOfferingNFT() – This function allows us to view the offerings of the participants in the marketplace.
- viewBalances() – Finally, this allows us to view the participants’ balances in the marketplace.
Step 3: Develop Your Own NFT Marketplace – Creating an HTML File
With the smart contract at hand, we can create an HTML file to structure the contents of our dApp. We won’t be going into too much detail as there isn’t much happening in this file, and the user interface (UI) will be quite basic. However, this is what the dApps’ UI looks like:

As you can see, if you check out the code, we have some headings, a couple of buttons, and some input fields. However, this is just a basic example of how simple your own NFT marketplace can look, but it is up to you to change the layout to fit your own preferences.
As such, we will simply provide you with the following link to the GitHub repository for you to take a closer look: ”index.html”.
Step 4: Develop Your Own NFT Marketplace – Creating the Logic for the dApp
The first thing that happens in the logic part of our dApp is the authentication of users with MetaMask. Once it authenticates users, it is possible to query information regarding their NFT and token balances. With the users signed in, three functions trigger instantly, which populate the NFTs, the offerings, and the balances. Furthermore, following these functions are three subscriptions; however, we will get to those in the next step.
populateNFTs()
First of all, we have the ”populateNFTs()” function, and this is what it looks like:
async function populateNFTs(){
    const localNFTs = await getNFTs().then(function (data){
        let nftDisplays = getNFTObjects(data);
        displayUserNFTs(nftDisplays);
    });
}
This function waits for the ”getNFTs()” function, which we use to query the users’ NFT balance in their wallets. This information will then display the NFTs to the users through an additional function. This is basically what the function does and is everything needed to display the tokens.
populateOfferings()
Next up, we have the ”populateOfferings()” function:
async function populateOfferings(){
    let offeringArray = await getOfferings();
    let offerings = await getOfferingObjects(offeringArray);
    displayOfferings(offerings);
}
This is quite similar to that of the ”populateNTFs()” function. First, the Moralis server is queried regarding all the offerings that currently exist in the marketplace. Second, we display the “offerings” similar to that of the previous function.
It is also important to note that this function is closely related to the smart contract created earlier. This function tracks the offerings made to the smart contract by the dApp on behalf of the users.
populateBalances()
Finally, we have the last function that triggers once the users authenticate, which is ”populateBalance()”. This function simply queries the balances of the users’ wallets and then displays the information in the dApp. As such, this is what the function looks like:
async function populateBalance(){
    const presentBalance = await getBalance(ethereum.selectedAddress);
    const formatedBalance = "Your Market Place Balance is " + Moralis.Units.FromWei(presentBalance) + " ETH"
    document.getElementById("balance").innerHTML = formatedBalance;
}
Selecting NFTs
We use the previous functions to populate data and display it to the users once they authenticate with MetaMask. However, we also need some functions for performing the actions of the website. First of all, we need a function to select the digital collectibles, and this is what the function looks like:
async function selectNFT(nftObject){
    const nftId = nftObject.parentElement.id;
    let nft = window.nftArray.find(object => object.object_id == nftId);
    const nftDisplay = `<div id="${nft.object_id}" class="text-center">
                            <img src=${nft.image} class="img-fluid rounded" style="max-width: 40%">
                            <h3>${nft.name}</h3>
                            <p>${nft.description}</p>
                            <div id="sellActions">
                                <input id="price" type="text" class="form-control mb-2" placeholder="Price">
                                <button id="sellButton"class="btn btn-dark btn-lg btn-block mb-2" id="sell"
                                onclick="offerNFT(this);">Offer for Sale</button>
                            </div>
                        </div>`
    document.getElementById("featured_nft").innerHTML = nftDisplay;
    nftOffered = await isNFTOffered(nft.token_address,nft.token_id);
    if (nftOffered){
        document.getElementById("sellActions").remove();
    }
}
This function simply allows users to select an NFT and display it in a particular area of the dApp. Once an NFT is selected, the users will be able to perform tasks, one of which is to offer digital collectibles to the marketplace.
Offering NFTs
This is a function that allows users to offer and sell digital collectibles on the marketplace:
async function offerNFT(context){
    let nftId = context.parentElement.parentElement.id;
    let nft = window.nftArray.find(object => object.object_id == nftId);
    const price = document.getElementById("price").value;
    const contract = nft.token_address;
    const tokenId = nft.token_id;
    context.setAttribute("disabled",null);
    const approval = await approveMarketPlace(contract, tokenId);
    const tx_approval = `<p> Approval transaction ${approval}</p>`
    context.parentElement.innerHTML = tx_approval;
    const offering = await placeOffering(contract,tokenId, price);
    console.log(offering)
}
The function consists of two parts, one for placing the offering and one for approving the marketplace. This is necessary since this is where permission is given for the dApp to make transactions on behalf of the users.
Once the marketplace is approved, then the offering is made to the market with an attached price. However, when an offering is made, it isn’t a smart contract that is called but rather a Moralis cloud function. The reason for doing so is that the dApp needs a private key to make the transactions on the users’ behalf, and we do not want to display this key in the frontend of our dApp.
Buying NFTs
The final function is the ”buyNFT()” function, and it allows users to purchase these digital collectibles on the marketplace. This is pretty straightforward, and the function calls an additional two functions whenever a user clicks the button from the UI.
async function buyNFT(context){
    const offeringId = context.parentElement.parentElement.id;
    let offering = window.offeringArray.find(object => object.offeringId == offeringId);
    const price = Moralis.Units.ETH(offering.price);
    const priceHexString = BigInt(price).toString(16);
    closedOffering = await closeOffering(offeringId,priceHexString);
    const tx_closeOffering = `<p> Buying transaction ${closedOffering}</p>`;
    context.parentElement.innerHTML = tx_closeOffering;
}
However, we have covered the basics of all the major functions, but there is still more to the complete dApp. If you are interested in learning more, then check out the GitHub repository, where you’ll find the complete code of the NFT marketplace. In the repository, you can see the additional functions that are connected to, for example, the ”buyNFT()” function.
Step 5: Develop Your Own NFT Marketplace – Set Up Subscriptions
Lastly, we also have the three “subscribe” functions of the dApp. These functions are important as they allow us to continuously update the dApp for our users in real-time whenever a transaction of digital collectibles occurs in the marketplace. For example, this is what the ”subscribeOfferings()” function looks like:
async function subscribeOfferings(){
    let query = new Moralis.Query("PlacedOfferings");
    subscriptionAlerts = await query.subscribe();
    subscriptionAlerts.on('create', (object) => {
        cleanOfferings();
        populateOfferings();
    });
}
The function listens whenever a new offering is made and added to the Moralis servers’ database. Then it will clear the offerings and populate once again with the new offering included. It doesn’t have to be more complicated than that when working with Moralis. Moreover, the other subscribe functions work similarly, and you can once again find them in the GitHub repository.
Develop Your Own NFT Marketplace – Step-by-Step Guide – Summary
Now that’s it for this tutorial on how to develop your own NFT marketplace. We were able to create a fully functioning marketplace where digital collectibles could be bought and sold in just five simple steps. If you have followed along, you’ll now know the power of the Moralis platform first-hand. No other platform would allow you to create an NFT marketplace in mere minutes. However, this isn’t all there is to the platform. Moralis offers many additional guides, such as how to build ETH dApps or how to transfer ERC-721 tokens. Moreover, the Moralis blog features a number of guides for complete beginners. This will allow you to get to grips with ERC721, ERC1155, BEP20, how to create mobile Ethereum apps with React Native, or understand Moralis’ comprehensive Ethereum dApp boilerplate.
So, if you want to become a blockchain developer, then make sure to sign up with Moralis right away. Signing up is completely free, and you’ll be able to become a dApp developer in record time!
