Are you a Unity developer? If so, the rise of Web3 gaming presents a huge opportunity for you. Many big players are already investing heavily in creating their centralized metaverse, with Meta leading the pack. However, humanity is hungry for decentralized alternatives. Thus, knowing how to create Unity Web3 apps is a must. Of course, this entails knowing what Unity Web3 development tools to use. If you want a smooth development process and create successful dApps, choosing the right tools is imperative. Now, you might have explored Alchemy API alternatives when searching for your preferred Web3 tech stack. However, while nodes and Web3 API providers are great tools, the real power lies in Web3 backend platforms. As such, Moralis is the premier platform you cannot afford to miss out on. Let this ultimate Web3 development platform (“Firebase for crypto”) take care of your backend needs. Create your free account now!
The transition from Unity to “Unity Web3” programming is generally not straightforward. In fact, many coders still fall into the trap of building directly on top of Ethereum RPC nodes. Thus, they end up facing all of the limitations of RPC nodes. But, when you use the shortcut mentioned above, you don’t need to worry about any extra overhead for your Web3 backend. You simply connect Unity with the Moralis Metaverse SDK by completing a quick initial setup. Then, you can devote all your energy towards creating an attractive Web3 UI and the best possible user experience. As such, the chances of your Unity Web3 game being a success increase automatically. Moving forward, we will provide you with more details about Moralis’ SDK. Hopefully, that will help you decide what your next steps should be. Nonetheless, we also have a step-by-step initial Unity Web3 setup guide waiting for you herein.
Why Unity Web3?
Just by looking at some of the most popular games, such as Call of Duty, League of Legends, and EA Sports’ FIFA, they all limit you to their communities. Why? Because they are built in a centralized manner and are all owned by centralized companies. That means they own your data and your in-game assets. Furthermore, in some cases, you may have a chance to interact with other game communities if the game belongs to the same brand. However, there is no way to bring together, let’s say, the EA community and the Blizzard Entertainment community. But, when Unity Web3 is used, a truly decentralized metaverse can be created.
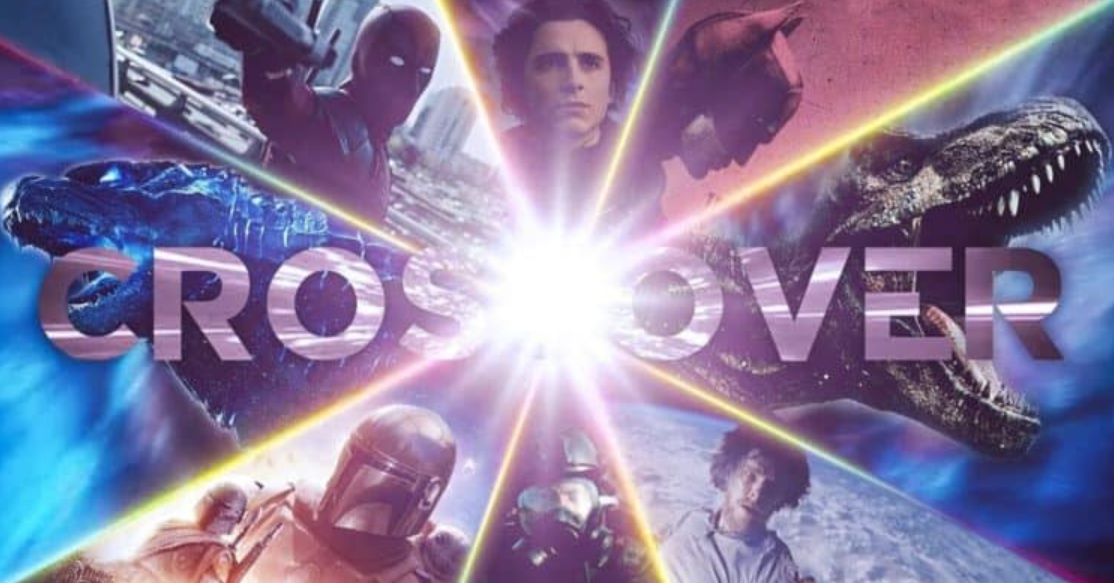
Now, you might be wondering why anyone would want to share information between different gaming worlds in the first place. Well, because it brings some insanely cool options to the table. For instance, just imagine crossover events. As a result, we could bring characters, features, and other assets from different games together. Wouldn’t that be amazing?
We believe that we are way past the “if” when it comes to bringing gaming universes together. The future of gaming is clearly about interoperability and decentralization, where users actually own their in-game assets. As such, the only remaining questions revolve around “how” to do this and what rules to implement. Hence, all the “no” and “it will never work” sayers will be left in the rear-view mirror.
With that said, we can all agree that centralized games cannot offer these sorts of crossover collaborations. However, the tech offered by programmable blockchains, such as Ethereum, brings us an ocean of new possibilities. As such, decentralized metaverses or even one giant metaverse suddenly becomes a possibility. Although, these concepts may be too big for today’s discussion. Thus, let’s focus on a Unity Web3 game example.
Creating Unity Web3 Games
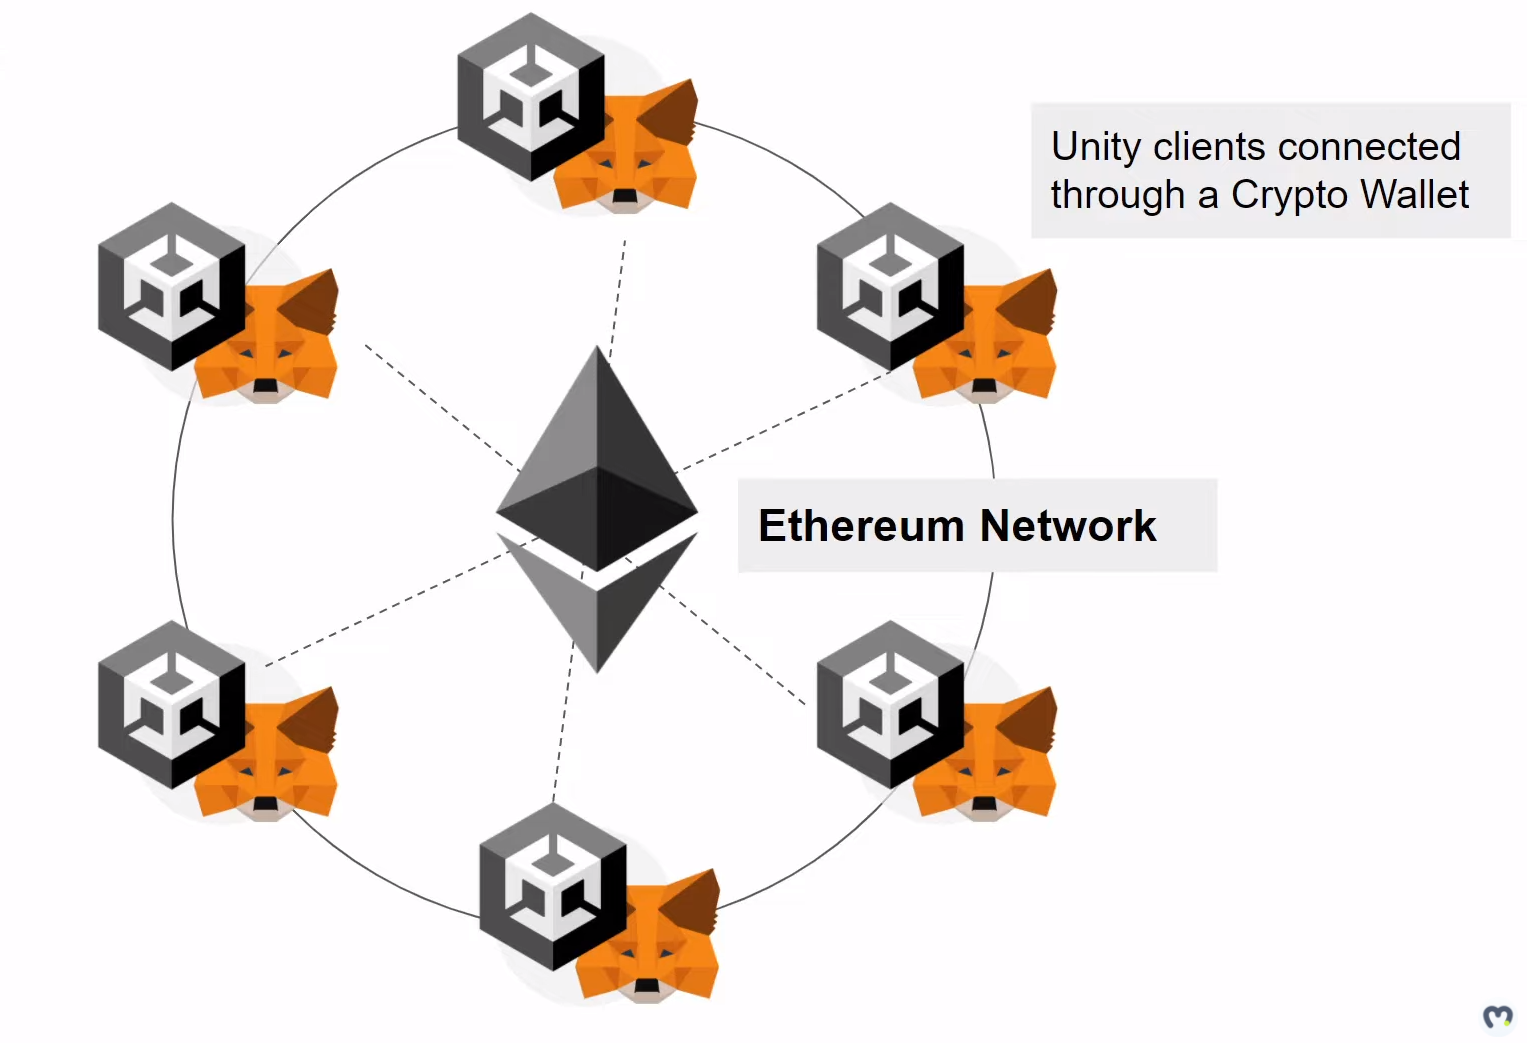
In this case, a game that we can create is one of the worlds within the Web3 realm. Moreover, since Ethereum is still the most popular chain, let’s power it with EVM. As such, all players will be able to connect with their Ethereum-supported Web3 wallets. Furthermore, their information will be automatically replicated through the entire decentralized network (see the image above). That way, players can transact with each other and even buy and sell various assets. In turn, the value from in-game assets can be easily carried over into the real world.
Nonetheless, such a Unity Web3 game, or should we say a digital world, would be a great place for massive quest events and in-game jobs. Before you start doubting such possibilities, let us remind you that new incredible technology always disrupts its current industry status. Furthermore, getting an initial negative overreaction is normally a good sign. As such, the revolution has already started.
As a matter of fact, the above concept can easily be taken even further. With Moralis, you can easily connect your Unity Web3 game with other reputable chains, as seen in the image below.
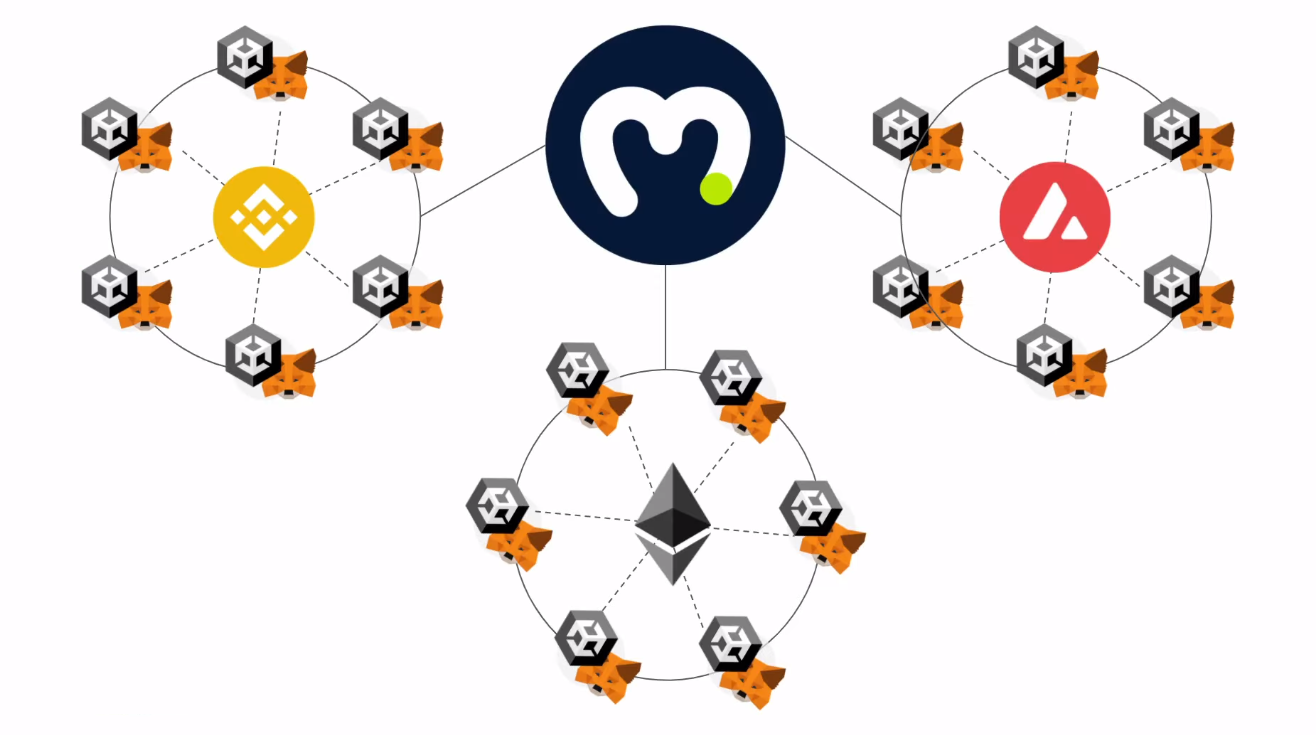
It is Moralis’ cross-chain interoperability that adds extra value. Let’s elaborate on that concept. So, when you use Moralis for your backend needs, you get to deploy your game to all of Moralis’ supported blockchains. That way, your Web3 games are available to users across different chains, which also means that you can reach a broader audience. In addition, your work is “future-proofed” as you are not stuck to any particular chain. Furthermore, this means that if a new programmable blockchain takes things over in the future, you can transition seamlessly.
How to Create a Unity Web3 Game
Assuming that you have at least some experience with Unity, you probably know how to go about creating 3D worlds and their scenes. This is where you also start when creating Web3 games. However, the real Web3 magic starts once you have your scenes ready. At that point, it’s time to focus on connecting a Unity game with Web3 login and accessing all other Web3 functionalities.
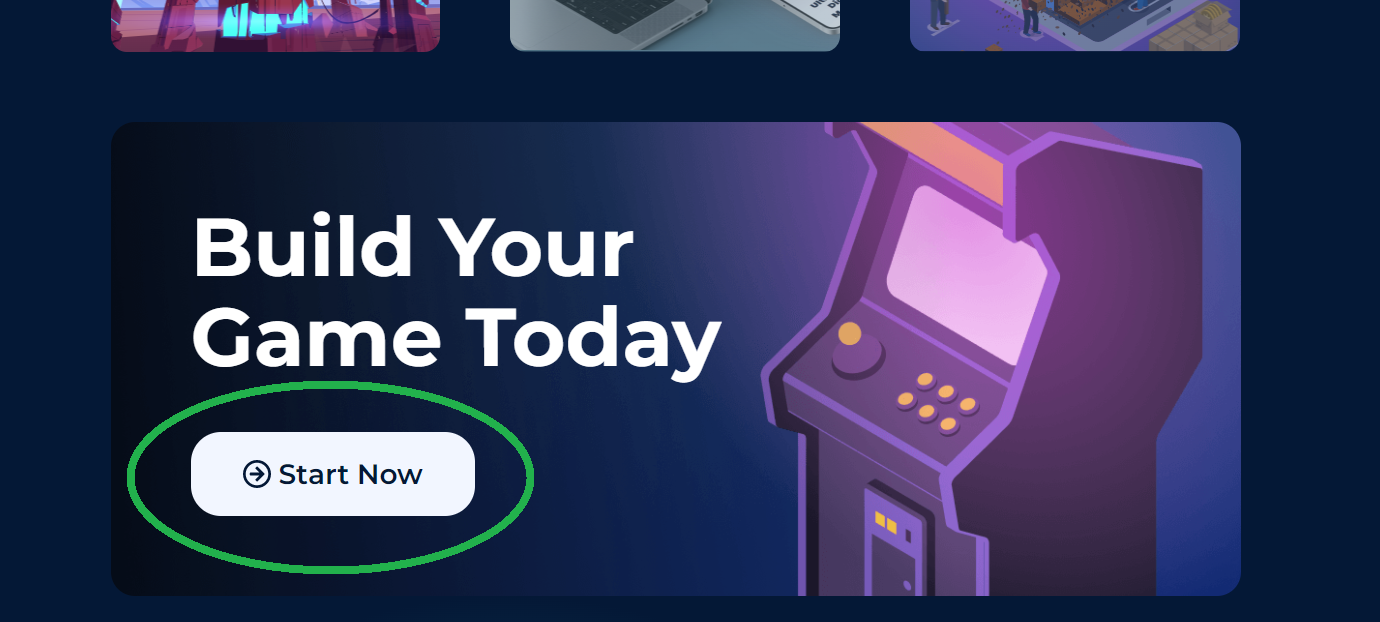
For starters, you need to access Moralis’ Metaverse SDK. You can use the corresponding link in the introduction or use Google and search for “Moralis Metaverse SDK”. After landing on the Moralis Metaverse SDK page, you need to scroll down a bit. There you’ll see the “Start Now” button:
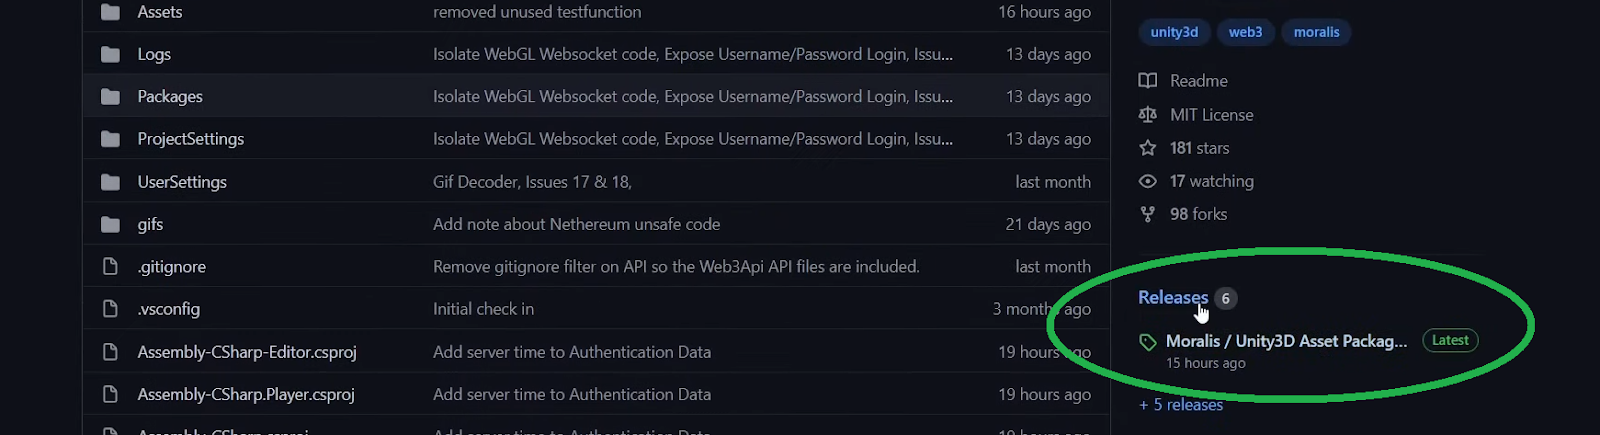
When you click on the button, it will take you to the Ethereum Unity boilerplate. This powerful shortcut awaits you on GitHub. There, you can find all the details about this boilerplate. However, in order to create a Unity Web3 game, click on the “Releases” section on the right-hand side. That way, you will access the latest version:
Next, you need to save the “.unitypackage” file to your computer:

Putting Moralis’ Metaverse SDK to Use
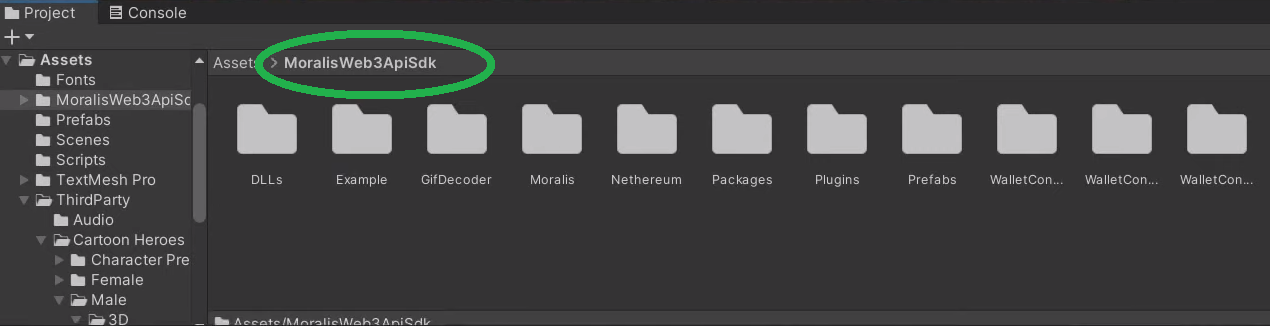
After saving the “.unitypackage” file successfully, return to Unity. Then, you want to drag and drop the above-downloaded folder into Unity’s interface. Don’t forget to confirm the import. By doing so, you’ll successfully import Moralis’ Unity package. Hence, the “MoralisWeb3ApiSdk” folder will be at your disposal from that point on:
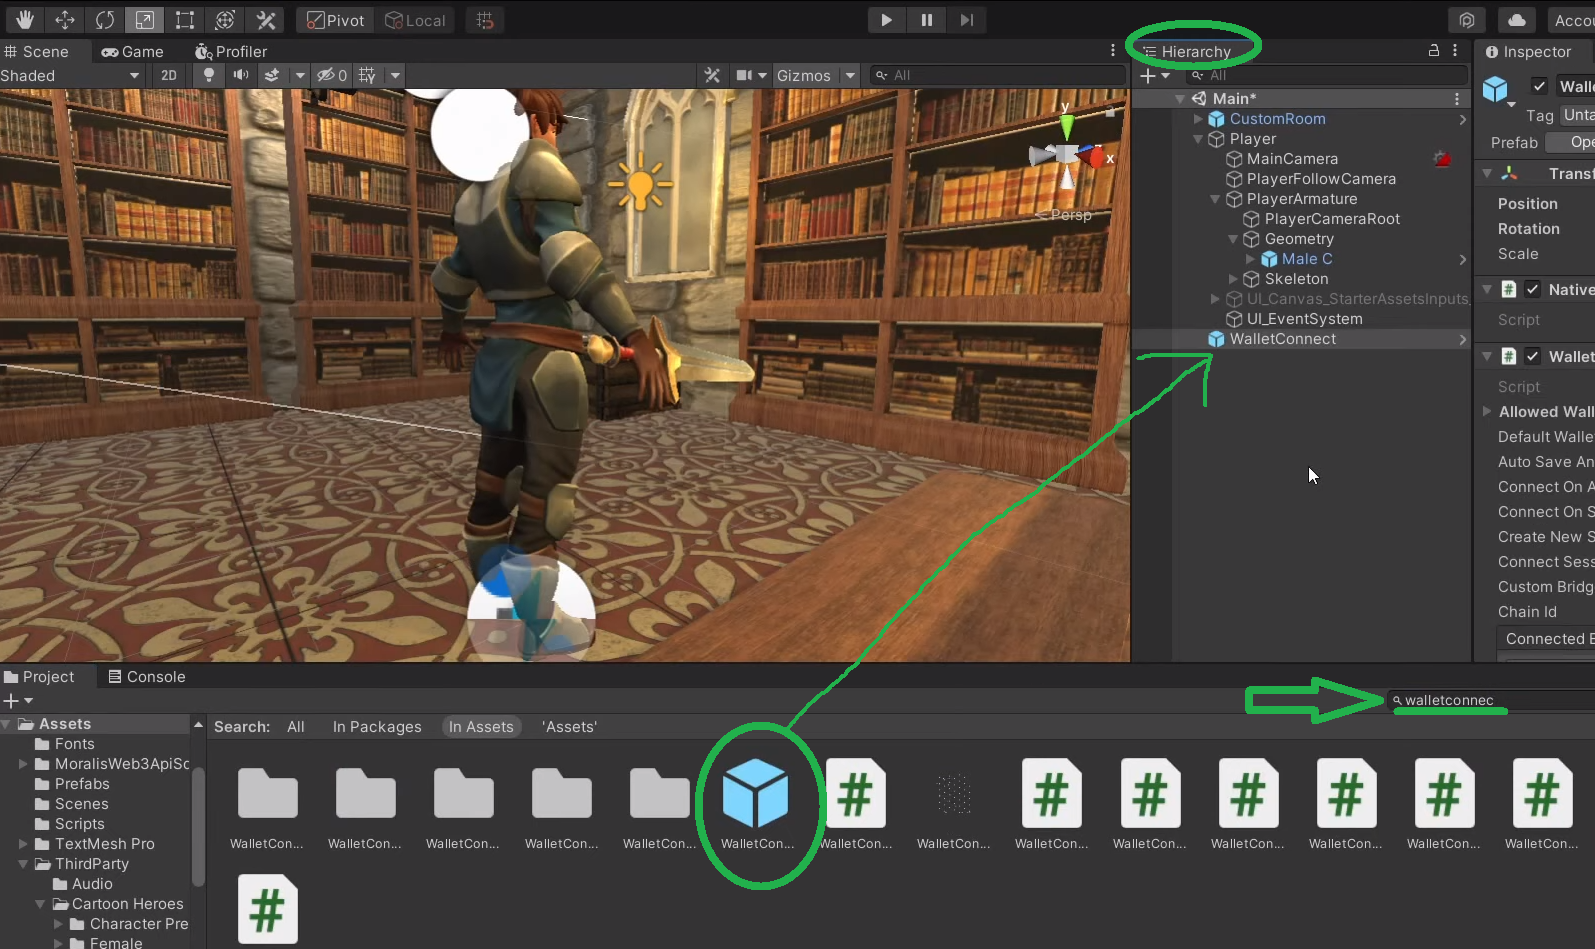
Moving forward, the selection of which Moralis prefabs to use depends on the type of project or game you are working on. However, in all cases, you’ll want to start with the “MoralisSetup” prefab. Note that you can always speed things up by using the search option to find this component. The example below shows you how to do that for the “WalletConnect” prefab. But the same principles apply when adding “MoralisSetup”. You simply drag and drop the prefab in question to your “Hierarchy” tab:
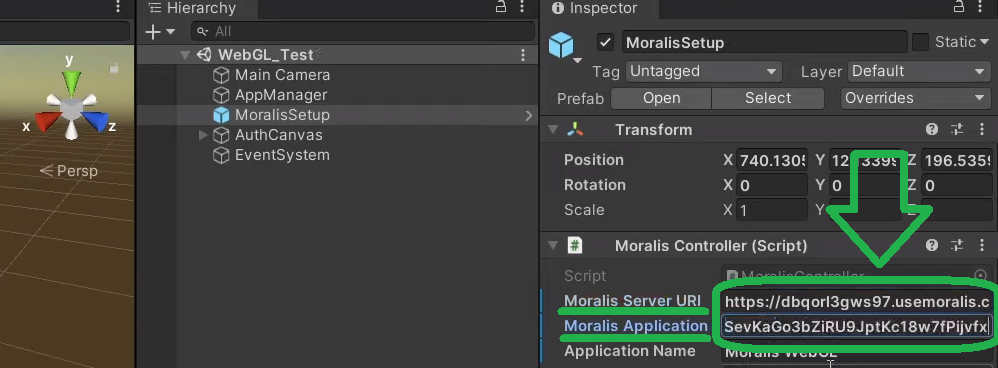
With the “MoralisSetup” component added, you need to complete the initial settings by entering your Moralis server’s details:
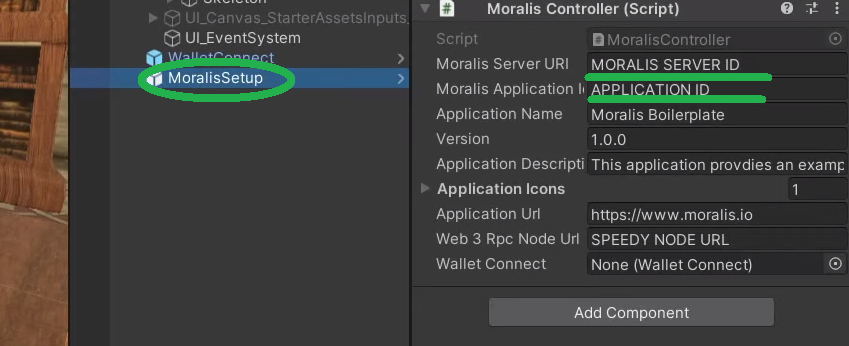
In case you are wondering what these details are, it means that you haven’t worked with Moralis before. As such, let us guide you through the initial Moralis setup.
Access Your Moralis Admin Area and Create a New Server
Whether your goal is to create a metaverse, a simple Web3 game, or dApps (decentralized applications) using the ultimate Ethereum dApp boilerplate, you need to create a Moralis server. Follow these steps to do exactly that:
- Log In to Your Moralis Account – If you used the link in the introduction, then you have most likely already created your free Moralis account. If that’s the case, simply log in using your credentials. On the other hand, in case you don’t have an active Moralis account yet, sign up now. You’ll need to enter your email address, create your password, and click on the confirmation link that will be sent to your inbox.
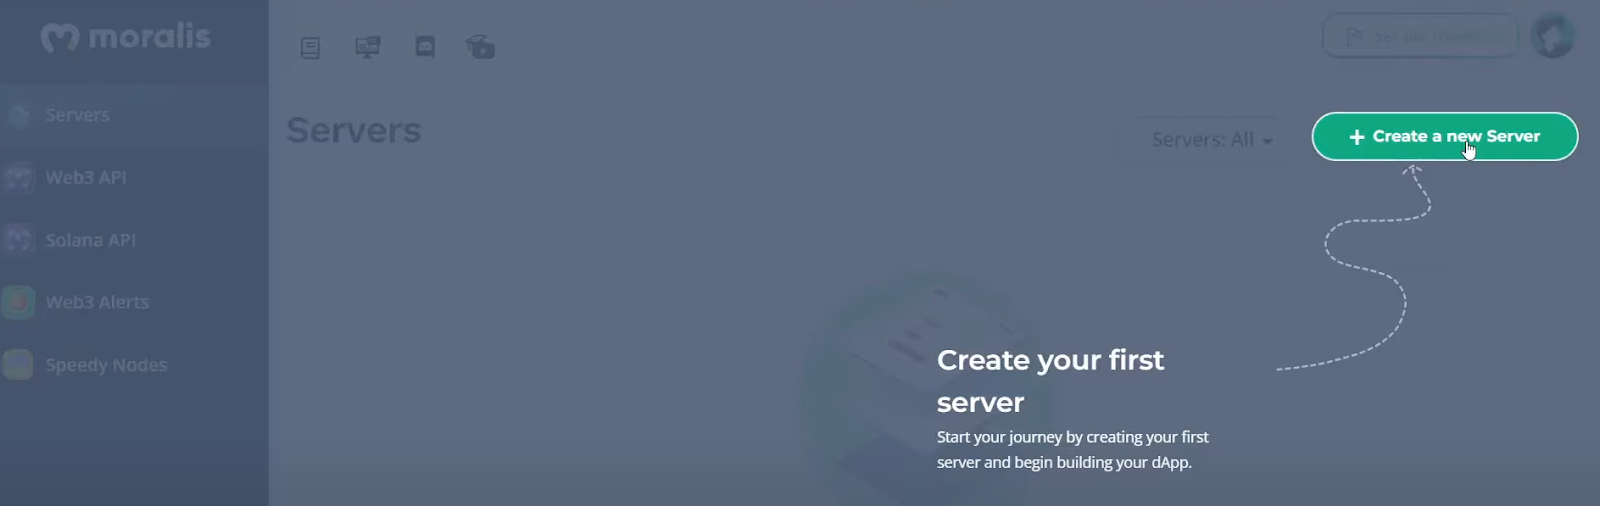
- Create a Moralis Server – Now that you are logged in, make sure you are in the “Servers” tab. There, click on the “+ Create a new Server” button (top-right corner inside the “Servers” tab). If this is your first time using Moralis, the on-page guide will help you out:
Once you click on “+ Create a new Server”, you’ll see a drop-down menu offering three network type options (see the screenshot below). Choose the one that best suits your project’s needs.
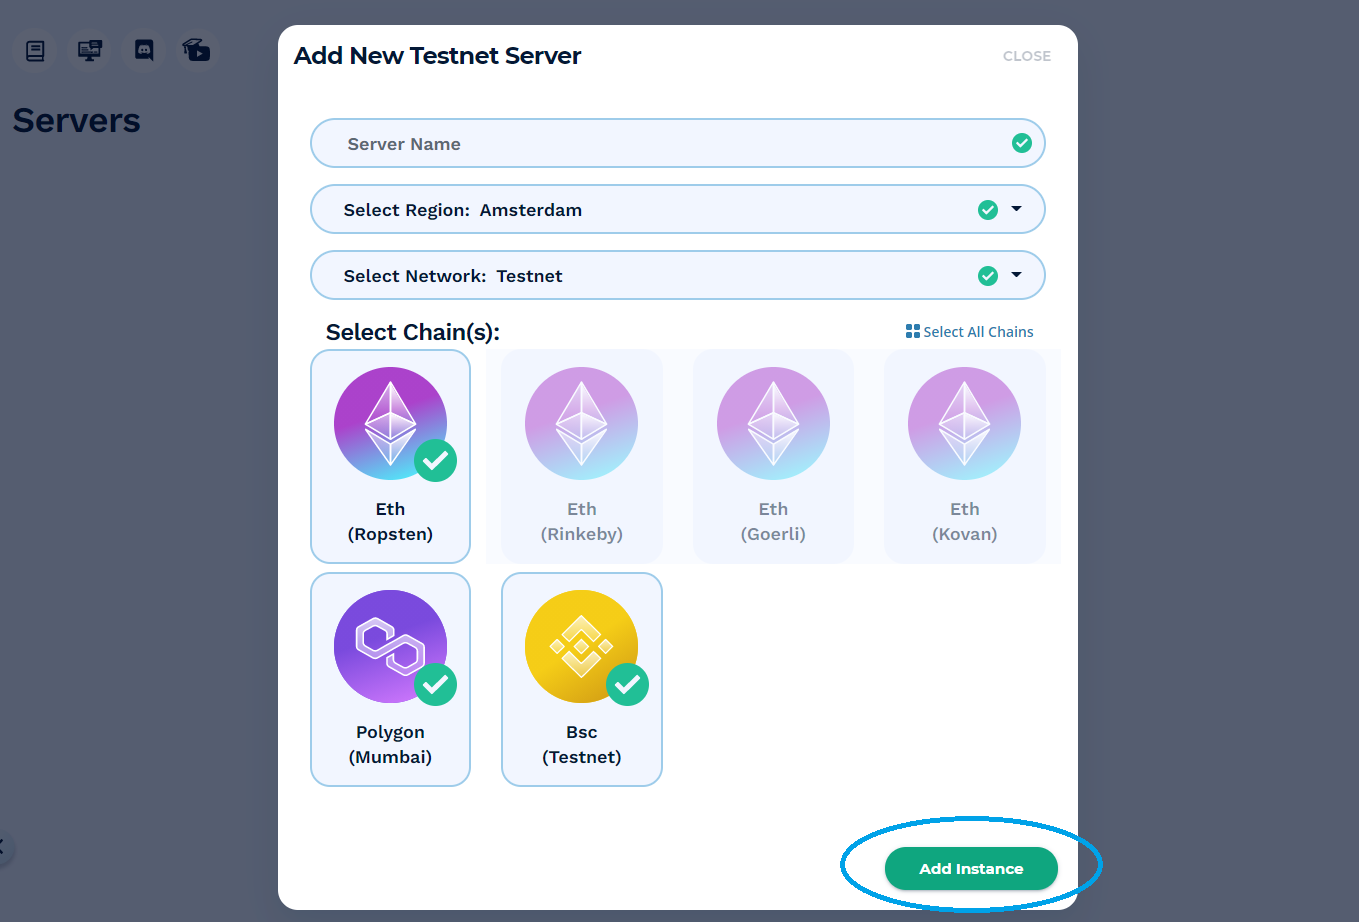
Note: If you are dealing with example projects or testing dApps, we recommend you focus on the “Testnet Server” or “Local Devchain Server” options. However, when you want to go live with your Unity Web3 games, you’ll need to select “Mainnet Server”.

Moving on, you’ll see a pop-up window prompting for server details. As such, enter your server’s name (this can be anything you want), then select your region, the network type, and chain(s). Finally, it’s time to spin up your server. Hence, click on the “Add Instance” button:
Access Your Moralis Server’s Details and Populate Unity
- Access Your Server’s Details – Now that your server is up and running, it’s time to access its details. The latter is available via the “View Details” button next to your server’s name:
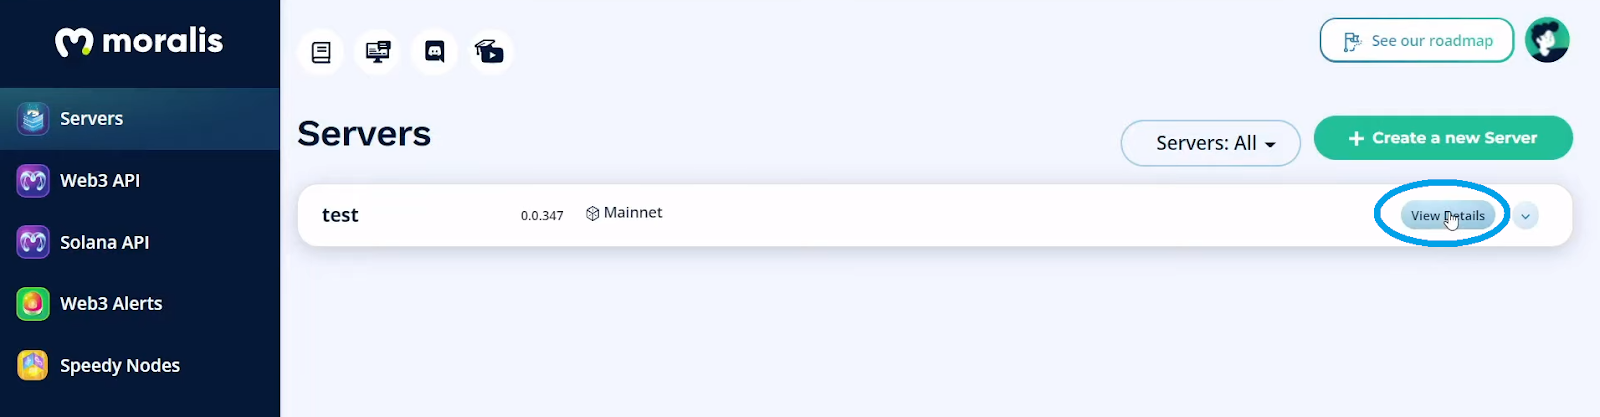
By clicking on “View Details”, the information you need will appear in a new window. As such, you can now copy your server’s URL and application ID by clicking on the copy icons on the right-hand side:

- Populate Unity – All that is left to finally connect Unity with Moralis’ SDK is to paste the above-copied server details into Unity:
Using Moralis Speedy Nodes for Unity Web3 Development
Note: While the above-covered Moralis server setup is essential, using Moralis Speedy Nodes is not. However, in many cases, you will need to complete this setup as well to get even more advanced functionality.
You can use Moralis Speedy Nodes by copying and pasting the corresponding URL from your Moralis admin area. Hence, you need to return to your Moralis admin area. This time select the “Speedy Nodes” tab. Once there, click on the “Endpoints” button under the network that you chose for your server during the above-covered setup:
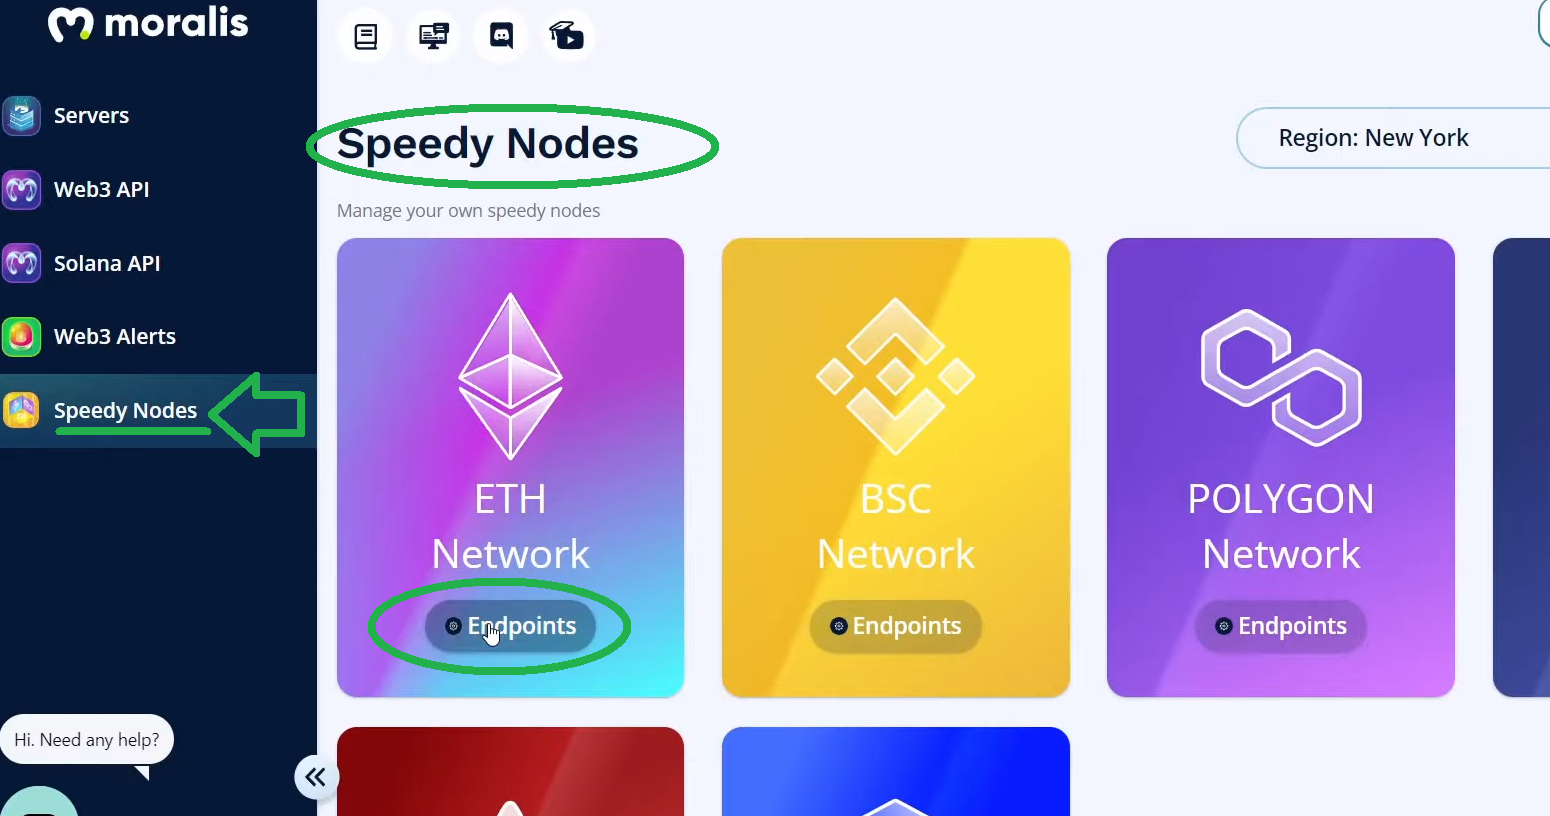
For the sake of this guide, we’ll assume that your server is on the Ethereum mainnet. In that case, you would need to click on “Endpoints” under “ETH Network”. Then, you’d need to copy the mainnet URL address from the pop-up window. Of course, the same principles apply for other mainnets and testnets:
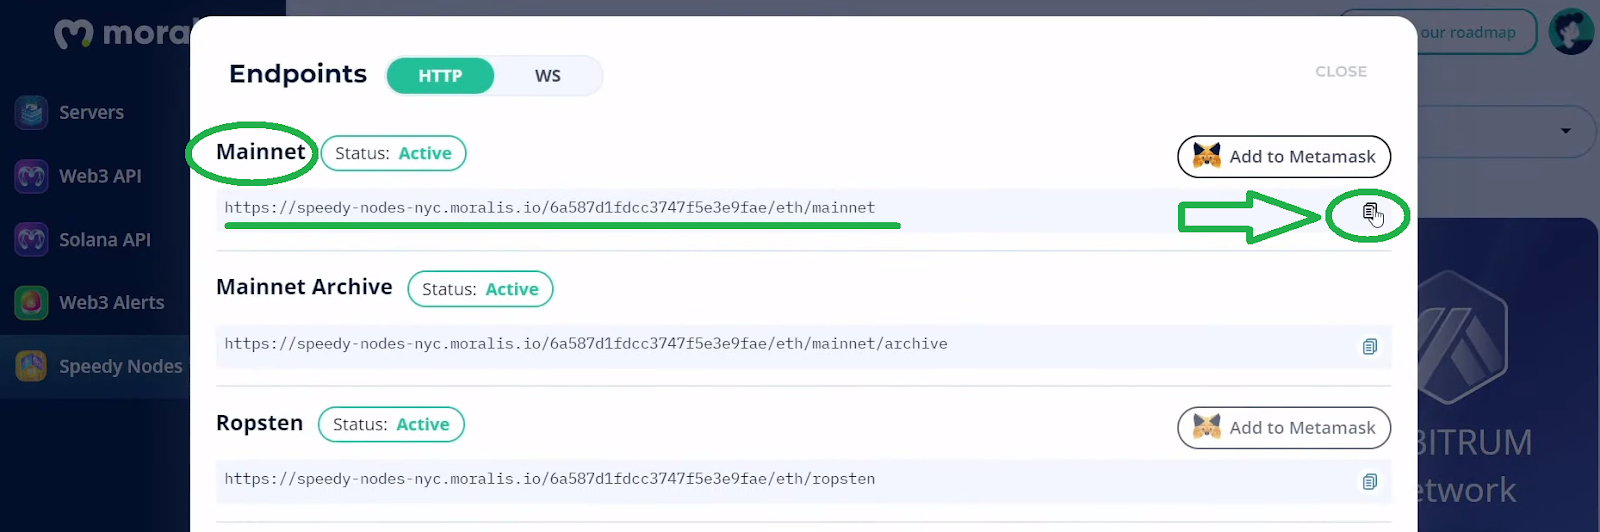
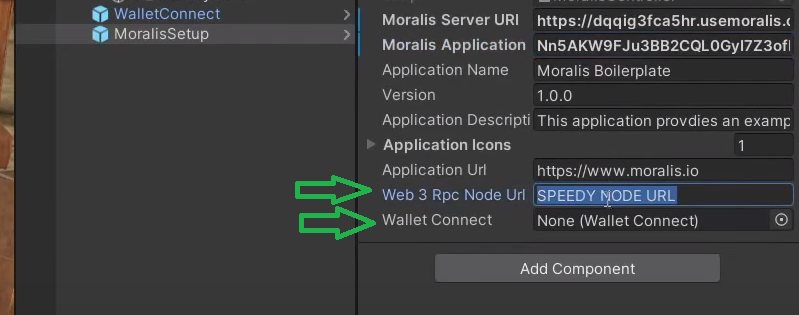
With the URL address copied, you must go to Unity and paste that URL into the entry field next to “Web 3 Rpc Node Url” as shown here:
Unity Web3 – Beginner’s Guide to Unity Web3 Programming – Summary
At this point, you now know why this is probably the best time to focus on Unity Web3 development. Further, you’ve also learned why the decentralized approach makes a lot of sense. Fortunately, Moralis and its Metaverse SDK offer you exactly that. All you need to do is download the latest version of “Unity3D Asset Package” and complete some simple initial setup steps. Moreover, now that you know how to do Unity Web3 game creation, it’s time to bring your creativity to the table. However, in case you lack confidence or knowledge, we recommend starting with some example projects. For instance, you can follow our lead and build a medieval metaverse game or create a Web3 MMORPG with Unity. Also, you can take a closer look at metaverse smart contract examples.
On the other hand, you might be interested in learning more about other areas of blockchain development. If that’s the case, the Moralis blog and the Moralis YouTube channel are the places to be. These two outlets are two of the best ways to continue your free crypto education. Not only do they cover a full scope of blockchain development topics, but they also offer countless example projects. Some of the latest topics include building a cross-chain Zapper dApp with ReactJS, creating a Web3 e-commerce platform or a Web3 Amazon marketplace, connecting a Unity app to a Web3 wallet, creating a BNB Chain token, cloning Coinbase Wallet, and many others.
However, if you are serious about becoming a blockchain developer as soon as possible, we recommend taking a more professional route. As such, enrolling in Moralis Academy might be the right path for you. Aside from getting access to high-quality courses, you’ll also become a member of one of the most advancing Web3 communities.