You’ve undoubtedly heard a lot about dApps, but you might not be sure how to build one quickly. Many in the IT world seem to have their own definition of what constitutes a dApp, and the more you delve into it, the more technical it all becomes. Put simply, dApp is short for “decentralized application”, and is a Web3 app. These dApps generally require a lot of work to bring to market. However, if you utilize a robust Web3 backend infrastructure platform such as Moralis, you can significantly reduce your dApp development time!
In this tutorial, we’ll go over how to use Moralis’ API and serverless real-time transactions to build a cross-chain Zapper dApp with ReactJS.
It will be a platform that allows anyone with an internet connection to connect their wallet and view their portfolio (which will include NFT[s], token[s], native balance, and real-time serverless transaction history).
Table of Contents
- What are dApps?
- What is Moralis?
- Project Setup and Installation
- Moralis Server Setup
- Building a Cross-Chain Zapper dApp
- Conclusion
Here is a link to the live demo and the GitHub repositories 👉 Zapper dApp
Prerequisites
- Make sure you have Node.js/NPM installed on our PC. If you don’t, head over here for a quick start guide
- Experience working with React.js
What are dApps?
The term “dApps” stands for “decentralized applications.” They’re comparable to regular apps and perform similar duties, but they run on a peer-to-peer network, such as a blockchain.
In short, decentralized applications (dApps) run on peer-to-peer (P2P) networks, similar to blockchains. Smart contracts, which enable dApps to provide functionality without an intermediary, are commonly used in dApps.
What is Moralis?
Moralis is a service that brings together a variety of tools and resources for building decentralized software that connects to the blockchain, such as Ethereum, Polygon, and Binance Smart Chain (now BNB Smart Chain).
Moralis’ ultimate Web3 development platform, which includes built-in cross-chain capability, allows novice and experienced developers to work quickly and easily. Furthermore, Moralis provides you with a Web3 backend infrastructure that lets you concentrate on frontend development. It essentially takes care of all the complicated, behind-the-scenes Web3 things required to make your dApps operate.
Moralis is also wholly controlled and infinitely scalable, which means your dApps will scale without difficulty.
Project Setup and Installation
To quickly get started with the project setup and installation, we will clone this project on GitHub and ensure that we are on the “project-setup” branch. Next, we will launch the project locally after cloning it using the following command on our terminal.
cd zapper-project && yarn && yarn start
Or
cd zapper-project && npm install && npm start
After cloning and installing the project, we should have something similar to what we have below:
Next, we will set up the Moralis server.
Moralis Server Setup
Let’s start setting up our Moralis server, as we’ll use it to develop the Zapper dApp in the next section. We’ll set up a server on our Moralis admin panel. Register one here if you don’t already have an account. Signing up is easy, and you can get started completely free.
We will click on the “create a new server” as shown below, then select the testnet server on our admin panel.

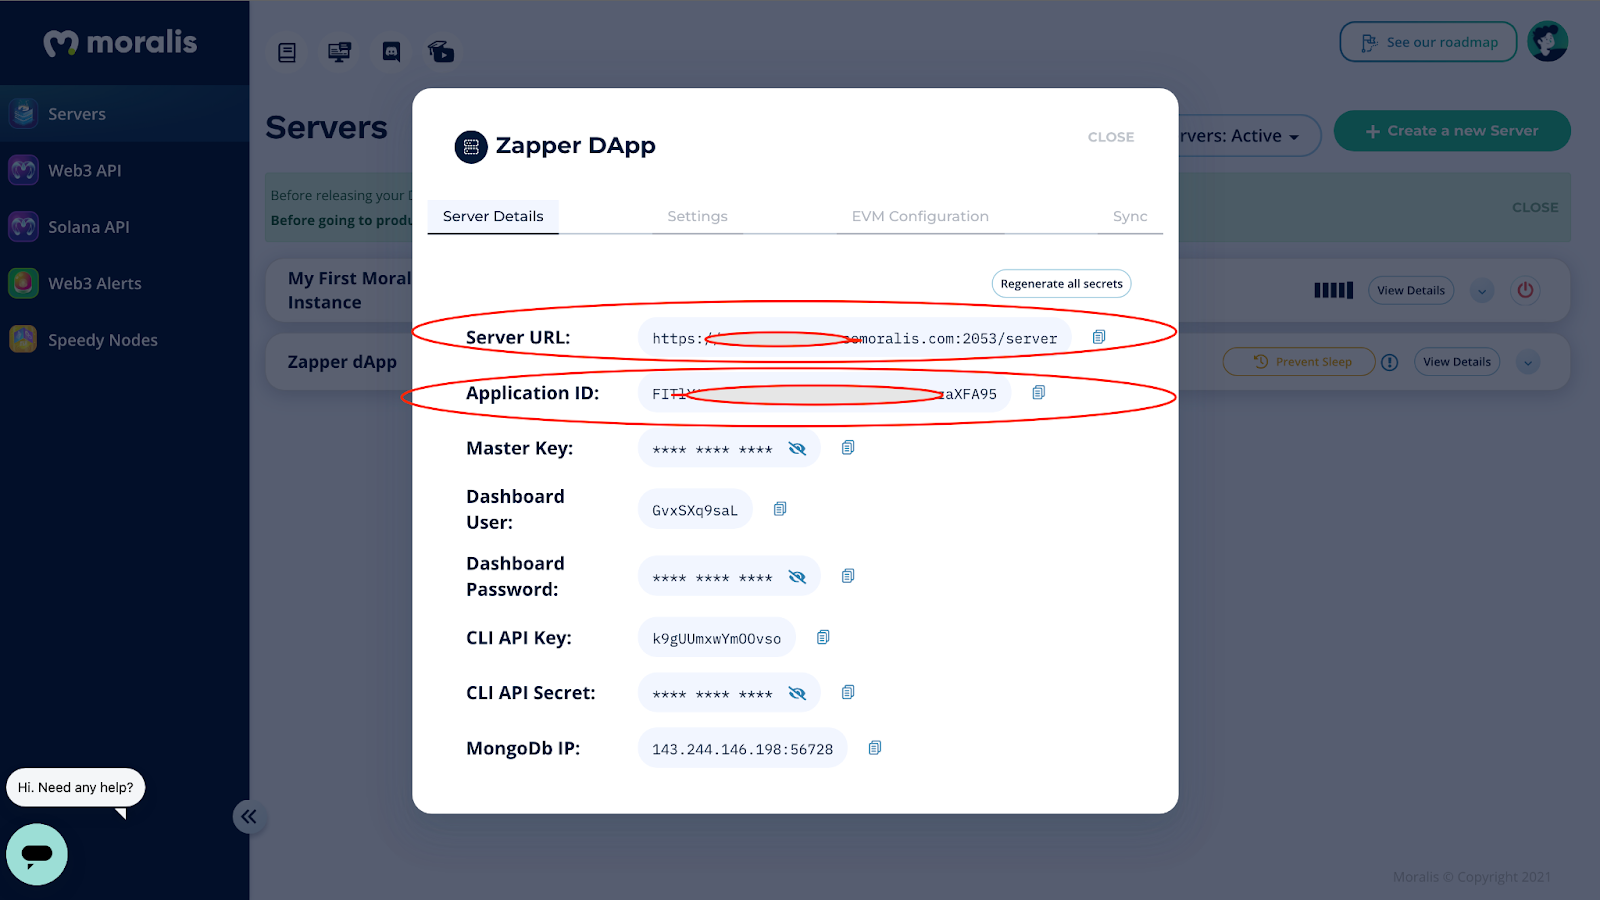
We will now enter our server details as shown below:

Our server will be ready in a few minutes, and we will have to access our server URL and application ID from the freshly created server instance on our Moralis admin panel.
We will use these details to connect to the server instance from our application, as shown below:

Next, we will build the Zapper dApp.
Building a Cross-Chain Zapper dApp
Now that we’ve got everything set up let’s get started with the implementation.
First, we’ll go to the “index.js” file and configure our application to use Moralis using the application ID and server URL we acquired from the previously built server instance.
We will need to create a “.env” file in the root of the project using the following command:
touch .env
Inside the “.env”, kindly add the following details below:
REACT_APP_MORALIS_APPLICATION_ID=our-application-id REACT_APP_MORALIS_SERVER_URL=our-server-url
Moralis Initialization
Inside “index.js”, we will update it with the code snippet below:
See the Pen How to Build a Cross-Chain Zapper dApp with ReactJS Using Moralis API and Serverless Real-Time Transactions 1 by Rasmus (@rashmosh) on CodePen.
In the code snippet above, we imported “MoralisProvider” from the “react-moralis” already installed. “MoralisProvider” will handle the whole initialization and let our components access Moralis functions.
Authentication
Inside “src/App.js” file, we will import “useMoralis”, “useMoralisWeb3ApiCall”, “useMoralisWeb3Api” from the “react-moralis” SDK using the code snippet below:
See the Pen How to Build a Cross-Chain Zapper dApp with ReactJS Using Moralis API and Serverless Real-Time Transactions 2 by Rasmus (@rashmosh) on CodePen.
We’ll check if a user is logged in before redirecting to our dashboard. Otherwise, we’ll redirect to a page where they can link their wallet using Moralis’ built-in methods.
See the Pen How to Build a Cross-Chain Zapper dApp with ReactJS Using Moralis API and Serverless Real-Time Transactions 3 by Rasmus (@rashmosh) on CodePen.
In the snippet above, we are using the “isAuthenticated” method from the “useMoralis” API to validate if a user is logged in, otherwise returning a view with a button where they can connect their wallet to log in.
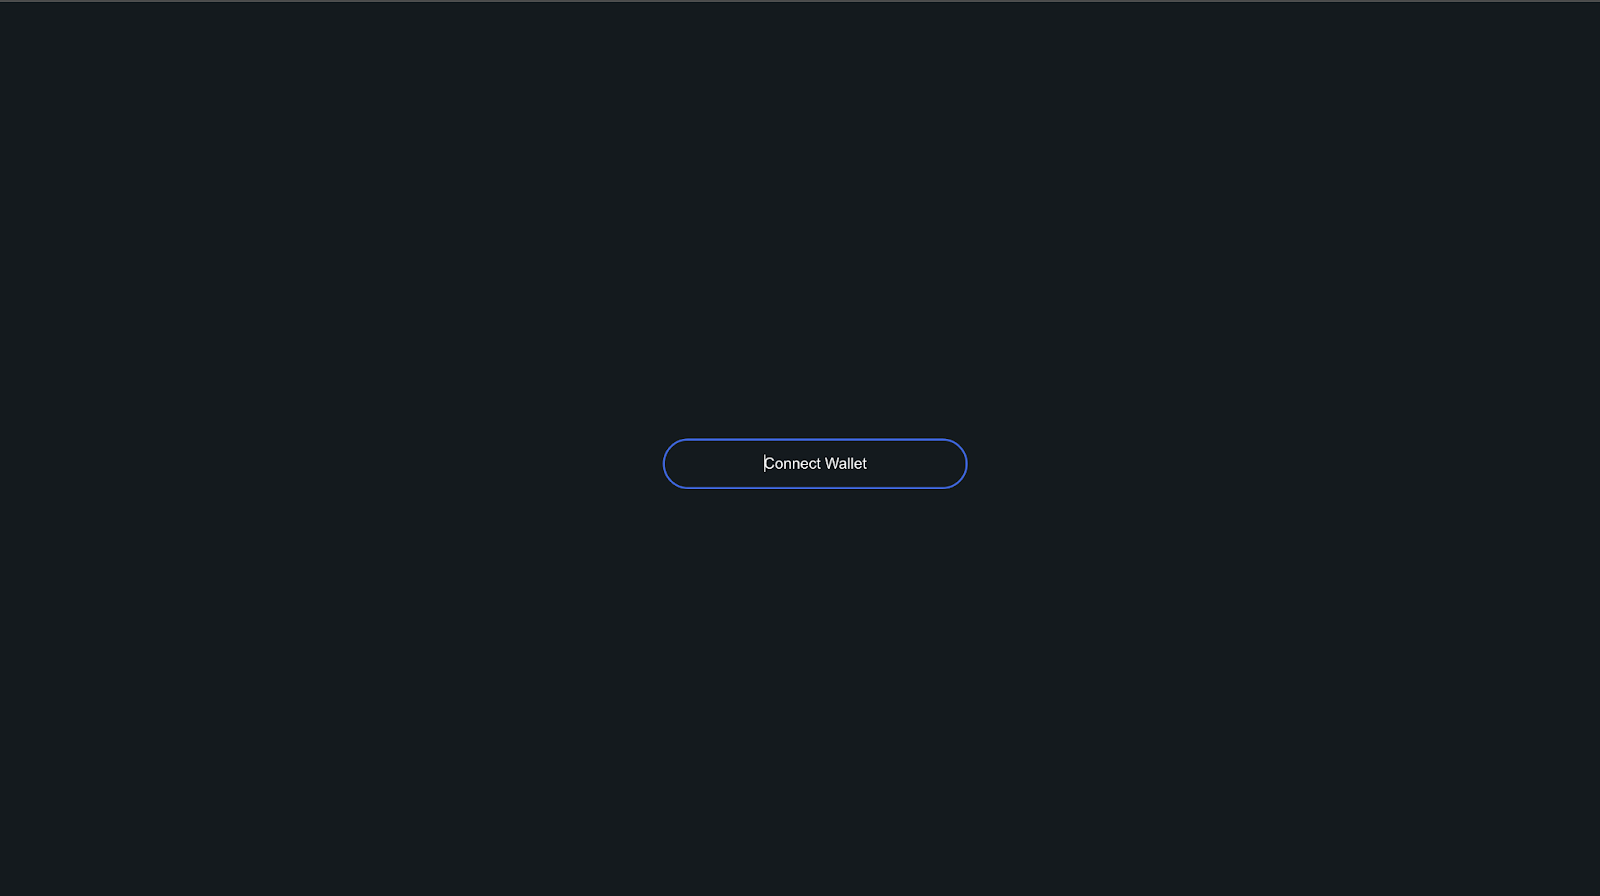
We should have something similar to the screenshot below on our browser:

We are promptly redirected to the webpage after signing the request, but nothing happens, right? Don’t be worried; we’ll take care of everything.
NFT API Implementation
Next, we’ll utilize “useMoralisWeb3ApiCall” to get a list of all current logged-in user NFTs and show them in a table on our dashboard’s NFT tab. We can now update our “src/App.js” with the following code snippet:
See the Pen How to Build a Cross-Chain Zapper dApp with ReactJS Using Moralis API and Serverless Real-Time Transactions 4 by Rasmus (@rashmosh) on CodePen.
Now that we’ve implemented the code to retrieve logged-in user NFT(s), we can use the “useEffect” hook to make the request whenever our app mounts by importing the hook and using the following code snippet:
See the Pen How to Build a Cross-Chain Zapper dApp with ReactJS Using Moralis API and Serverless Real-Time Transactions 5 by Rasmus (@rashmosh) on CodePen.
In the code snippet above, we use the Moralis API to get the logged-in user NFT(s) when the application mounts. We also added the functionality to get the most recent update using the “setInterval” method, which runs every five seconds in this example.
You may want to restrict how many requests a user may make to the Web3 API. You can achieve this by changing the default settings and referencing it in your cloud code by calling “Moralis.settings.setAPIRateLimit”.
Learn more about the Moralis rate limit here.
Updating our component with the data retrieved by passing it as props to the home component as shown below:
See the Pen How to Build a Cross-Chain Zapper dApp with ReactJS Using Moralis API and Serverless Real-Time Transactions 7 by Rasmus (@rashmosh) on CodePen.
Update “components/Home/index.js”
See the Pen How to Build a Cross-Chain Zapper dApp with ReactJS Using Moralis API and Serverless Real-Time Transactions 8 by Rasmus (@rashmosh) on CodePen.
Update “components/Home/Tab.js”
See the Pen How to Build a Cross-Chain Zapper dApp with ReactJS Using Moralis API and Serverless Real-Time Transactions 9 by Rasmus (@rashmosh) on CodePen.
Inside the “components/Tables/NFTTable”, let’s finally display our data by updating the returned function (NFTTable) as shown below:
See the Pen How to Build a Cross-Chain Zapper dApp with ReactJS Using Moralis API and Serverless Real-Time Transactions 10 by Rasmus (@rashmosh) on CodePen.
In the code snippet above:
- We retrieved our “nftData” passed as props into the “NFTTable” component.
- We validated and ensured “nftData” was not empty.
- We returned a “No NFT(s) Found!” notification if a user does not have any NFT(s). Otherwise, we wait while the data loads and show the “Loading…” notification to our users.
- We also trimmed the length of our token address and token ID by slicing it and returning a specific size.
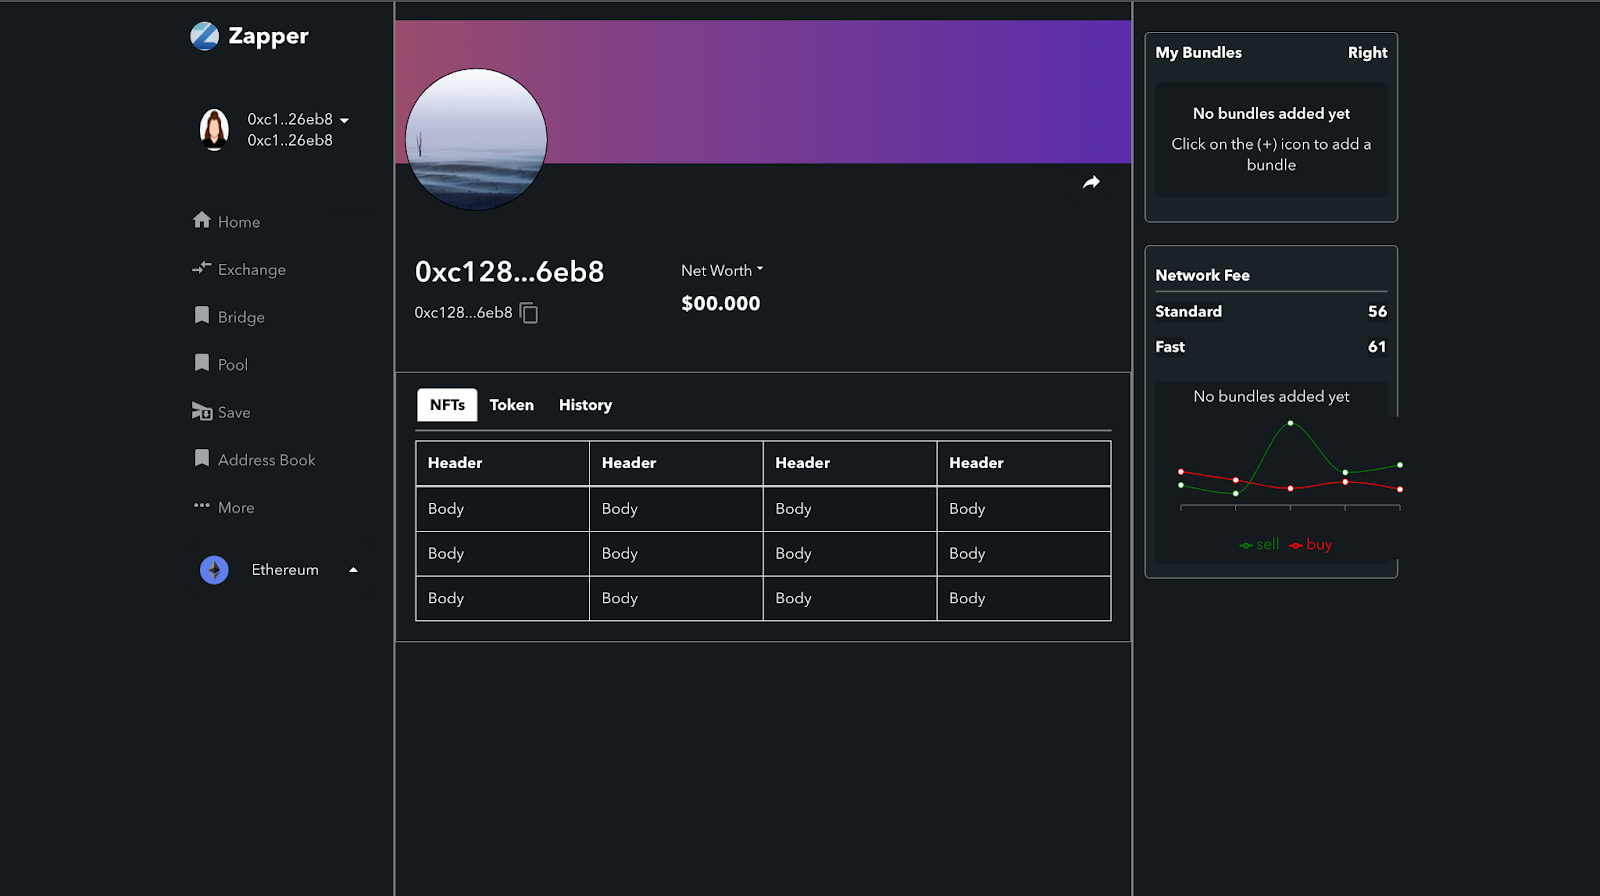
Let’s go to our browser dashboard; we should see something similar to what we see below on the NFT tab:

Of course, the logged-in account has some NFT(s) on the Polygon chain, which is why we were able to extract all of the information listed above.
Token and Transaction History – API Implementation
Token and history will be implemented in the same way as NFT; therefore, let’s go to “src/App.js” and implement the method using Moralis’ API.
“src/App.js”
See the Pen How to Build a Cross-Chain Zapper dApp with ReactJS Using Moralis API and Serverless Real-Time Transactions 11 by Rasmus (@rashmosh) on CodePen.
Next, let’s proceed to update “components/Home/index.js” as shown below:
See the Pen How to Build a Cross-Chain Zapper dApp with ReactJS Using Moralis API and Serverless Real-Time Transactions 12 by Rasmus (@rashmosh) on CodePen.
Update “components/Home/Tab.js”
See the Pen How to Build a Cross-Chain Zapper dApp with ReactJS Using Moralis API and Serverless Real-Time Transactions 13 by Rasmus (@rashmosh) on CodePen.
Next, we will update “components/Tables/TokenTable” and “components/Tables/HistoryTable”, and then finally display our data by updating the returned function (“TokenTable” and “HistoryTable”) as shown below:
Inside “components/Tables/TokenTable”, we will update the following code:
See the Pen How to Build a Cross-Chain Zapper dApp with ReactJS Using Moralis API and Serverless Real-Time Transactions 14 by Rasmus (@rashmosh) on CodePen.
Let us also update the “components/Tables/HistoryTable” with the code snippet below:
See the Pen How to Build a Cross-Chain Zapper dApp with ReactJS Using Moralis API and Serverless Real-Time Transactions 15 by Rasmus (@rashmosh) on CodePen.
In the respective code snippet above for the token table and history table, we did something similar to what we have in the NFT table for displaying the data. We basically:
- Retrieved our “tokenData” and “transactionData” passed as props into the individual component.
- We validated and ensured the data passed was not empty; else, we return a “No Token(s) Found!” or “No Transactions(s) Found!” notification. Otherwise, we wait while the data loads and show the “Loading…” notification to our users.
- We also trimmed the length of our “block_hash”, “from_address”, and “to_adress” by slicing it and returning a specific size.
Let’s open our browser and check out what we’ve done so far in this tutorial. We should have something similar to what is shown below for displaying user tokens and transaction history.


The currently logged-in user has only one transaction to perform and no token, which is why we have the table above; however, your situation will undoubtedly change.
User Address and Native Balance API Implementation
We’ll implement the native balance API in this section using the Moralis API before moving on to retrieving the user’s address and displaying it on the user’s dashboard.
Let us update our “src/App.js” with the following code snippet:
See the Pen How to Build a Cross-Chain Zapper dApp with ReactJS Using Moralis API and Serverless Real-Time Transactions 16 by Rasmus (@rashmosh) on CodePen.
Next, we will update our “components/Nav/LeftBar.js” with the following code snippet to dynamically display the retrieved user address passed as a prop.
See the Pen How to Build a Cross-Chain Zapper dApp with ReactJS Using Moralis API and Serverless Real-Time Transactions 17 by Rasmus (@rashmosh) on CodePen.
Now, inside the “components/Home/index.js” file, we will update it with the following code snippet to display the logged-in user’s native balance and user’s address.
See the Pen How to Build a Cross-Chain Zapper dApp with ReactJS Using Moralis API and Serverless Real-Time Transactions 18 by Rasmus (@rashmosh) on CodePen.
Let’s open our browser to put our application to the test.

As we may have observed, all of the NFT(s), token(s), and transaction(s) fetched came from the Polygon chain because that is what we specified when making our API request. However, we want cross-chain capabilities, which we will provide in the next section.
Cross-Chain Implementation
As cross-chain compatibility grows in popularity as a means of enabling connectivity and scalability, it’s evident that cross-chain interoperability, which Moralis provides out of the box, will be the way of the future.
Let’s head over to “src/App.js” and implement cross-chain functionality by using the snippet below:
See the Pen How to Build a Cross-Chain Zapper dApp with ReactJS Using Moralis API and Serverless Real-Time Transactions 19 by Rasmus (@rashmosh) on CodePen.
In the preceding code snippet:
- For the cross-chain functionality, we created a state variable titled value that would contain the selected value in the dropdown.
- We sent the value state variable to each Moralis API request as an option.
- The value state variable was also supplied as a prop to the “leftBar” component.
- Finally, when the dropdown value changes, we create a method to manage and keep track of the changes.
Next, we will update “component/Nav/LeftBar” as shown below:
See the Pen How to Build a Cross-Chain Zapper dApp with ReactJS Using Moralis API and Serverless Real-Time Transactions 20 by Rasmus (@rashmosh) on CodePen.
Yay! 🥳 We should now have a completely functional decentralized application similar to the screenshot below after testing our application:

Conclusion
This tutorial shows how to completely build a decentralized application using the ultimate Web3 development platform and provide the most advanced Web3 API – Moralis – to build a Zapper dApp. Using Moralis, you can build a wide variety of different Web3 dApps. Sign up with Moralis today to start building your own Web3 project!
