Web3 gaming is a huge industry, and its user base keeps growing daily. The exponential growth of Web3 and gamers participating in a blockchain game vs. a “regular” Web2 game might be due to blockchain games’ decentralized aspects and earning potential. Plus, owning in-game assets and trading them into actual money is also hugely beneficial. However, the feature of executing blockchain game transactions is something that developers find challenging to implement into their projects, such as into Web3 MMORPG games. Fortunately, when using the right Web3 tech stack tools, implementing Web3 transactions with Unity becomes a straightforward process. Thanks to Moralis’ Metaverse SDK, you get to cover blockchain game transactions with just a few clicks and some basic setups.
Moving forward, you’ll see how to implement Web3 transactions with Unity in a matter of minutes. We will use one of our existing projects, a simple MMORPG, and add this additional feature. However, even if you haven’t completed that past example project, you’ll have no problem following along. We’ll show you how to use GitHub to access the code and files that you’ll need. Also, you’ll learn how to complete the initial Moralis setup. That way, you’ll gain access to this “Firebase for crypto” platform’s full power.
Furthermore, for the sake of this example, we will focus on the WebGL platform. As such, we will use the appropriate Web3 authentication method. Nonetheless, we strongly encourage you to not only read through this article but also take action. Implement the steps herein yourself! That way, you’ll get the most out of this experience and learn to set up blockchain game transactions.

Blockchain Game Transactions with Unity Made Easy
We’ll go through everything you need to know to add blockchain game transactions to a Web3 MMORPG game in the upcoming sections. Since you can use our code, you can do it all in about fifteen minutes. Along the way, you’ll also learn how to complete the necessary setup for Moralis and Photon. The former will cover all your blockchain-related backend needs, and the latter will be your multiplayer solution. However, before we move on to the setups and tweaks inside Unity, let’s do a quick preview of our Web3 game example.
Blockchain Game Transactions in Action – Example Unity dApp Preview
Here’s the login screen that the user will see first:
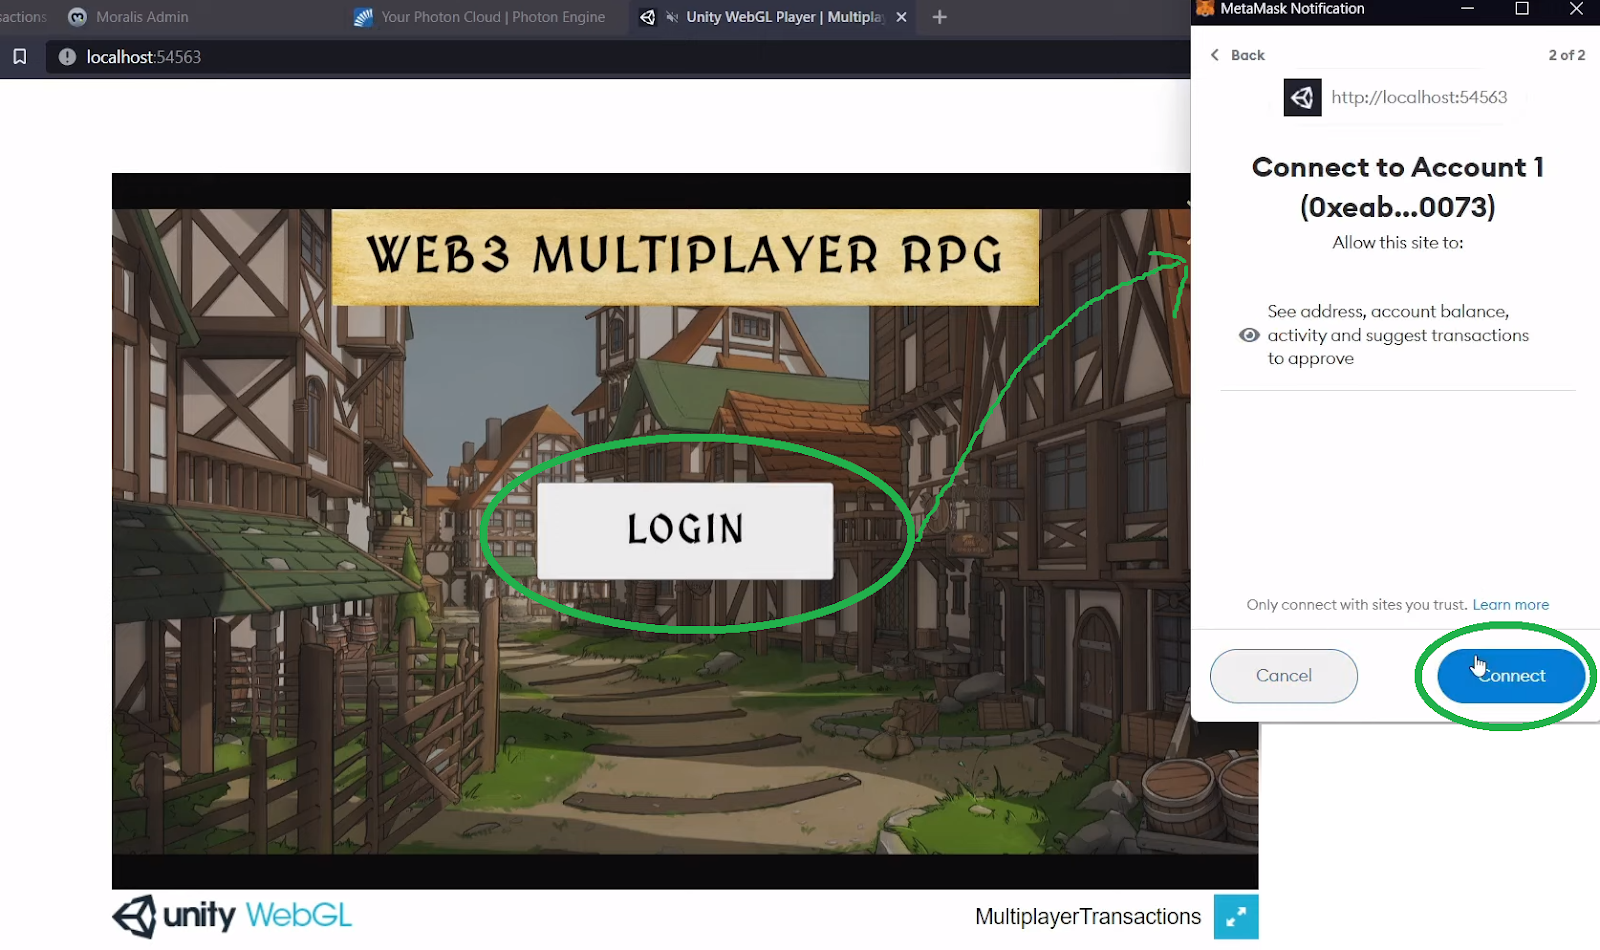
In the above screenshot, you can see that our game example starts by logging in users. While there are various ways to go about this, we decided to authenticate with MetaMask. The latter is the best alternative for web users. To authenticate, users need to click on the “login” button and then confirm their Web3 login using their Web3 wallet.
Another neat way to go about Web3 user onboarding is by creating a QR login code. That way, users can simply scan the code using their devices. Fortunately, all of these options are offered by Moralis’ SDK and its integrations. While MetaMask is the best solution for web users, WalletConnect caters best for mobile users. Though, it is important to note that users may prefer familiar Web2 login methods. Thus, Moralis also makes Web3 authentication via email and Web3 social login possible.
Moving on with our demo; once new users log in, they have a chance to join the game by clicking on the “JOIN ROOM” button:
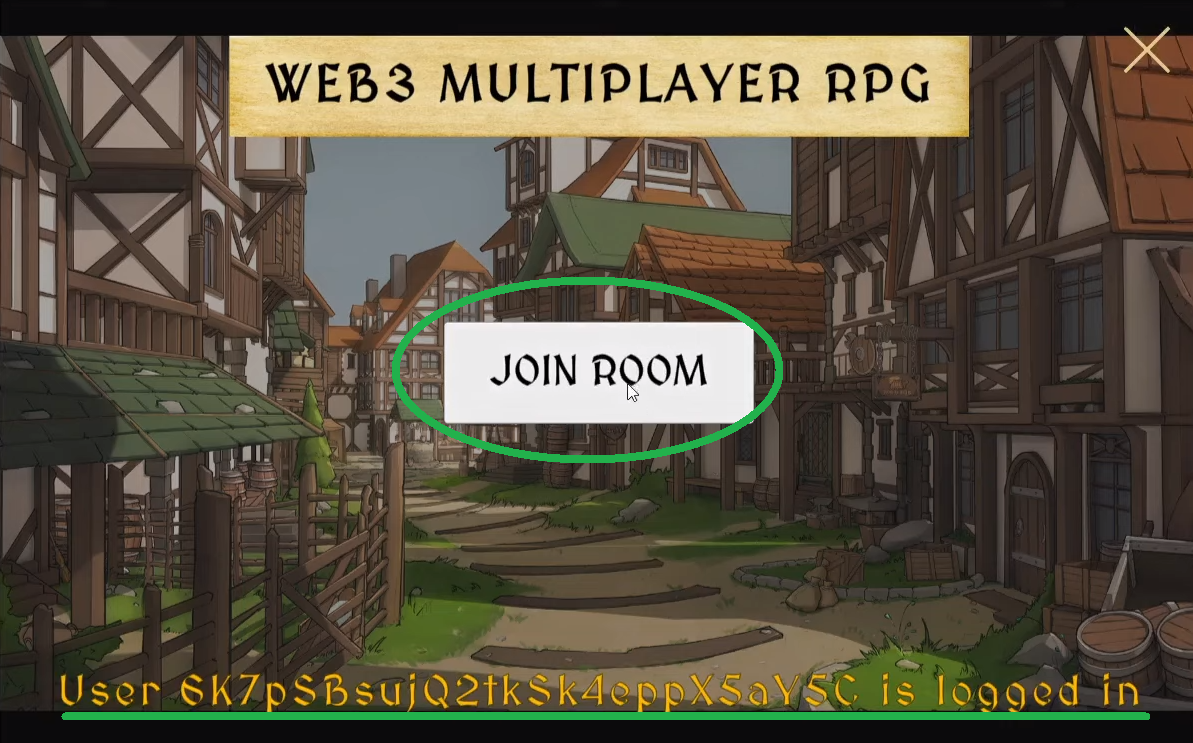
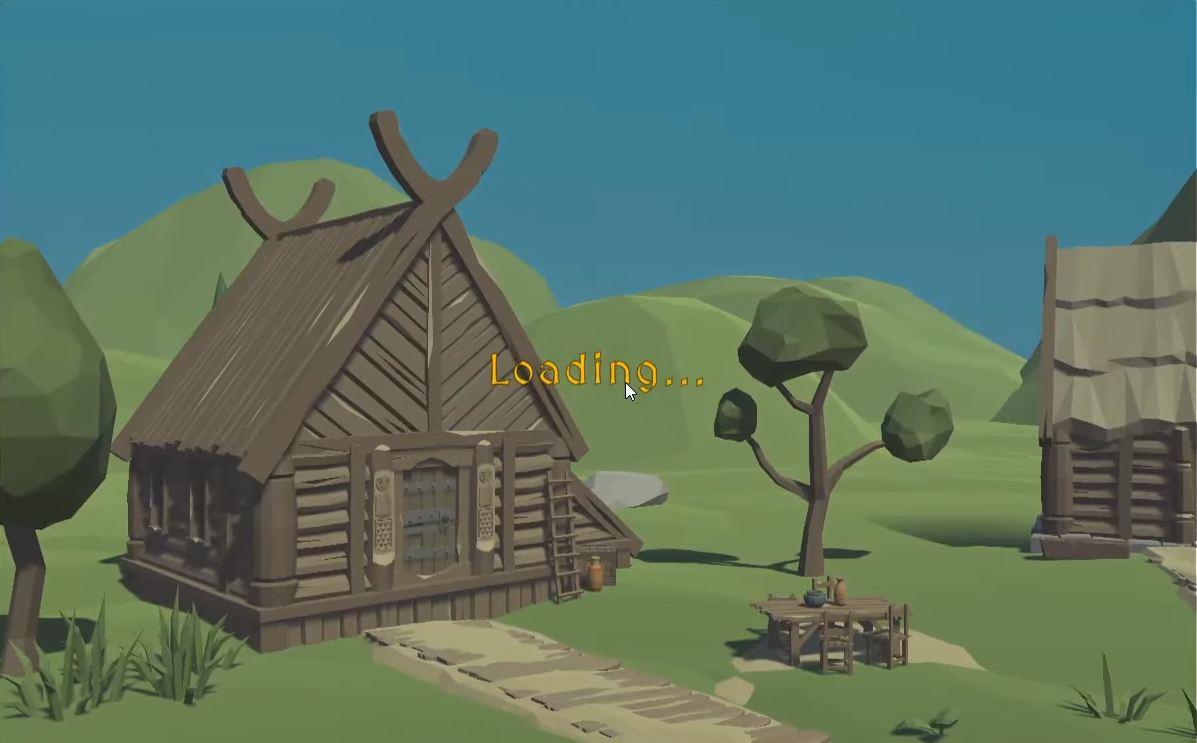
Looking at the image above, you can also see a message at the bottom of the screen. The latter informs users that their login was successful and that their wallet address is now connected to the game. As such, they can join the game. Once users click on the “JOIN ROOM” button, the “game” scene loads:
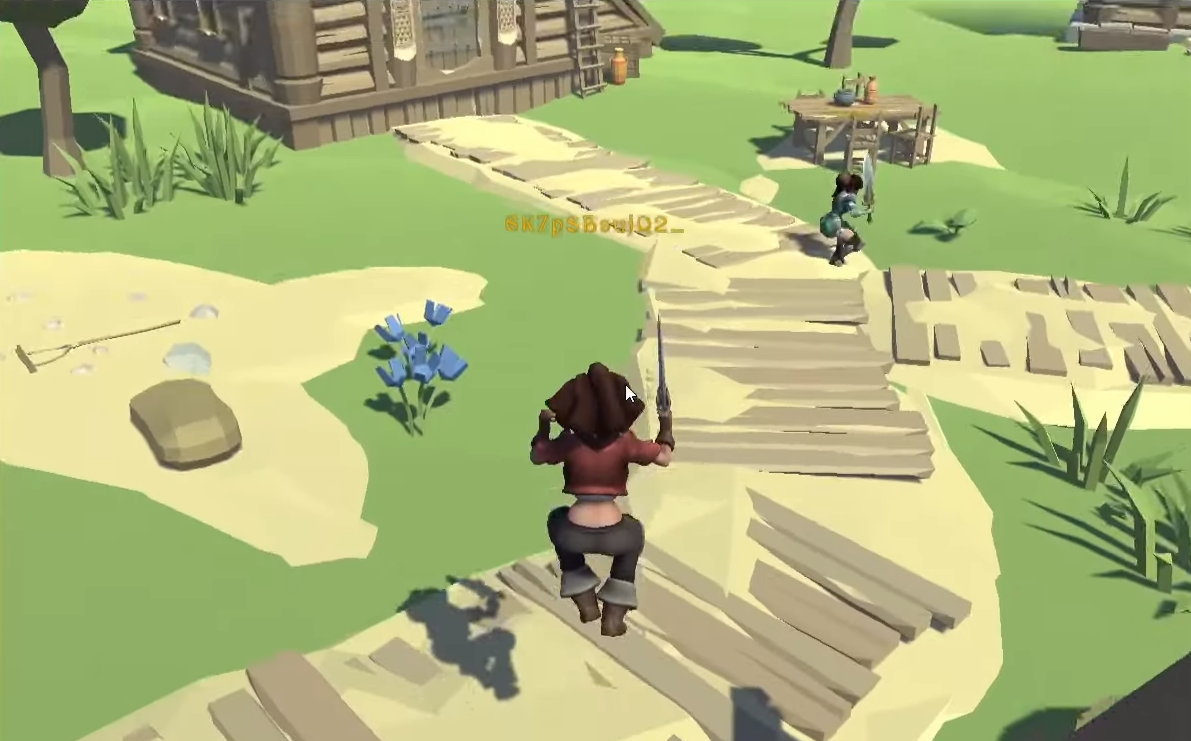
Furthermore, the game also randomly assigns users with characters, which are dropped into the scene:
How Do Web3 Transactions with Unity Work?
With the scene loaded and users’ characters added, users can move their characters around. Furthermore, as you can see in the screenshot below, there are also parts of users’ addresses displayed above the characters:
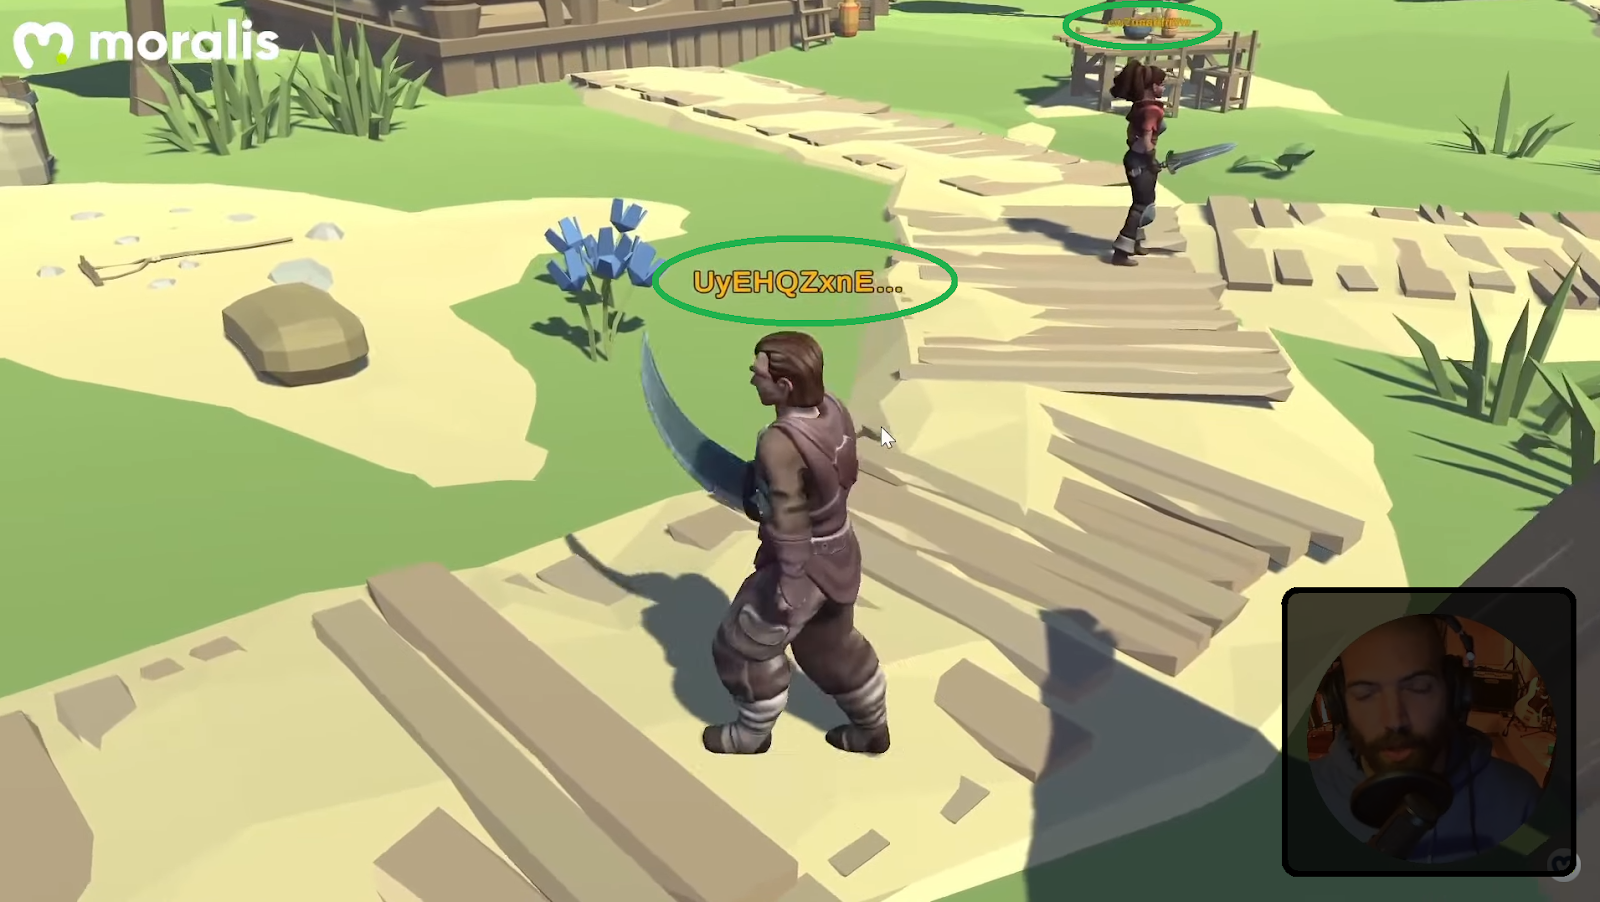
Moreover, as far as the interaction between characters goes, we decided to stick with the basics. However, this is enough to do blockchain game transactions. When players are in proximity with other characters, they can click on them. This shows their usernames and wallet addresses:
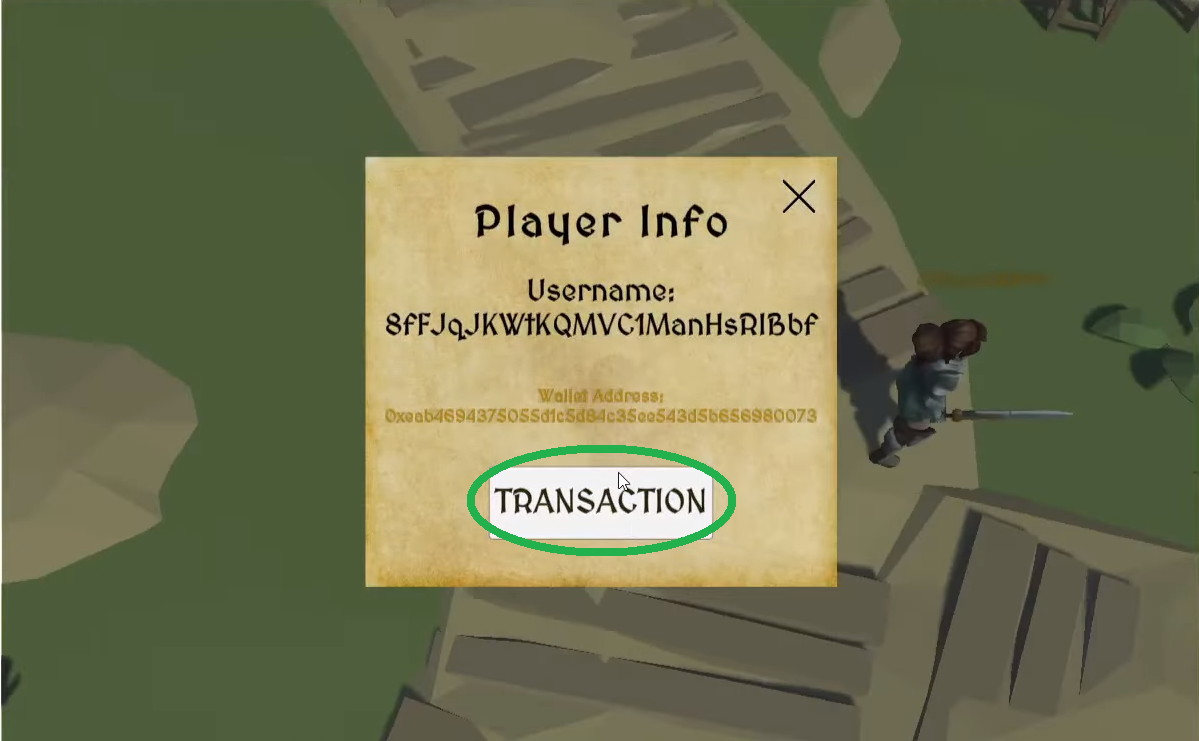
As you can see in the image above, aside from users’ usernames and addresses, there is also the “TRANSACTION” button. Thus, clicking this button enables users to do blockchain game transactions:
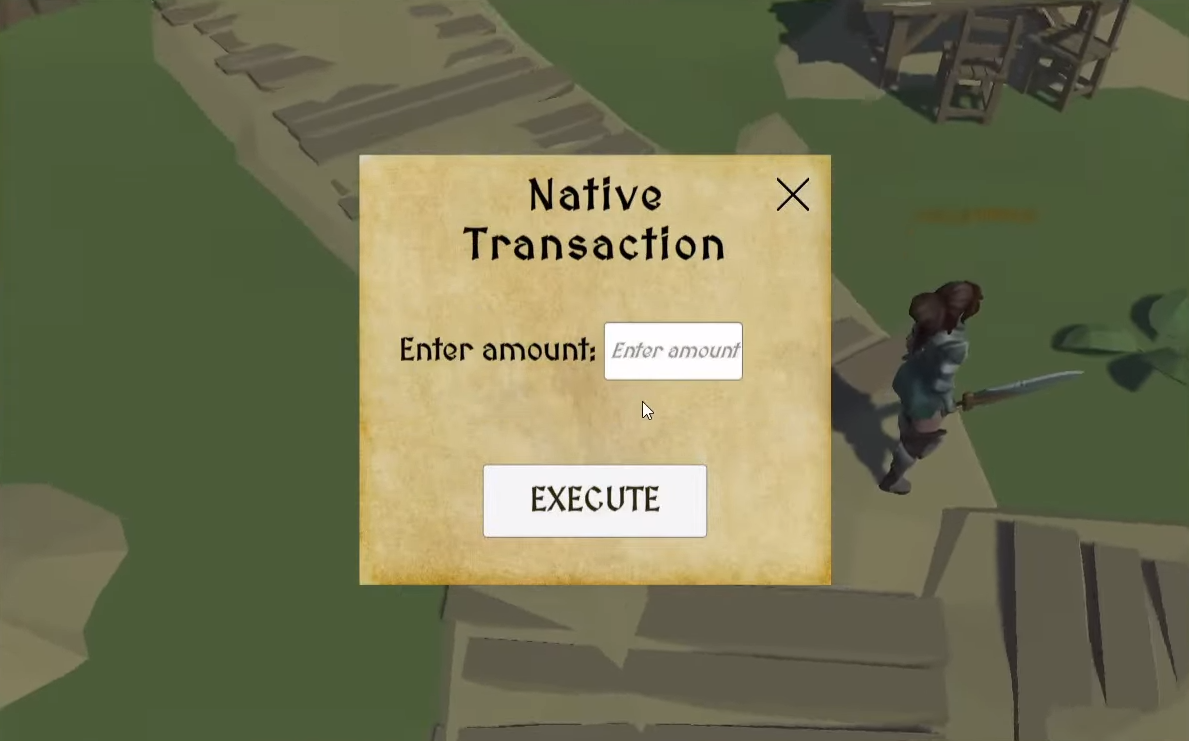
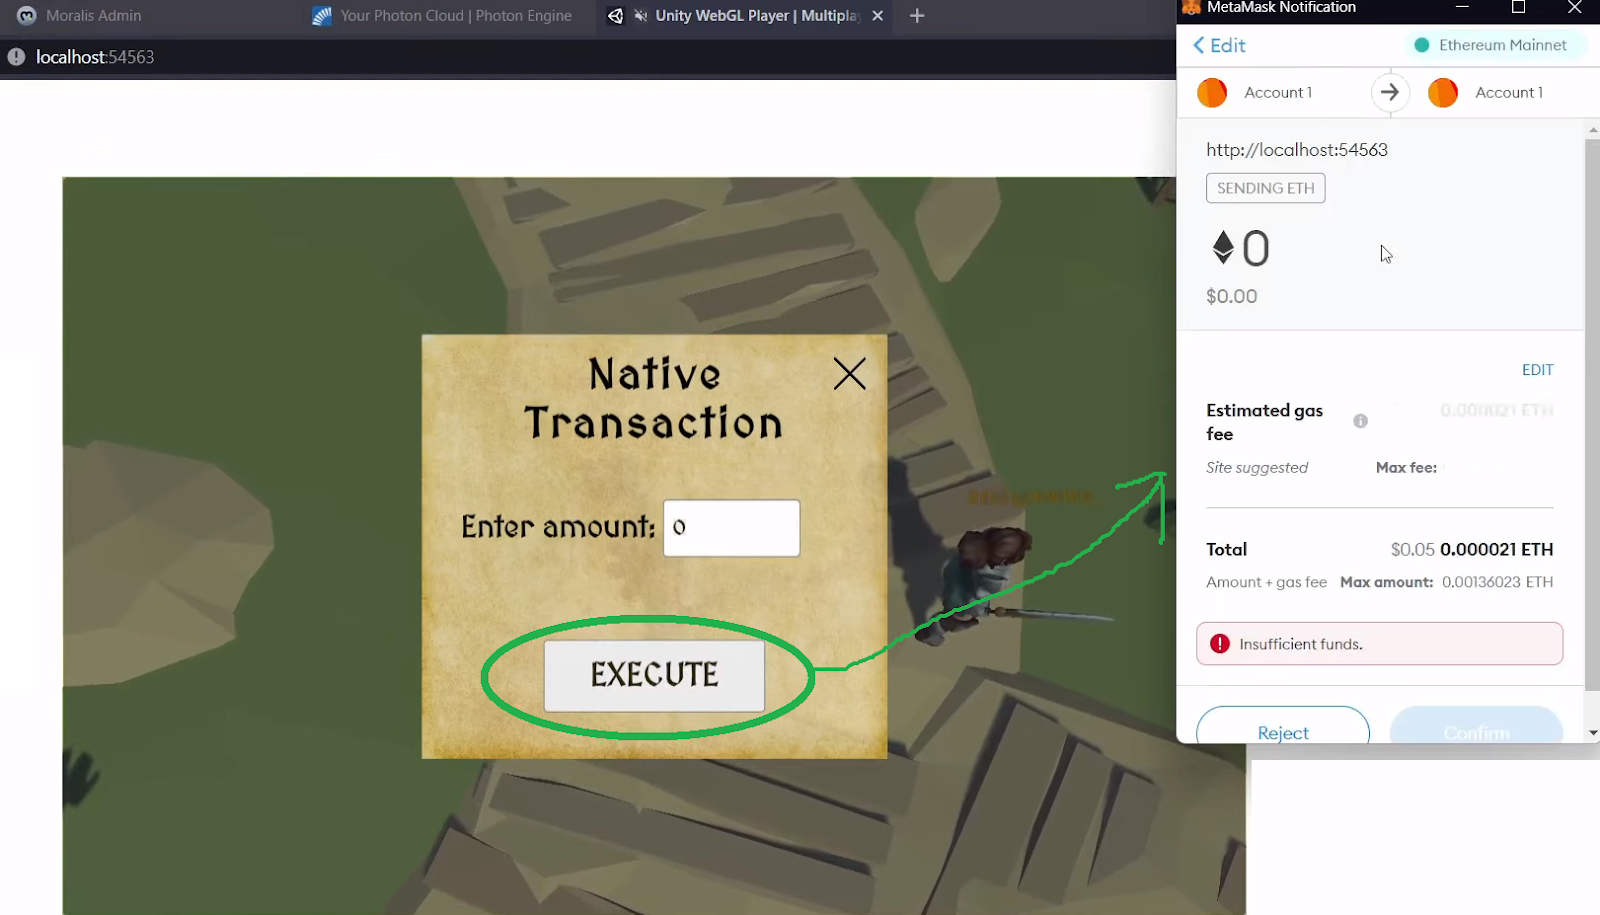
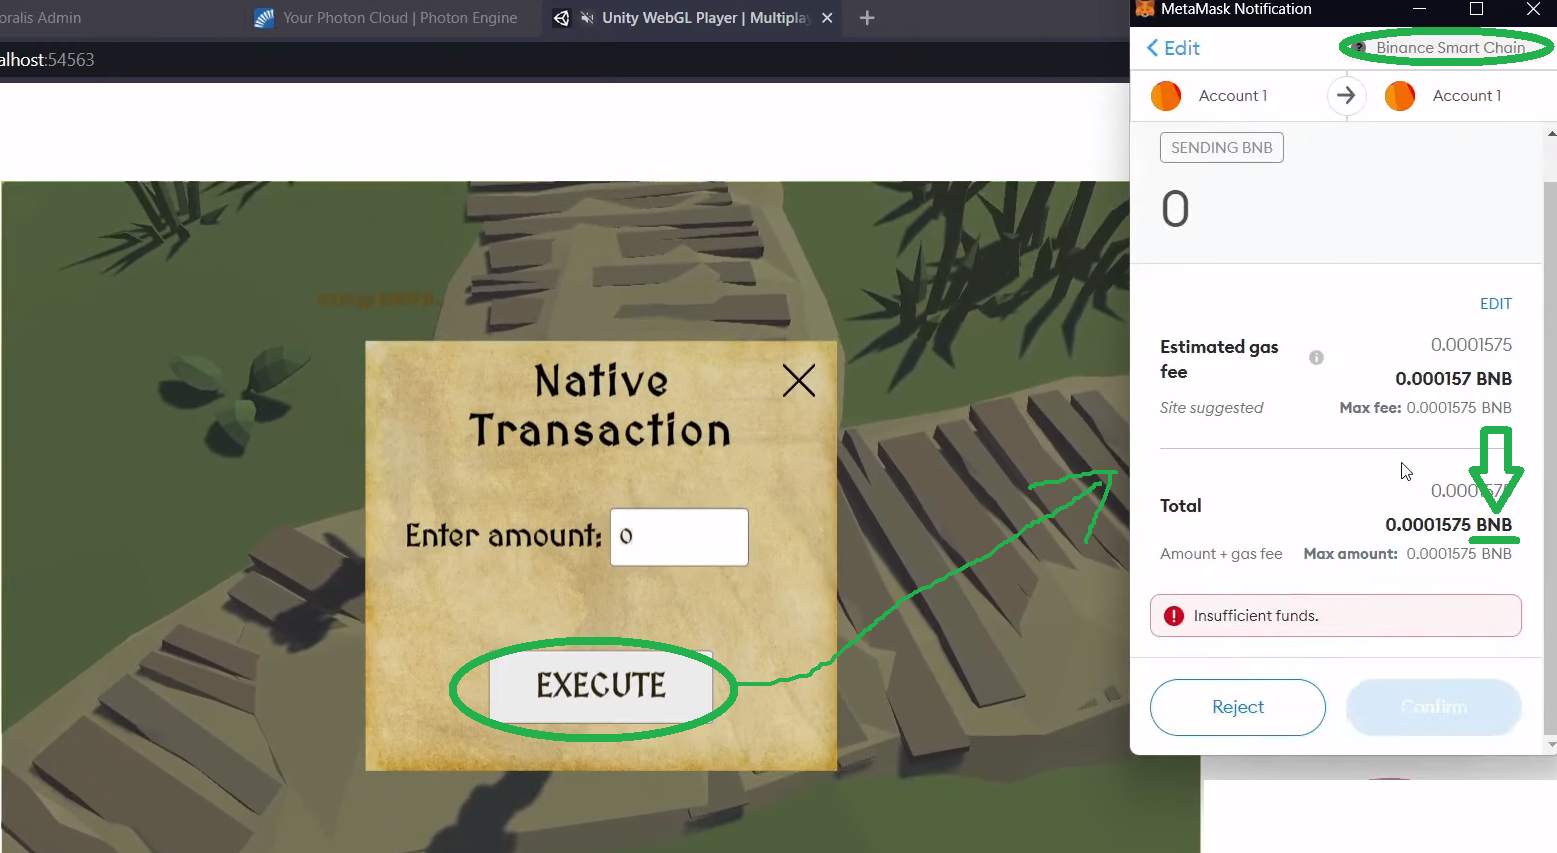
As the “Native Transaction” title suggests, these kinds of Web3 transactions with Unity support native tokens or coins. By entering the amount that a user wants to send and clicking the “EXECUTE” button, MetaMask asks for confirmation:
Another great feature is Moralis’ cross-chain interoperability. The latter enables you to do the above-presented blockchain game transactions on other chains. To do this, users only need to use their MetaMask extension to switch to another network:
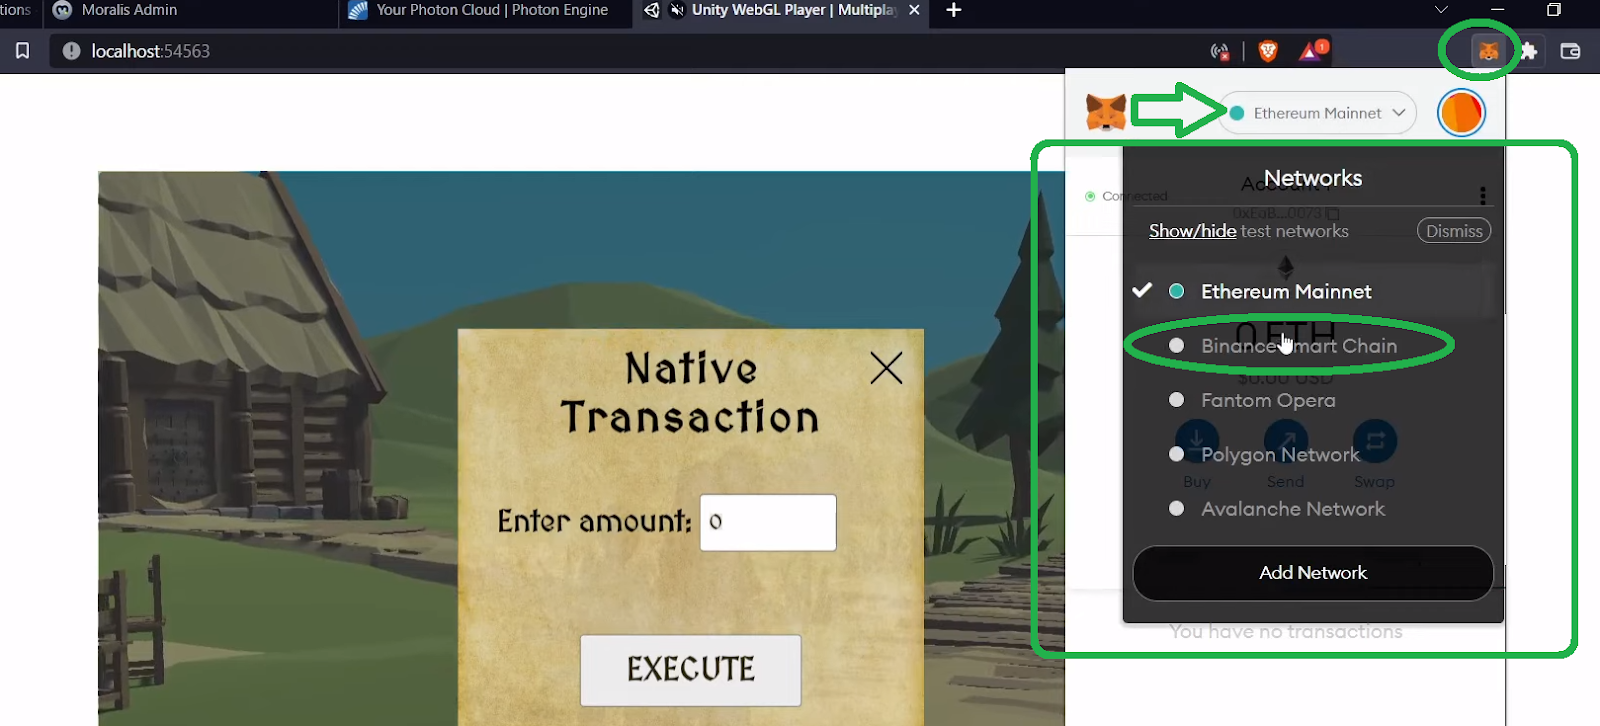
If they now repeat the above steps again, they will be able to send BNB (as long as the BNB Chain network has been added already to MetaMask) instead of ETH:
Blockchain Game Transactions with Unity and Moralis
Moralis is the ultimate Web3 development platform. Thus, it is the tool that enables Web3 transactions with Unity. However, to create the above-presented example game yourself, you’ll also need Photon and MetaMask. While Photon will take care of our multiplayer needs, it is Moralis that will make blockchain game transactions possible. This best Web3 backend platform makes creating dApps (decentralized applications) a whole lot simpler. All in all, Moralis enables you to save 87% of development time. Moreover, as mentioned earlier, Moralis is cross-chain interoperable. Hence, you can deploy your dApps across multiple programmable chains easily. Moreover, this phenomenal Web3 tool lets you overcome all of the limitations of RPC nodes. By saving your time and money on backend development, you get to devote your maximum attention to the frontend. As such, you are likely to create an excellent Web3 UI.
Fortunately, Moralis’ free version provides you with everything you need to get started. By creating your free Moralis account, you get to create your Moralis server and access its database (Moralis dashboard). If you then combine your Moralis dashboard with Moralis’ “sync” feature, you can easily sync and index smart contract events. This also makes Moralis the greatest tool to index the blockchain effortlessly. Nonetheless, in case you haven’t done so yet, make sure to create your free Moralis account before moving on.
Download Our Unity Sample Project
As touched on earlier, we made the entire code for the Web3 MMORPG presented earlier available at GitHub. Since this is our base to implement Web3 transactions with Unity, we urge you to follow the steps below. Actually, the best way to go about this is to download our example project’s ZIP file:

After downloading the ZIP file, unzip it, and open it with Unity. Then, you’ll be able to see that the Moralis SDK is already imported inside the project:
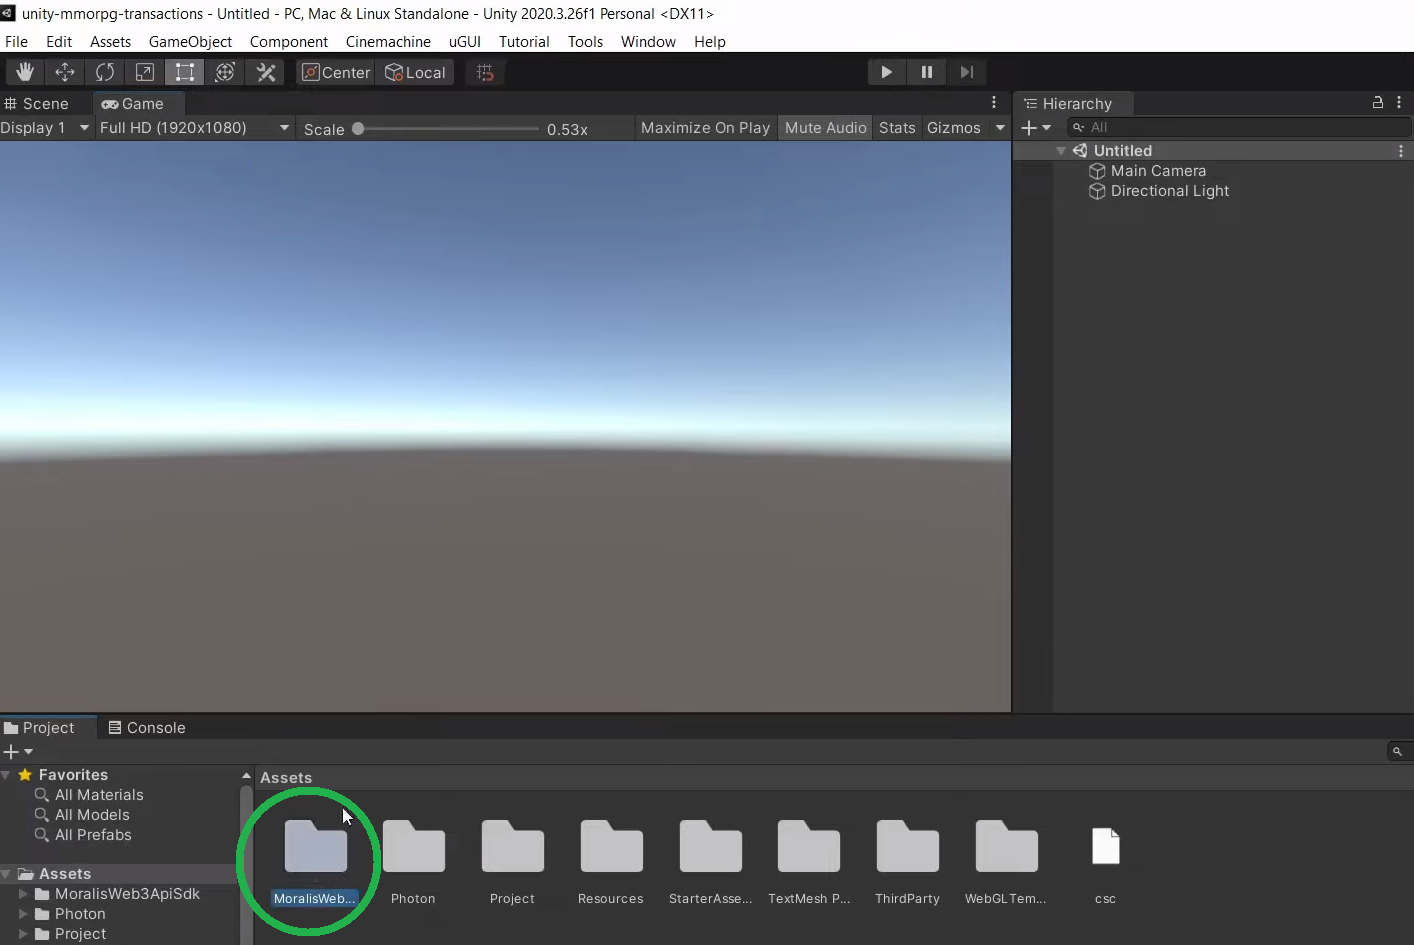
However, for the sake of this example project, we want to focus on the “Project” folder. Inside the latter, you’ll find the “Scenes” folder, which contains the “Game” and “Login” scenes. We’ll start with the latter:
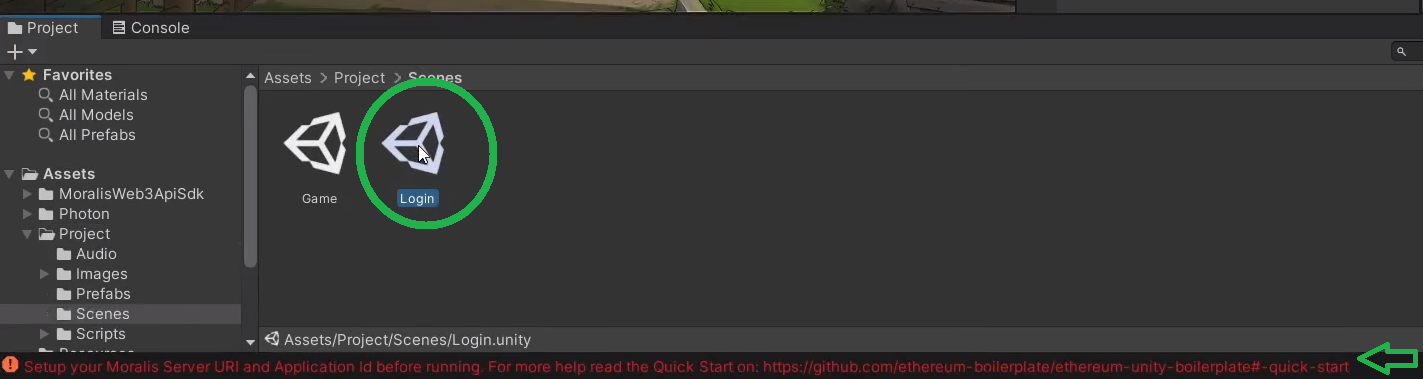
Implementing Web3 Transactions with Unity – The “Login” Scene
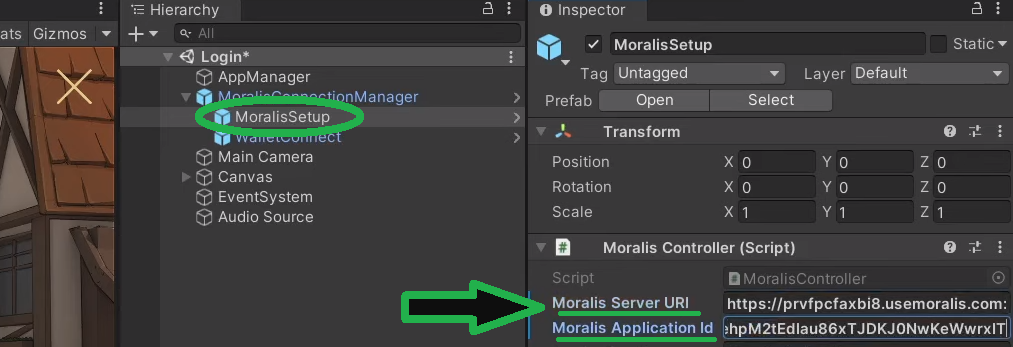
With the “Login” scene opened, we can access the “MoralisSetup” prefab in the hierarchy. Moreover, by selecting that prefab, we land on “Moralis Controller”. This is the area where you need to enter your Moralis server’s details to get the backend support you need:
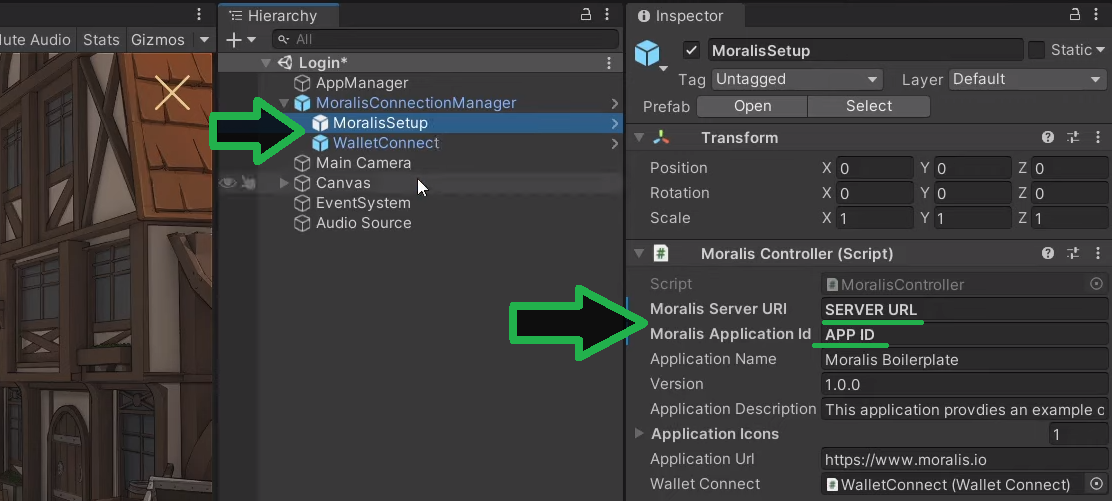
The image above clearly shows the details of the “MoralisSetup” prefab. You can see that you need your Moralis server URL and application ID. Hence, this is your cue to create your own Moralis server and obtain its details.
Initial Moralis Setup
Whether you are interested in creating Web3 games with Unity or other dApps, you must start with the initial Moralis setup. Here are the steps to get that done easily:
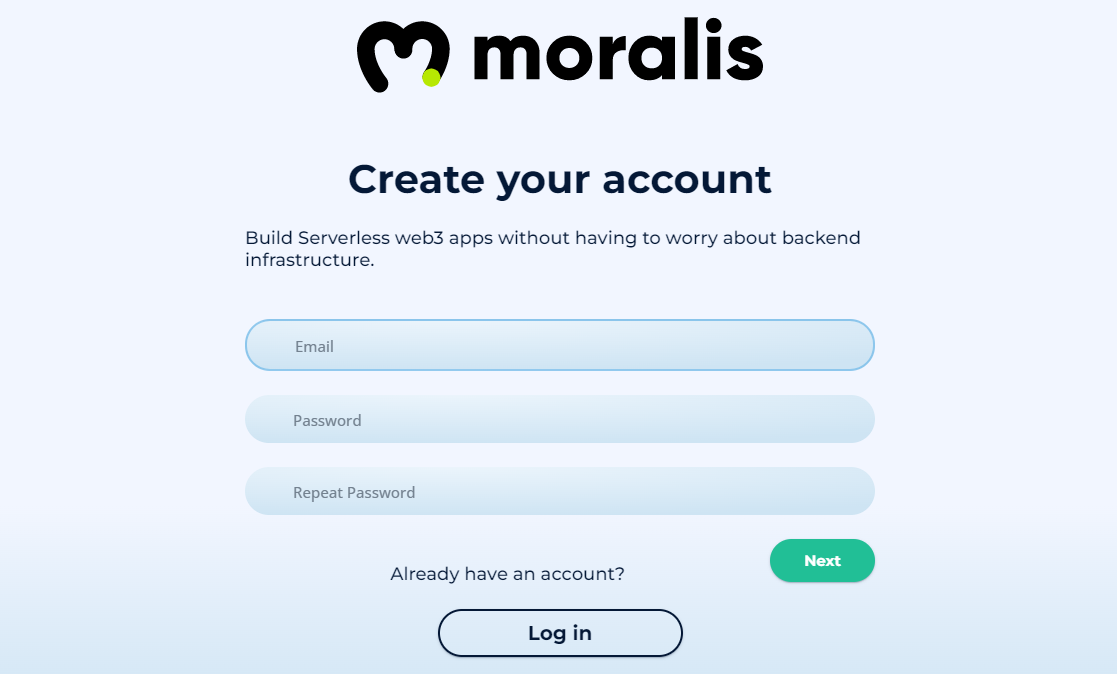
- Log In to Your Moralis Account – At this point, you most likely already have an active Moralis account; thus, just log in. However, if you don’t have a Moralis account yet, use this “create your free Moralis account” link above, which will take you to the signup page. There, enter your email, create your password, and confirm your account by clicking on the link that will be sent to your email.
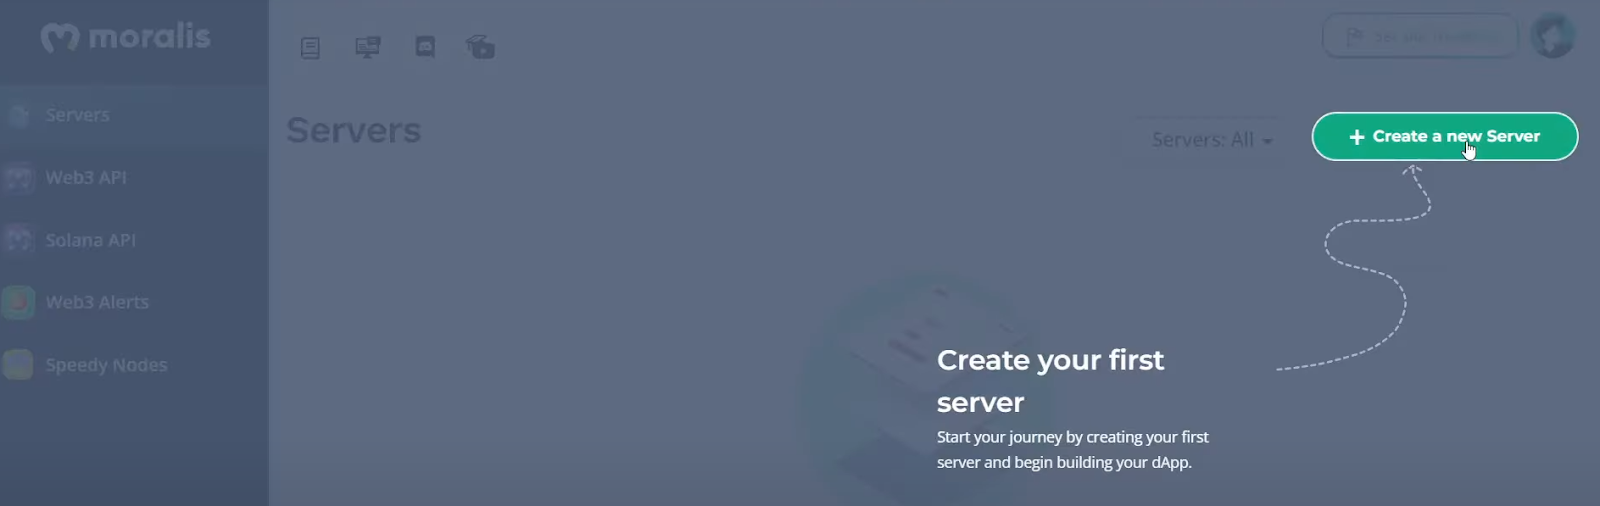
- Create a Moralis Server – Inside your Moralis admin area, you will see the “+ Create a new Server” button located in the top-right corner inside the “Servers” tab. As a new user, you’ll be able to follow along with the on-page tutorial:
Next, you’ll need to select the proper network type (see screenshot below). When working on example projects or testing dApps, “Testnet Server” or “Local Devchain Server” are the best options. However, once it’s time to go live, you need to go with the “Mainnet Server” option.

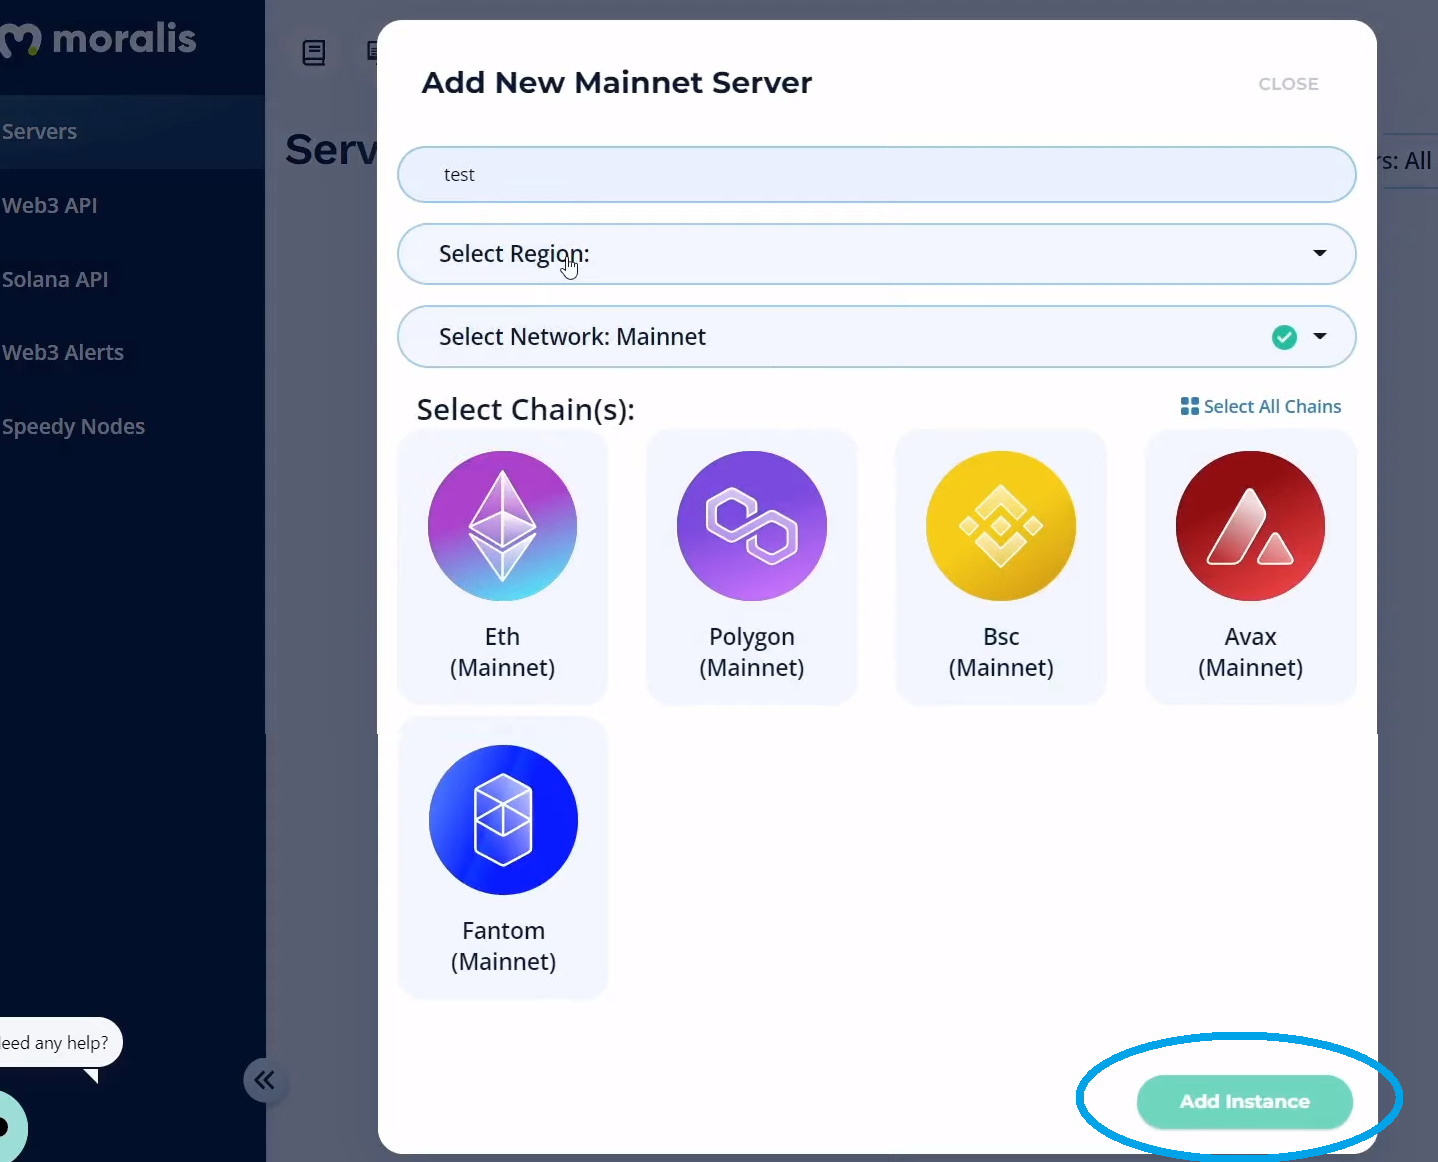
Then you’ll see a pop-up window asking for your server details. So, enter your server’s name, then select your region, network type, and chain(s). Finally, run your server by clicking on “Add Instance”:
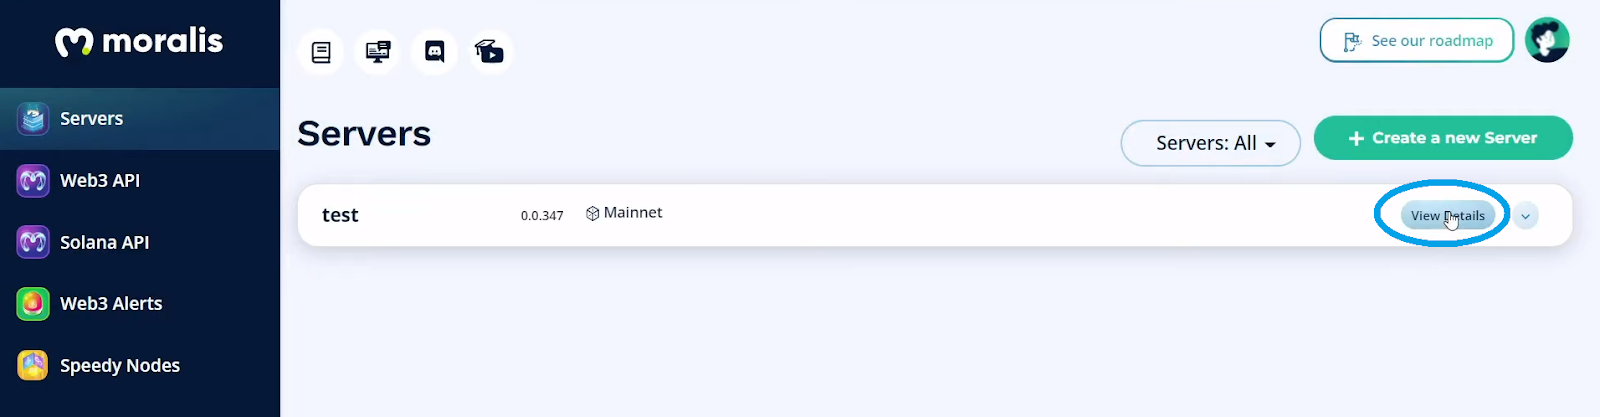
- Access Your Server’s Details – Once your server is up and running, you can access its details via the “View Details” button:
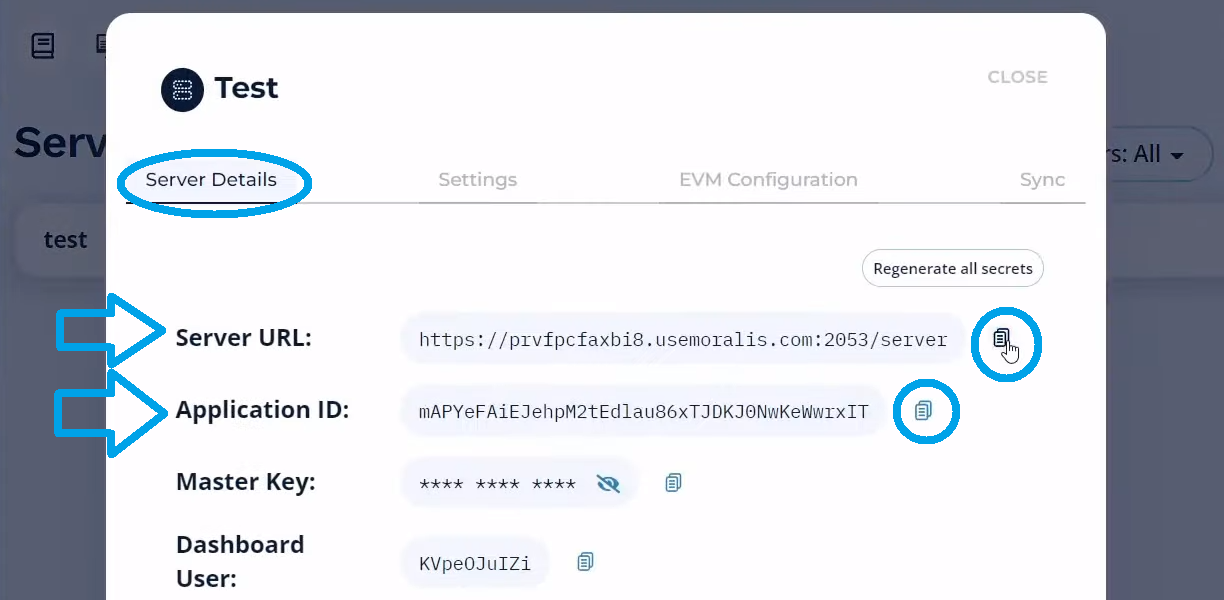
By doing so, you’ll see the details in a new window. By using the copy icons on the right-hand side, you get to copy your server’s URL and application ID:
- Populate Unity – All that’s left to do now is to paste the above-copied details into the appropriate fields inside Unity:
Blockchain Game Transactions on WebGL
To complete this project, we need to make some initial tweaks to the setting. By default, you get to connect users with WalletConnect, which is great for Android and iOS devices. However, in our example, we want to focus on web users. So, go to “File” > “Build Settings”, select “WebGL”, and click on the “Switch Platform” button:

Then let Unity do its thing. Next, click on the “Player Setting” button located in the bottom-left corner of the “Build Settings” window (see the image above). Inside the “Project Settings” window, select “Player” from the side menu. Then, select the “MoralisWebGL” template under “Resolution and Presentation”:

Web3 Transactions with Unity and the Basis for Multiplayer Needs
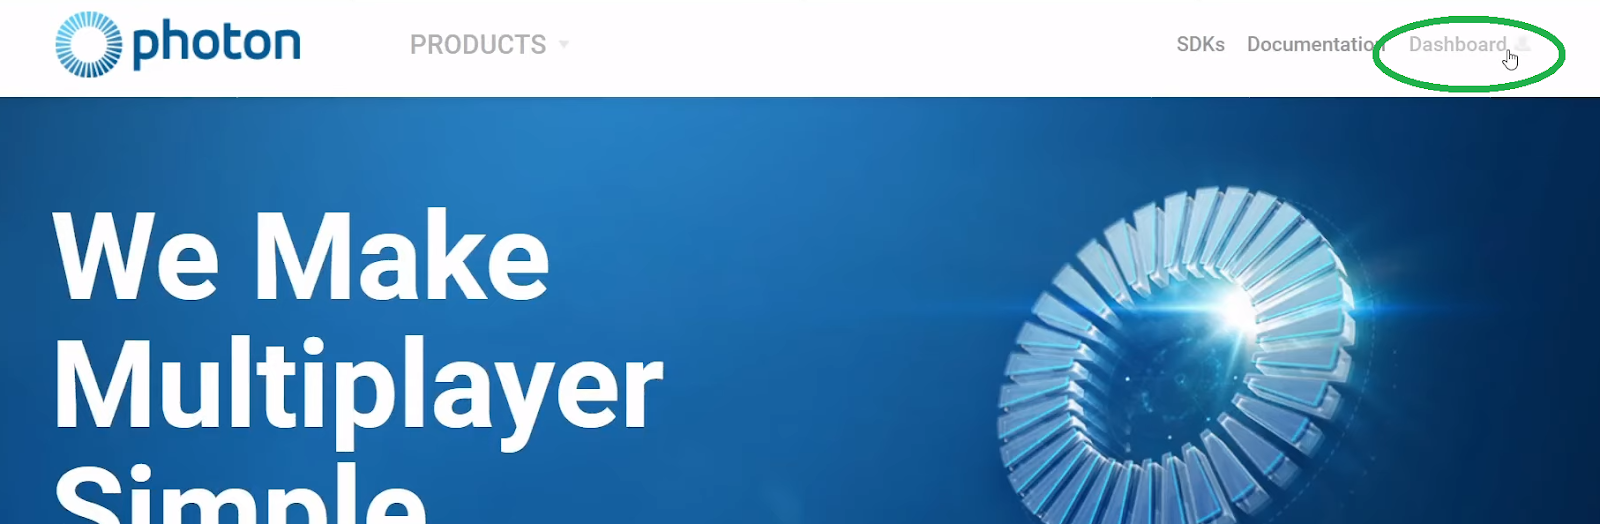
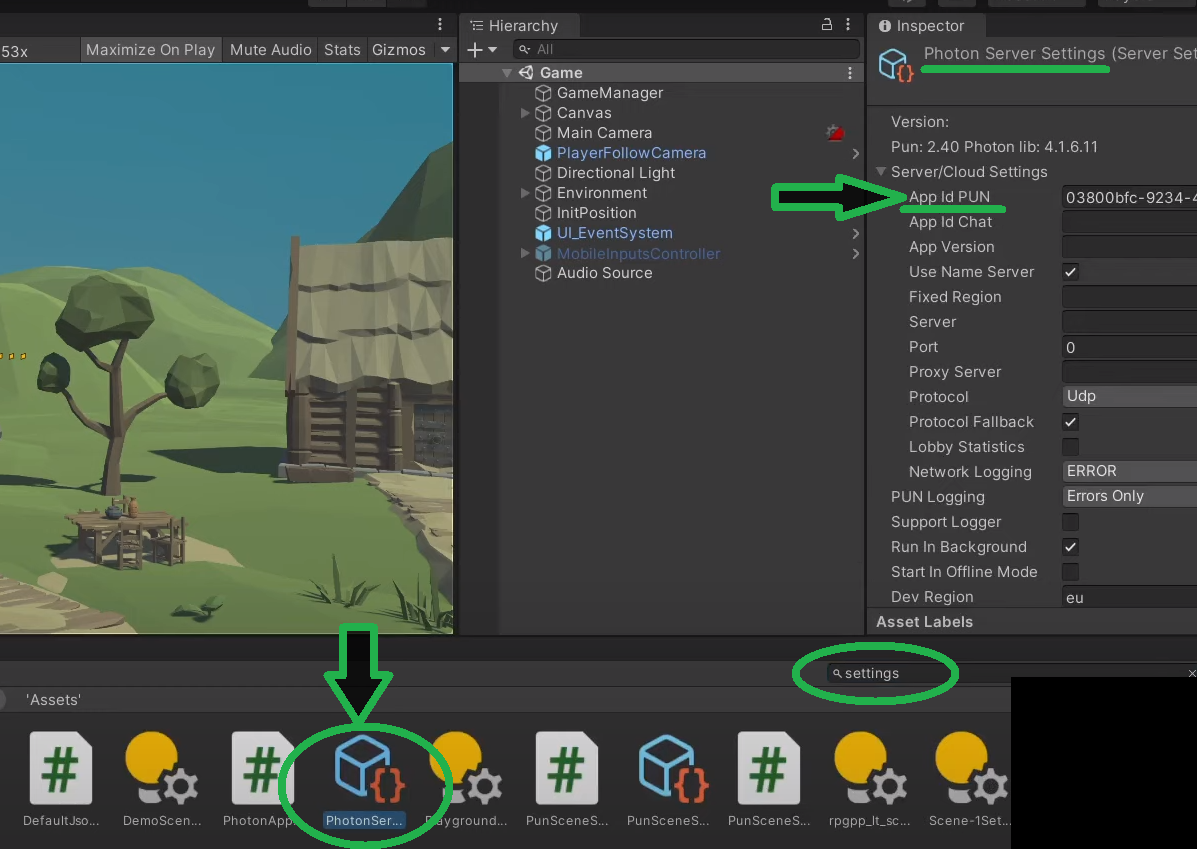
As mentioned a couple of times so far, our example Web3 game is an MMORPG. As such, we need to ensure that the multiplayer features are properly covered. That’s why we’ll use Photon. All you need is your Photon app ID, which you’ll later paste inside the “Photon Server Settings” in Unity. But you’ll first need to create your Photon account. You can use Google to search for “Photon engine”. Then, click the link to its homepage and create your account. Now that you are signed in, you need to navigate to your dashboard:
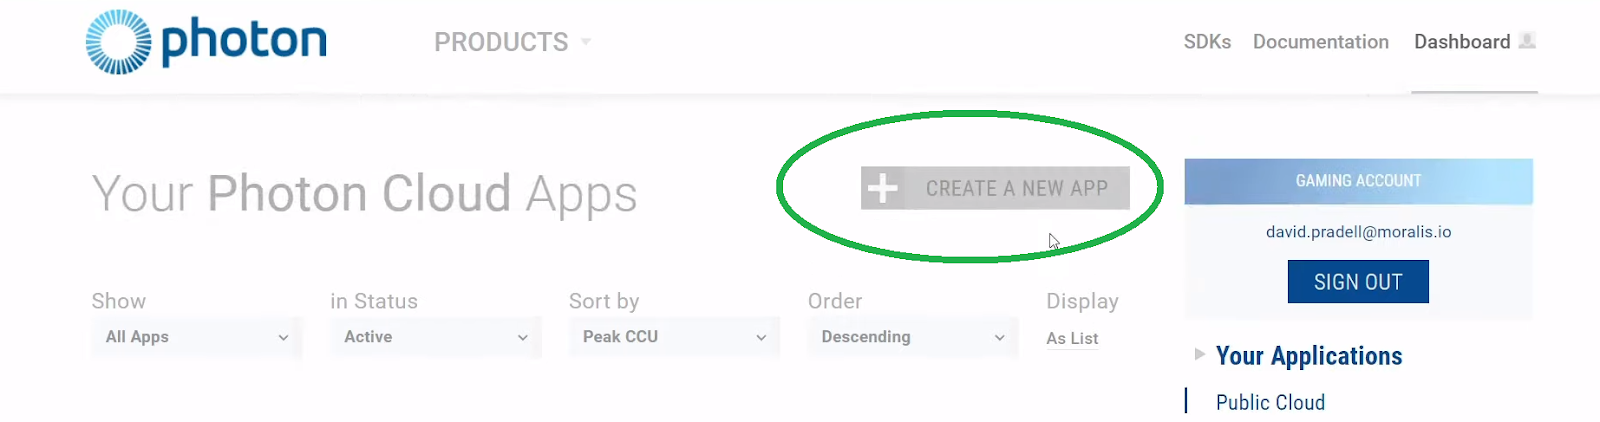
This is where you access your Photon app ID. However, in case this is your first time using Photon, you must first create a new application:
Then, select “PUN” under “Photon Type”:
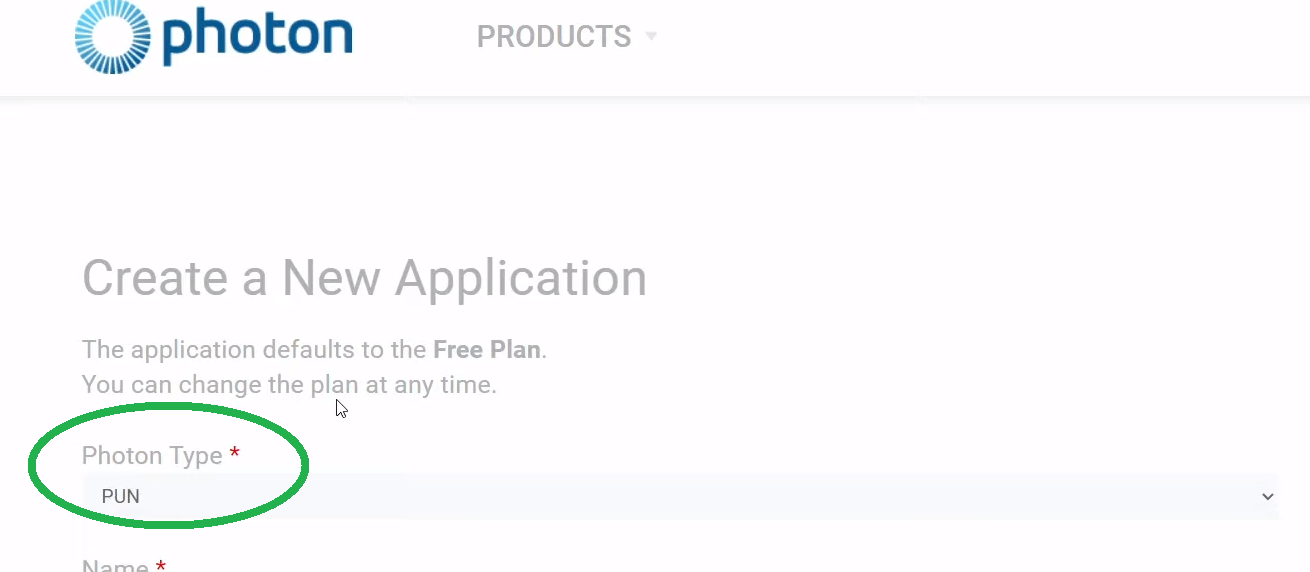
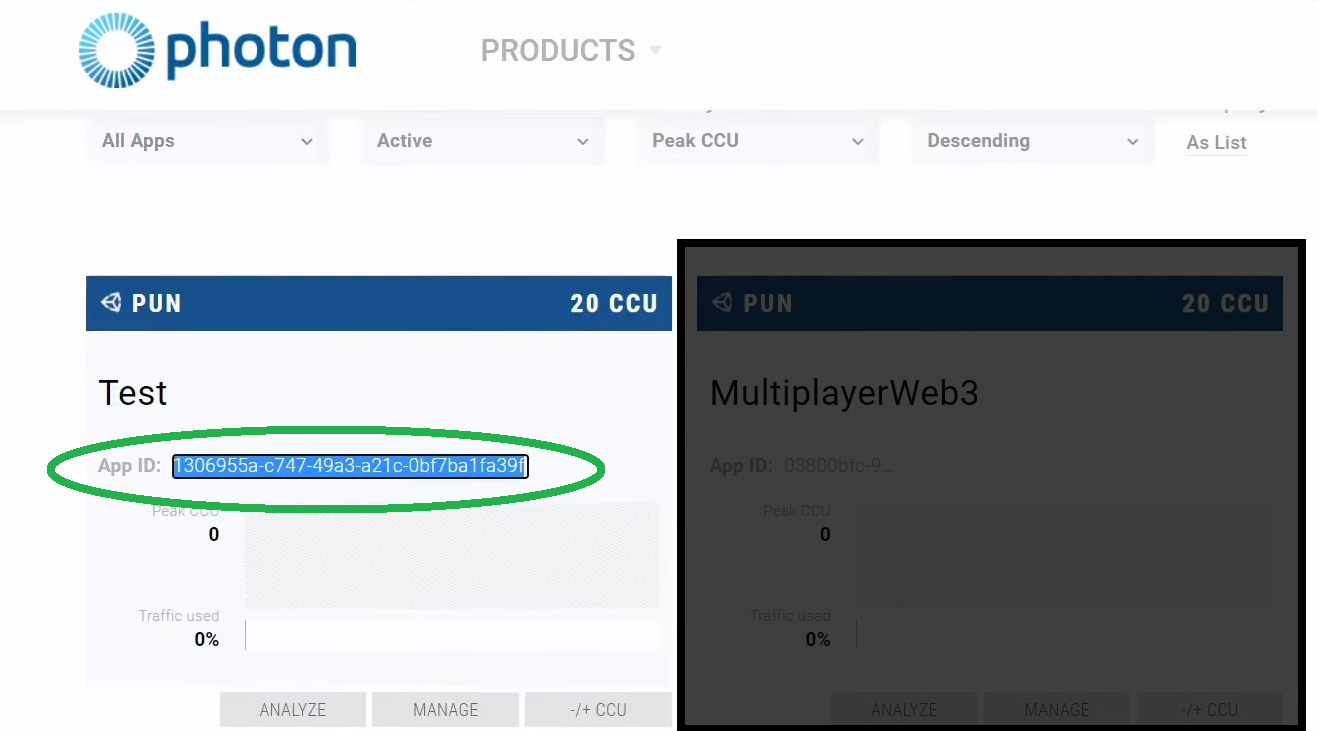
The other details can be anything you want. Finally, click on the “Create” button. With your new app created, you can copy its ID and paste it in Unity:
As such, use Unity’s search tool and enter “settings”. Among the offered results, open “PhotonSer…”:
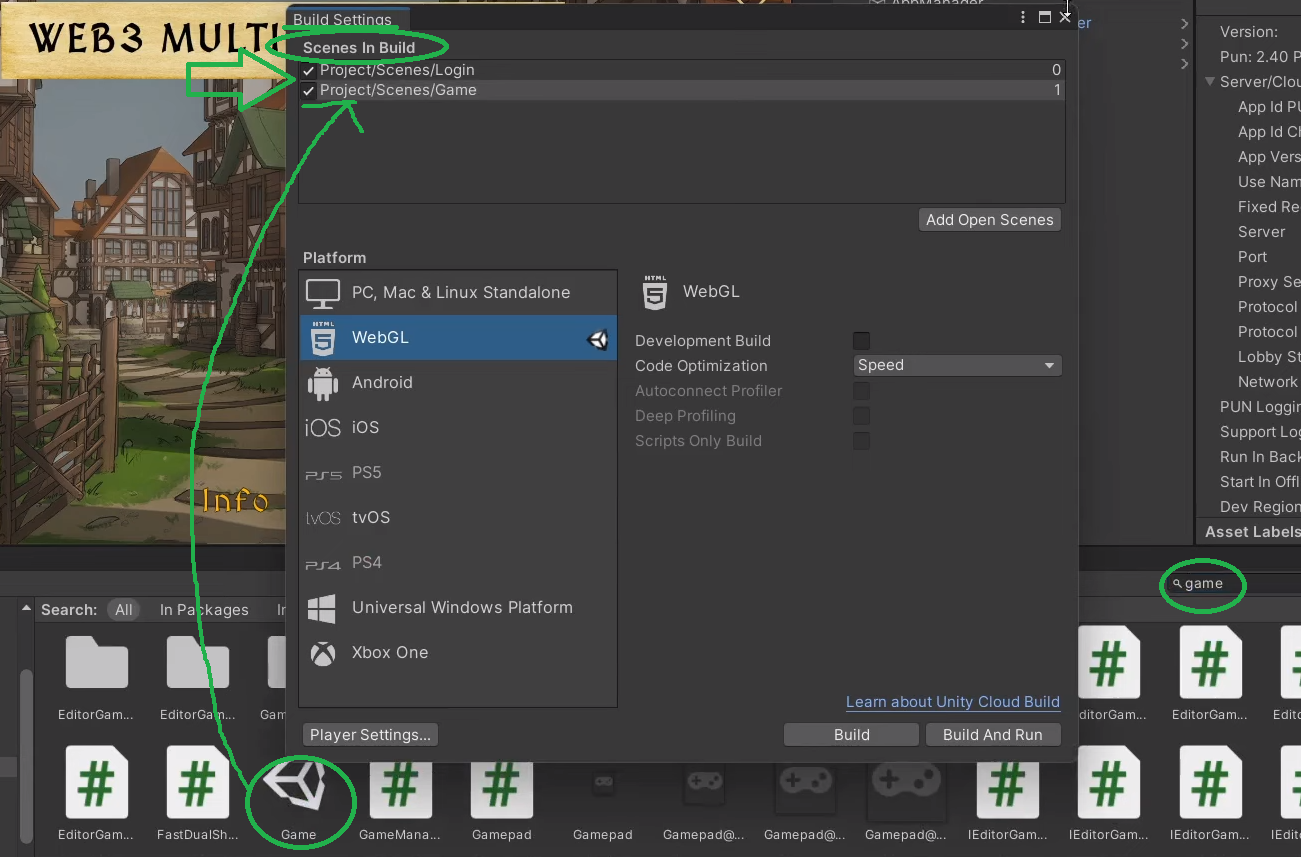
To test run your version of this example Web3 game, make sure to add both the “Login” and the “Game” scenes to “Build Settings”. Hence, open “Build Settings” from the “File” menu. Then drag and drop both scenes into the frame under “Scenes In Build”:
Note: For more details on how to run your Web3 game, use the video below starting at 08:14.
Implementing Web3 Transactions with Unity – The “Game” Scene
Now’s the time to focus on how to implement blockchain game transactions. We do this inside the “Game” scene. As such, start by opening this scene. Under the “Canvas” prefab, you will see three panels:
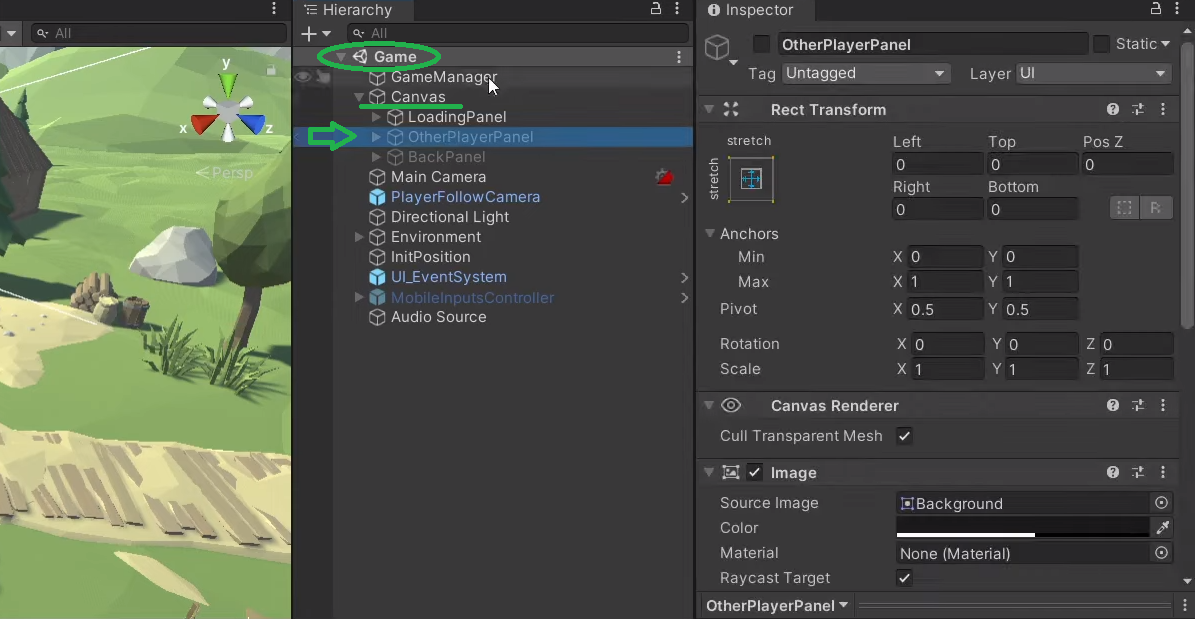
It is the “OtherPlayerPanel” that activates when we click on the other player (remember the demo at the beginning of the article). As such, make sure to checkmark the “OtherPlayerPanel” box:
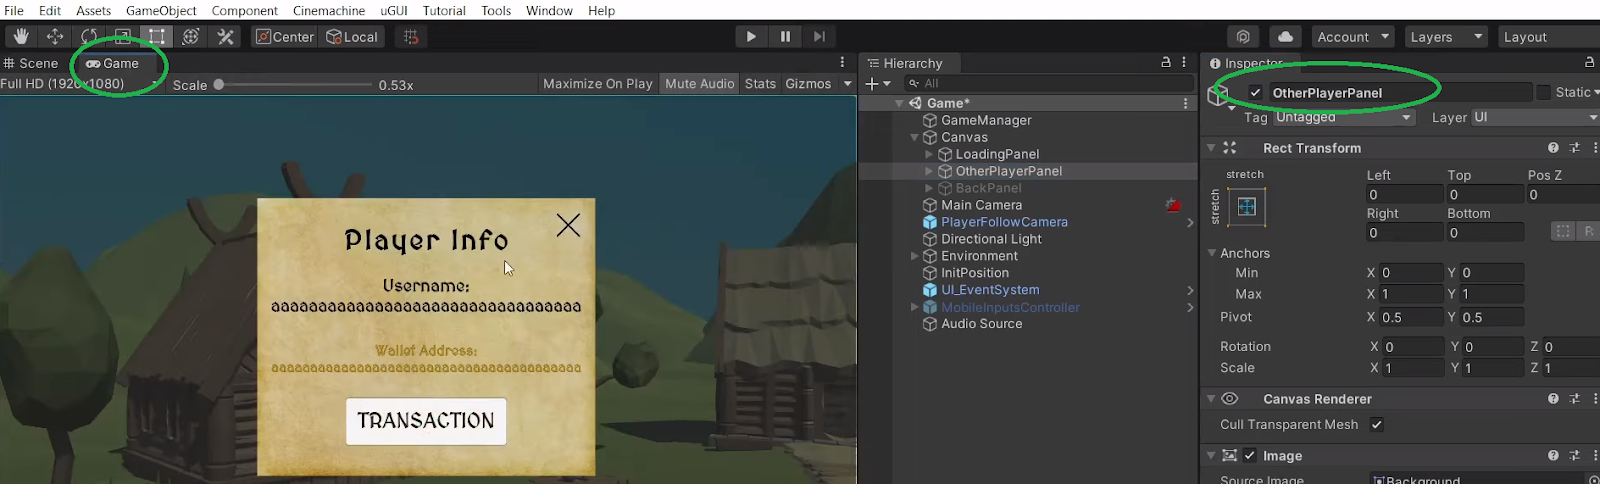
Next, we click the “TRANSACTION” button and checkmark the box next to “TransactionPanel” inside the “TransactionPanel” prefab. This will open the “Transaction” panel:
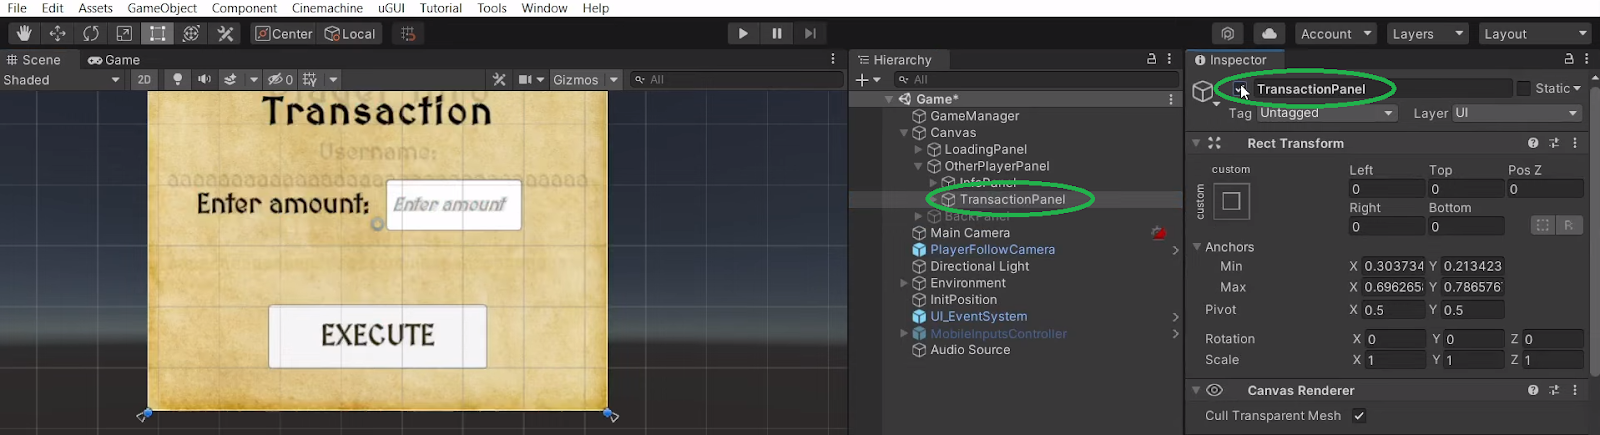
You can now uncheck the “TransactionPanel” and the “OtherPlayerPanel” boxes. The purpose of the above was to show you how panels get activated. Furthermore, you now know that all of this is managed inside the “OtherPlayerPanel”. Nonetheless, if you are interested in learning more details about the code that gets this done, make sure to watch the video below at 10:33. In that video, a Moralis expert will take a closer look at the “OtherPlayerPanel” script. This is where you’ll learn about the “MoralisInterface” method and several practical Moralis SDK endpoints, including “SendTransactionAsync”. Last but not least, to view the final results, use the video instruction at 12:29.
Here’s the video we’ve been referencing throughout the article:
How to Do Blockchain Game Transactions with Unity – Summary
We’ve covered quite a lot of ground in this article. You’ve learned how to easily do blockchain game transactions with Unity. Also, you’ve had a chance to use our template and create an example Web3 game in minutes by completing the Moralis and Photon initial setup. Furthermore, if you’ve followed our lead to the point, you’ve been able to launch the game on your end and even execute Web3 transactions with Unity.
We hope this example inspired you and showed you the potential of Moralis’ Metaverse SDK. Hence, it is now up to you to take things to the next level and start putting your Web3 game ideas to life. However, in case you want to take on other Unity Web3 examples, we recommend you learn how to create a metaverse dApp. Or, perhaps build a medieval metaverse game. On the other hand, you may be interested in other aspects of blockchain development. If so, make sure to check out the Moralis YouTube channel and the Moralis blog. Both of these outlets offer high-quality explanations and guides. For instance, some of the latest topics cover how to create a Web3 music platform, gasless metaverse interactions, how to create an ERC-721 NFT, how to lunch a white-label NFT marketplace, and metaverse smart contract examples.
Though, if you want to become a Web3 developer in the shortest time possible, you might need to take a more professional approach. In that case, enrolling in Moralis Academy might be just the right path for you. Aside from top-notch courses, you’ll also become a member of an advanced community, get a personalized study path, and receive expert mentorship.
