In this article, we’ll use the above video as our guideline while creating our ERC-721 NFT. Some of the tools we’re about to use for this project are Hardhat, MetaMask, QuickNode, JavaScript, and Moralis! A Solidity smart contract following the ERC-721 standard is also needed. Fortunately, thanks to OpenZeppelin, you can create an ERC-721 NFT contract with just a few lines of code. That said, if you take on this article’s featured tutorial, you’ll be able to use the following contract:
// SPDX-License-Identifier: MIT
pragma solidity ^0.8.0;

import "@openzeppelin/contracts/token/ERC721/ERC721.sol";

contract MNFT is ERC721 {
    constructor() ERC721("Moralis NFT", "MNFT") {
        // mint an NFT to yourself
        _mint(msg.sender, 1);
    }
}
If you are familiar with other smart contract deploying tools, such as Remix or Brownie, feel free to use them to deploy the above contract to mint an ERC-721 NFT. However, dive into the tutorial below if you want to continue using Hardhat. Additionally, if you are interested in building killer dapps around your NFTs or other existing NFTs, sign up with Moralis! This is the place to get your hands on the ultimate NFT API. With that powerful tool, you can cover blockchain-related backend features with short code snippets!

Overview
The first part of today’s article will be our tutorial on how to create an ERC-721 NFT. The tutorial shows how to use the above-given smart contract with Hardhat and will guide you through the entire process. First, it shows you how to set up your Hardhat project correctly. Then, you’ll learn how to copy-paste the above smart contract into the proper “.sol” file. Finally, the tutorial shows you how to create a JS script that enables you to mint an ERC-721 NFT.
Below the tutorial, you can find an additional NFT ERC-721 example that includes an NFT-representing file that enables NFT minting after the contract’s deployment. Also, to further clarify your understanding of token standards and NFTs in general, there are several other sections further down the article. This is where you can explore NFTs and token standards by learning what NFTs are and exploring the ERC-721 and some other token standards. Nonetheless, you also have a chance to learn how to write a smart contract. Lastly, we inform you of the easiest way to create an ERC-721 NFT.
Tutorial: How to Create an ERC-721 NFT
To finish this tutorial, you need to complete the following three steps:
- Set up your Hardhat project
- Implement the intro’s smart contract
- Deploy the smart contract template by running a JS script
Some tools needed to go through the above steps include NodeJS, Hardhat, MetaMask, and QuickNode. Of course, our smart contract is written in Solidity; however, since you’ll be able to copy-paste the code, you don’t actually need to know Solidity to complete this tutorial.
These are the prerequisites you need to take care of before moving forward:
- Install NodeJS (download from “nodejs.org/en/download/”)
- Set up MetaMask
- Add the Goerli testnet
- Use a vetted Goerli ETH faucet to obtain test funds
- Create a QuickNode account
Initial Hardhat Setup
Before you can use Hardhat, you need to set it up correctly. Start by creating a project directory using the following command:
mkdir PROJECT_NAME
Then, you need to cd into the above-created folder:
cd PROJECT_NAME
Now, you’re ready to initialize a new npm project with this command:
npm init -y
Next, you want to install the dotenv dependency:
npm i dotenv
By this point, you have everything ready to install Hardhat and its associated dependencies. The following command will do the trick:
npm install --save-dev hardhat @nomicfoundation/hardhat-toolbox
After successfully installing Hardhat, you need to create a new Hardhat project:
npx hardhat
The above command will result in the following prompt from your terminal:
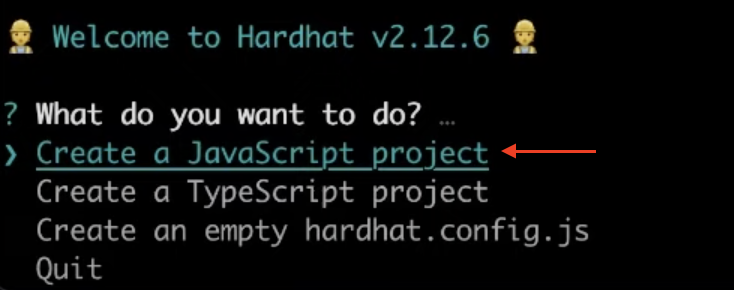
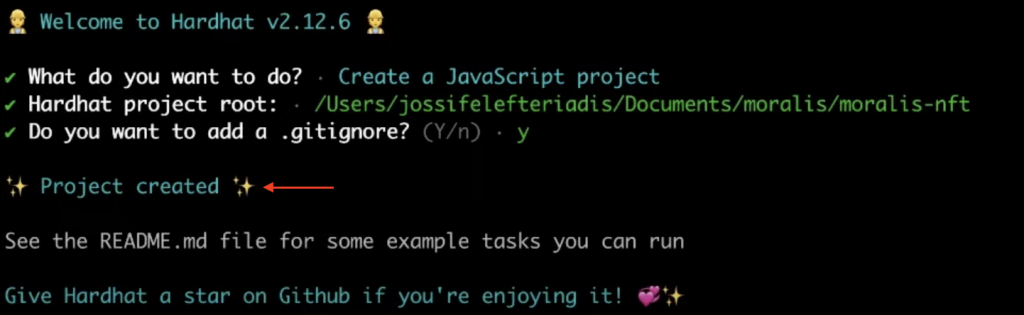
As indicated in the above screenshot, make sure to select the “Create a JavaScript project” option. In response, your terminal should show you this success message:
The final step of this setup requires you to also install the OpenZeppelin dependency by running the following command:
npm install @openzeppelin/contracts
Thanks to OpenZeppelin, you’ll get to focus more on how to mint an ERC-721 NFT instead of dealing with writing an ERC-721 contract from scratch.
Implement an ERC-721 Smart Contract
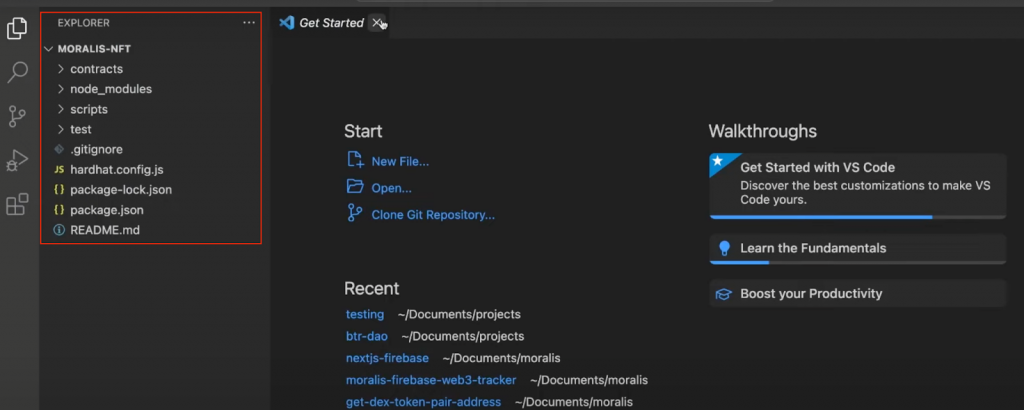
Presuming you’ve successfully completed the initial setup above, we invite you to open your project’s directory in your favorite integrated development environment (IDE). Feel free to follow our lead and use Visual Studio Code (VSC). All in all, this is what your project tree should look like:
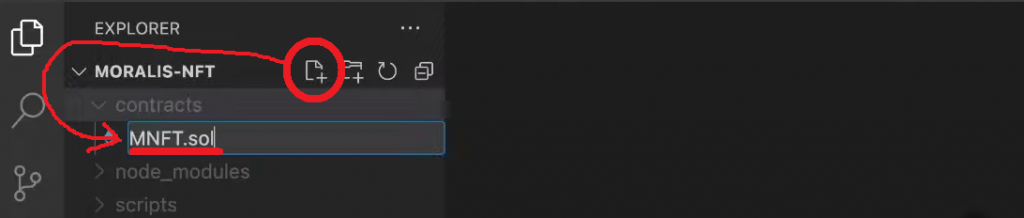
To implement the smart contract, you need to focus on the “contracts” folder. There, you’ll see a “Lock.sol” smart contract file template. Delete that file:

Then, create a new “.sol” file inside the “contracts” folder. This script will host the lines of code provided in the introduction of today’s article. Feel free to name the script as you wish (we called it “MNFT.sol”):
Moving on, you can simply copy the code from the intro and paste it into your “.sol” file. Or, you can implement it line by line by using this short code walkthrough:
- Add the standard MIT license, which should be at the top of all Solidity smart contracts:
// SPDX-License-Identifier: MIT
- Specify the version of Solidity that you want to use via this pragma line:
pragma solidity ^0.8.0;
- Import OpenZeppelin’s verified ERC-721 smart contract:
import "@openzeppelin/contracts/token/ERC721/ERC721.sol";
- Finally, define your contract by using its symbol (
MNFTin our case) as an ERC-721 contract. Then use theconstructorfunction that will be triggered when you deploy the contract:
contract MNFT is ERC721 {
    constructor() ERC721("Moralis NFT", "MNFT") {
        // mint an NFT to yourself
        _mint(msg.sender, 1);
    }
}
The above constructor takes in the token name and its symbol. As for the _mint function, it takes in the msg.sender parameter and the number of tokens to mint. The former specifies that the address deploying the contract receives the token.
With your instance of the above contract in place, it’s time to compile it. As such, run the following command:
npx hardhat compile

Mint an ERC-721 NFT
By this point, you’ve already implemented your smart contract and compiled it using Hardhat. As such, it’s time for you to learn how to mint an ERC-721 NFT via a deployment script. This is where the “deploy.js” script enters the scene. You can find the template version of that script inside the “scripts” folder. First, select the initial content of “deploy.js” and delete it. Then, populate the script with the following lines of code:
const { ethers } = require("hardhat");

async function main() {
  const nftContract = await ethers.getContractFactory("MNFT");

  const deployedNFTContract = await nftContract.deploy();

  await deployedNFTContract.deployed();

  console.log("NFT Contract Address:", deployedNFTContract.address);
}

main()
  .then(() => process.exit(0))
  .catch((error) => {
    console.error(error);
    process.exit(1);
  });
To deploy your contract and create an ERC-721 NFT, you also need to add some environmental variables. Create a new “.env” file where you should add the following two variables:
QUICKNODE_HTTP_URL=”REPLACE_ME”

PRIVATE_KEY=”REPLACE_ME”
Note: Make sure to actually replace the above placeholders with your QuickNode URL and your private MetaMask key.
For the final piece of the “mint an ERC-721” puzzle, you must focus on the “hardhat.config.js” file. Again, select the existing content and replace it with the following lines of code:
require("@nomicfoundation/hardhat-toolbox");
require("dotenv").config({ path: ".env" });
const QUICKNODE_HTTP_URL = process.env.QUICKNODE_HTTP_URL;
const PRIVATE_KEY = process.env.PRIVATE_KEY;
module.exports = {
  solidity: "0.8.9",
  networks: {
    goerli: {
      url: QUICKNODE_HTTP_URL,
      accounts: [PRIVATE_KEY],
    },
  },
};
The above code snippet imports the required libraries and uses module.exports, through which you’ll get to deploy your smart contract. You can see that the above script focuses on the Goerli testnet. This is where you’d need to make the necessary tweaks if you were to deploy to other EVM-compatible chains.
With the “config.js”, “.env”, and “hardhat.config.js” files ready, you can deploy your smart contract and create an ERC-721 NFT. To do this, run the following command:
npx hardhat run scripts/deploy.js --network goerli
Scripts to Create an ERC-721 NFT GitHub Repo – github.com/MoralisWeb3/youtube-tutorials/tree/main/moralis-erc721-token
Additional NFT ERC-721 Example
The above NFT ERC-721 example taught you how to use Hardhat to mint ERC-721 NFTs. However, it used a pretty simple smart contract that didn’t even include an NFT-representing file. Thus, we encourage you to take a closer look at another ERC-721 example.
The contract below also imports OpenZeppelins’ ERC-721 standard, plus Counters from utils. Below the MIT license, pragma line, and OpenZeppelin imports, this is the contract letting its owner mint NFTs post-deployment:
contract NFT is ERC721URIStorage {
    using Counters for Counters.Counter;
    Counters.Counter private _tokenIds;
    address public owner;
    constructor() ERC721("ContractNftTest", "CNT") {
        owner = msg.sender;
    }
    function createToken() public returns (uint) {
        require(_tokenIds.current() < 10000, "No more NFTs can be minted");
        _tokenIds.increment();
        uint256 newItemId = _tokenIds.current();
        string memory tokenURI = "YOUR _TOKEN_URI";
        _mint(msg.sender, newItemId);
        _setTokenURI(newItemId, tokenURI);
        return newItemId;
    }
}
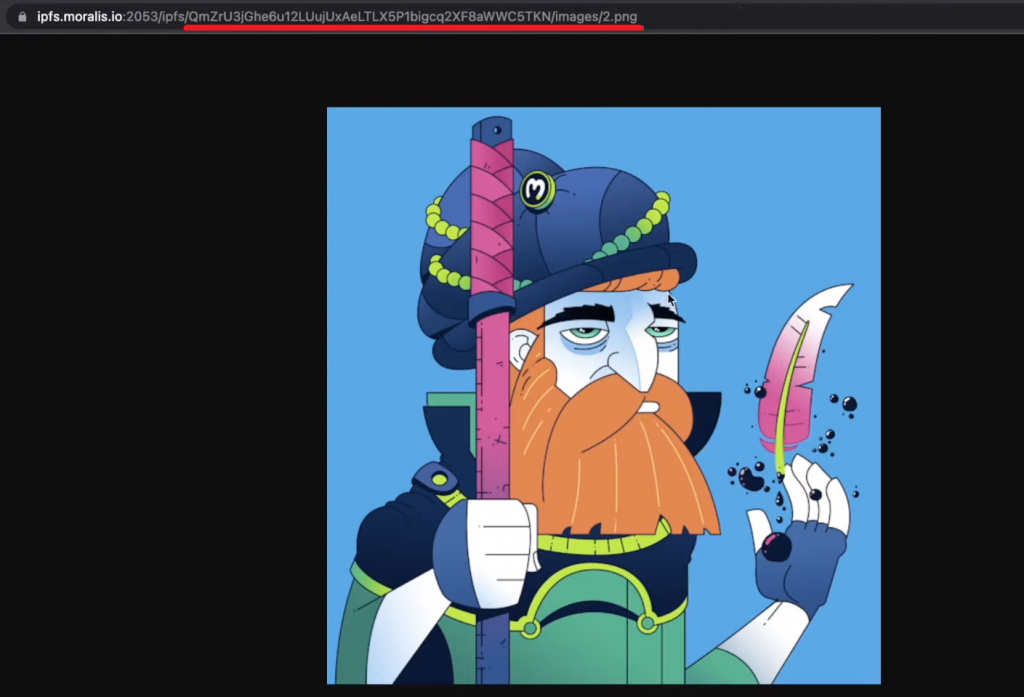
Before you deploy the above NFT ERC-721 example contract, make sure to replace YOUR _TOKEN_URI with a URI of your NFT metadata. The latter should also include a URL link to your NFT-representing file. Here’s an example of our NFT’s metadata URI and image URL (both stored on IPFS):
- NFT token URI:

- NFT-representing file URL:
Exploring NFTs and Token Standards
If you are new to NFTs and the ERC-721 standard, you’ll really appreciate the following sections. We will first answer the “what are NFTs?” and “what is the ERC-721 token standard?” questions. Then, we’ll list other leading token standards. You’ll also get a chance to learn how to write ERC-721 contracts and explore the easiest way to create ERC-721 NFTs.

What are NFTs?
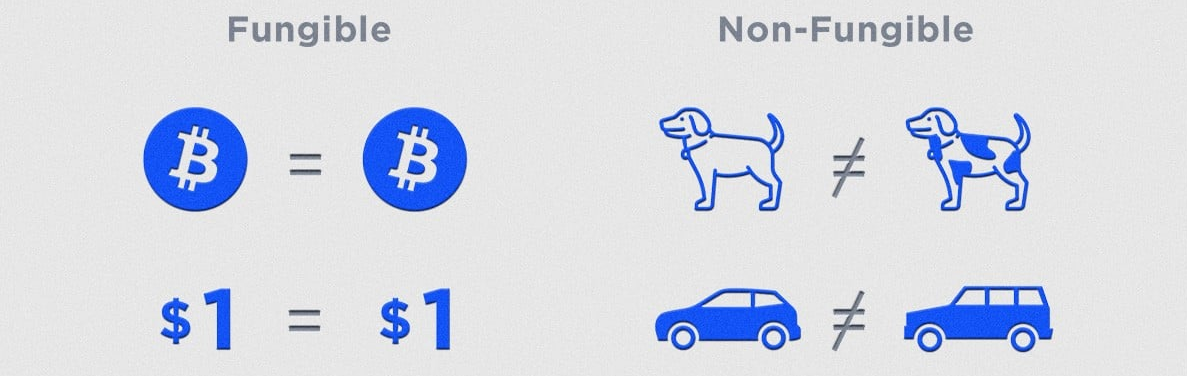
NFTs, short for non-fungible tokens, are unique kinds of crypto assets. As the term “non-fungible” indicates, these types of tokens are not interchangeable, meaning no two NFTs are the same. This makes NFTs great for all sorts of use cases requiring transparency and uniqueness. Some great examples are digital collectibles and art. However, NFTs can also represent all sorts of certificates, proofs of ownership, event tickets, in-game assets, etc.
Of course, not all NFTs are the same, and to create the right kind of NFT, one needs to understand the NFT standards correctly. However, generally, NFTs come with NFT-representing files and metadata files. Most existing NFT collections use image files as NFT-representing files. But these files are not stored on the blockchain via the smart contract. Neither are the metadata files. The only thing that devs need to include in NFT smart contracts to assign those files to NFTs are token URIs. The latter are URI links to metadata files. This means that NFT-representing files and metadata files can also be stored in a centralized manner. However, we encourage you to always use a reputable decentralized storage solution instead (e.g., IPFS).
It’s also worth pointing out that NFT metadata and NFT-representing files are optional. This is the option we went with in the NFT ERC-721 example tutorial above. After all, the real value of NFTs lies in their on-chain IDs.
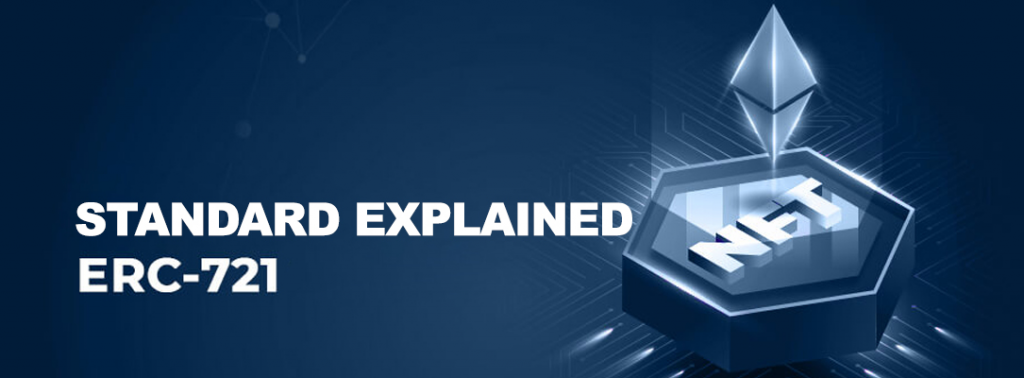
What is the ERC-721 Token Standard?
The ERC-721 token standard was the first NFT standard for non-fungible tokens on Ethereum. The core community set the standard in place to ensure that all NFT tokens remained compatible throughout an entire ecosystem (including other EVM-compatible chains). So, Ethereum Request for Comments 721 (ERC-721) ensures that tokens originating from any ERC-721 contract implement a minimum interface. Furthermore, all ERC-721 tokens must be transferable between accounts, it must be possible to fetch token balances, and anyone must be able to check the total supply of a token.
However, now there are other NFT standards, some more suitable for production purposes (ERC-1155). Today, devs primarily use the ERC-721 standard as part of the learning process or for simpler projects.
Note: You can learn more details about the ERC-721 standard in our ERC721 vs ERC1155 comparison.

Other Token Standards
There are many token standards that smart contracts running on Ethereum Virtual Machine (EVM) need to comply with. While the above image depicts the three most popular token standards, the following list includes other popular standards:
- ERC-20
- ERC-165
- ERC-721
- ERC-223
- ERC-621
- ERC-777
- ERC-827
- ERC-884
- ERC-865
- ERC-1155

How to Write an ERC-721 Smart Contract?
If you took on the above tutorial, you saw that creating smart contracts isn’t all that scary. After all, there are some powerful tools that make your job a whole lot simpler. For instance, you can use OpenZeppelin to import verified smart contracts and access their functions with your contract. It helps to know at least the basics of Solidity, which is the programming language catering to smart contracts on EVM-compatible chains. Alternatively, you can use Vyper; however, the latter is less popular.
To examine the exact structure of ERC-721 contracts, make sure to return to the above NFT ERC-721 example contracts. However, the core part is to define the contract as ERC-721 with contract CONTRACT_NAME is ERC721 and to include constructor() ERC721("TOKEN_NAME", "TOKEN_SYMBOL").
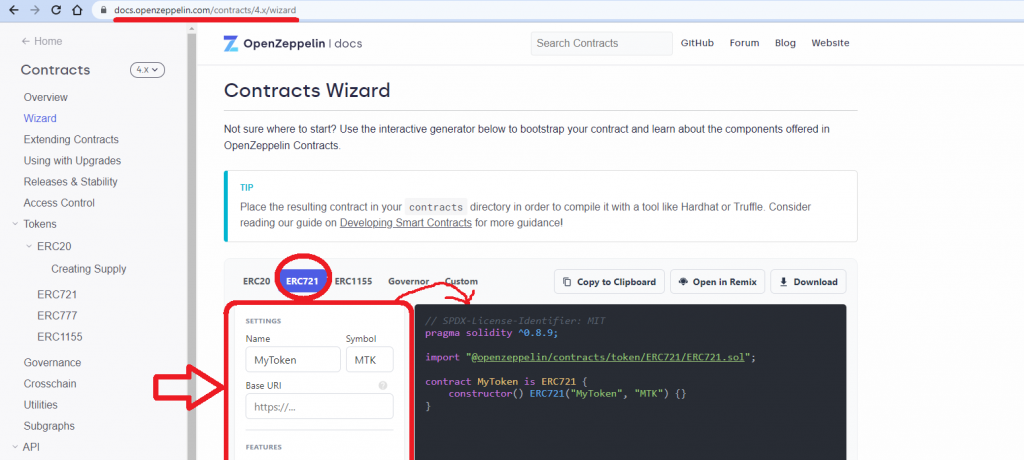
You can also use OpenZeppelin Wizard to write contracts for you by simply completing the settings, selecting the features, etc.:
Easiest Way to Create an ERC-721 NFT
The easiest way to create an ERC-721 NFT for developers is to use template contracts provided by OpenZeppelin. Then, use the smart contract deployment tool that they know. For instance, you can use one of our smart contracts herein or focus on other verified templates. In that case, you must not forget to implement the necessary tweaks to meet your project’s needs. Or, you can use the above-presented OpenZeppelin Wizard to create a contract from scratch without actually writing it.
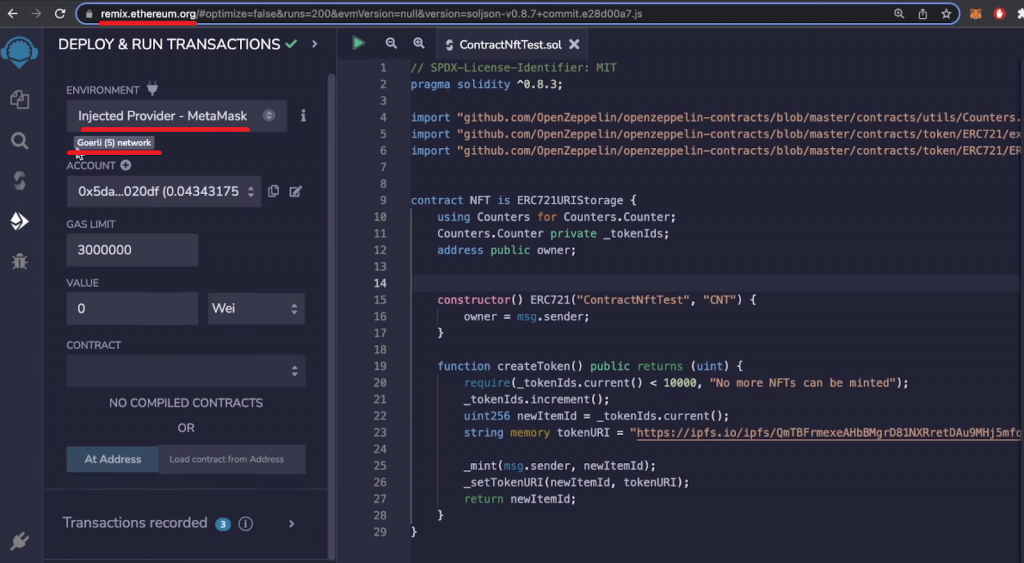
So, getting a smart contract ready is the first step. Then, you need to mint an ERC-721 NFT by deploying that contract. There are many ways to do that, and you learned how to go about it with Hardhat above. However, using Remix IDE is arguably the simplest way. This option allows you to use your favorite browser and deploy smart contracts without any utility scripts:
On the other hand, for users with zero programming skills, using NFT platforms to mint an ERC-721 NFT may be the simplest way. So, let’s have a look at how to create an ERC-721 NFT on OpenSea!
How to Create an ERC-721 NFT on OpenSea
If you have zero experience with coding and want to avoid dealing with smart contracts altogether, you can use a more centralized approach when creating NFTs. In that case, you can create an ERC-721 NFT using a reputable NFT marketplace. There are several prominent options on the market, including SuperRare, Rarible, and, of course, OpenSea. The latter continues to be the leading NFT marketplace. Thus we’ll direct our attention to this platform.
So, to create an ERC-721 NFT using OpenSea, the first thing you’ll need to do is visit their official website and click on the ”Create” button:
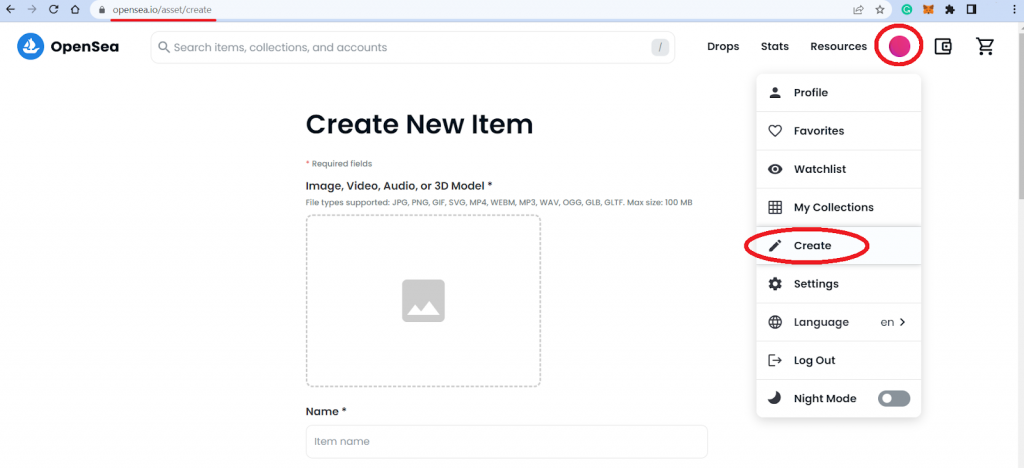
Once you click on the button, OpenSea will prompt you to connect your wallet. It provides various options; however, we recommend using MetaMask since this is the most well-established crypto wallet on the market.
With your wallet connected, the next step is to mint your ERC-721 NFT. To do so, you’ll need to add a file you would like to use as an NFT-representing file by clicking on the image field. Make sure to consider the file format and size limitations as listed on the webpage.
With an image uploaded, the next step is to name your NFT. You can also add a description and other optional attributes. Finally, you must click on the “Create” button at the bottom of the “Create New Item” page. By doing so, you’ll mint your ERC-721 NFT. Also, remember that minting an NFT this way still requires you to pay a gas fee. As such, check the current gas prices and ensure you have a sufficient amount of native currency in your wallet.

How to Create an ERC-721 NFT? – Summary
In today’s article, you had a chance to create your own ERC-721 NFT using our smart contract template and Hardhat. Altogether, you saw two NFT ERC-721 example contracts and learned all you need to know about the ERC-721 standard. You even learned how to write smart contracts and explored the easiest way to create an ERC-721 NFT.
Creating your own token can be a lot of fun; however, to realize the full potential of fungible and non-fungible tokens, we need user-friendly dapps. There must be a useful or entertaining (ideally both) use case for a token to gain an actual and lasting value (hype aside). Even when it comes to digital art and collectibles, people want neat dapps to display, trade, or utilize these tokens. To build cool dapps the easy way, you need reliable tools. Particularly, you need Web3 APIs that you can count on. That’s why you need Moralis! This Web3 infrastructure toolkit helps you cover the blockchain-related backend aspects of your dapps in minutes. As such, you have more time and resources to create the best possible UX.
Aside from the industry-leading Web3 APIs, Moralis provides an impressive arsenal of resources to help you become a Web3 developer in no time. Any Web3 tutorial on the Moralis YouTube channel or blog is a great place to start. This is how you can learn to create your own ERC-20 token, get started using ethers.js, create a DAO, get acquainted with the BNB NFT API, Web3 Python, Arbitrum testnet, and much more.

