If you’ve used Ethereum during high-demand peaks, you know how painful high transaction fees can be. However, the introduction of gasless transactions made things a lot smoother. Now, with the ever-expanding metaverse, do you think gasless metaverse interactions could be possible? Fortunately, the answer is yes! Hence, we’d like to show you how easy it is to implement gasless metaverse interactions for your dApps. Moreover, NFT marketplaces, Unity Web3 games, and other Web3 applications can become zero fee dApps. Furthermore, this is the same feature that OpenSea has started to introduce. Thus, they now offer gasless metaverse transactions, which we’ll look at more closely below.
Moving forward, you’ll have a chance to follow our lead and take on a simple example project. As such, you’ll learn more about a potential gasless metaverse and how to include that feature in your dApps. Moreover, you will also see how the ultimate Web3 development platform, Moralis, makes things a whole lot simpler. This “Firebase for crypto” platform enables you to cover your backend needs by simply copying and pasting short snippets of code. Aside from Moralis, we’ll also use two other phenomenal tools. For compiling and deploying our smart contract, we’ll use Remix. Also, for connecting with one of the Ethereum testnets, we’ll use MetaMask – the most popular Web3 wallet. To get the most out of this article, we encourage you to use the code provided on GitHub and take the necessary action yourself. Nonetheless, do not forget to create your free Moralis account before moving forward.

OpenSea’s Gasless Metaverse Inception
As mentioned, let’s take a closer look at how OpenSea is offering NFT creators the option to lazy mint NFTs. At this point, you probably know that on-chain transactions on all chains come with fees (known as “gas”), right? Some proof-of-stake (PoS) chains already offer incredibly low gas fees; however, Ethereum gas fees remain exorbitant. From one angle, we can see this is a good indication that the chain is popular and used by many. However, it is also a huge nuance, especially for users with a tighter budget. Now, let’s point out that there is no such thing as complete “gasless transactions”. Someone always has to cover those fees. Thus, the term “gasless”, even when talking about a “gasless metaverse”, focuses on user-friendly solutions. Hence, a dev team or value-receiving party can cover the fees.
So, how does OpenSea offer this zero fee dApps solution? They made this possible by allowing NFT creators and sellers to create listings or sell orders off-chain. This means that the actual transactions are not executed on-chain at the time of listing. As such, there is no need for a gas fee at that time. With that said, let’s take an example NFT and see how this gasless metaverse aspect is used. For this purpose, we will focus on OpenSea’s testnet version, using the Rinkeby testnet.
Zero Fee dApps – OpenSea Listing Demo
Here is our NFT example:

By clicking on the “Sell” button, we can list the “Daniel the Trickster” NFT without any gas fees. We must enter its price and list the NFT by clicking on the “Complete listing” button:

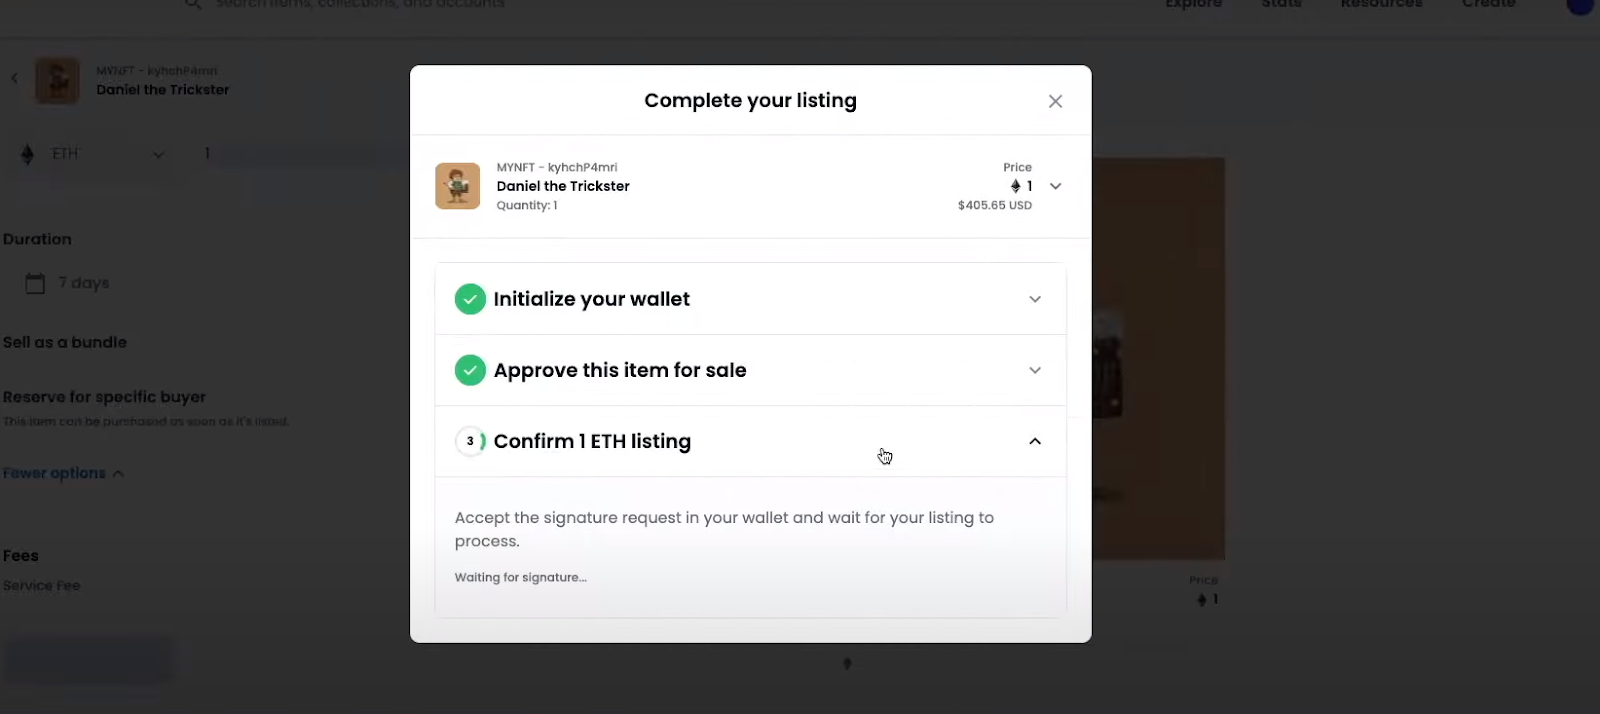
After we click on the “Complete listing” button, we’re not executing an on-chain transaction. Instead, an off-chain “transaction” initiates. As such, the parameterized order needs to be signed as a message by the creator:

In order to activate the “sign” button, we need to scroll through the message. Then, we can click on “sign” and confirm our listing:

After signing the above message, you’ll see this sort of message:
The above message shows up briefly and only while our signature is being confirmed. As soon as the signature is confirmed, we’ll get a message informing us that our NFT is now listed for sale:
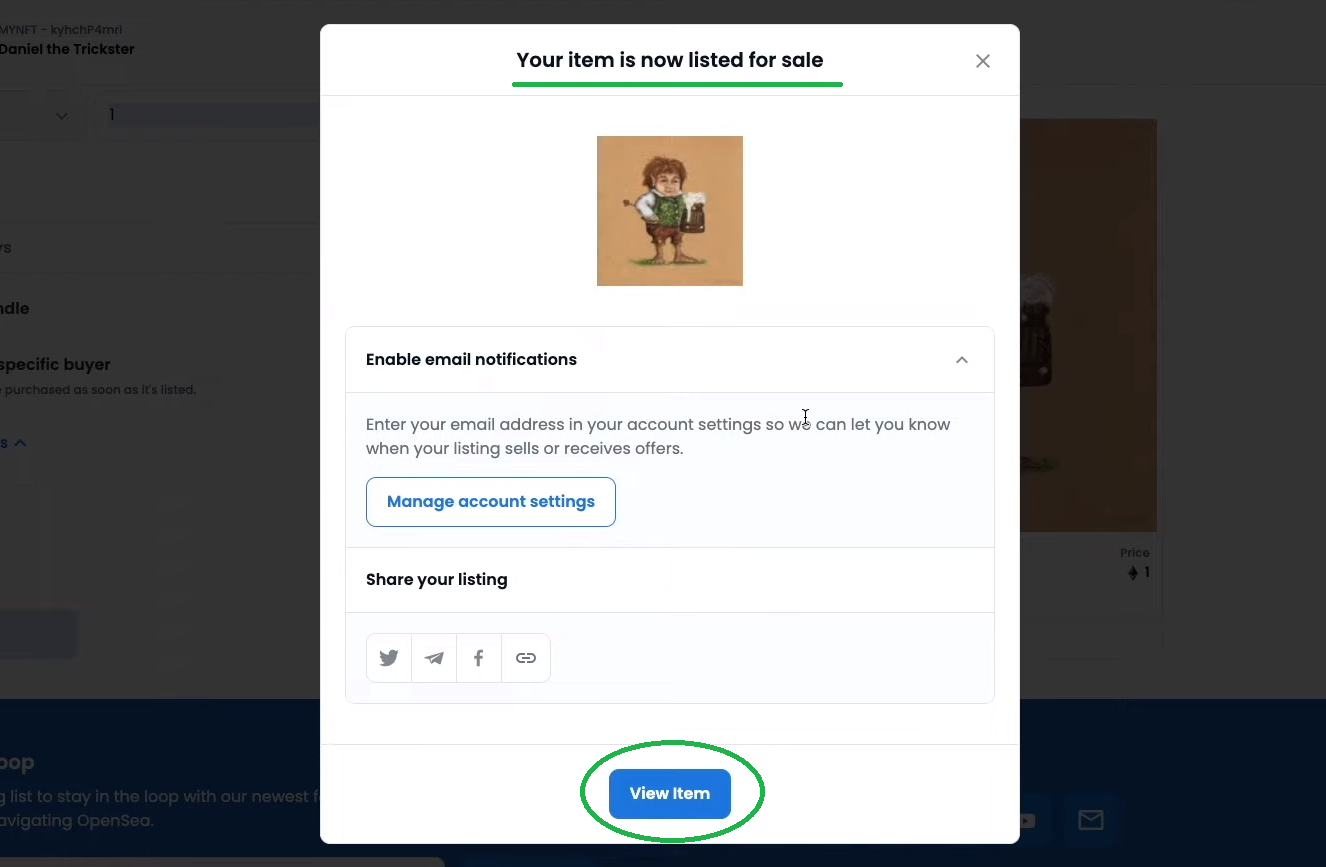
As such, we’ve successfully listed our example NFT without paying any gas fees:

The above gasless metaverse transaction example is not an actual transaction. By signing MetaMask’s message, we only confirmed the creation of the hash for the potential future transaction. Furthermore, this hash was stored off-chain, as mentioned above. Moreover, this transaction will go on-chain when someone purchases this NFT. Also, at the time of purchase, the buyer who is receiving the value will pay the associated gas fee.
Zero Fee dApps Potential
The same “gasless” method can be used by other zero fee dApps. For instance, we could implement this sort of strategy in a Web3 game. So, let’s say we want to grant an in-game asset to a player, which requires NFT minting. However, as a platform, you do not want to spend money on gas, which would add up if you were to consider all the players. Hence, you can use something similar to the above-presented tactic. That means that you produce a message on your backend and sign it with an account under your control. Then, finally, grant a coupon to the users. The users then redeem the coupon and cover the gas fee themselves. Of course, we won’t leave it to you to figure out the details yourself. Instead, we will show you how to do that with our gasless metaverse example.
Gasless Metaverse Interactions – Example Project
As mentioned above, it is now time to show you how to create zero fee dApps. Hence, we will create a script that produces a message hash and signs it. Please note that in your games, metaverse, and other dApps, you will normally implement this functionality in the backend. However, for the sake of this tutorial, we decided to do it on the frontend. The logic behind it is the same. That way, you will get a much clearer picture of the process itself.
We also created a smart contract template, which is able to verify the signatures and grant the content of the coupons. Furthermore, since we will be doing this on the frontend, we will also create a simple interface where users can claim their coupons. As such, these are the three steps of this gasless metaverse interaction example:
- Cover coupon generation.
- Deploy our “zero fee dApps” smart contract.
- Create a coupon claiming UI.
Gasless Metaverse Transactions via Coupon Generation
As explained above, we will use virtual coupons to serve as a method of postponing the transaction fees. Hence, we need to generate coupons. Furthermore, each coupon is a combination of a hash of our particular payload and our admin account’s signature of that payload. As mentioned previously, you will normally do this on the backend.
To make things as clear as possible, let’s take a look at a preview of our coupon-generating interface:

Looking at the screenshot above, you can see that we kept things as simple as possible. There are three entry fields. First, we have “Type of Object”. Then there are two fields next to “Characteristics”. The one on the left is “rank of object”, and the one on the right is “damage points”. These fields could be whatever you want, which is clearly indicated by our example entry above. Once we enter the example values, we click on the “Grant” button to generate a gasless metaverse transaction coupon. Just as with the OpenSea demo above, this prompts MetaMask to request a signature:

As you can see in the image above, our message contains only a hash. Of course, we could be more creative here. After clicking on the “Sign” button, our interface displays that same hash:

Coupon Generation for Zero Fee dApps – Code Walkthrough
If you have some experience with frontend programming, you can imagine that our coupon-generating interface can be covered with a simple HTML file. For that purpose, we created an “index.html” file. Moreover, the logic is covered by “logic.js”. Both of these files are available on GitHub.
Coupon Generation for Zero Fee dApps – Code Walkthrough – Interface
The parts we want to point out from our HTML file are the “input” parameter lines. This part of the code enables us to enter parameters that serve as details for our payload:
 <div class="input-group mb-2">
                        <span class="input-group-text">Type of Object</span>
                        <input id="objectType" type="text" class="form-control" placeholder="Input Type of Object">
                    </div>
                    <div class="input-group mb-2">
                        <span class="input-group-text">Characteristics</span>
                        <input id="objectRank" type="text" class="form-control" placeholder="Rank of Object ">
                        <input id="damagePoints" type="text" class="form-control" placeholder="Damage Points">
                        <button class="btn btn-secondary" id="grant" onclick="grantCoupon();">Grant</button>
                    </div>
Coupon Generation for Zero Fee dApps – Code Walkthrough – Logic
Furthermore, if we now focus on the logic portion, it starts with a login function:
login();
const ethers = Moralis.web3Library

async function login(){
    Moralis.Web3.enableWeb3().then(async function (){
        const chainIdHex = await Moralis.switchNetwork("0x2A");
    });
}
The above initializes Moralis’ SDK, which also serves us with a Web3 provider. The latter, in our case, is Ethers. Moreover, “0x2A” defaults our network to the Kovan testnet. In addition, another important part of our logic is covered by this line of code:
const hash = ethers.utils.hashMessage(JSON.stringify(object));
With Ethers.js objects created, we can also access that library and use its functions. Furthermore, this library enables us to use an excellent battle-tested message hashing function. In order to hash the message, we need to stringify our payload. Once hashed properly, we can sign it. The latter is done by using a private key or a set of private keys that you control and are able to secure. Moreover, our interface is returning signed coupons that are granted to the users. Remember, you will normally do this on the backend.
Nonetheless, we should also point out that each coupon is nothing more than the concatenation of the message hash and the signature. By decomposing coupons, we can build a “verification smart contract”. The latter will verify that the message was signed by the correct account. Moreover, if that is the case, it will trigger specific on-chain action.
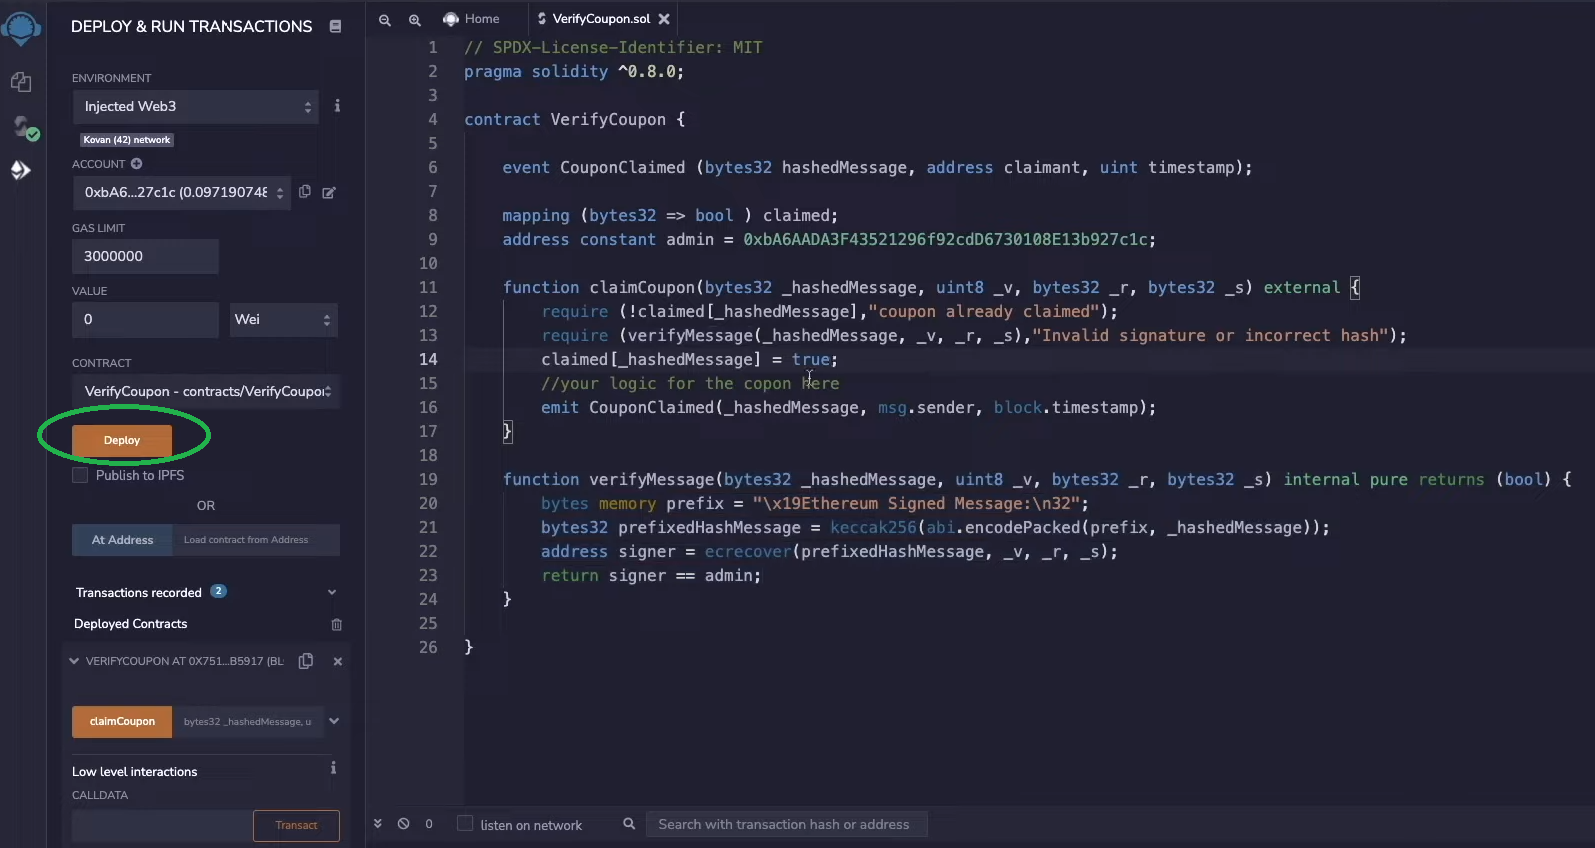
Smart Contract Example for Gasless Metaverse Transactions
A great online tool for compiling and deploying smart contracts is Remix. As such, we recommend you copy the content from the “verify.sol” file and paste it into Remix. Moreover, the inputs for our smart contract are the hash message and the signature of the hash. We get these from our coupons. For more details about our example gasless metaverse smart contract, check out the video (6:45) at the bottom of the article. There, you’ll also learn about a special prefix, which Ethereum offers as a security measure. Also, you’ll find out how the “ecrecover” function recovers who is the signer of the hash message. Of course, you will also be guided on how to compile and deploy our example smart contract.
Coupon Verification Interface
The final part of our example project revolves around verifying generated coupons. We must point out again that both coupon generating and coupon redeeming processes would normally be done on the backend.
Here’s what our example interface looks like:

It has an entry field where the hash must be pasted. Then, we must click on the “Verify” button. Moreover, the looks and the functionality of this part are covered by the “verify.html” and the “logic-verify.js” files. Again, both of these files are at your disposal on GitHub. Furthermore, while the HTML code is relatively simple, the logic part is slightly more complex. However, it is still quite easy to set it in place, thanks to Moralis. Nonetheless, for a detailed code walkthrough, refer to the video below, starting at 10:40. In addition, this is also where you’ll learn how the Moralis “executeFunction” does the heavy lifting within the “verify” function.
Here’s the video that we’ve been referencing above:
Gasless Metaverse Interactions – Exploring Zero Fee dApps – Summary
At this point, you are a real semi-expert on gasless metaverse interactions. For one, you now know that blockchain transactions cannot be executed without gas fees. However, you’ve also learned that the actual execution of transactions can be postponed. This is also how the gas fees can be paid by a value-receiving party. In addition, we’ve also shown you how to do that using a simple interface and our example smart contract. Furthermore, we’ve done our gasless metaverse interaction on the frontend. As such, you had a chance to see this, otherwise backend feature, up close. Nonetheless, with the above example under your belt, you are ready to use this concept and create your own zero fee dApps.
However, in case you need more Web3 development practice first, make sure to check out our other example projects. You can find these on the Moralis YouTube channel and the Moralis blog. These two outlets are also excellent places to learn more about different blockchain development aspects. For instance, some of our latest topics include how to become a Web3 developer, how to launch a white-label NFT marketplace, how to connect a Unity game with Web3 login, metaverse smart contract examples, how to build a cross-chain Zapper dApp with ReactJS, how to build a Web3 MMORPG, how to create a Web3 e-commerce platform, and much more. For example, we recently outlined how to build a Spotify Web3 clone in just a few simple steps!
Moreover, you might want to go beyond free crypto education to become a blockchain developer even sooner. If that’s the case, you ought to check out Moralis Academy. Of course, this is the place to enroll in high-quality blockchain development courses. However, an even greater value lies in receiving expert mentorship, amazing community, and a personalized study path, which Moralis Academy provides!
