In this article, we’ll show you how to launch your very own white-label NFT marketplace. However, if you’d like, you can skip the tutorial and jump straight into the code by visiting the following GitHub repository:
Complete White-Label NFT Marketplace Documentation: https://github.com/DanielMoralisSamples/25_NFT_MARKET_PLACE
With the increased attention towards NFTs (non-fungible tokens), it’s now more timely than ever to dive deeper into NFT marketplaces and discover more about what they entail. An NFT marketplace is a space where digital artists and developers can display their work to the masses. Moreover, as the platform accumulates and displays art in a marketplace, it becomes more accessible to potential buyers. So, since the NFT trend is hotter than ever, we’ll do a deep dive into the process of launching a white-label NFT marketplace with Moralis herein.
Creating a white-label NFT marketplace – or any Web3 application – can be a relatively tedious task without the proper tools, especially if you’re new to the blockchain development space. However, if you’re utilizing Moralis, you’ll be able to cut the development process for all future blockchain projects with a whopping average of 87%!
Moralis Speedy Nodes, the NFT API, and the Price API are just a few examples of tools that can aid you in your development endeavors. Moreover, the extensive toolkit of Moralis, in combination with the platform’s backend infrastructure, provides you with the best developer experience on the market. In fact, with the utilization of the operating system, we’ll be able to launch a white-label NFT marketplace in no time!
So, if you’re an aspiring blockchain developer, sign up with Moralis right away! Joining the platform is free, and you’ll receive immediate access to all the useful development tools of the platform.
What is a White Label NFT Marketplace?
Before delving deeper into the process of launching a white-label NFT marketplace, we ought to take a closer look at what a white-label NFT marketplace entails. To fully understand this, a good starting point is to define and unravel the concept of a ”white-label” product/service. So, what exactly does the term ”white-label” mean?

The term ”white-label” suggests that a product/service is generic, meaning that they don’t have a brand or company name attached to them. As such, anyone can apply their logo to the product/service and sell it under their name. White-label products/services are, therefore, produced by a third party and sold to a business without any branding. This business does, in turn, brand and sell the products/services under their own name. With this brief explanation, you hopefully know what a white-label product/service is. Now, let us take a closer look at NFT marketplaces.
The meaning of an NFT marketplace can vary quite a bit. This is because any application or platform where people can list, sell, and buy NFTs can be considered an NFT marketplace. For this reason, there are many different variants on the market. As such, when launching your marketplace, you can let your creativity flow and adapt the platform to fit your preferences.
Now, with a better understanding of the term ”white-label” and what an NFT marketplace is, we can combine the concepts to understand what a white-label NFT marketplace is. In short, they are essentially generic platforms that anyone can launch under their own company name/brand.
Advantages of a White-Label NFT Marketplace
The primary advantage of a white-label NFT marketplace is accessibility when it comes to the development process. As these at first glance are entirely generic platforms, they become easy to develop, and you’ll be able to do so in minutes. Moreover, with Moralis, this process becomes even more accessible as you can utilize an already developed backend infrastructure. As such, you can avoid ”reinventing the wheel” as the platform takes care of most of the heavy lifting.
Moreover, even though white-label products are generic, they work as great foundations for further customization. With a quick and easy development process, you can alleviate most of your workload, which would allow you to place more emphasis on designing a compelling user interface (UI) and user experience (UX). If you’d like to learn more about Web3 UI design, be sure to check out our article about Moralis’ Web3UI kit.
Launching a white-label NFT marketplace also provides a high degree of flexibility, especially when working with Moralis. Utilizing the operating system’s tools allows you to customize and implement new features easily. As such, you can ensure that the platform is adapted for your target market and include the features that you need while excluding unnecessary gimmicks.
Finally, white-labeled software products are well-tested. In turn, you don’t need to worry about bugs and other development issues when launching a white-label NFT marketplace.
With a better understanding of what a white-label NFT marketplace is and the advantages of launching such a platform, we can move on to the main part of this article which revolves around launching the NFT marketplace.
How to Launch a White-Label NFT Marketplace
This is the central part of this article where we’re going to show you how to launch a white-label NFT marketplace. However, before we get going with the actual coding part of the process, we want to show you an example of what the application will look like to provide you with an idea of what we’re working towards. As such, this is what the NFT marketplace looks like when finalized:
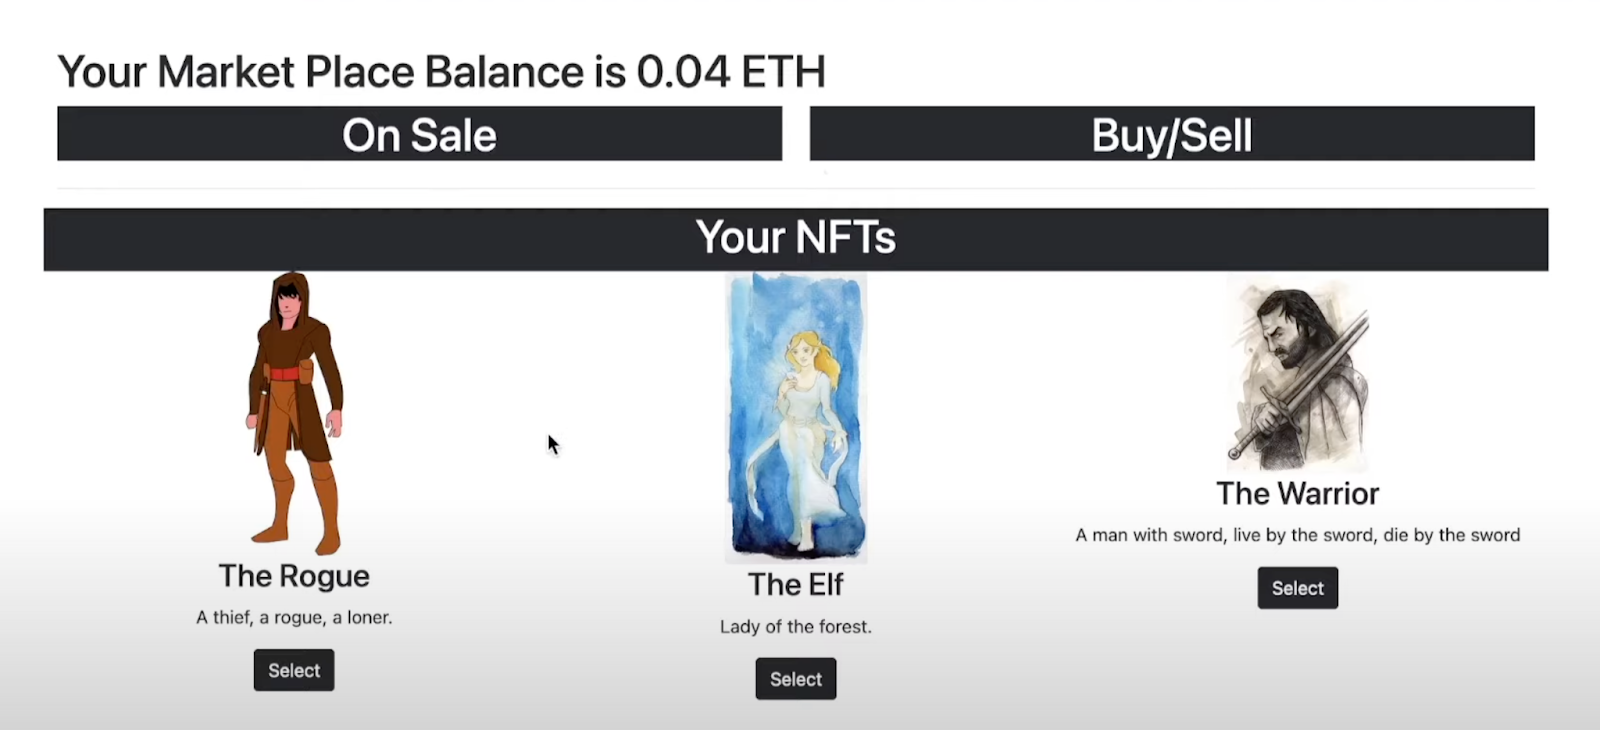
As you can see from the screenshot above, there are three distinct sections: ”On Sale”, ”Buy/Sell”, and ”Your NFTs”. The ”On Sale” section will display all the NFTs available to purchase on the market. However, in this instance, there are no items up for sale.
The ”Buy/Sell” section will display the NFT that the user selects. If an item is selected, it will transfer to this field, which will allow users to either purchase or sell a token. Lastly, the final section is ”Your NFTs”, which simply displays the user’s NFTs. This means that the platform is equipped with functionalities to display, select, sell, and purchase NFTs directly through the marketplace.
So, now that we know what we’re aiming towards, we can move on and take a closer look at the process. Moreover, we’re going to divide the process into the following three parts:
- Setting up a Moralis Server
- Creating a Smart Contract
- Creating the dApp
By following the steps mentioned above, you’ll be able to launch a white-label NFT marketplace in minutes. However, if you’d rather watch a video guide explaining the complete process in further detail, check out the following tutorial from the Moralis YouTube channel:
Nonetheless, let’s kick off this tutorial by taking a closer look at setting up a Moralis server!
Part 1: Setting Up a Moralis Server
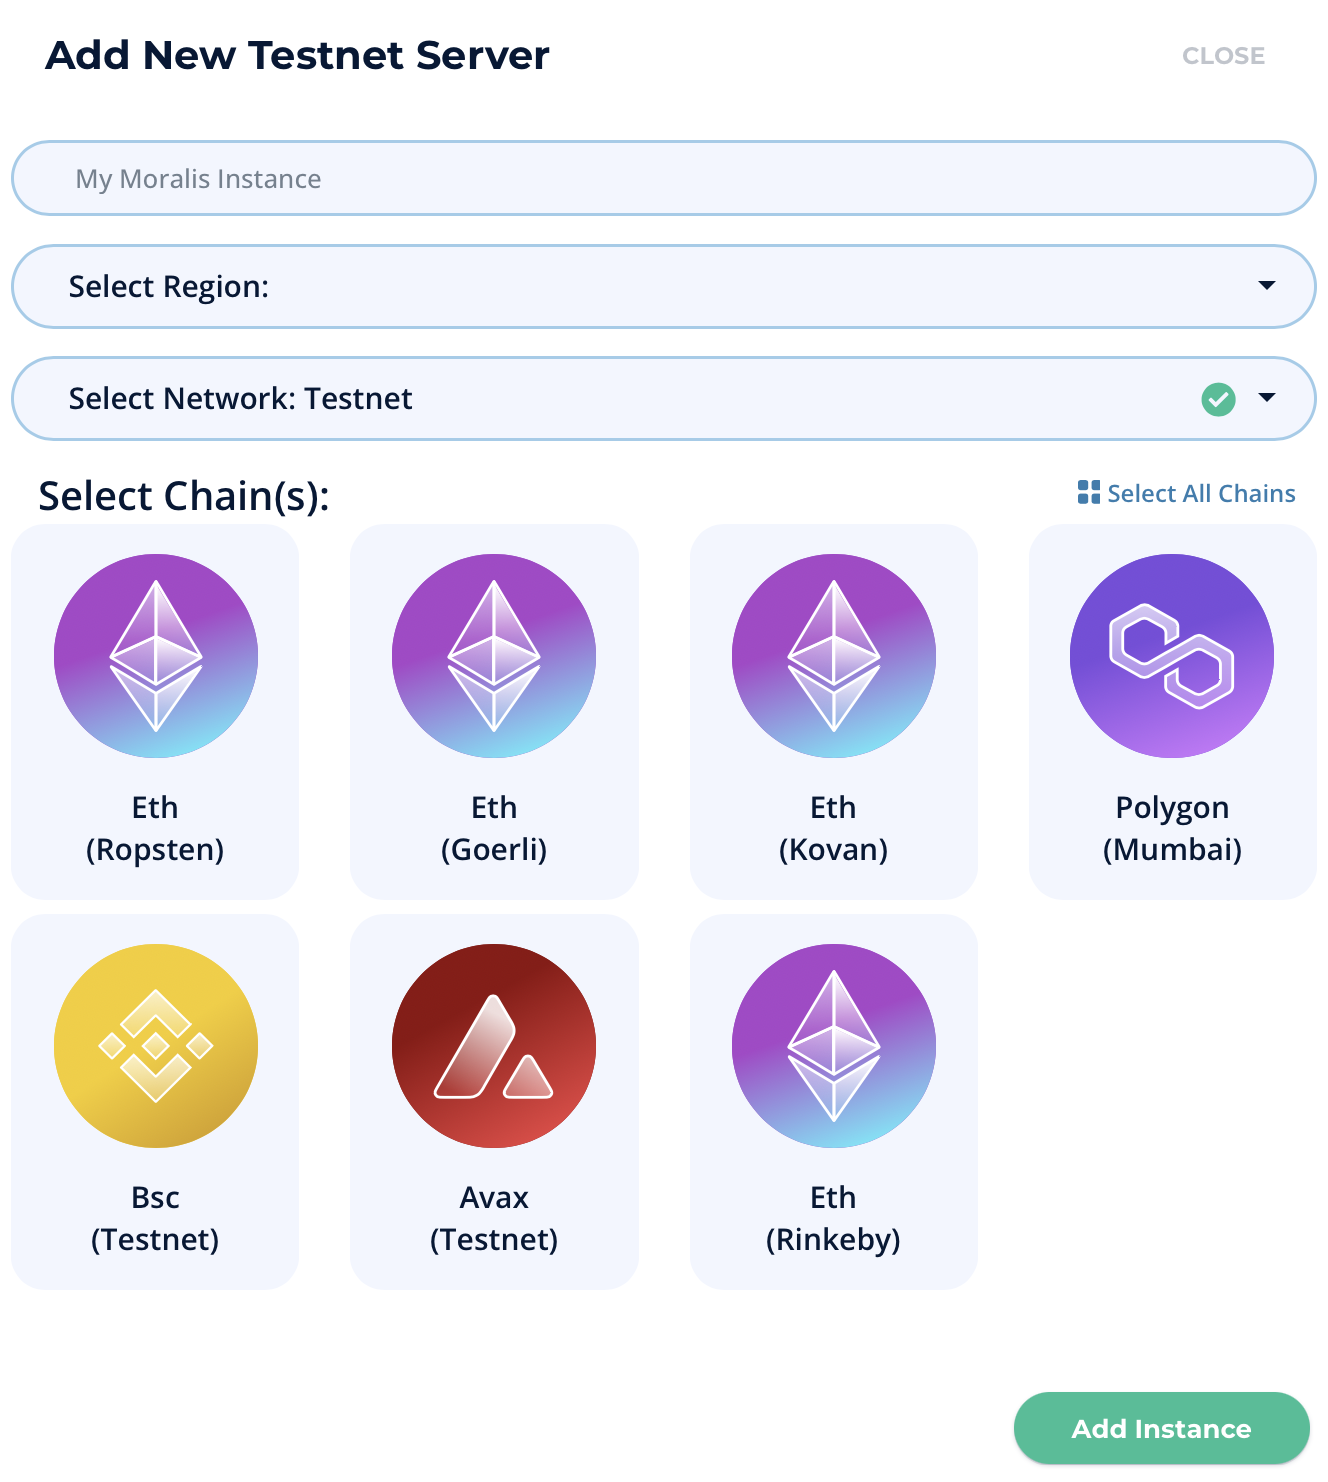
The first thing you must do is to sign up with Moralis. Creating an account is entirely free, and it only takes a couple of seconds. With an account at your disposal, you can create a Moralis server by clicking on ”+ Create a new Server” at the top of the Moralis admin panel. This will provide you with a drop-down menu containing three alternatives. In this instance, as this is a tutorial, we’re opting for a testnet server.

Once you click on the testnet alternative, you’ll need to name the instance, select a region, and pick chain(s). With all the fields completed, you can spin up the server by clicking on the ”Add Instance” button at the bottom right. It might take a while for the server to get going; however, worry not, the server will boot up momentarily.
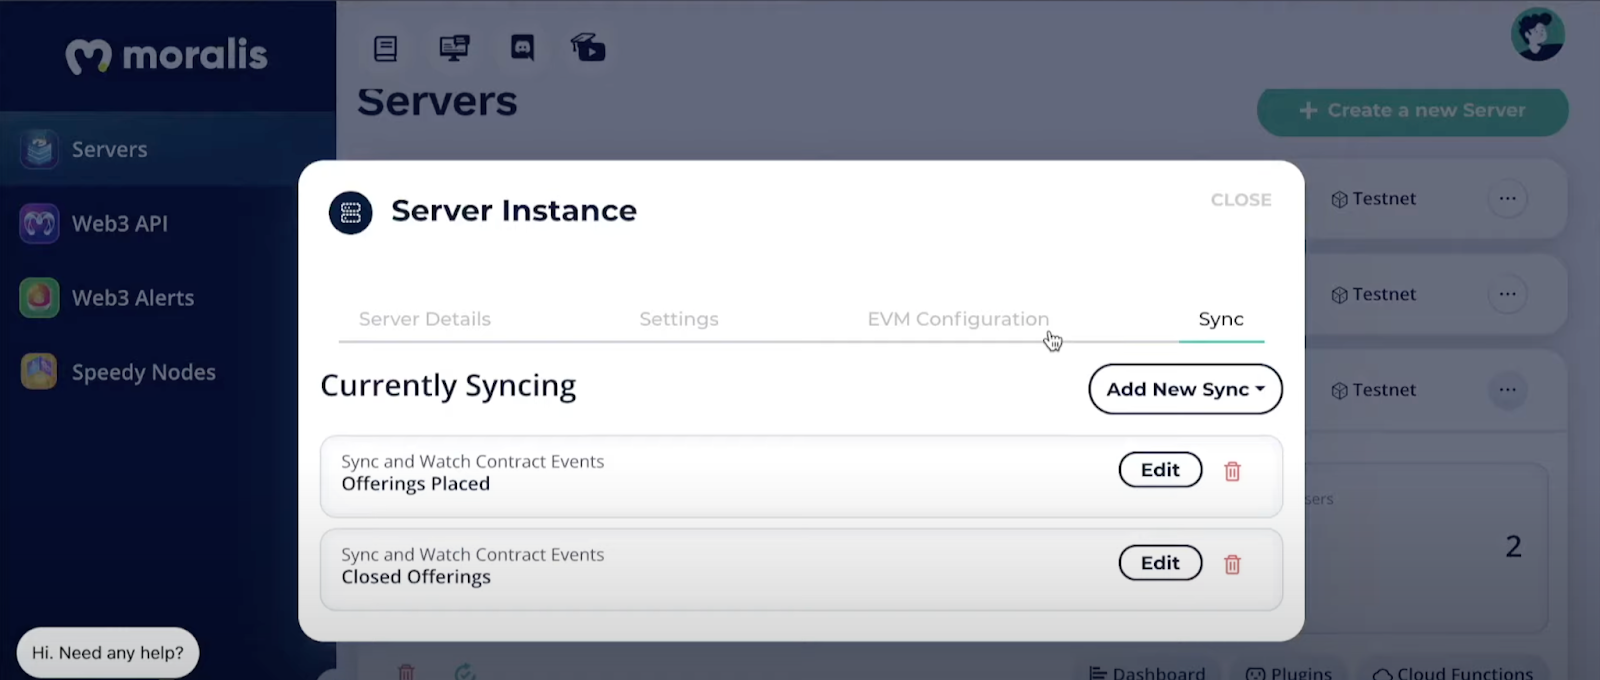
With the server up and running, Moralis allows you to take several different actions. For example, you can add sync events, which we’ll do in this tutorial. These events will be two listeners that register specific smart contract events. One of the sync events listens when a new offer is placed, and the other detects when an offer is closed. These listeners are continuously active, ensuring that the dApp knows when someone puts a token up for sale or when someone purchases an NFT.
When creating a Moralis server, you’re also provided with a database where details regarding the users are kept. You can access the database by clicking on the ”Dashboard” button for the server in question. The information that the dashboard displays are token balances, transaction histories, NFTs, etc. Moreover, the listeners of the server also populate this data, ensuring that the database’s information is up to date.
Part 2: Creating a Smart Contract
The next part of launching a white-label NFT marketplace is to create a smart contract. If you’re unfamiliar with smart contracts, we recommend reading up on this topic in our article on how to create smart contracts. However, for this tutorial, we’ll utilize an already prepared smart contract called ”MarketPlace” from this project’s GitHub repository. This means that you don’t really need much smart contract experience, but some Solidity skills will be helpful.
To understand the smart contract, we need to look closer at the events covered in the code. The contract consists of four events: ”OfferingPlaced()”, ”OfferingClosed()”, ”BalanceWithdrawn()”, and ”OperatorChanged()”. As such, this is what it looks like in the contract code:
contract MarketPlace{
    event OfferingPlaced(bytes32 indexed offeringId, address indexed hostContract, address indexed offerer, uint tokenId, uint price, string uri);
    event OfferingClosed(bytes32 indexed offeringId, address indexed buyer);
    event BalanceWithdrawn (address indexed beneficiary, uint amount);
    event OperatorChanged (address previousOperator, address newOperator);
}
The other parts of the code ensure that these events are adequately covered. As such, this makes sure that users can only sell NFTs in their possession, and buyers can only purchase items that are up for sale.
As we are providing you with the complete code for the contract, you can essentially copy-paste this contract from the repository and use this for your own white-label NFT marketplace.
Now that we have a smart contract that covers the essential functionalities allowing the dApp to make NFT transactions on behalf of the user, we can move on to coding the actual marketplace.
Part 3: Creating the dApp
In this part of the tutorial, we’ll take a closer look at the three main files: ”logic.js”, ”cloudCode.js”, and ”index.html”, which you’ll find in the GitHub repository. The ”index.html” file contains the HTML code used to structure the contents of the marketplace. This is where you’ll find the code for the buttons, fields, etc. We’ll not dive any deeper into this file since the code is available on GitHub, and how you design the UI should depend on your preferences.
The main file of the dApp, to which we’ll direct most of our attention, is ”logic.js”. This file ensures that the marketplace is equipped with the necessary functionalities the users need to interact with the application. Moreover, this is a JavaScript file. As such, if you’re proficient in JavaScript, you’ll have no trouble analyzing the code.

However, if you’d like to learn more about blockchain development and vital programming languages, check out our ”Best Languages for Blockchain Development” article.
Nonetheless, the first thing we need to take care of in the ”logic.js” file is initializing Moralis. For this, you’ll need to fetch the application ID and server URL from your server. You can acquire this information by clicking on the ”View Details” button on your server. You can then copy-paste this into the file, and it should look something like this:
Moralis.initialize(""); // Application ID from moralis.io
Moralis.serverURL = ""; // Server URL from moralis.io
Moralis.authenticate()
Following this, we have an essential function called ”Moralis.authenticate()”. You can see the function below, and this makes sure that all the correct functions are executed when users authenticate themselves:
Moralis.authenticate().then(function(){
    populateNFTs();
    populateOfferings();
    populateBalance();
    subscribeOfferings();
    subscribeBuys();
    subscribeUpdateNFTs();
});
The remainder of the code ensures that all ”populate” and ”subscribe” functions obtain the correct data. Along with this, the code also makes sure that all the data is neatly displayed for the users. Finally, Moralis takes care of all the heavy backend lifting through code snippets that fetch data from your Moralis dashboard. These code snippets include the following:
Moralis.Query(“PlacedOfferings”)
Moralis.Query(“ClosedOfferings”)
Moralis.Query(“PolygonNFTOwners”)
Moralis.Cloud.run(“getBalance”, params)
Moralis.Units.FromWei(presentBalance)
Moralis.Cloud.run(“placeOffering”, params)
Moralis.Units.ETH(offering.price)
Moralis.Cloud.run(“placeOffering”, params)
One of the most significant functions from above is “Moralis.Cloud.run(“placeOffering”, params)”. This function bears some extra significance and, therefore, deserves some extra attention as this function ensures that the dApp signs transactions behind the scenes and protects all private keys. Moreover, this is also where the ”cloud.Code.js” files enter the equation. In this file, you’ll need to add the private key that corresponds to the Ethereum address that you’re using.
Now, that’s essentially it for this tutorial on how to launch a white-label NFT marketplace!
However, if you’re looking for a more detailed breakdown of the code, feel free to take a closer look at the video that we linked to earlier in the article. You can skip to 6:35, where the walkthrough of the code starts.
Moreover, if you have further interest in NFTs, you might have an interest in developing your own tokens. If this is the case, be sure to take a closer look at our guide on how to create your own NFT!
How to Launch a White-Label NFT Marketplace – Summary
By following the aforementioned steps in this article, you’ll be able to both easily and quickly launch a white-label NFT marketplace. All you need to do is create a Moralis server, program a smart contract, and create the dApp itself. Moreover, once you have the white-label NFT marketplace at your disposal, you’re free to brand it however you’d like. You can also make quick adjustments to the generic product to customize according to your preferences and gain a competitive advantage in the market.
This is all possible due to the Moralis operating system’s tools and backend infrastructure. All you really need is some proficiency in JavaScript to cover the frontend development, and Moralis takes care of the rest. Moreover, for this reason, Moralis isn’t only applicable when launching a white-label NFT marketplace but for other blockchain projects alike.
As such, if you have ambitions to step up your Web3 development game, check out the Moralis blog for more incredible content. Here, you can read up on how to build a Web3 MMORPG, how to build a Web3 Amazon marketplace, how to build a medieval metaverse game, and much more.
So, if you are interested in blockchain development, be sure to sign up with Moralis today! Creating an account only takes a few seconds, and you’ll receive instant access to all the platform’s tools. As such, joining Moralis will provide you with a more accessible development process for all future blockchain projects!

What is ERC-4337? Full EIP-4337 Guide