Medium is a platform where readers can read inspirational thoughts and forward-thinking ideas from passionate content creators. There’s a great possibility that you might have read articles from this popular platform and also published compositions there. However, although Medium has its pros, one of the cons is its centralized nature. That’s not just the case for Medium but many other popular platforms. Thus, programmers are starting to create decentralized options, such as a Web3 alternative to Medium, a Web3 Twitter clone, etc. If you would like to explore how to build a Web3 Medium clone, you’ll find this guide hugely beneficial!
This tutorial on creating a Web3 Medium clone will benefit those who decide to get their hands dirty by taking actionable steps. If you end up building a Web3 Medium clone, you will learn how to publish blog articles to the blockchain. The published articles will be in the form of NFTs (non-fungible tokens), which will be minted using a smart contract. Hence, you will learn Solidity basics. Also, we will show you how to use Hardhat to compile, deploy, and verify smart contracts easily. You will also learn how to upload NFT metadata to IPFS. Plus, you’ll see how to make the most out of your JavaScript skills and create a neat Web3 UI using React. Lastly, you will learn how to utilize Moralis – the ultimate Web3 development platform. So, create your free Moralis account before moving on.

Web3 Medium Demo
Like most Web3 applications, our Web3 Medium clone also starts with Web3 authentication:
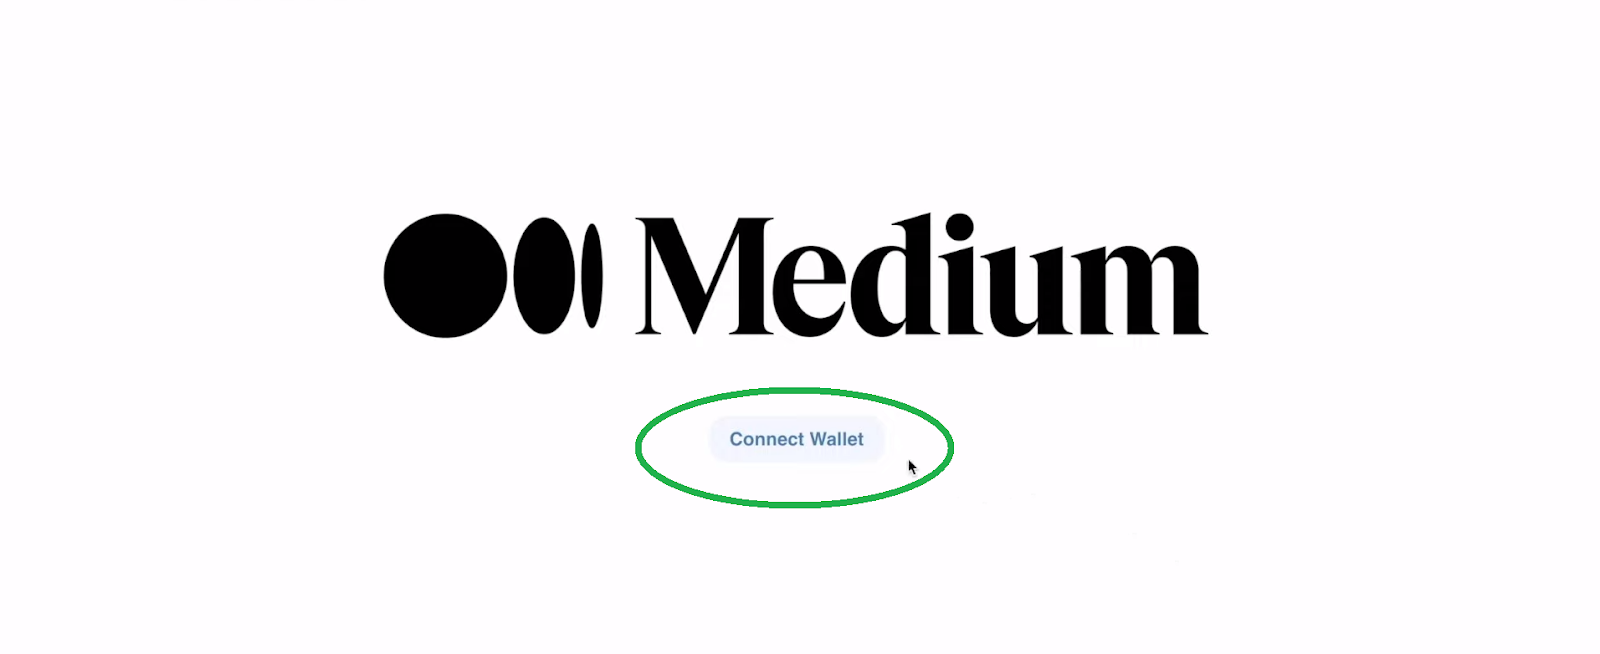
By clicking on the “Connect Wallet” button, users get to select their favorite Web3 wallet to complete their Web3 login. Since MetaMask continues to be the most popular crypto wallet, our example user decided to authenticate with MetaMask. So, after clicking on “Metamask”, this wallet’s browser extension pops up asking to select an account:
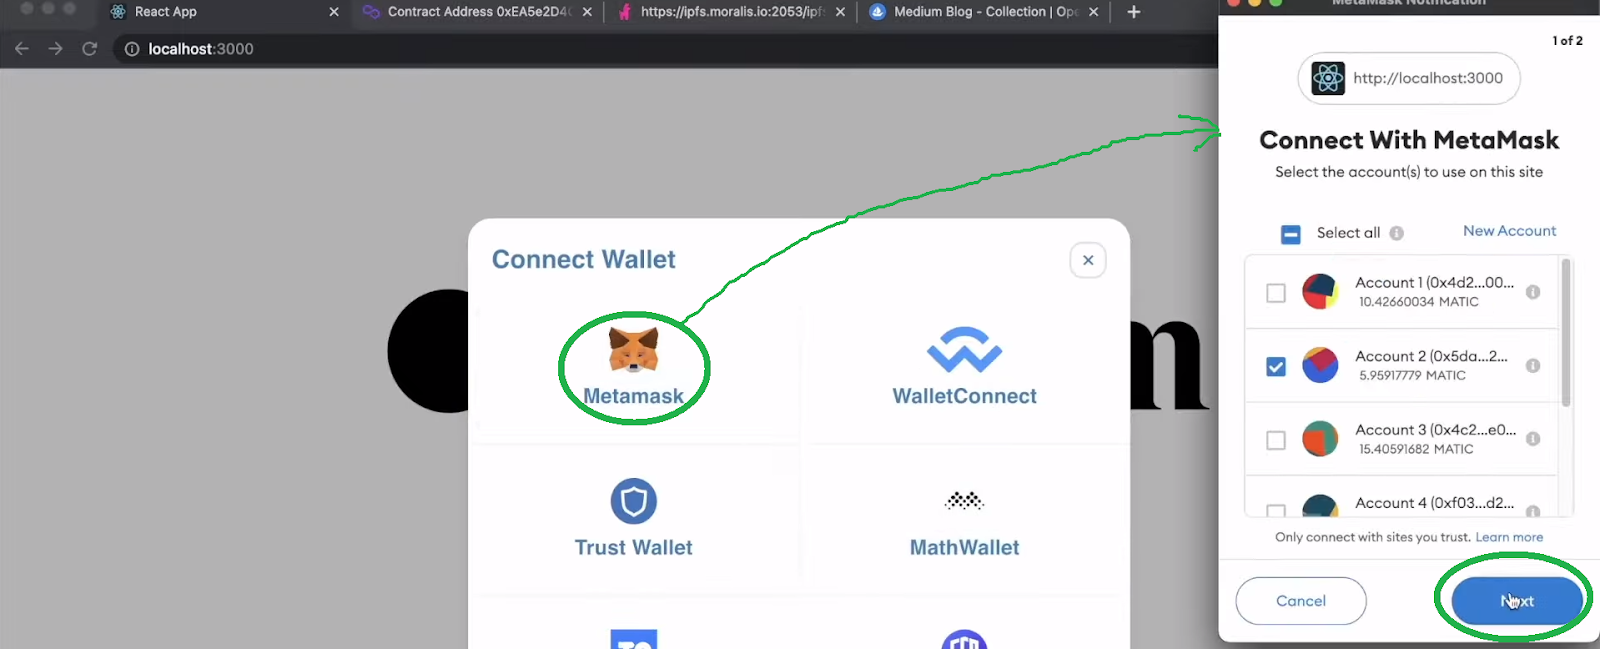
Once the user selects an account and clicks on “Next”, they need to complete the authentication by clicking on the “Connect” button:

Then, the user lands on the homepage of our Web3 Medium clone:
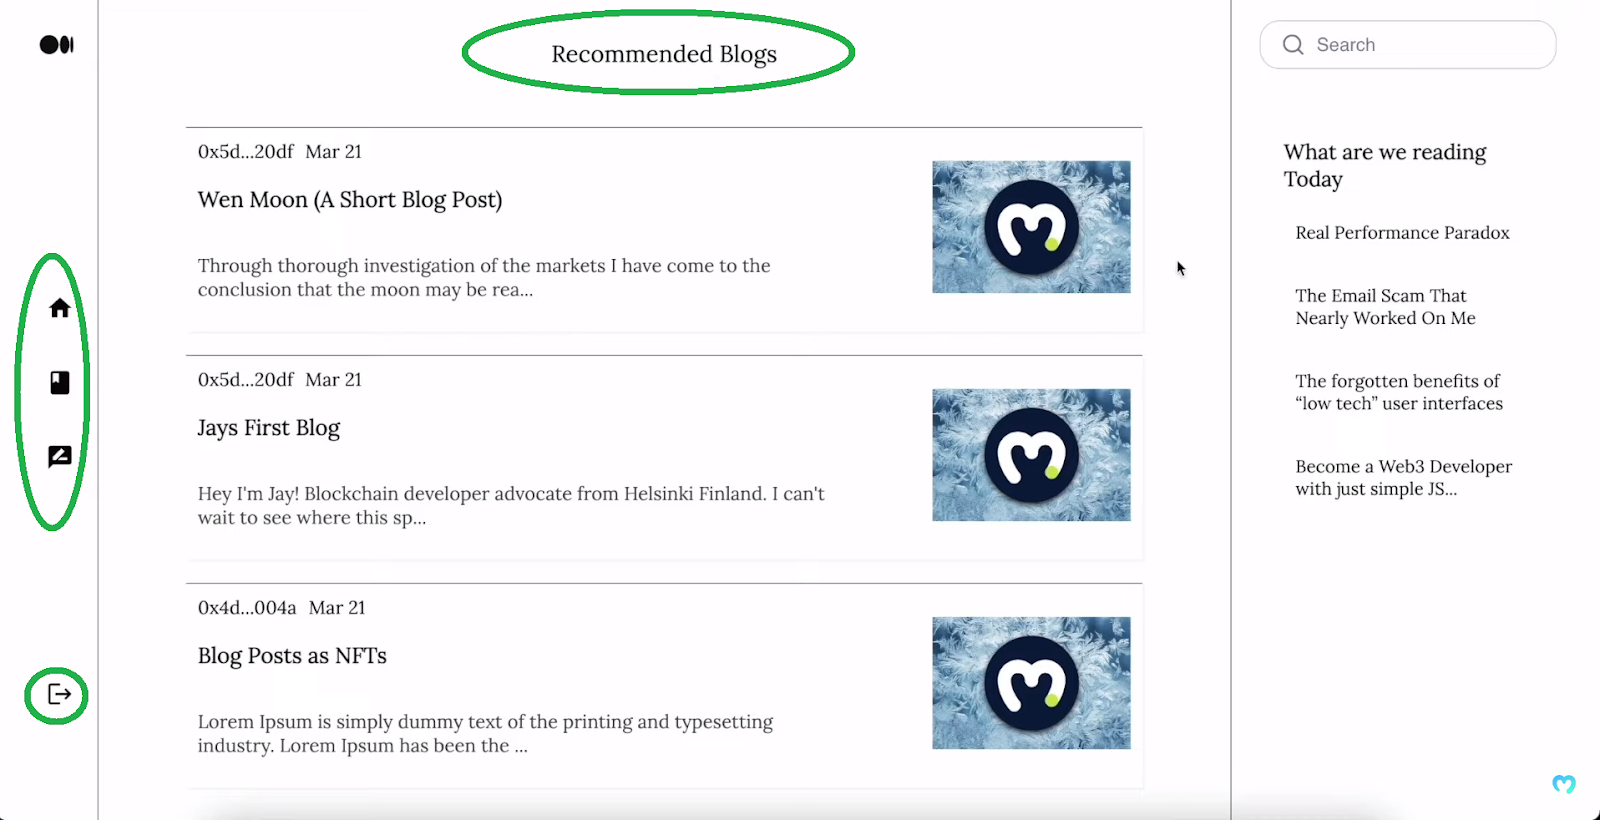
Looking at the screenshot above, you can see that our Medium clone for Web3 has three sections. On the sides, there are sidebars, and in the middle is the “Recommended Blogs” section (homepage). This is where the latest blogs are displayed. These blogs are NFTs stored on the Polygon testnet (Mumbai). So, if the users decide to read one of the blogs, they need to click on it. By doing so, the Web3 Medium clone displays the selected post in the central section:
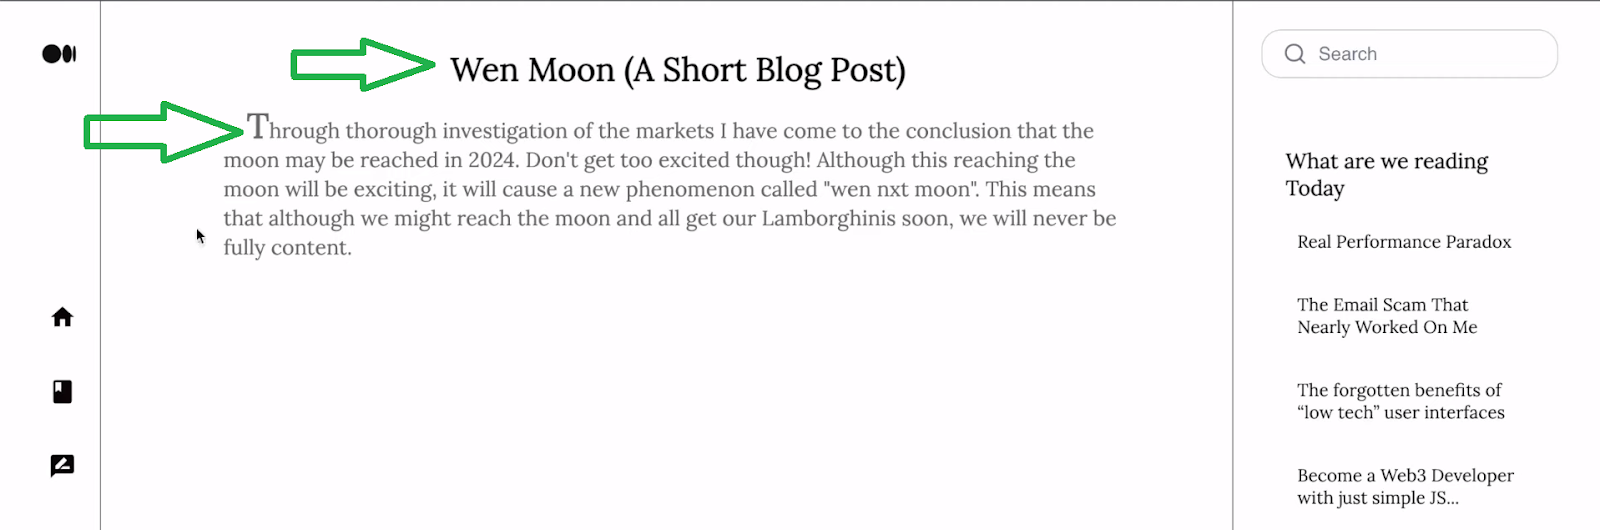
As you can see in the image above, each blog post contains a title and content. To return to the homepage (where all blog posts are listed), users need to click on the “home” icon in the left sidebar. The icon below “home” takes users to the page that displays their blog posts:
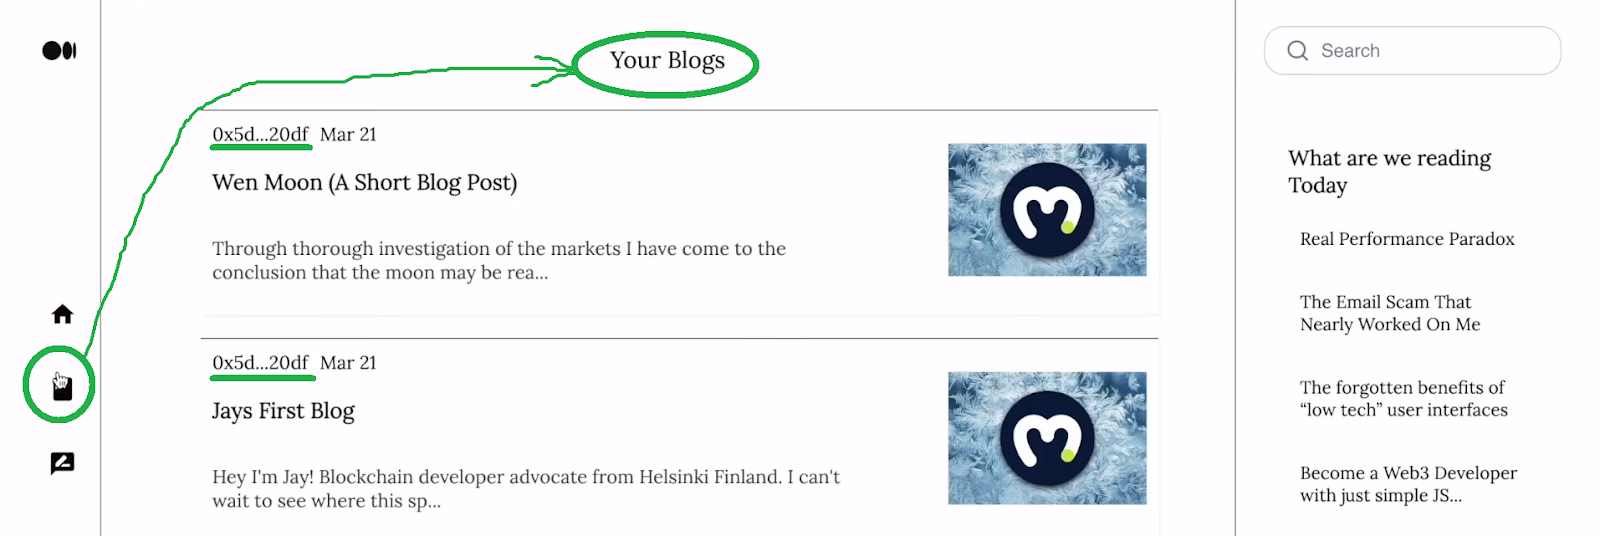
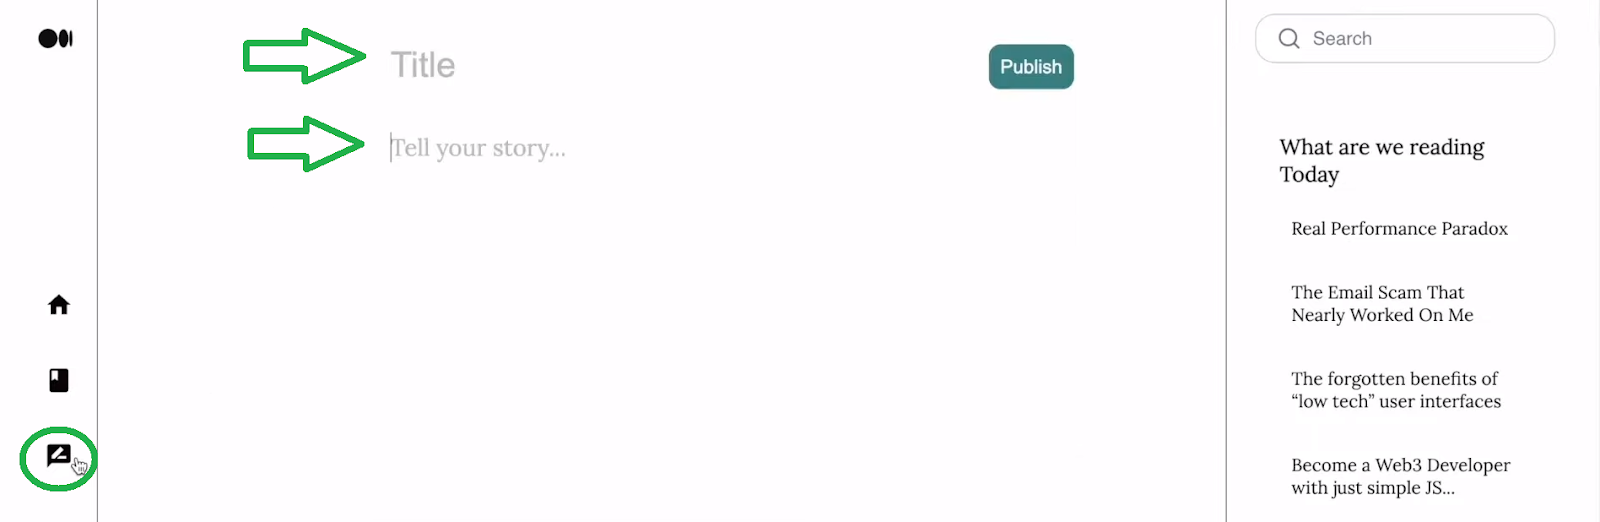
To create new blog posts, users need to click on the “write” icon:
Now, let’s take a look at what publishing a blog post using our Web3 Medium clone looks like.
Publishing Posts with Web3 Medium – Demo Continuation
Once users are on the “write post” page, they can type their post’s title and content. Then, they can publish it by clicking on the “Publish” button:
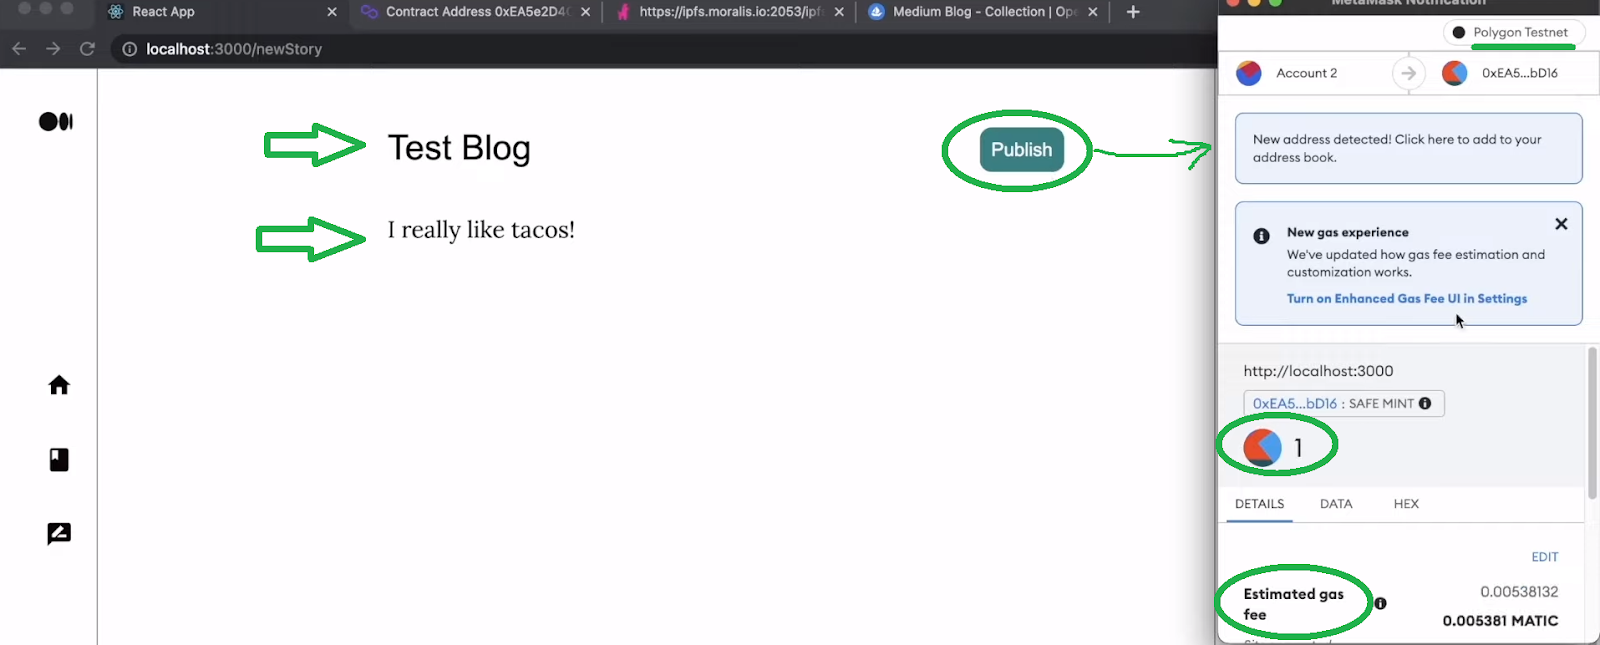
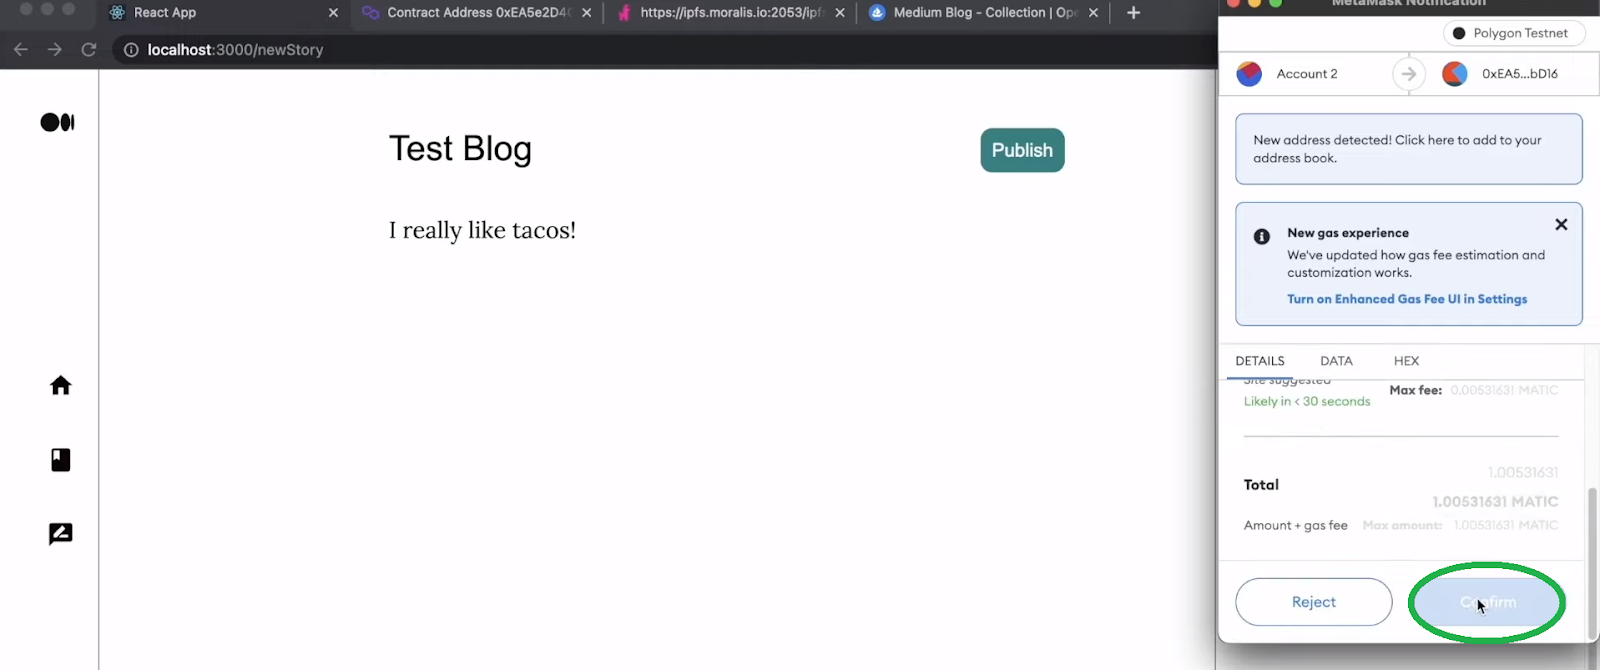
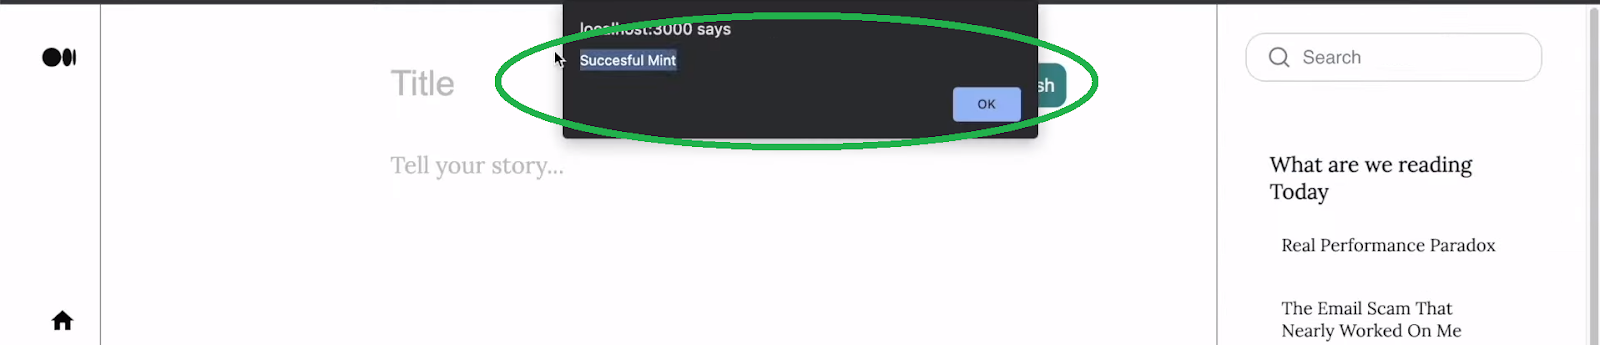
However, since our Web3 Medium posts blogs in the form of NFTs, users also need to confirm the related on-chain transaction. As such, a MetaMask prompt will show the details (see the screenshot above). Thus, users can see that they will need to pay one MATIC plus the gas fee to publish their posts. Moreover, if they agree with the required details, they need to scroll down their MetaMask extension and click on “Confirm”:
Once the transaction goes through, our Medium clone returns the following message:
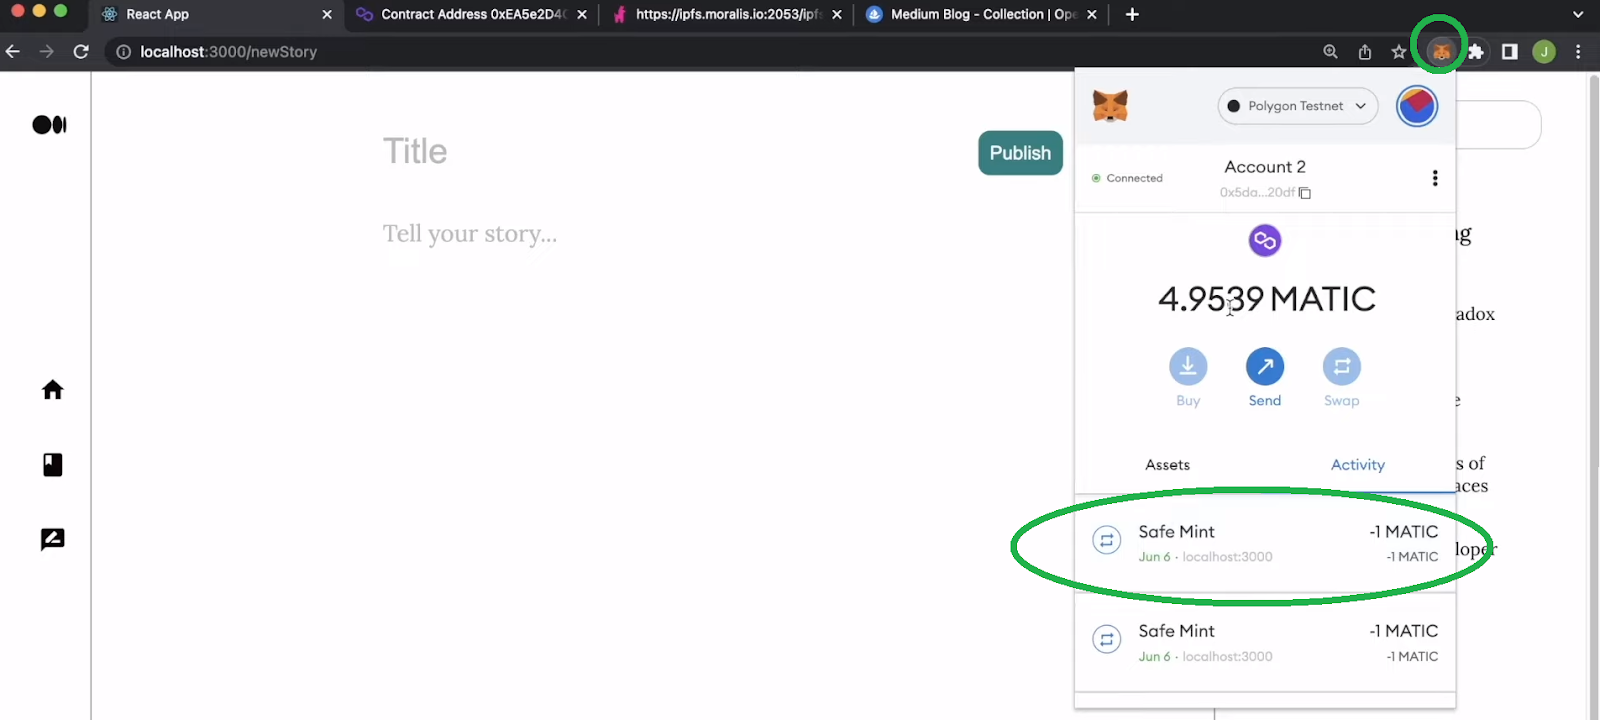
We can also confirm that the above transaction was executed properly in several ways. For instance, users can utilize their MetaMask to see their latest transactions:
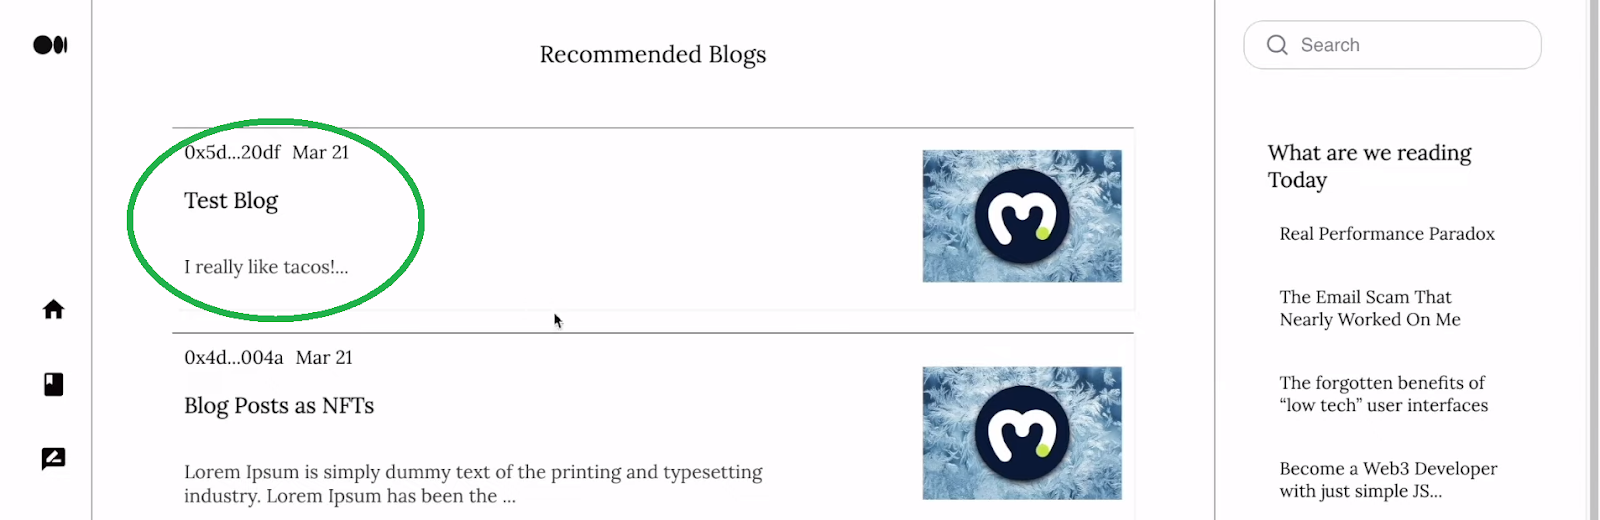
Of course, they can also see their latest post on the homepage:
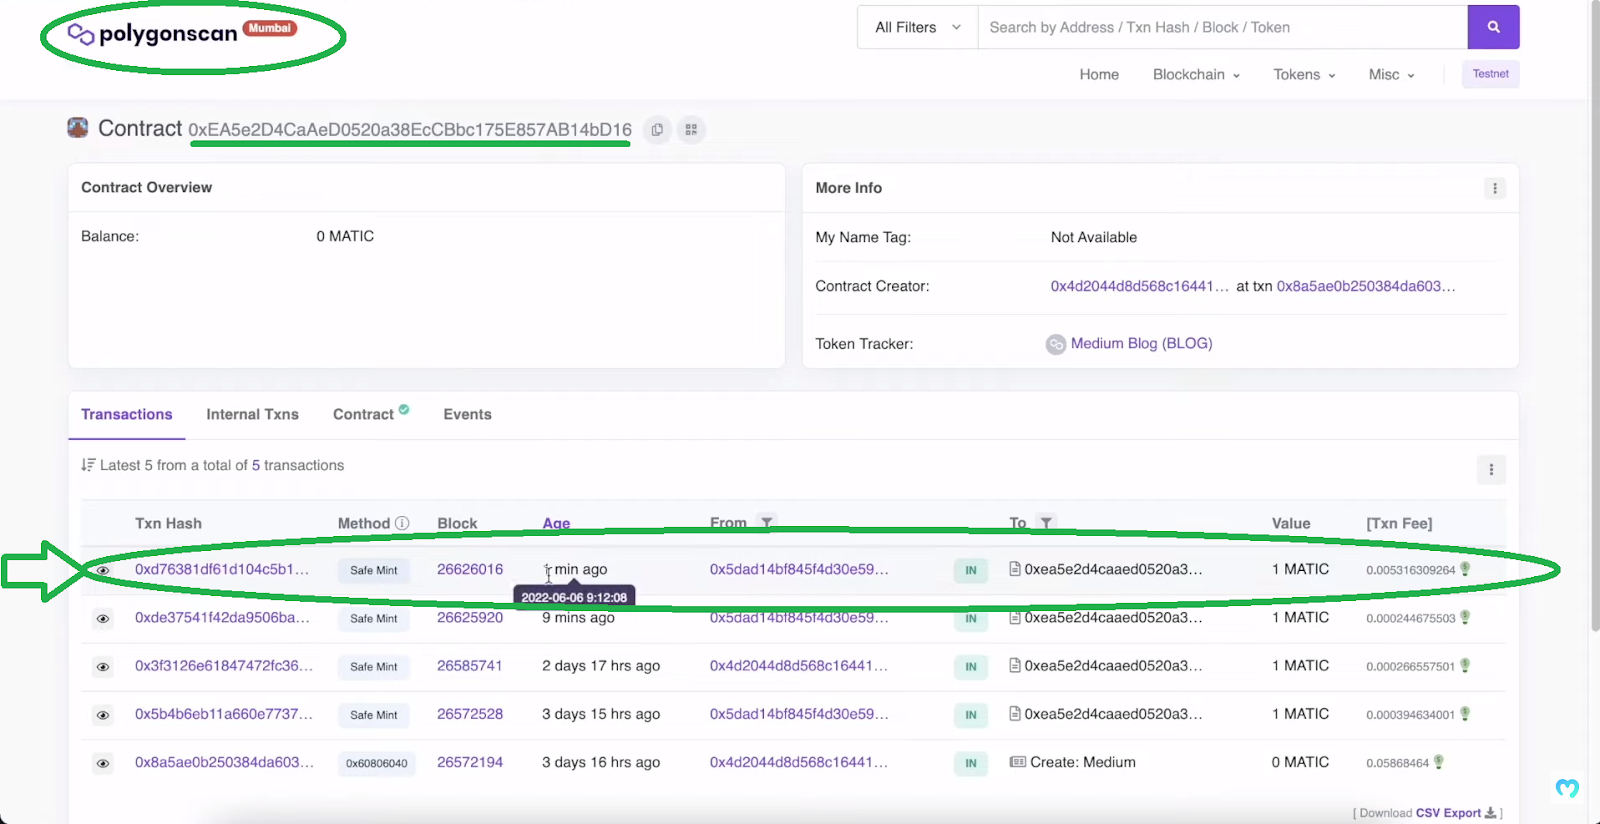
Furthermore, for those of you who want additional confirmation, you can also use blockchain scanners (PolygonScan in our case):
Nonetheless, since our Web3 Medium’s blog posts come in the form of NFTs, you can also view them on OpenSea:
Build a Web3 Medium Clone with Hardhat, React, and Moralis
After seeing what an excellent dapp we built, you probably can’t wait to create your own instance of a Web3 Medium clone. If so, you should set aside about 70 minutes. Moreover, in addition to our instructions and screenshots, utilize the video at the bottom of this article. This is also where our timestamps throughout this article point to. Nonetheless, here are the steps you will need to complete if you want to build a Web3 Medium clone quickly and easily:
- Set up Hardhat
- Create, compile, and deploy your NFT-minting smart contract
- Initialize a React project and connect to Moralis’ SDK
- Set up Web3 authentication
- Use React to build the Web3 frontend of your dapp:
- Create sidebars
- Create a list of blogs (your homepage)
- Create a blog page
- Create a publishing page
- Upload to IPFS (storing NFTs’ metadata in a decentralized manner)
- Set up the minting functionality of your Web3 Medium clone
- Querying NFTs using the ultimate Web3 API
Of course, you don’t have to start from scratch. You can access our “starter” code and our “final” code on GitHub.
Note: The following instructions and the video tutorial assume you start with the “starter” code. After all, this is the path you should take if you want to get the most out of this example project.
Set Up Hardhat
Note: If you are used to working with Remix, you can take that route instead of deploying your smart contract with Hardhat.
Use your favorite code editor (we use Visual Studio Code [VSC]) and open a new folder. Then, use VSC’s terminal to install Hardhat using the “npm i -D hardhat” command:

Next, use the “npx hardhat” command to create a new Hardhat project. Then, use the terminal and select the obvious options to complete the Hardhat setup. Essentially, you need to click on “enter” four times. Finally, you’ll also want to install all dependencies:
- “npm i @openzeppelin/contracts” to use Web3 contract templates from OpenZeppelin
- “npm i -D dotenv” to work with the “.env” file that will hold the environment keys
- “npm i -D @nomiclabs/hardhat-etherscan” to verify your smart contract
Web3 Medium Smart Contract
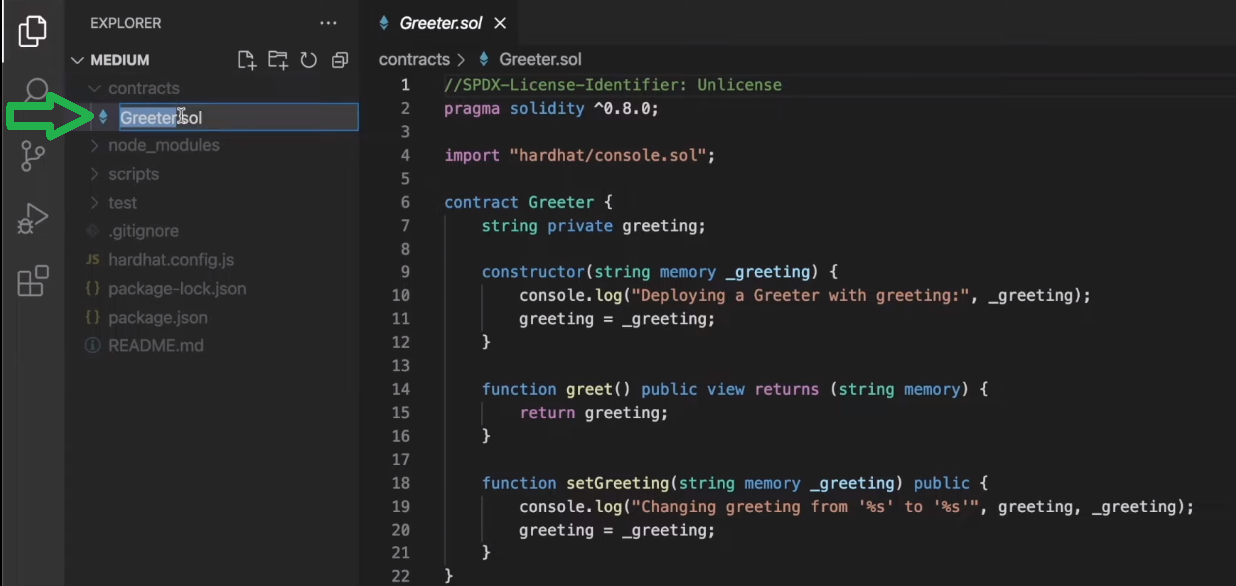
Once you’ve installed all dependencies, you are ready to create your Web3 Medium smart contract (4:17). You will start by renaming the smart contract template (“Greeter.sol”):
Next, you will write the proper lines of code. In case you are not ready to learn the basics of Solidity, you can also copy the code from GitHub (“Medium.sol“). At this point, you know that our Web3 Medium clone needs to be able to take the metadata and convert it into NFTs. As such, your smart contract will be minting ERC-721 tokens using an ERC-721 contract.
Compile and Deploy Your ERC-721 Contract
With your instance of our “Medium” smart contract ready, you must utilize Hardhat to compile, deploy, and verify it (11:04). This is where the “sample-script.js” file will make things a lot simpler for you. You will rename it to “deployMedium.js” and replace “Greeter” and “greeter” with “Medium” and “medium”:
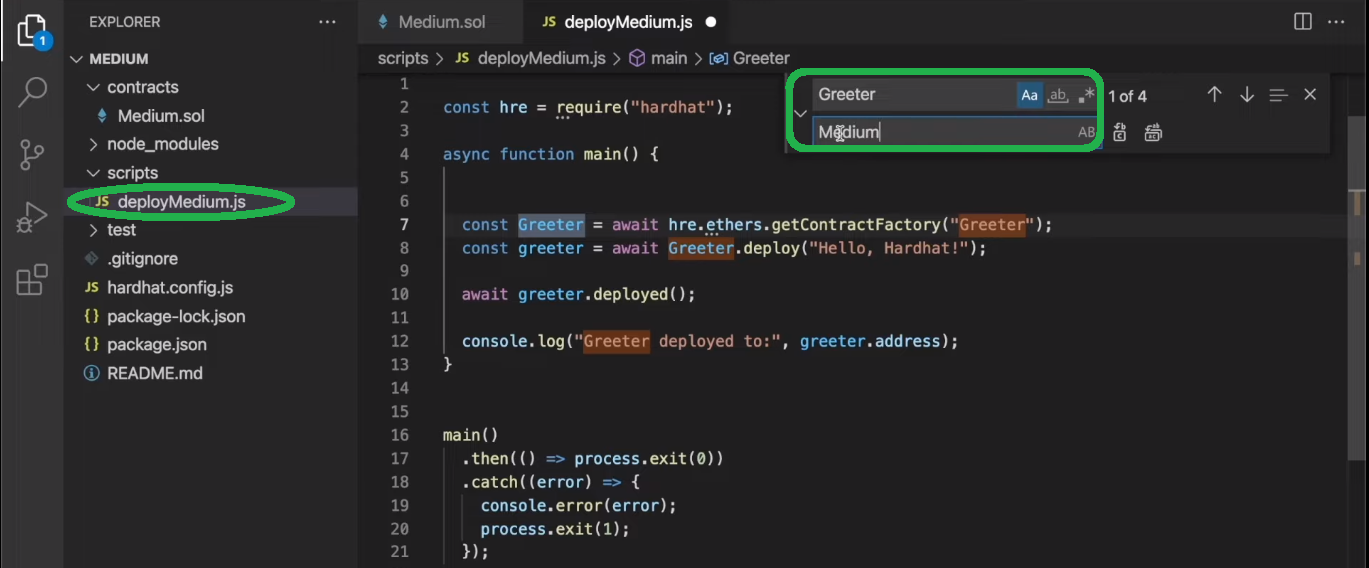
You will also add proper parameters inside “.deploy”:

Then, you will make the necessary tweaks to the “hardhat.config.js” file (12:31). You will use this file to compile and verify your smart contract. At the top of the file, you will add the following lines of code:
require(“@nomiclabs/hardhat-etherscan”);
	const dotenv=require(“dotenv”);

	dotenv.config();
You will also need to tweak “module.exports” at the bottom of the file:
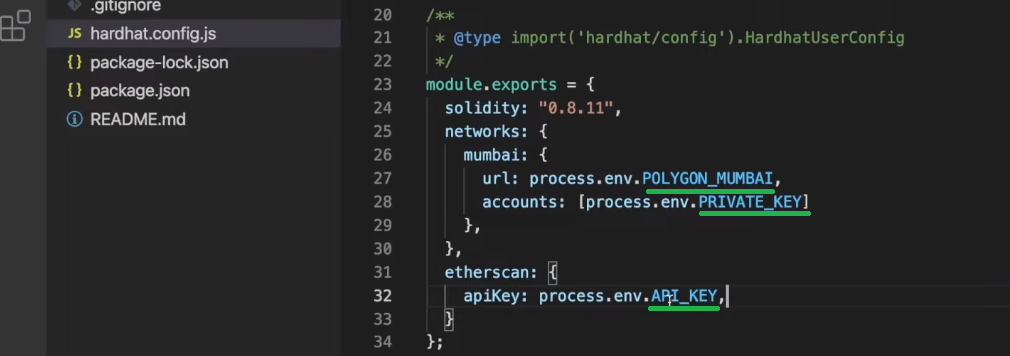
The above-market variables are the ones you will store in your “.env” file:
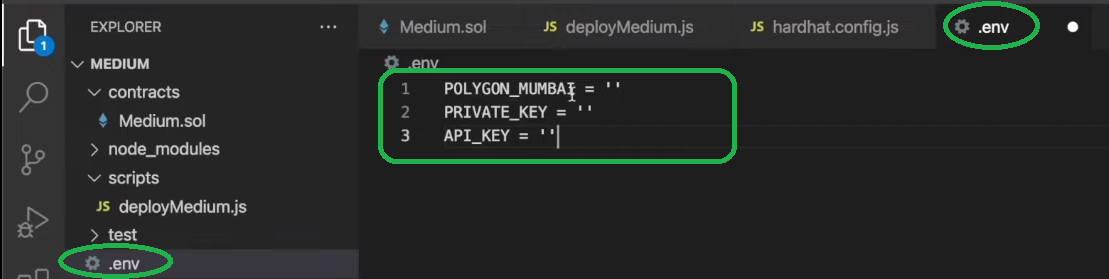
Of course, you will also need to populate the above variables with appropriate values. For detailed guidance on finding these values, use the video below, starting at 14:48. As far as “Polygon_Mumbai” goes, you use the “Starting with Moralis – New Admin UI” section below. With these values in place, you’ll be ready to compile, deploy, and verify your smart contract (16:40). Once your smart contract is live, you can start interacting with it using PolygonScan (18:47). However, our goal is to create a neat UI for that purpose. As such, it’s time you create the frontend for your Web3 Medium clone.
Web3 Medium Clone Frontend
When it comes to building the Web3 frontend, things are quite similar to Web2. When you focus on using React, you start by initializing a React project (22:04). This is where you should clone the “starter” code if you haven’t done so yet. Furthermore, before you move one, make sure to paste your Moralis dapp’s details into the “index.js” file. Use the “Starting with Moralis – New Admin UI” section for help with the new admin UI. Then, using the “yarn start” command, you should be looking at the blank canvas with our Web3 Medium structure set in place:
Starting at 23:39, you will first tackle Web3 authentication. Using Moralis’ web3uikit, you’ll have a fully functional “Connect Wallet” button ready in under two minutes. Next, you’ll create both sidebars (25:24), the list of blogs (29:36), a blog page (38:41), and the “publish blog” page (44:53).
Web3 Medium Clone Backend
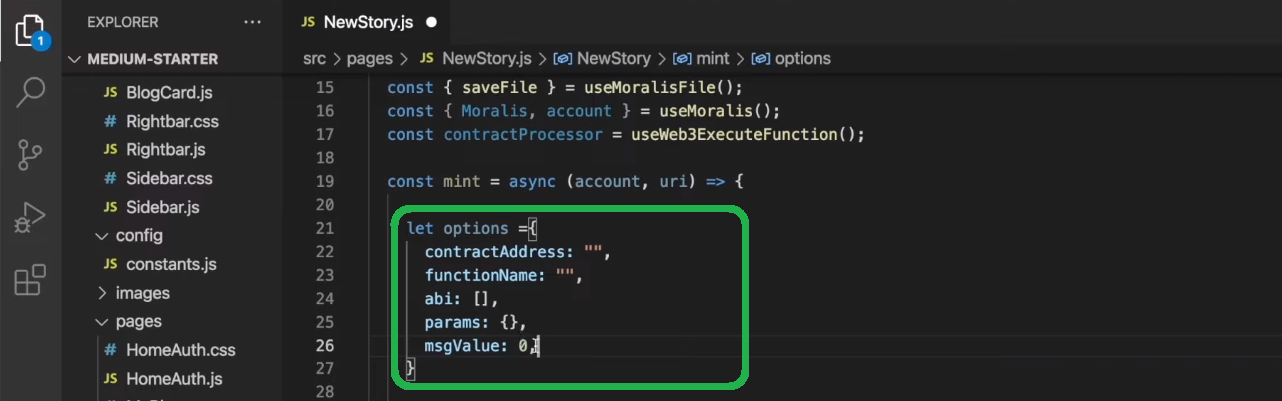
One of the key aspects of your Web3 Medium’s backend is your ERC-721 smart contract, which is already live. However, to ensure that your dapp runs as presented in the demo above, you need to implement the appropriate code. As such, make sure to use the video tutorial below to automate the uploading of metadata to IPFS (48:05). This is where you’ll use the “NewStory.js” file. Thanks to the power of the Moralis SDK, which includes IPFS integration, “saveFile” will do most of the heavy lifting. Moreover, with the metadata in place, you can use your smart contract to mint web Medium posts as NFTs (53:35). This is where our in-house expert will show you how to use PolygonScan to obtain your contract’s details:
Finally, you’ll also learn how to use Moralis’ Web3 API to query on-chain data (58:57). This is how you will populate your Medium clone’s homepage and the “Your Blogs” page. You will use the “homeAuth.js” and the “MyBlogs.js” files. Thanks to the “fetchAllNfts” function and the “getNFTOwners” hook, you will effortlessly access all the on-chain info you need.
Starting with Moralis – New Admin UI
Note: Our in-house expert in the video tutorial below uses the Moralis admin legacy UI. As such, you can follow his lead and switch to the old UI:

However, below are also the instructions to help you navigate the updated UI:
- Log in to your Moralis admin area. In case you haven’t created your free Moralis account yet, use the link stated at the beginning of this article.
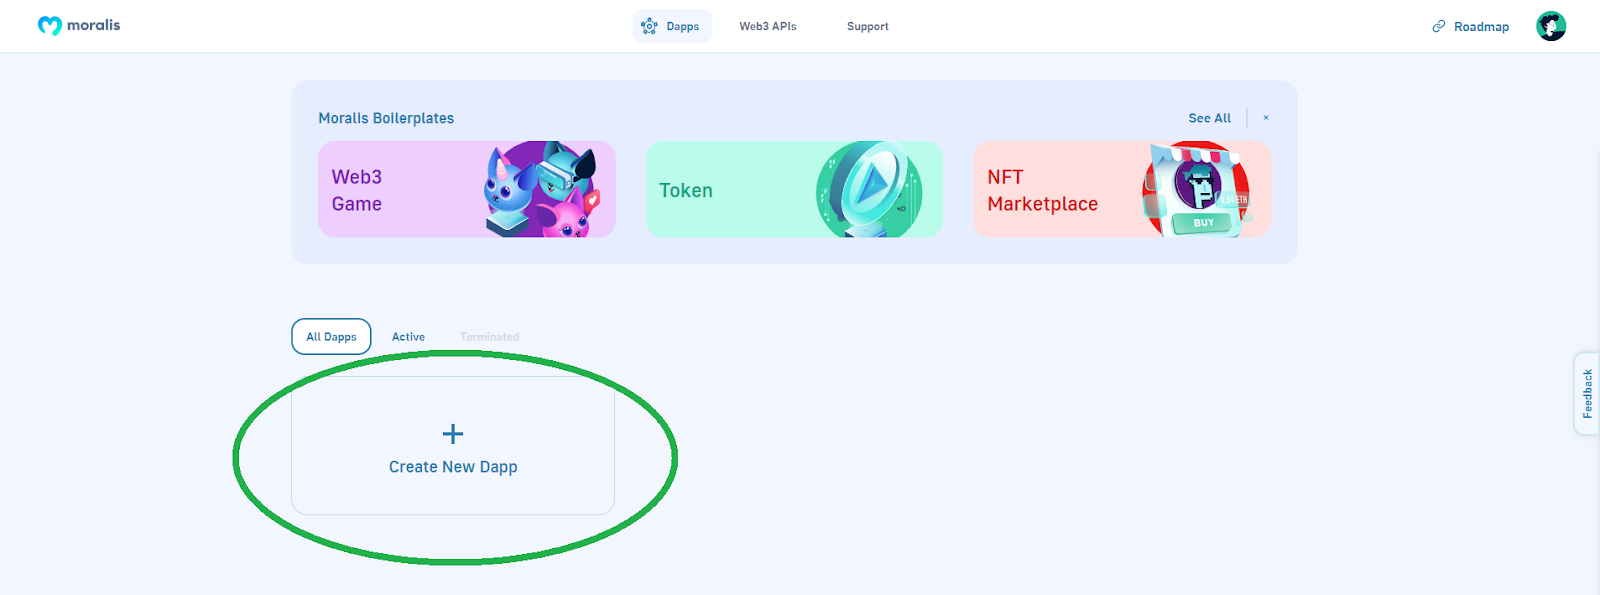
- Inside your Moralis admin panel, create a new dapp:
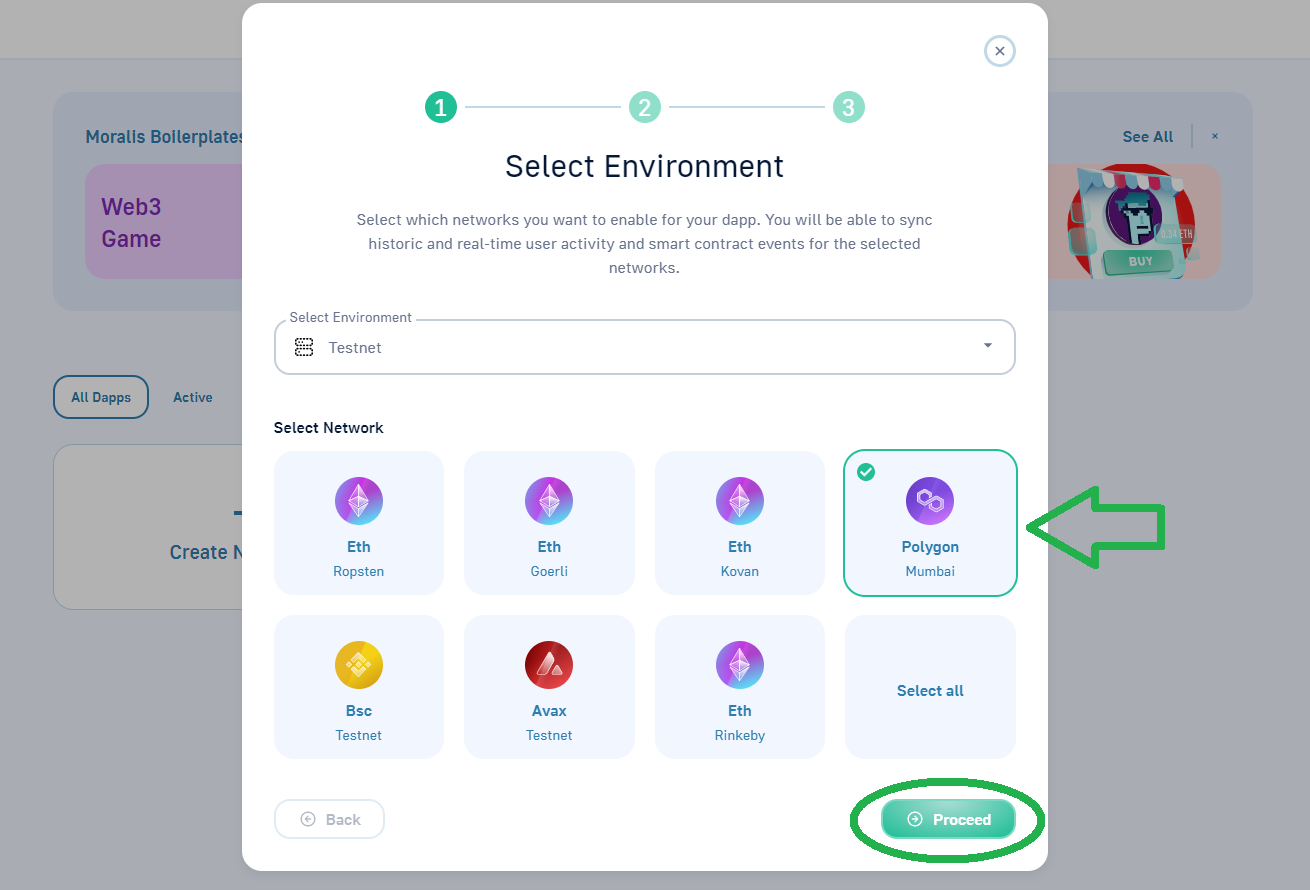
- Select your environment – go with “Testnet”:

- Choose “Polygon Mumbai” and click on “Proceed”:
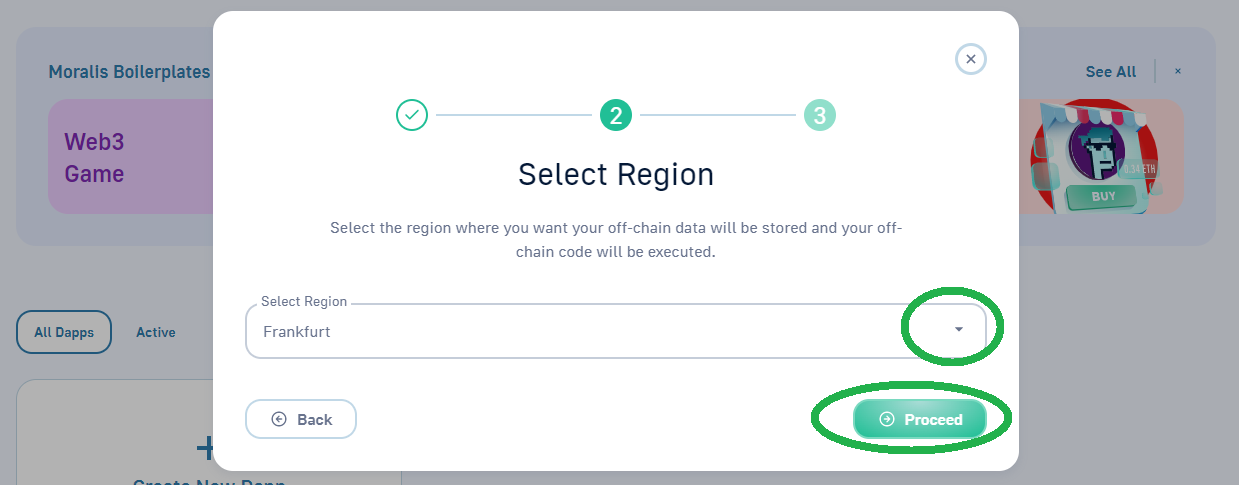
- Select the city closest to you:
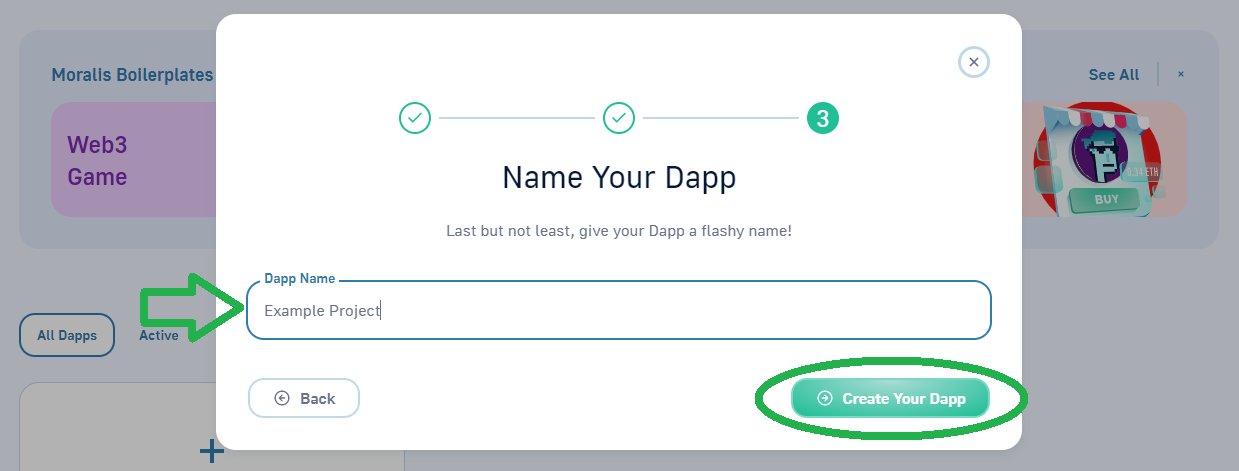
- Name your dapp and complete the process by clicking on the “Create Your Dapp” button:
Once your dapp is up and running, you can obtain the Mumbai testnet’s endpoints and your dapp’s details (URL and ID):
- Accessing Endpoints:
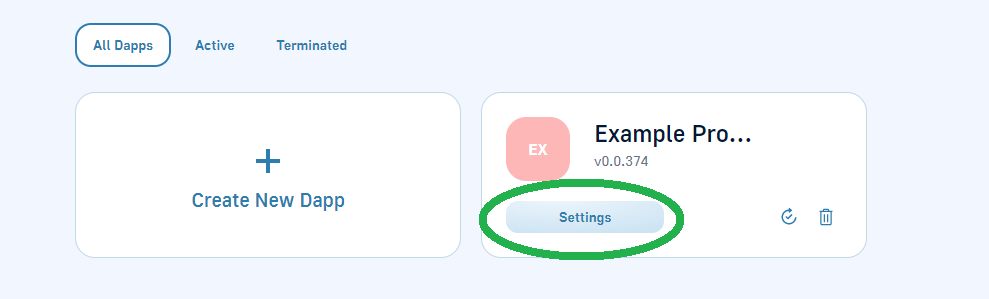
- Click on “Setting” for your newly created dapp:
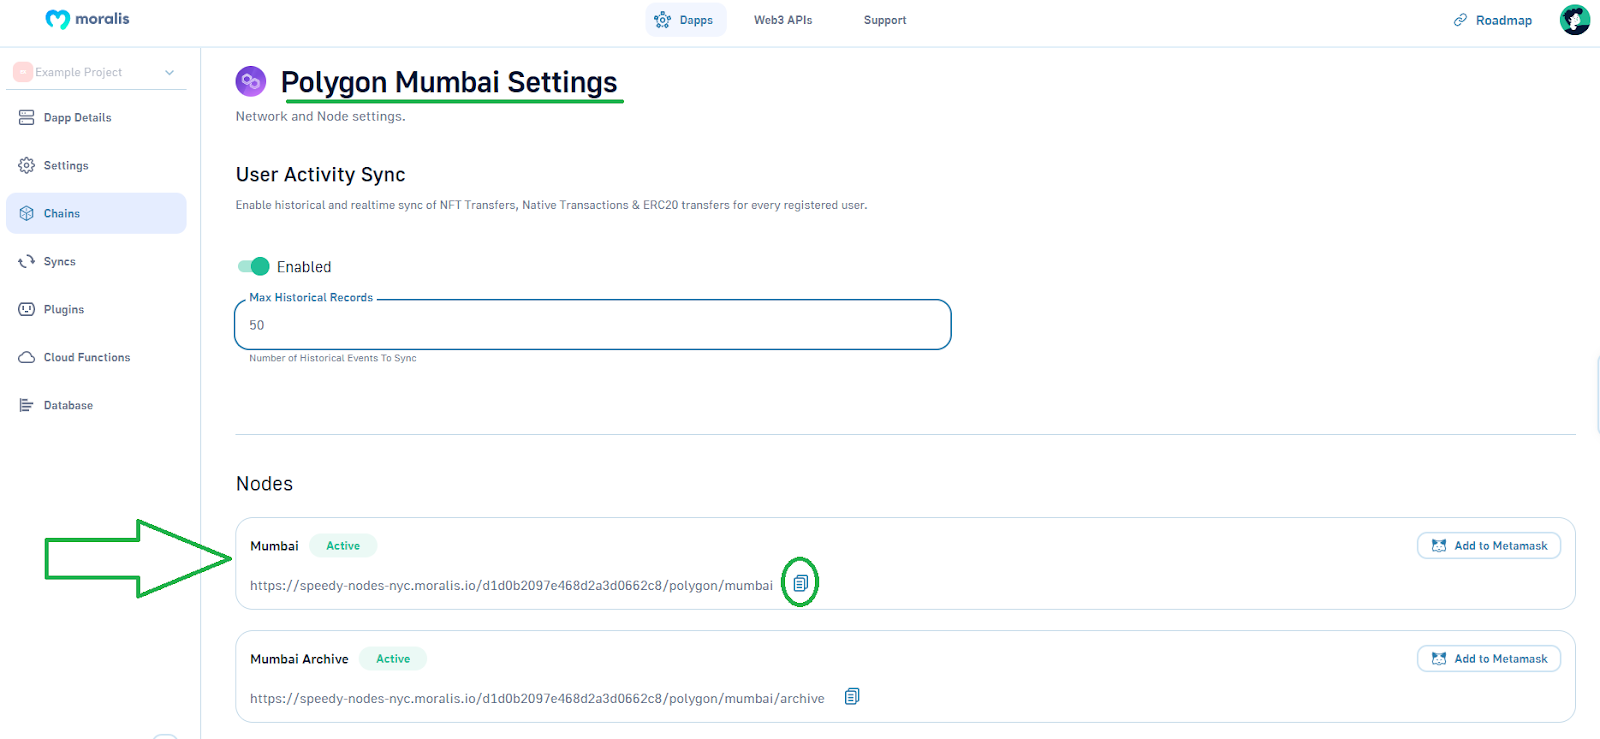
- Select “Chains” on the right side and then click on “Settings” next to “Polygon Mumbai”:

- Copy Mumbai’s endpoint:
- Accessing Dapp ID and URL:
- Click on “Settings” for your newly created dapp:
- Copy your dapp’s URL and ID:

Here’s the video tutorial we’ve been referencing above:
How to Build a Web3 Medium Clone – Summary
By following our lead and the above video tutorial, you had a chance to build your own Web3 Medium clone. You also learned how to create, compile, deploy, and verify an ERC-721 smart contract. Also, you had a chance to refresh your React skills by creating a user-friendly frontend. Most importantly, you learned how to utilize the pinnacle of the current Web3 tech stack – Moralis. As a result, you now have the ability to use this ultimate Web3 backend platform for all your future Web3 endeavors.
If you enjoyed today’s example project, we encourage you to check out our other “clone” tutorials:
- Web3 Netflix Clone
- OpenSea Clone
- Uniswap DEX Clone
- Web3 Spotify Clone
- Coinbase Clone
- Web3 Elden Ring Clone
- Reddit Clone for Web3
Make sure to explore other blockchain development topics on the Moralis YouTube channel and the Moralis blog. Some of our latest articles include building a Web3 role-playing game, creating a social media dapp, exploring a Binance dapp API, the Ethereum Merge, an Ethereum NFT API, and a Polygon NFT API, etc. Nonetheless, you may also want to check out the Moralis Academy. After all, this is one of the best places to become a Web3 developer fast and with confidence.
