Social media has changed how we interact online and has become an essential tool in our everyday lives. However, because of the centralized nature of current social media channels and apps, issues such as data breaches, censorship, ghost banning, etc., are unfortunately quite common, negatively affecting users and content creators worldwide. Fortunately, as we’re slowly transitioning from Web2 to Web3, developers have the opportunity to solve these centralized social media issues by creating decentralized alternatives. Would you like to build a decentralized social media app alternative? If so, pay close attention to the content herein as we create a social media dapp clone of Twitter. Now, don’t be alarmed; building a decentralized Twitter is not as challenging as it sounds. In fact, with the best Web3 tech stack, you can easily create a social media dapp such as a Web3 Twitter in less than 90 minutes!
In the following sections, you will learn how to utilize React, Remix, and Moralis to build decentralized applications (dapps) effortlessly. React will enable you to use your JavaScript proficiency and cover the frontend. With Remix, you will easily compile and deploy a smart contract to support your social media dapp. Furthermore, with Moralis (a.k.a. “Firebase for crypto“), you will tie it all together. With this ultimate Web3 backend platform, you will easily implement all essential Web3 features, starting with Web3 authentication. Thanks to the Moralis SDK, you will be able to index the blockchain and handle off-chain data and on-chain data. As such, make sure to create your free Moralis account to use this powerful toolset. However, before we show you how to build your own instance of our social media dapp, let’s do a quick demonstration of our Web3 Twitter clone.
Demo of Our Social Media Dapp
Just like most dapps, our social media dapp starts with Web3 login:

Looking at the screenshot above, you can see that users get to complete their Web3 authentication using Web3 wallets. Once they click on “Connect Wallet”, users can choose among several options:
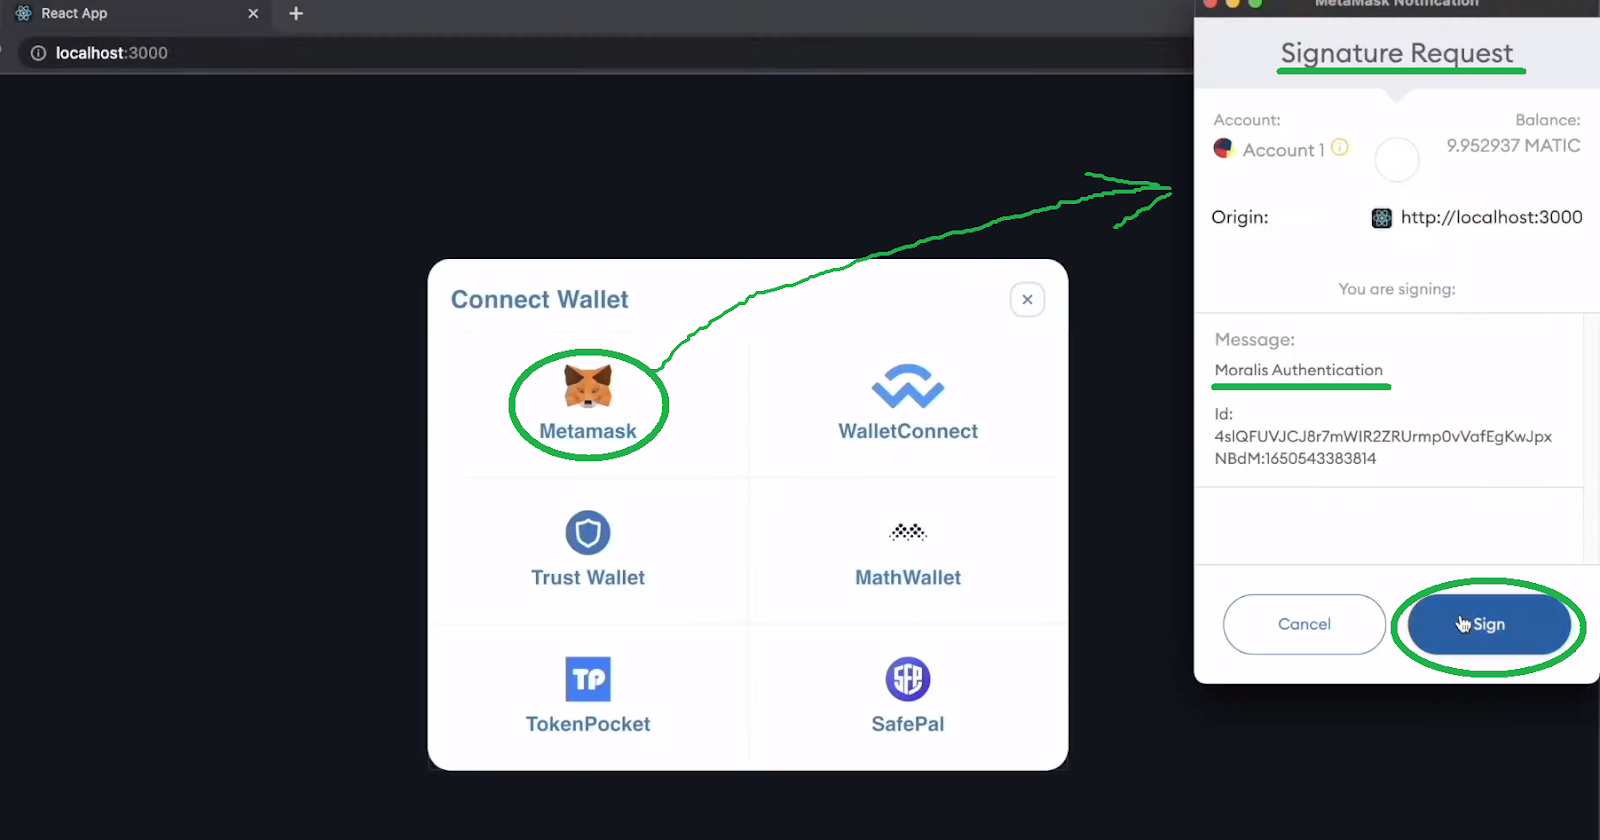
However, in this demonstration, we will consider an example user who decides to authenticate with MetaMask. He starts by clicking on the MetaMask icon, which triggers this crypto wallet’s extension to pop up. The latter requests a digital signature (confirmation). Hence, the user needs to click on “Sign” to enter our social media dapp’s homepage:
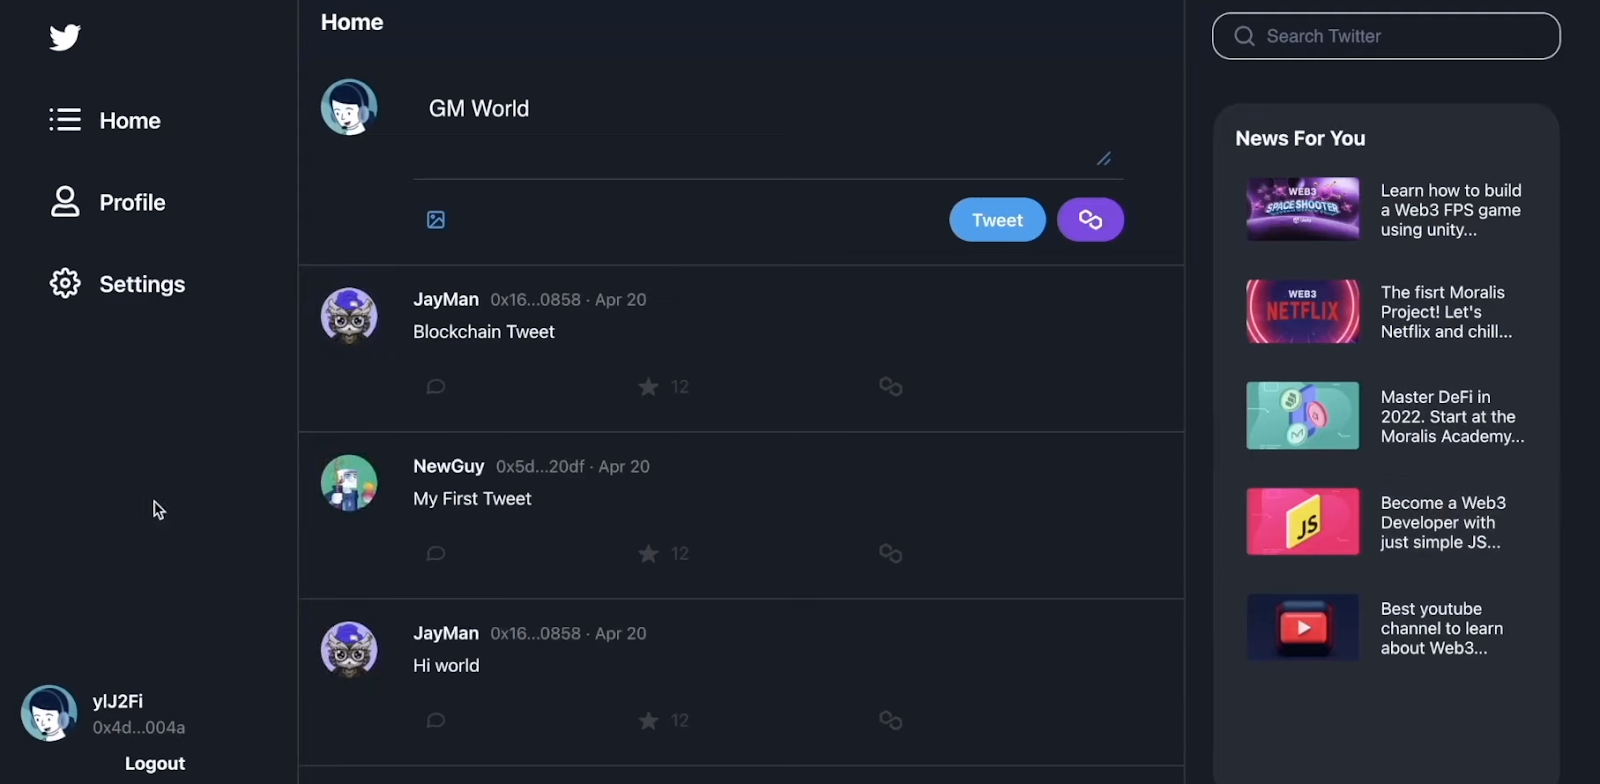
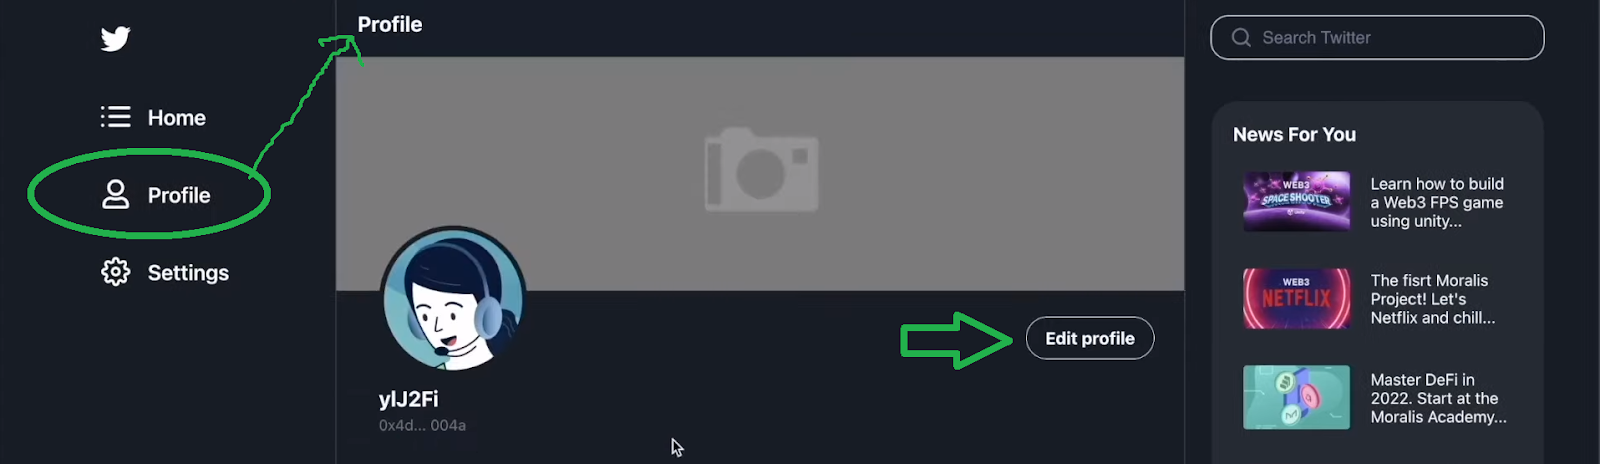
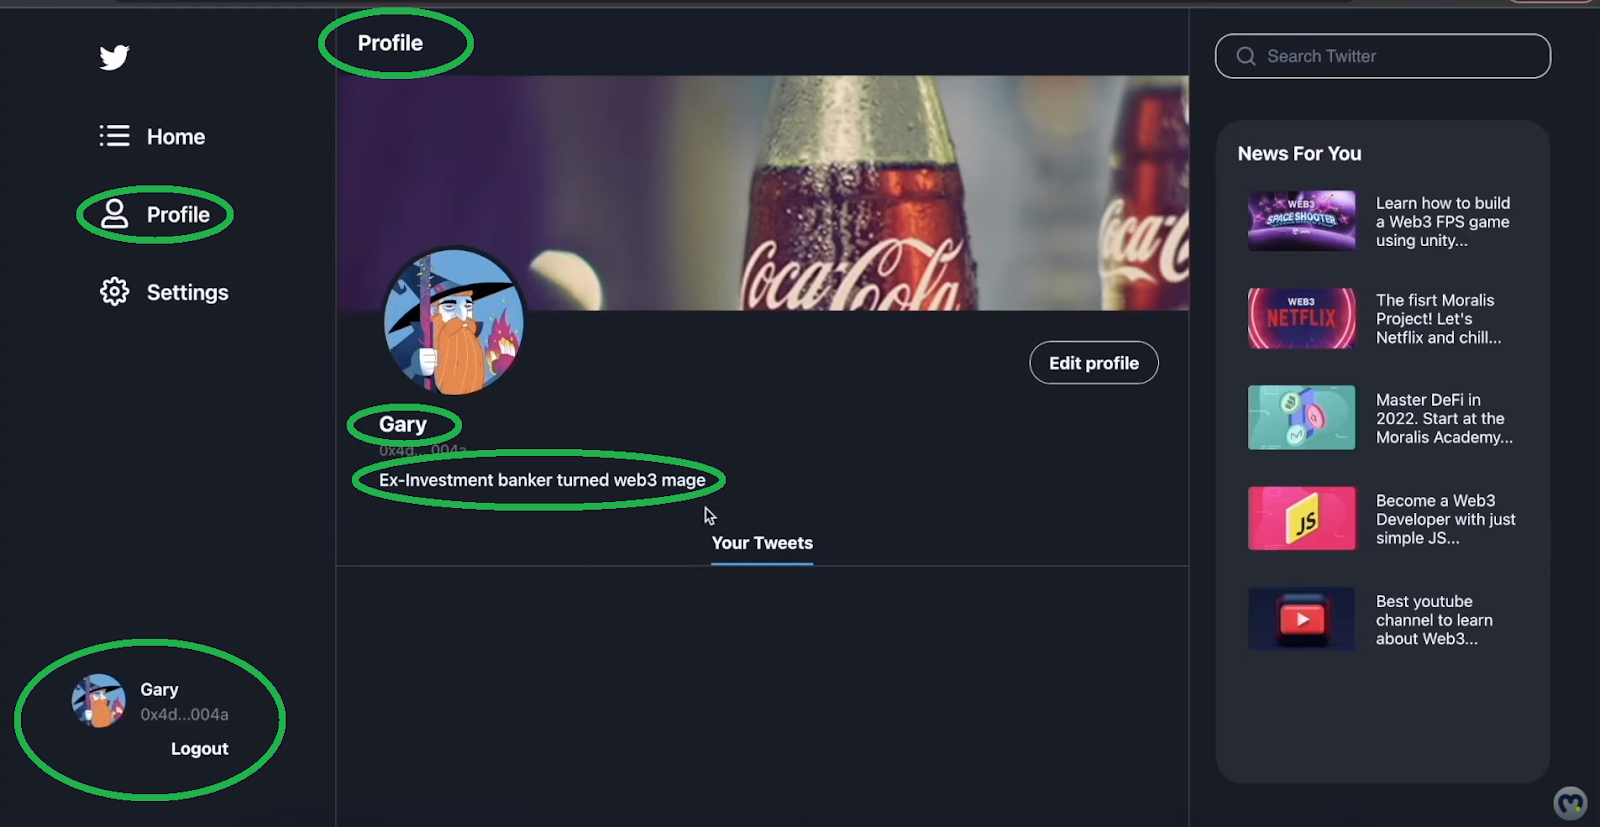
In our example, this user has logged in for the first time, and our dapp sets the default user icon. When the user logs in, the user can immediately see the tweets feed. By selecting the “Profile” tab, he can personalize his account via the “Edit profile” button:
Inside the profile settings, users get to enter their names and bio. They can also use their NFTs (non-fungible tokens) stored in the connected wallet as their profile images. Nonetheless, those who wish to do so can also personalize their banners by uploading images. To do this, they just need to click on the gray area below the “Profile Banner” section:
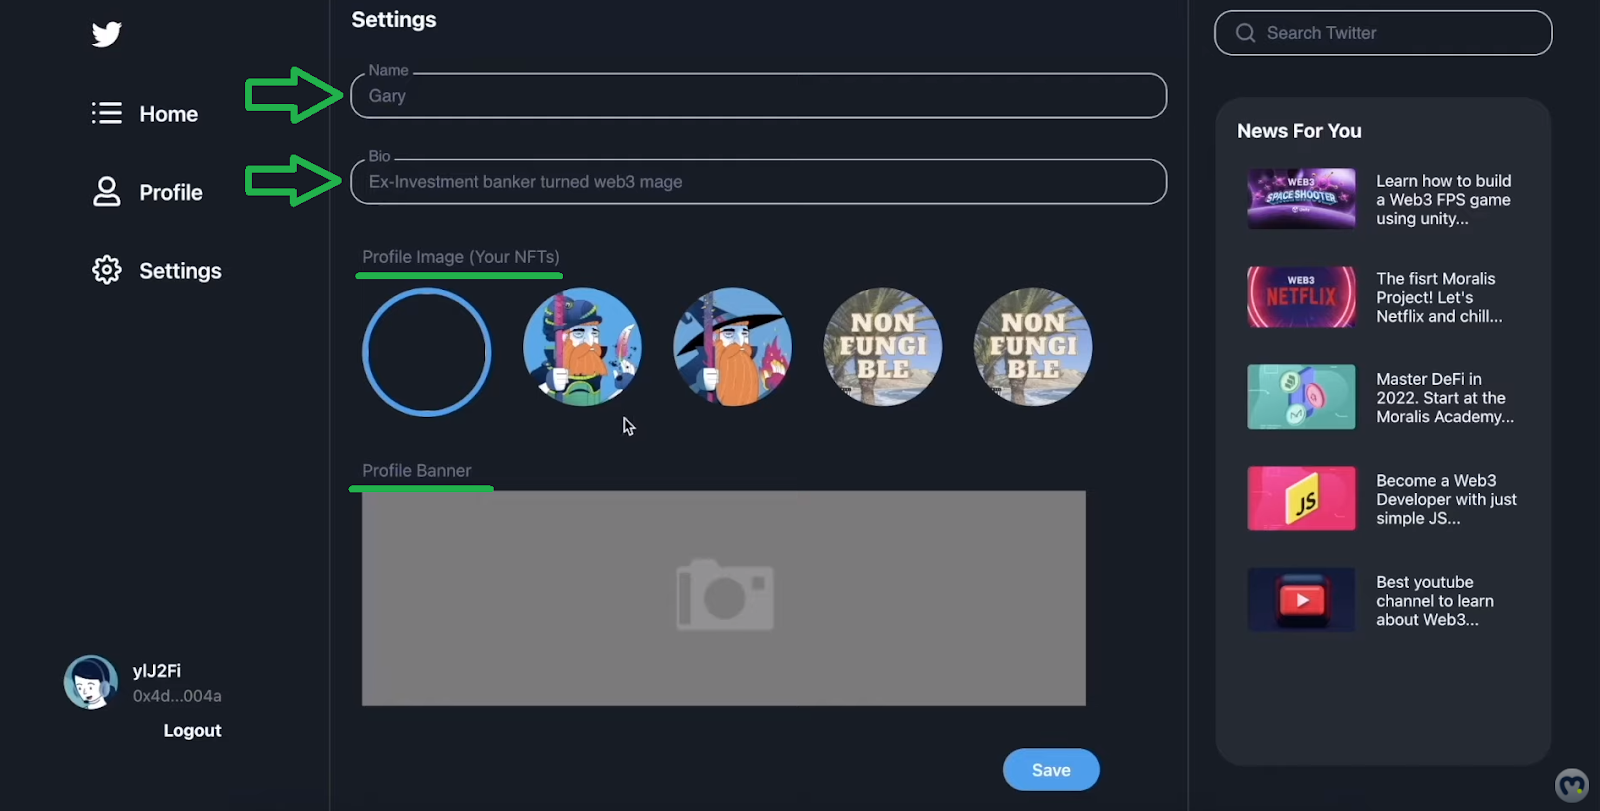
Once the users enter all their details, they just need to click on “Save” to complete the personalization of their accounts. These are the result for our example user named Gary:
How to Tweet with Our Social Media Dapp
Let’s now look at how users get to tweet with our social media dapp. For starters, to access this feature, they need to be on the “Home” tab:
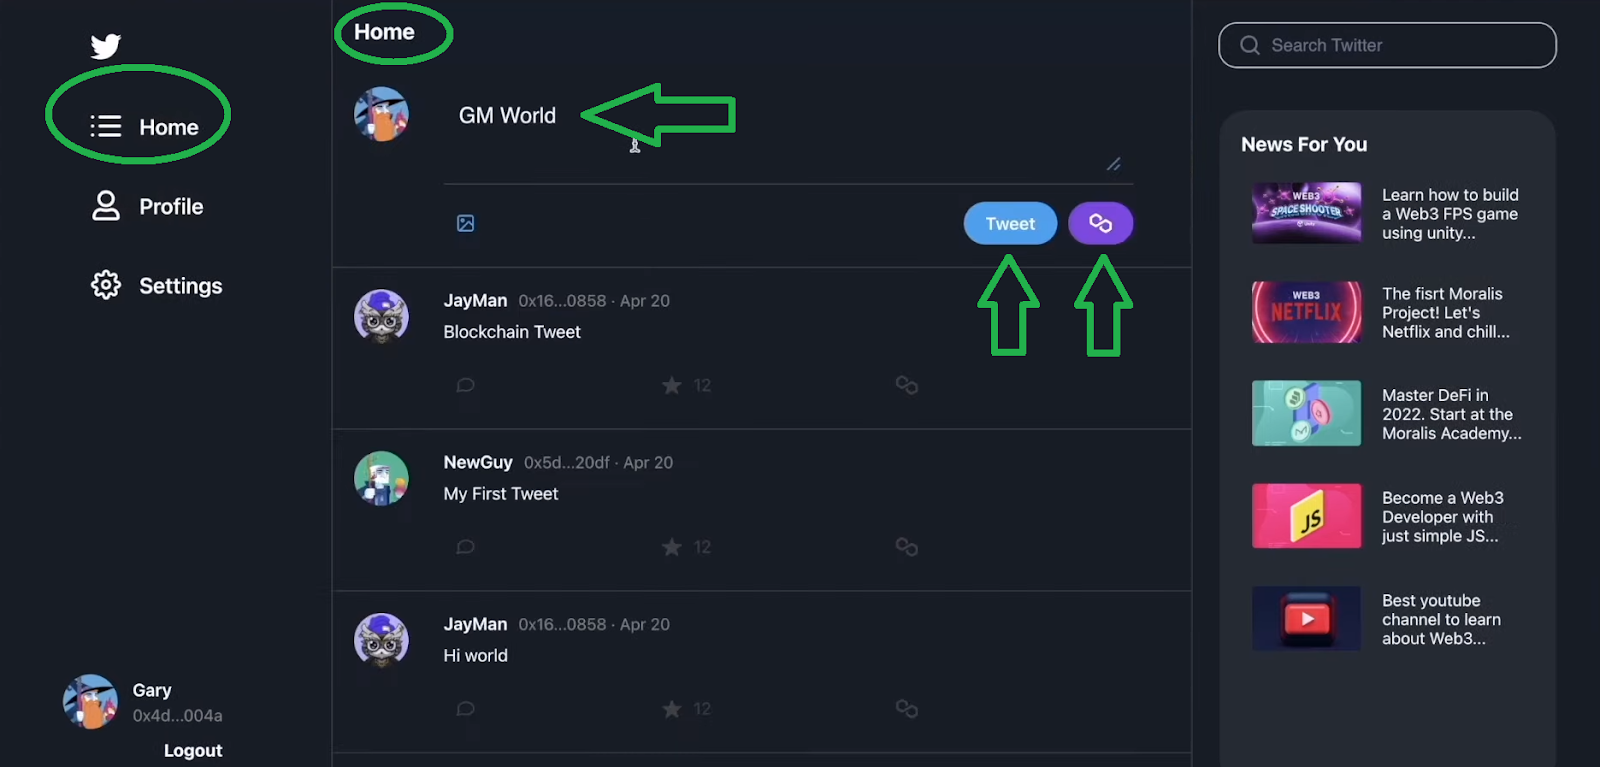
Second, they need to click on the entry field (where it says “GM World”) and type in some text. Also, they can add an image to their tweets via the “image” icon below the text on the left-hand side. Once they have their text (and image) ready, our dapp gives them two choices. They can do a regular tweet by clicking on the “Tweet” button. However, if they click on the “Polygon icon” (chain), they get to save their tweet on the blockchain.
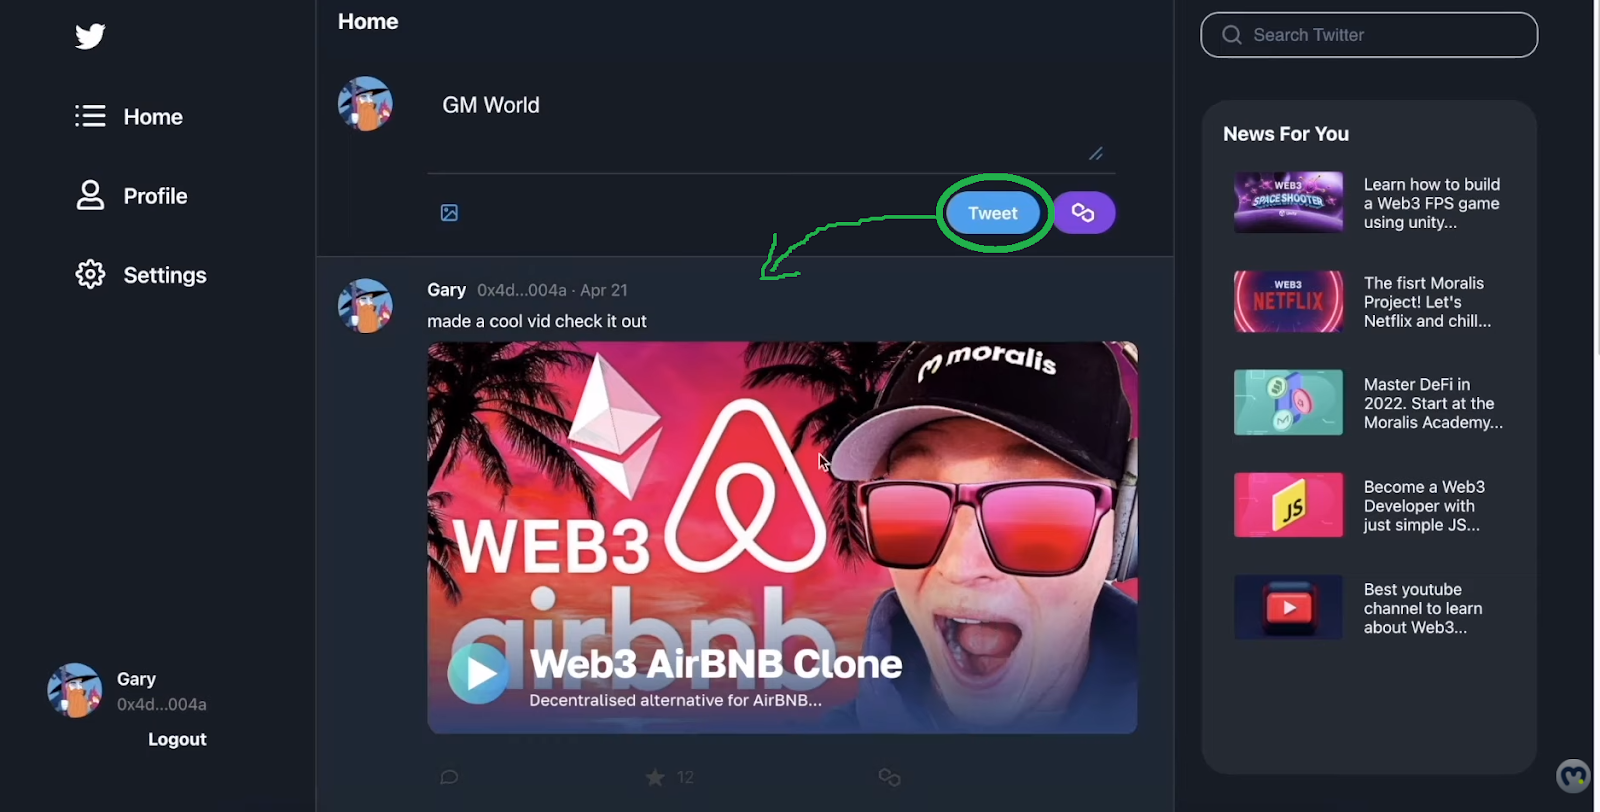
Regular Tweets Demo
If the user clicks on “Tweet”, his new tweet will basically appear almost instantly in the tweet thread below the entry field:
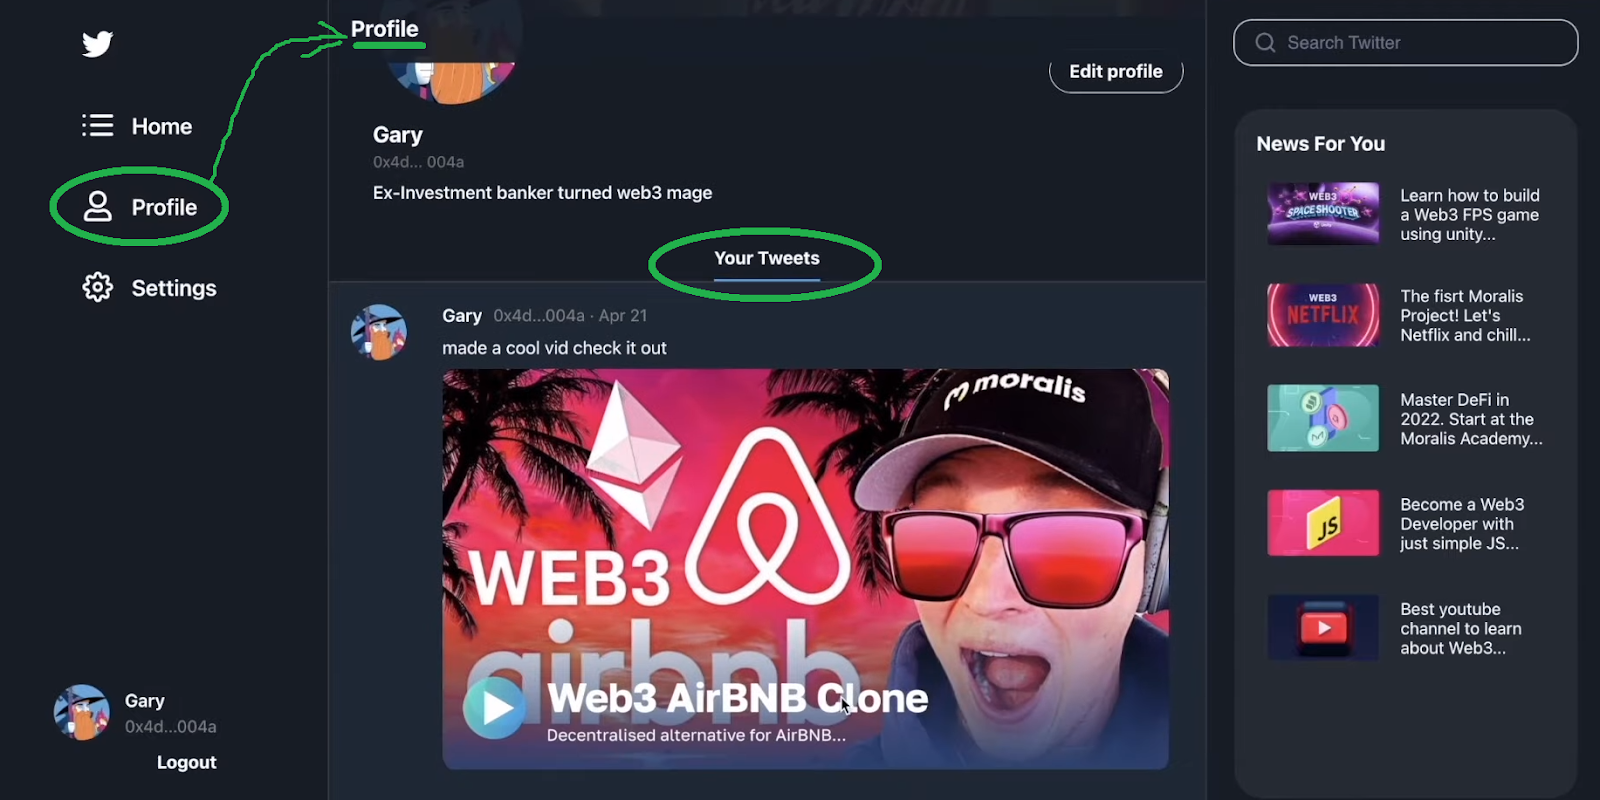
Users can also view their tweets under the “Your Tweets” section (inside their profile tab):
On-ChainTweets Demo
Users who decide to post their tweets on the blockchain will click on the “Polygon icon” button:
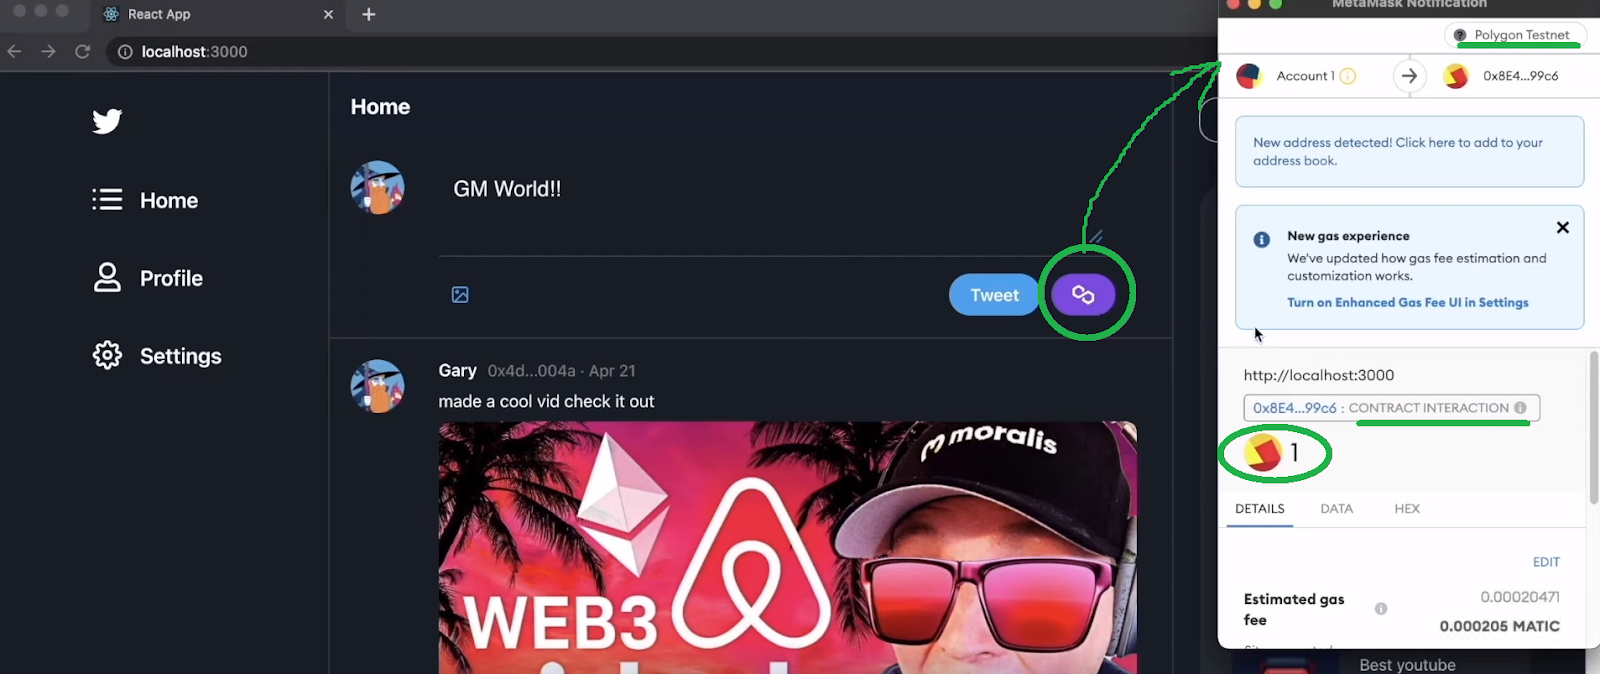
This action triggers their Web3 wallet, which prompts them to confirm the transaction related to storing their tweet on the blockchain. Accordingly, users must click on “Confirm” and pay the gas fee:
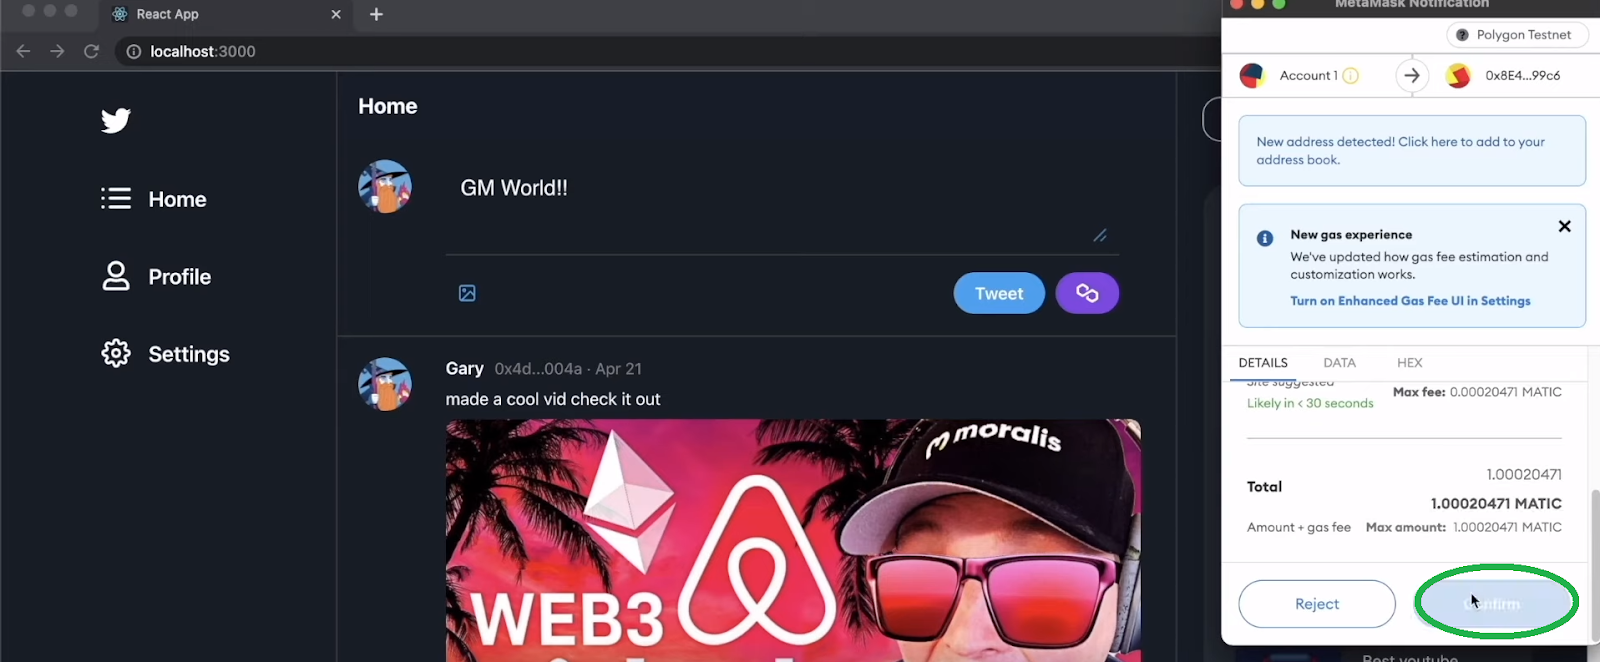
Once the above transaction is processed, users’ on-chain tweets will also appear in the tweet thread:

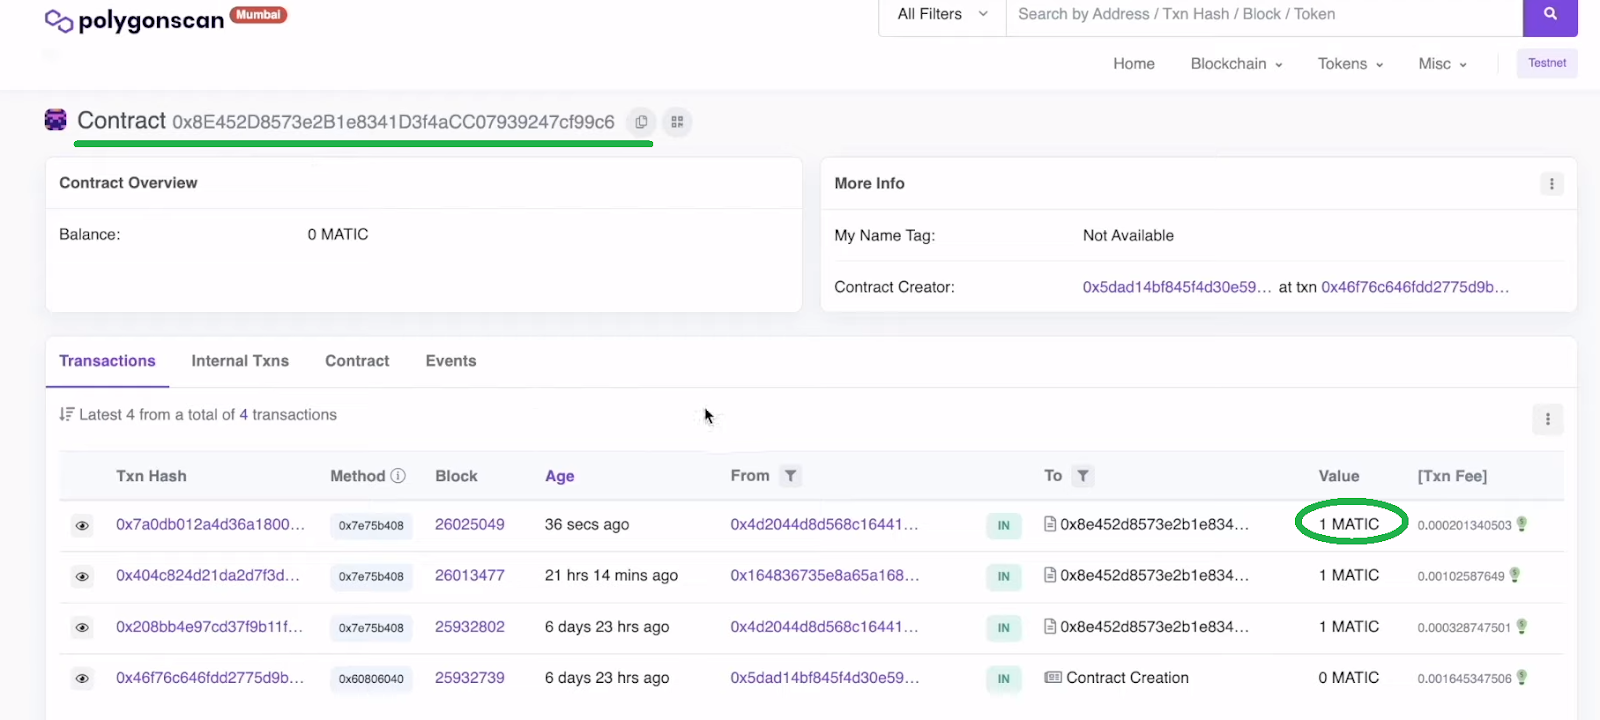
Since the above transaction is an on-chain event, we can use a blockchain explorer (PolygonScan [Mumbai testnet] in our case) to confirm that the above tweet really is stored on the Mumbai chain:
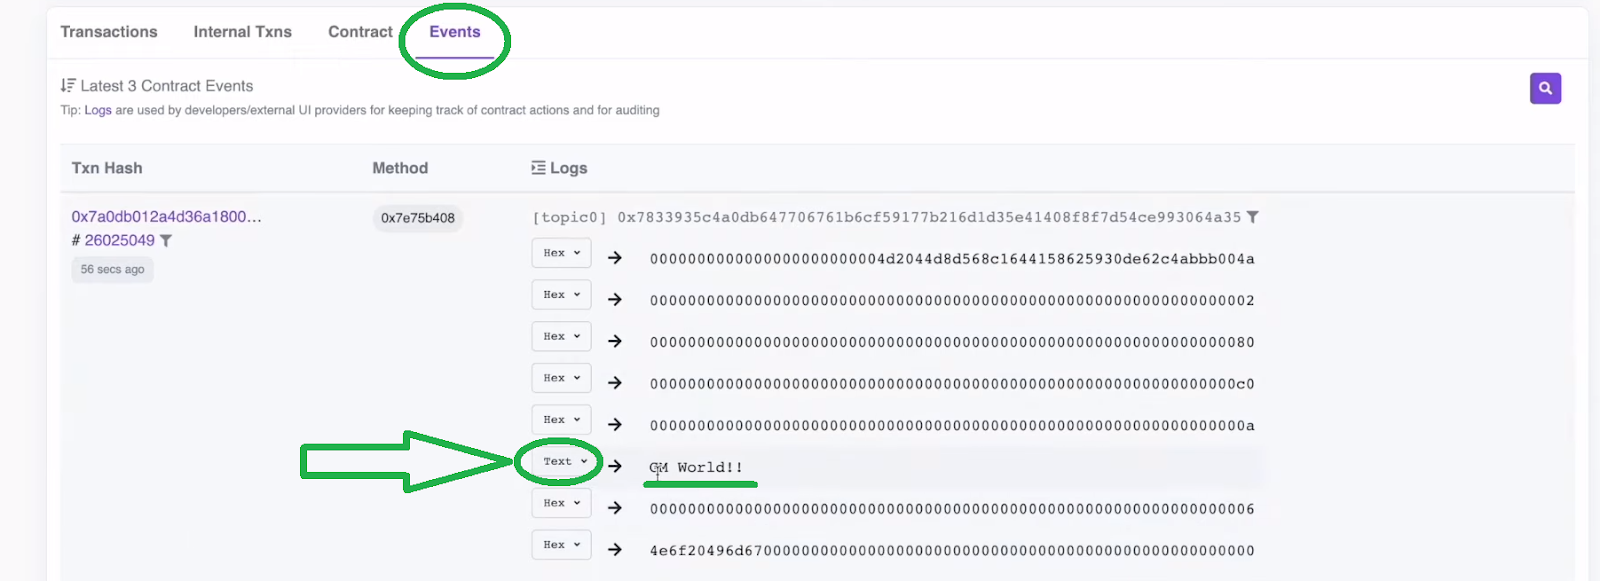
We can select the “Events” tab for more details. There, we need to switch the example transaction’s “Hex” into “Text” to view the content of the above example tweet:
Build Your Social Media Dapp with React, Remix, and Moralis
If the above demo impressed you, roll up your sleeves and follow our lead. This is where you’ll learn how to create a social media dapp. You’ll see how to create a social media dapp smart contract, set up the frontend (sidebars, homepage, profile page, setting page), and integrate the Moralis dashboard. Aside from our guidance, you can also watch a detailed video tutorial at the end of this article. This is the video we will reference using timestamps throughout the following sections.
Furthermore, we made the starter code and the final code of this example project available on GitHub. We strongly encourage you to clone the starter code and implement the code yourself. That’s the path our tutorial assumes you will take. However, if you are in a hurry, you can also clone the final code and use our tutorial as a code walkthrough. Now, without further ado, let’s begin our journey by examining how to create a social media dapp smart contract.

Social Media Dapp Smart Contract
As you may know, there are smart contracts behind every on-chain transaction. Since our dapp’s on-chain tweets require on-chain transactions, we need a smart contract. Thus, let’s create that smart contract (video below, starting at 4:42). Start by opening Remix. Then create a new file and name it “tweets.sol“:

Note: If you are not interested in learning Solidity basics, you can just copy our smart contract’s code and paste it into Remix.
At the top of your newly created file, you must first enter the “pragma” line. Then, you can start adding your contract details. Make sure to use the video tutorial below to make sure that you enter the lines of code correctly. With the smart contract ready, you need to compile it before you can deploy it. Fortunately, both of these steps are quite easy when using Remix (15:51):
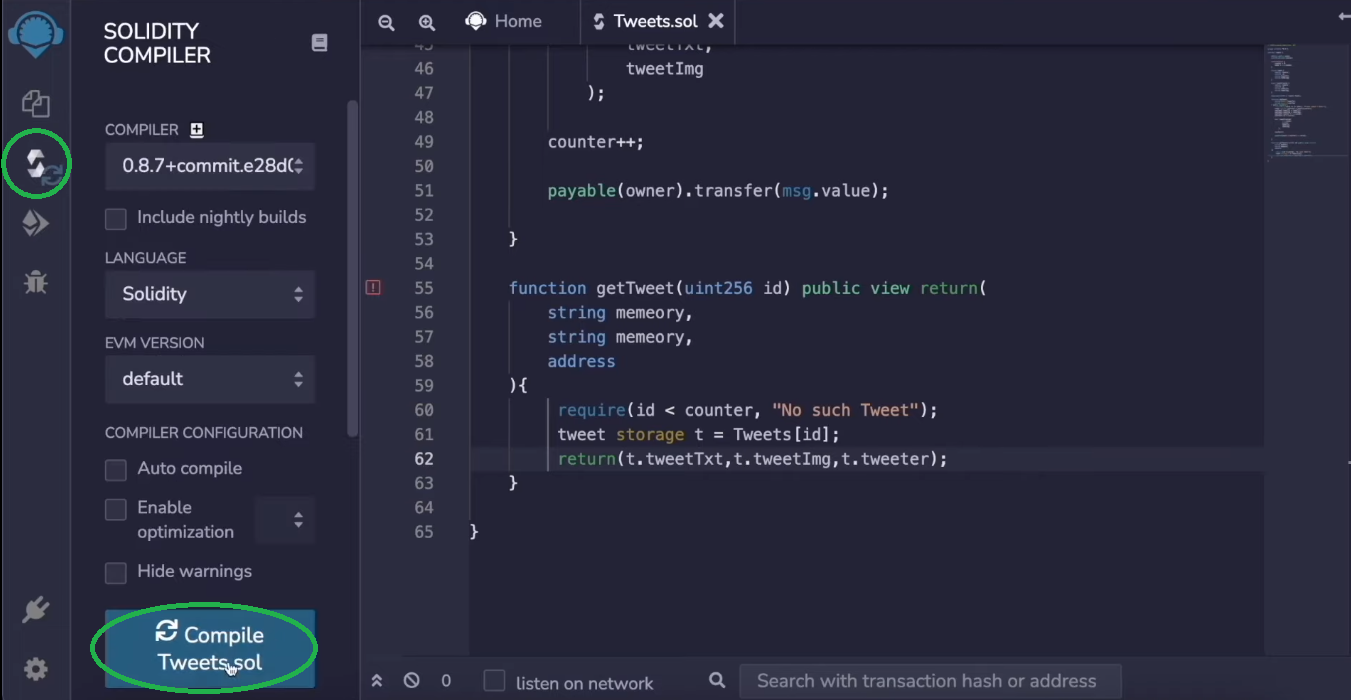
Once you’ve compiled your smart contract, it’s time to deploy it:
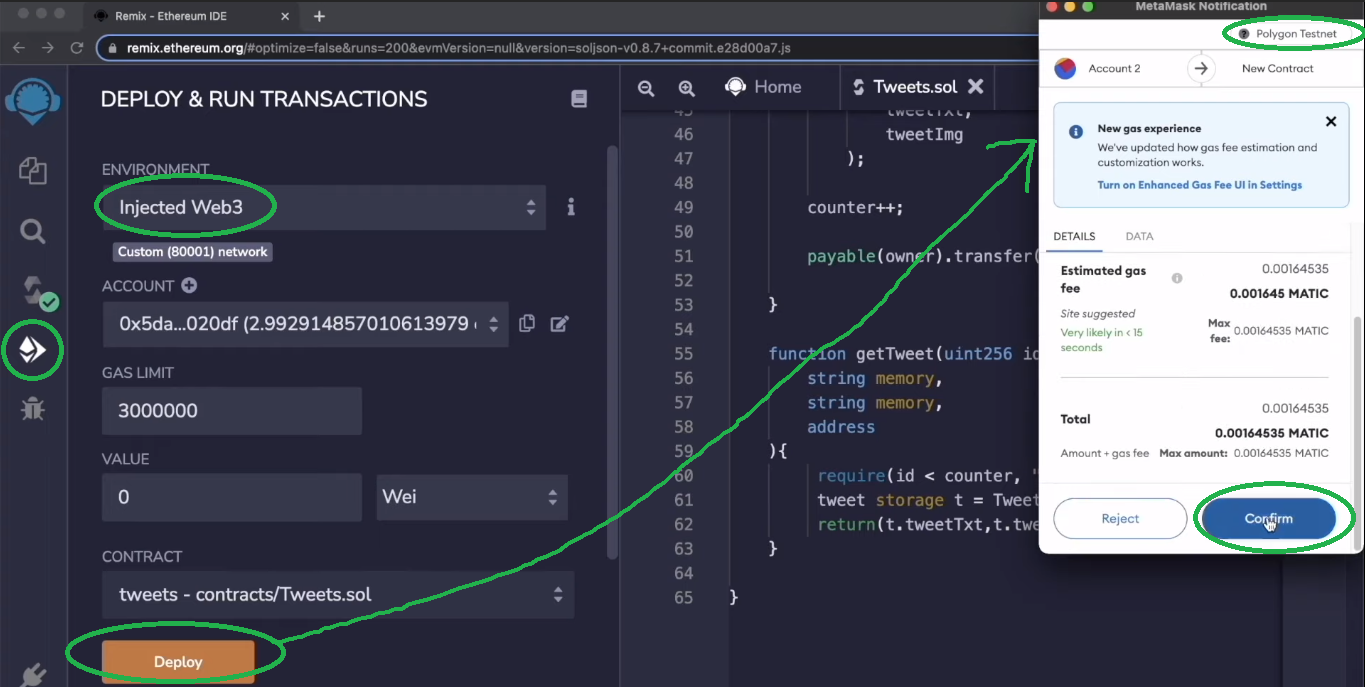
As indicated in the screenshot above, make sure to navigate to the right tab. Then, make sure you select the “Injected Web3” environment and connect your MetaMask extension to the Mumbai testnet.
Note: If this is your first time using MetaMask to connect to Mumbai’s testnet, you must first add that network. Also, add some “play” MATIC to your wallet using the Mumbai testnet faucet.
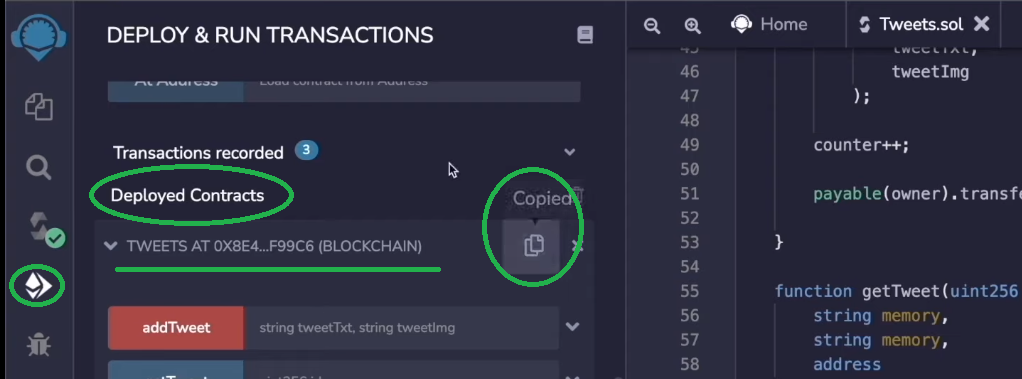
After meeting all of the above prerequisites, you can deploy your contract. Once you complete that process, you’ll be able to see your smart contract on PolygonScan. Just copy the address under the “Deployed Contracts”:
The Frontend of Our Social Media Dapp
When it comes to the Web3 UI aspects, the goal is to make it intuitive for users. Further, the Web3 frontend must be quite similar to what users understand. This is why you use the same tools as for Web2 when developing. So, in our case, we will focus on using React. In addition, you will learn to use Moralis’ web3uikit, which further simplifies things. Hence, make sure to watch the video below, starting at 20:15, and follow our in-house expert. You’ll start by completing the initial setup:
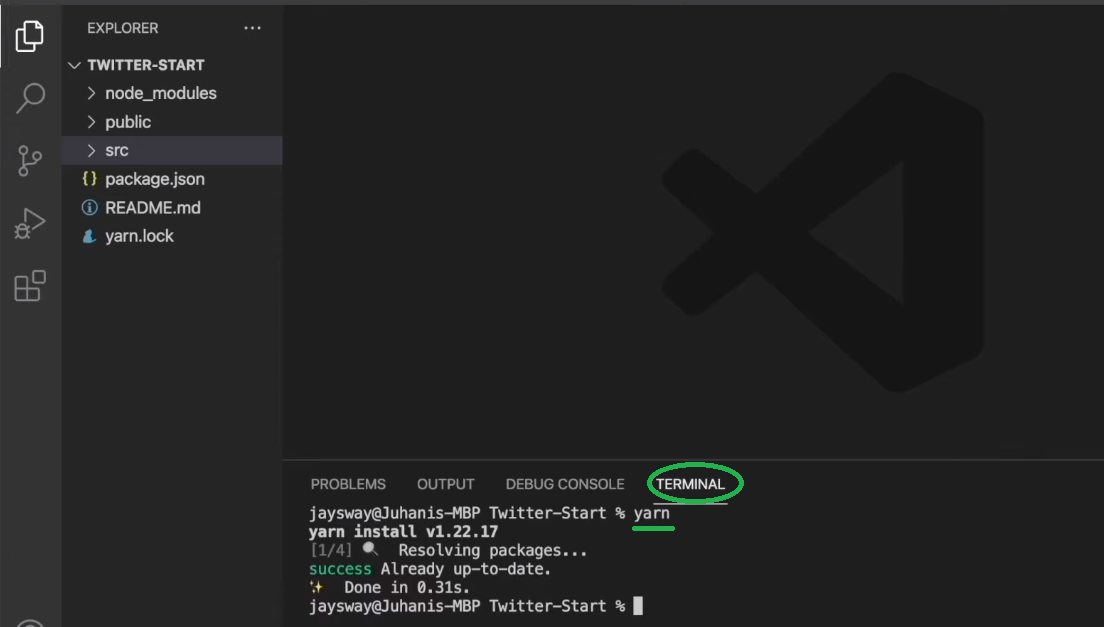
Once you clone the code and install all dependencies, you’ll build your social media dapp’s sidebars (22:41). This is where you’ll learn how to utilize the “Sidebar” component and save a lot of time. Ultimately, it shouldn’t take you more than ten minutes to have both sidebars ready:

Moving forward, you will start building the “Home.js” file, which will be your dapp’s homepage (31:44). This is where our expert will show you how to exploit web3uikit. This will empower you to effortlessly add the text-entry area, icons, and buttons. In addition, you will find out how to incorporate the option to upload images seamlessly. Once you complete the “tweeting” area, you will start building your social media dapp’s tweet feed. Next, you will add the “Profile” page (46:41). Finally, to wrap up the frontend part of this example project, you will tackle the “Settings” page (49:53).
The Backend of Our Social Media Dapp
With your smart contract and frontend in place, it’s time (video below, starting at 57:29) to take care of the Web3 functionality. This is where you can use the power of Moralis to avoid dealing with the limitations of RPC nodes. At this point, you probably already have your free Moralis account ready; hence, log in. If that’s not the case, use the “create your free Moralis account” stated at the beginning of this guide.
Note: Moralis has recently updated its UI. Thus, what you currently see inside your Moralis admin panel will most likely not match the video tutorial below. So, you have two options. You can use the new UI as per the screenshots below. Or, you can switch to the legacy UI:

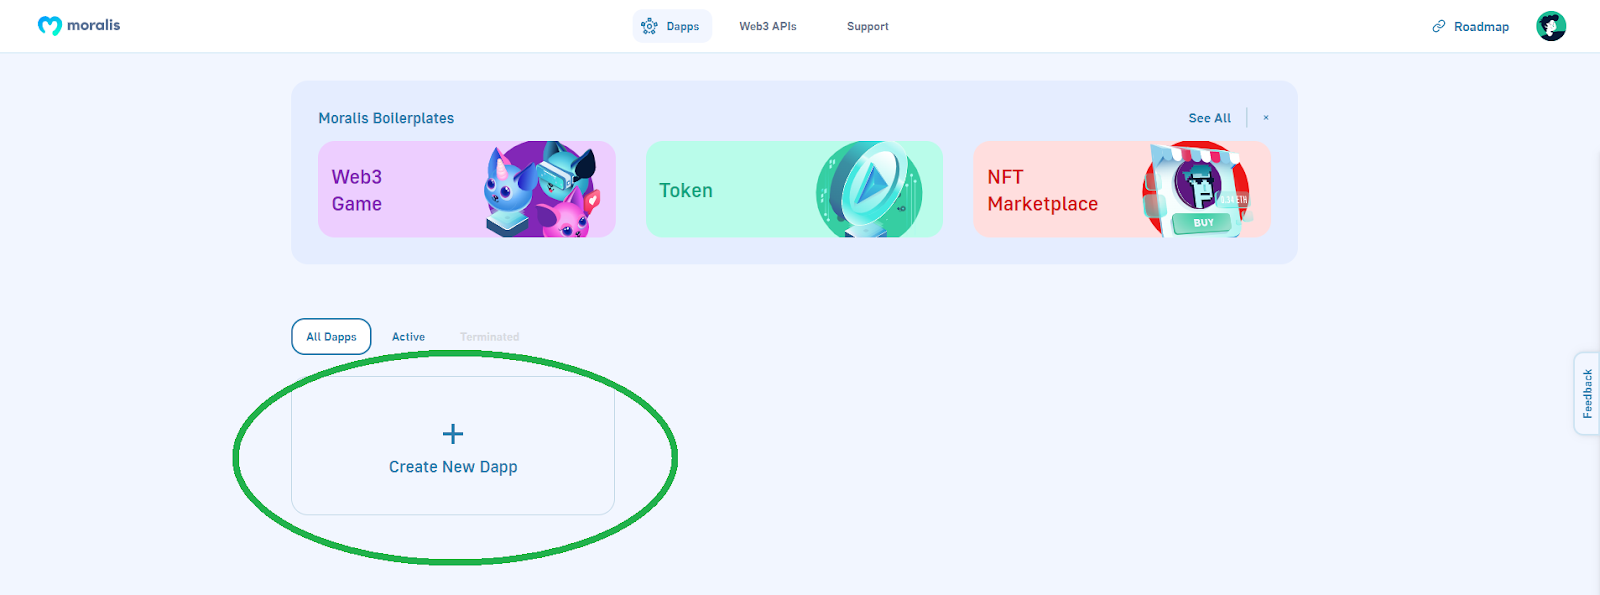
First, you’ll need to create a new dapp inside your Moralis admin panel (57:46):
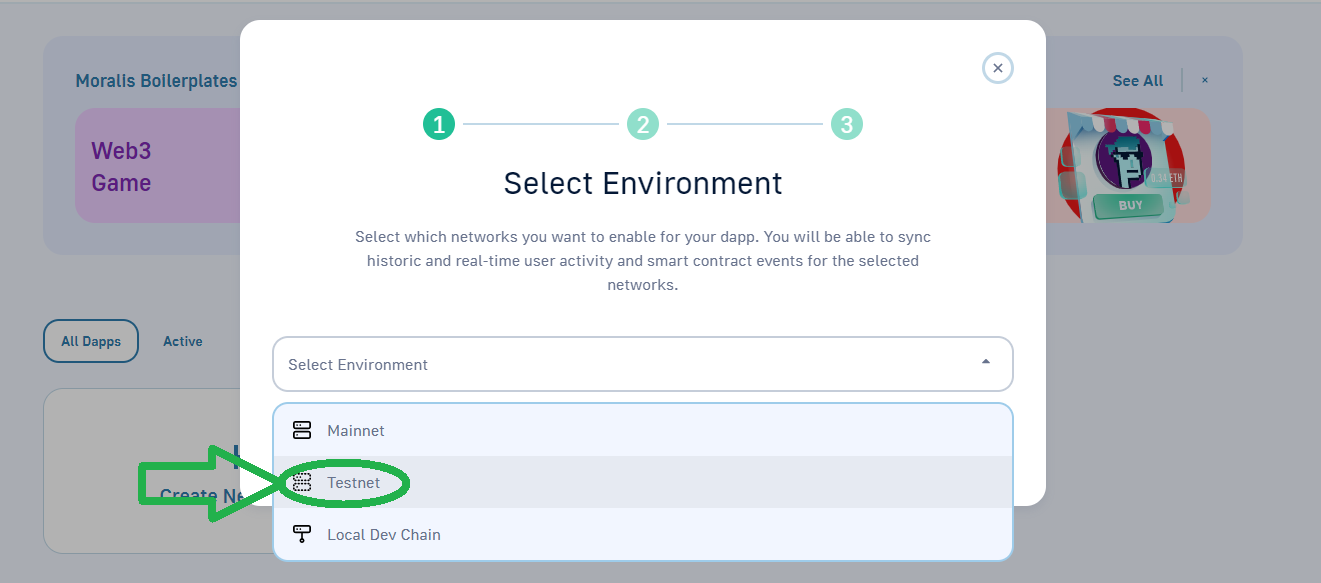
Next, select your environment – when working on example projects, the testnet is the most suitable choice:
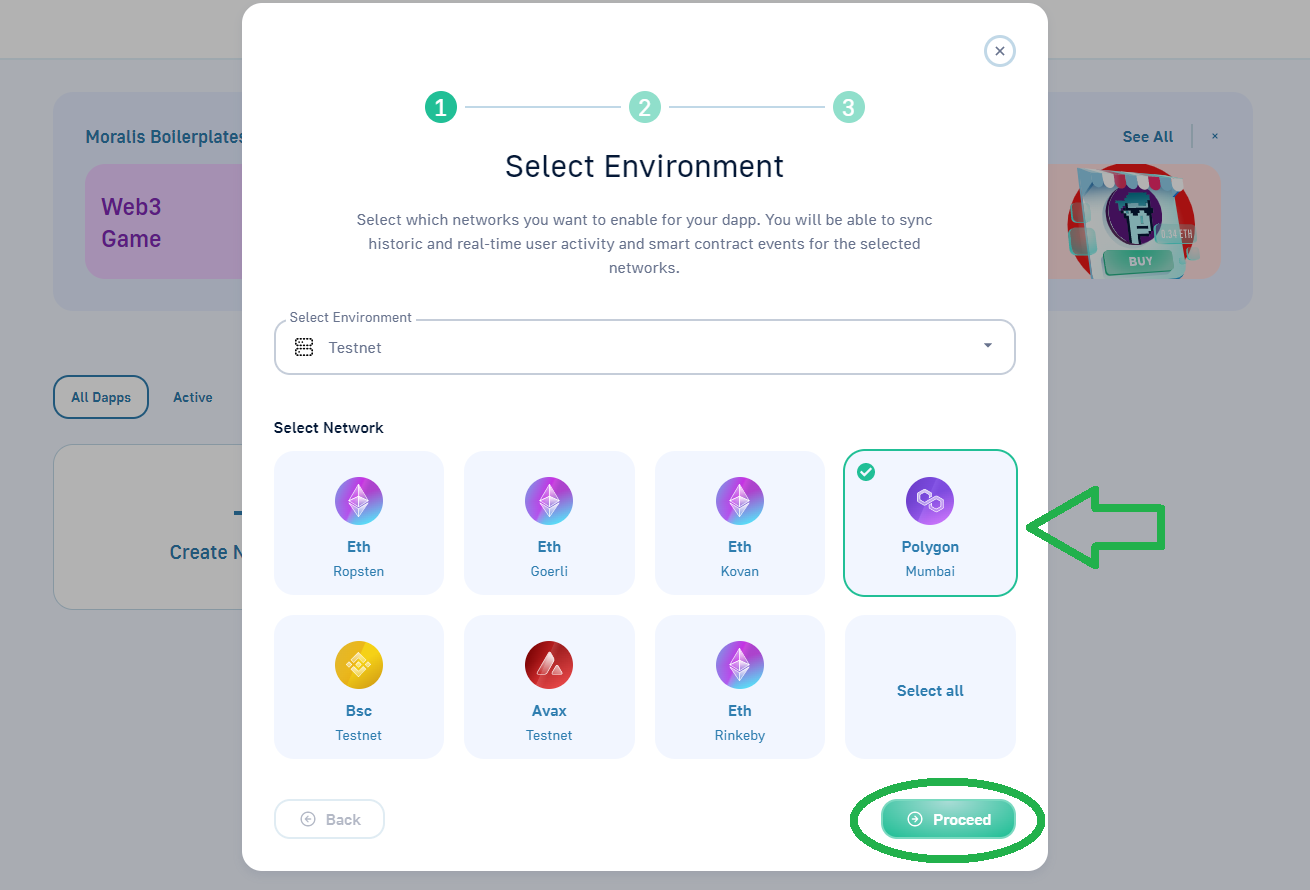
Then, select “Polygon Mumbai” and click on “Proceed”:
Then select the city closest to you:

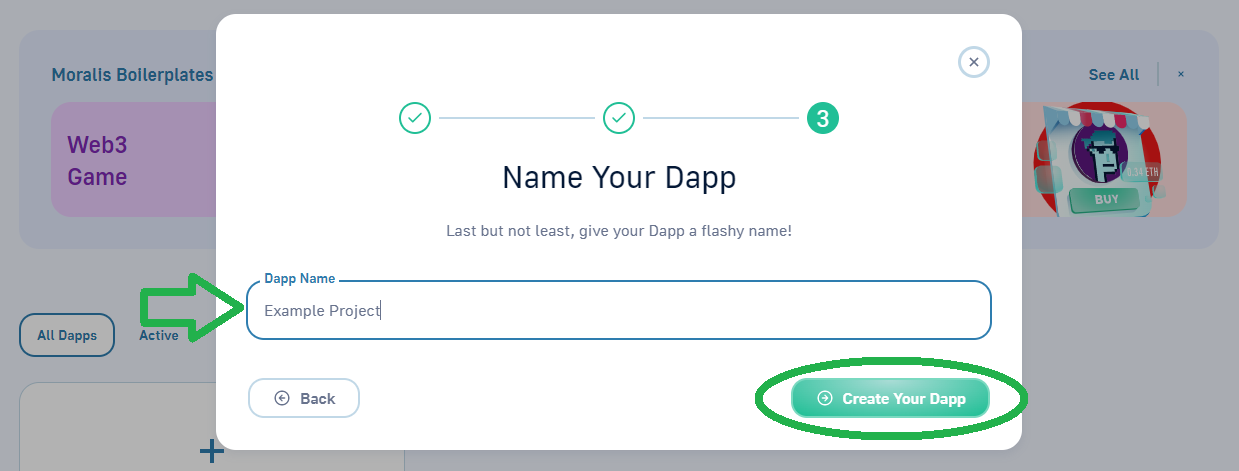
Finally, name your dapp and complete the process by clicking on the “Create Your Dapp” button:
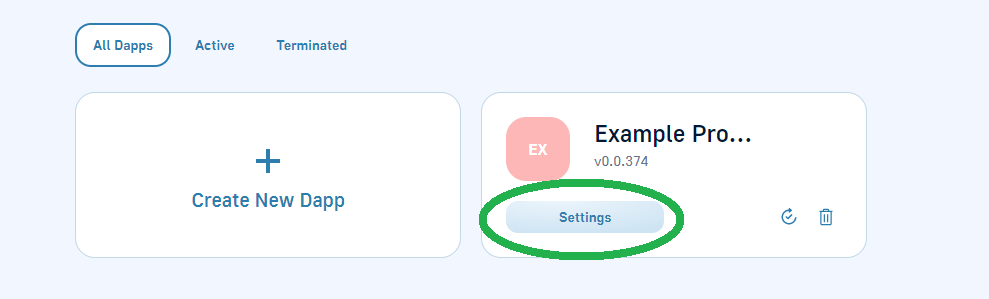
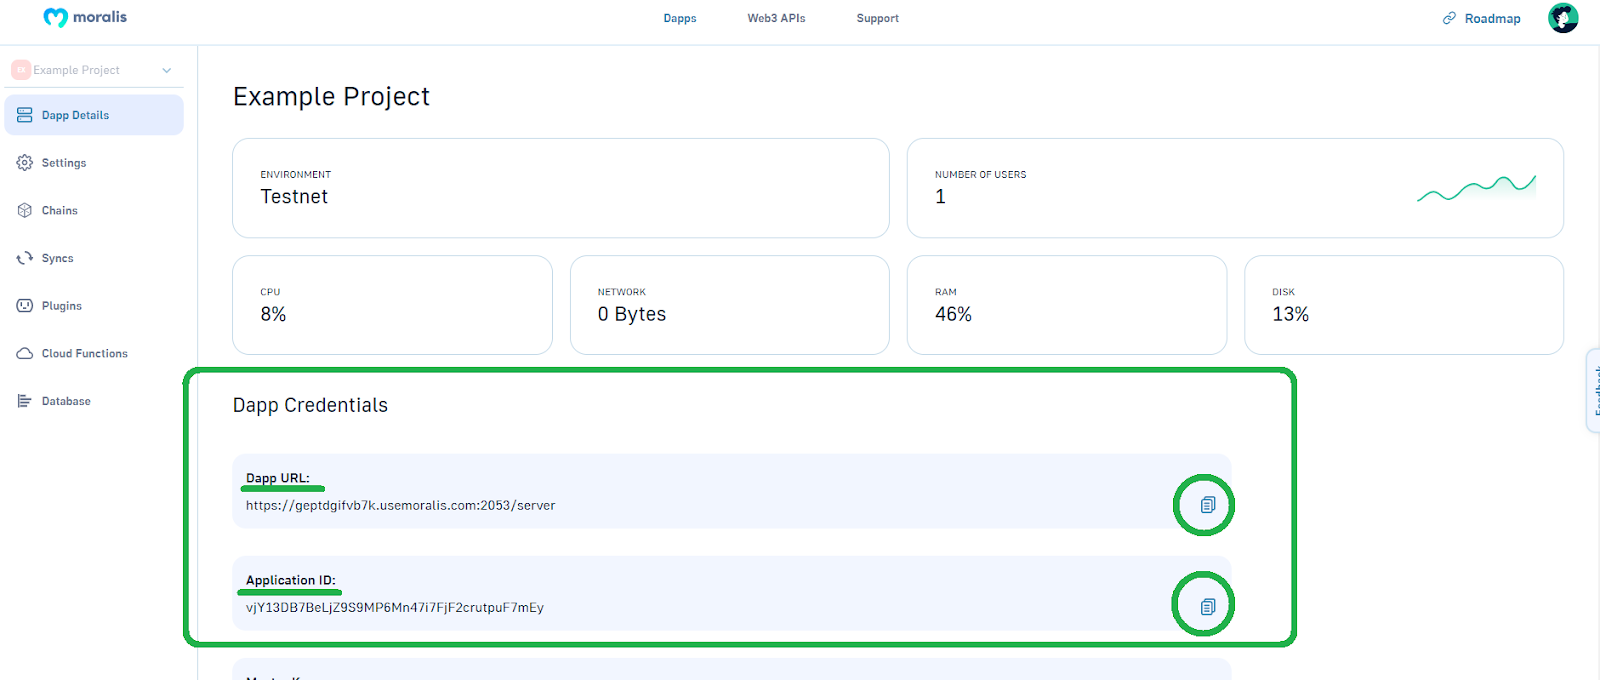
Now that your dapp is up and running, you can obtain its details (URL and ID):
Next, copy your dapp URL and ID:
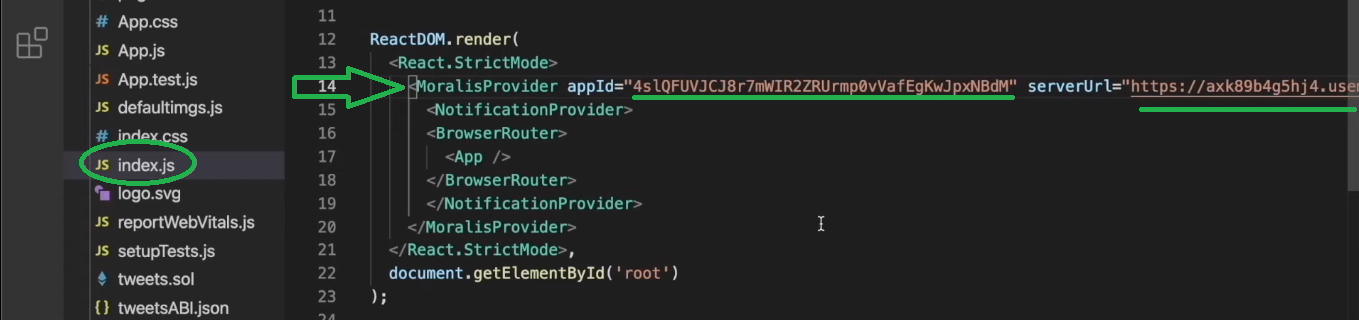
Finally, paste the above-copied details into the “index.js” file:
By completing the steps above, you now have Web3 functionality at your disposal. As such, you can add Web3 authentication to your social media dapp using the “App.js” file. Also, thanks to web3uikit, you’ll be able to have a clean and attractive “Connect Wallet” button ready in no time. Moreover, you’ll start to unveil the unlimited power of Moralis’ SDK with the “isAuthenticated” method.
On-Chain and Off-Chain Data at Your Disposal
Starting at 1:00:59, you’ll begin utilizing your Moralis database to store the on-chain and off-chain data easily. This is where you access your dapp’s database with the new UI:
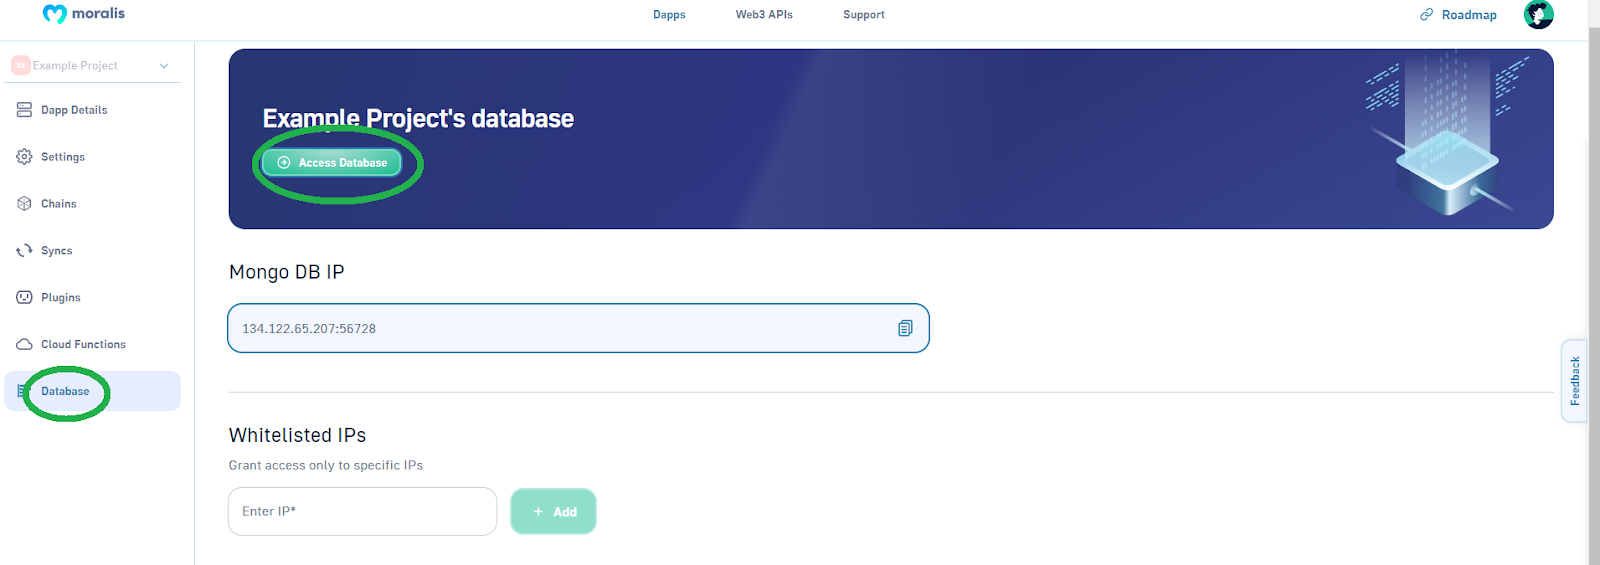
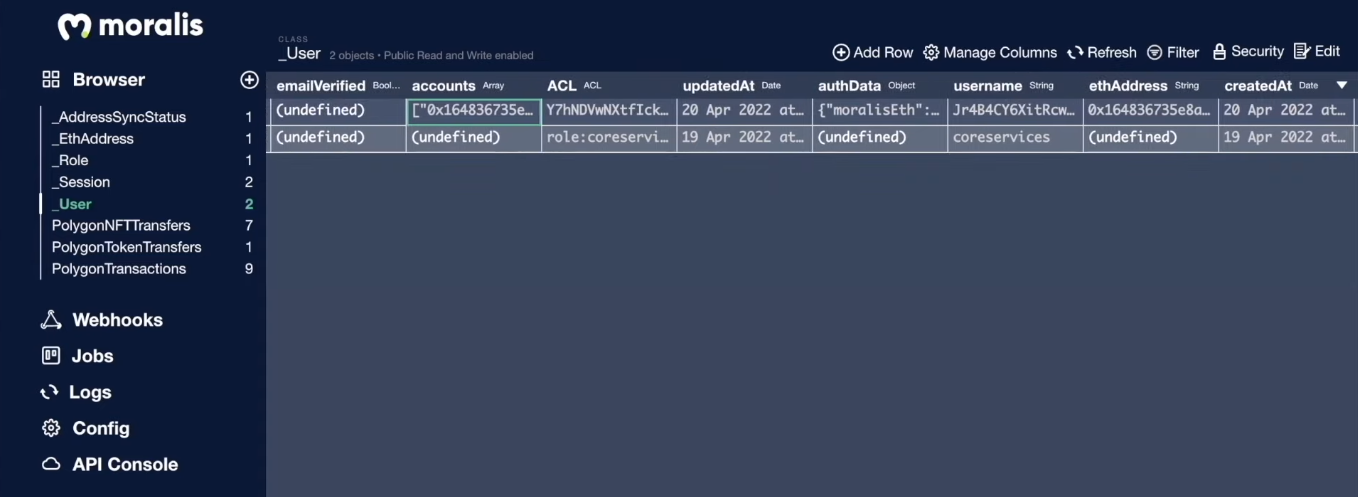
Here’s the actual database:
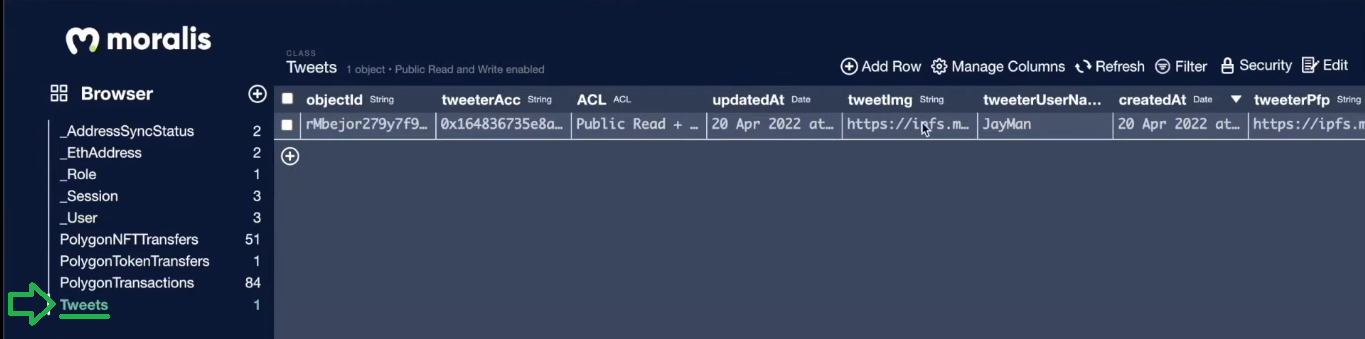
To add classes, you need to make the database work properly for your social media dapp, and you’ll use “Settings.js”. This file will also enable you to upload to IPFS, which is one of the neatest ways to save image files in a decentralized way. Then, your dapp’s users will be able to use this feature to tweet images. Next, you will utilize “useMoralis” and create the “saveEdits” async function, which will be triggered when users click on the “Save” button on their account settings page. Using “useMoralisWeb3Api”, you’ll create “useEffect” to fetch users NFTs via “getNFTs”. This will enable users to set their NFTs as their profile pictures. Finally, you want to give your social media dapp’s users a way to save their tweets on the blockchain (1:12:40). To complete this feat, you will again use your Moralis database – the “Tweets” class:
Here’s the video we’ve been referencing throughout the “Build Your Social Media Dapp with React, Remix, and Moralis” section:
How to Create a Social Media Dapp – Summary
If you’ve followed our lead, you now have your own social media dapp up and running. Hopefully, you cloned our starter code and implemented the necessary code using the above guide. However, even if you cloned our final code, you still needed to deploy your smart contract and connect your Moralis account with your React application. So, whichever path you actually took, you now know how to use Remix to compile and deploy smart contracts. More importantly, you know how to use the Moralis Web3 API and the Moralis database to cover your Web3 backend needs.
If you enjoyed creating this social media dapp, you might be interested in our other “clone” projects. If so, you can pick between the following example projects:
- Uniswap DEX Clone
- Web3 Elden Ring Clone
- Reddit Clone for Web3
- Web3 Spotify Clone
- Coinbase Clone
- Web3 Netflix Clone
- OpenSea Clone
However, if you find these projects too extensive for your taste, we encourage you to explore the Moralis blog and the Moralis YouTube channel. Some of the latest topics there cover the Ethereum Merge, an Ethereum NFT API, a Polygon NFT API, Binance NFT API, Solana NFT API, how to get Solana NFT metadata, how to mint thousands of NFT game assets, uploading Web3 Unity metadata, and much more. Moreover, if you use them properly, these two outlets can help you become a Web3 developer. However, taking a more professional approach can make the journey a lot smoother. As such, make sure to consider enrolling in Moralis Academy.
