One of the greatest things about blockchain is that all data is publicly available. In turn, every data scientist can use the Web3 data in countless ways and provide value to others. For those intrigued by Web3, this introduction to Web3 data science will be highly beneficial. By using some phenomenal tools, we’ll show you how easy the process of importing on-chain events is. The latter is done by listening to smart contract events. Essentially, the goal is to sync and index smart contract events to understand and utilize the on-chain data. Hence, once you learn how to index the blockchain, you can use available programming languages to make the most out of the obtained data.
Moving forward, you will learn how to tackle Web3 data science challenges using Moralis effortlessly. This ultimate Web3 development platform, also known as “Firebase for crypto”, provides you with a complete Web3 SDK. In addition, you’ll also get your hands on Moralis’ “sync” feature and an advanced database. Furthermore, to make things as clear as possible, we will even take on an example project. Moreover, we will be using Moralis’ beta version of Moralis Nitro. Thus, you will have a chance to experience the power of Moralis firsthand. Also, you probably know that Python and R are the two most popular programming languages for data handling, right? Thus, we will show you how to use both of these popular options for importing on-chain events. As such, you may as well consider this article as your gateway to Web3 data science.
What Makes Web3 Great for Data Science?
As mentioned earlier, the crypto realm provides an abundance of publicly available data on various blockchains. Thus, individuals with the right knowledge and tools can easily access the on-chain information. This includes all transactional data, transfer data, data on both NFTs and fungible tokens, data on staking, and more. As such, Web3 is made for advanced data science applications for anyone willing to dig into it. Moreover, since we’re so early in the game, you can be one of the first scientists to import on-chain events.
Furthermore, with several reputable programmable blockchains up and running, the sea of data is spreading fast. Fortunately, all reputable chains also have publicly available chain explorers that help Web3 data science progress. For instance, you have Etherscan for Ethereum, BscScan for Binance Smart Chain (BSC), SnowTrace for Avalanche, Polygonscan for Polygon, FtmScan for Fantom, and Solscan for Solana. All of these blockchain explorers combined with the power of Moralis offer countless opportunities for data scientists. By the way, Moralis fully supports all of the above blockchains. As such, you can easily build useful dApps (decentralized applications) on top of any of these chains. With that said, let’s jump into our Web3 data science example project.

Web3 Data Science – Importing On-Chain Events – An Example Project
As mentioned above, we will use Moralis to sync smart contract data. As such, we will first guide you through the initial setup that includes creating a Moralis server. Furthermore, in order to ensure that you experiment with the latest updates, make sure to use the link above to Moralis’ beta version. With Moralis Nitro updates in place, you’ll be able to work with an even more powerful database. Once we use Moralis’ “sync” and “database” features for importing on-chain events, we will take that data on a test drive using R and Python. Nonetheless, we’ll wrap things up by taking a closer look at some data exploration examples.
Creating a Moralis Server
To obtain Moralis’ backend functionality, you need to create your Moralis server. The latter is also essential when using Moralis for other Web3 data science tasks. Hence, follow these steps:
- Create a Free Moralis Account – Use the “Moralis beta version” link at the beginning of this article to access the signup page. Then, enter your email address, create your password, and complete the process by confirming your account (click on the confirmation link in the email sent to you). On the other hand, if you already have your Moralis beta account, just log in.
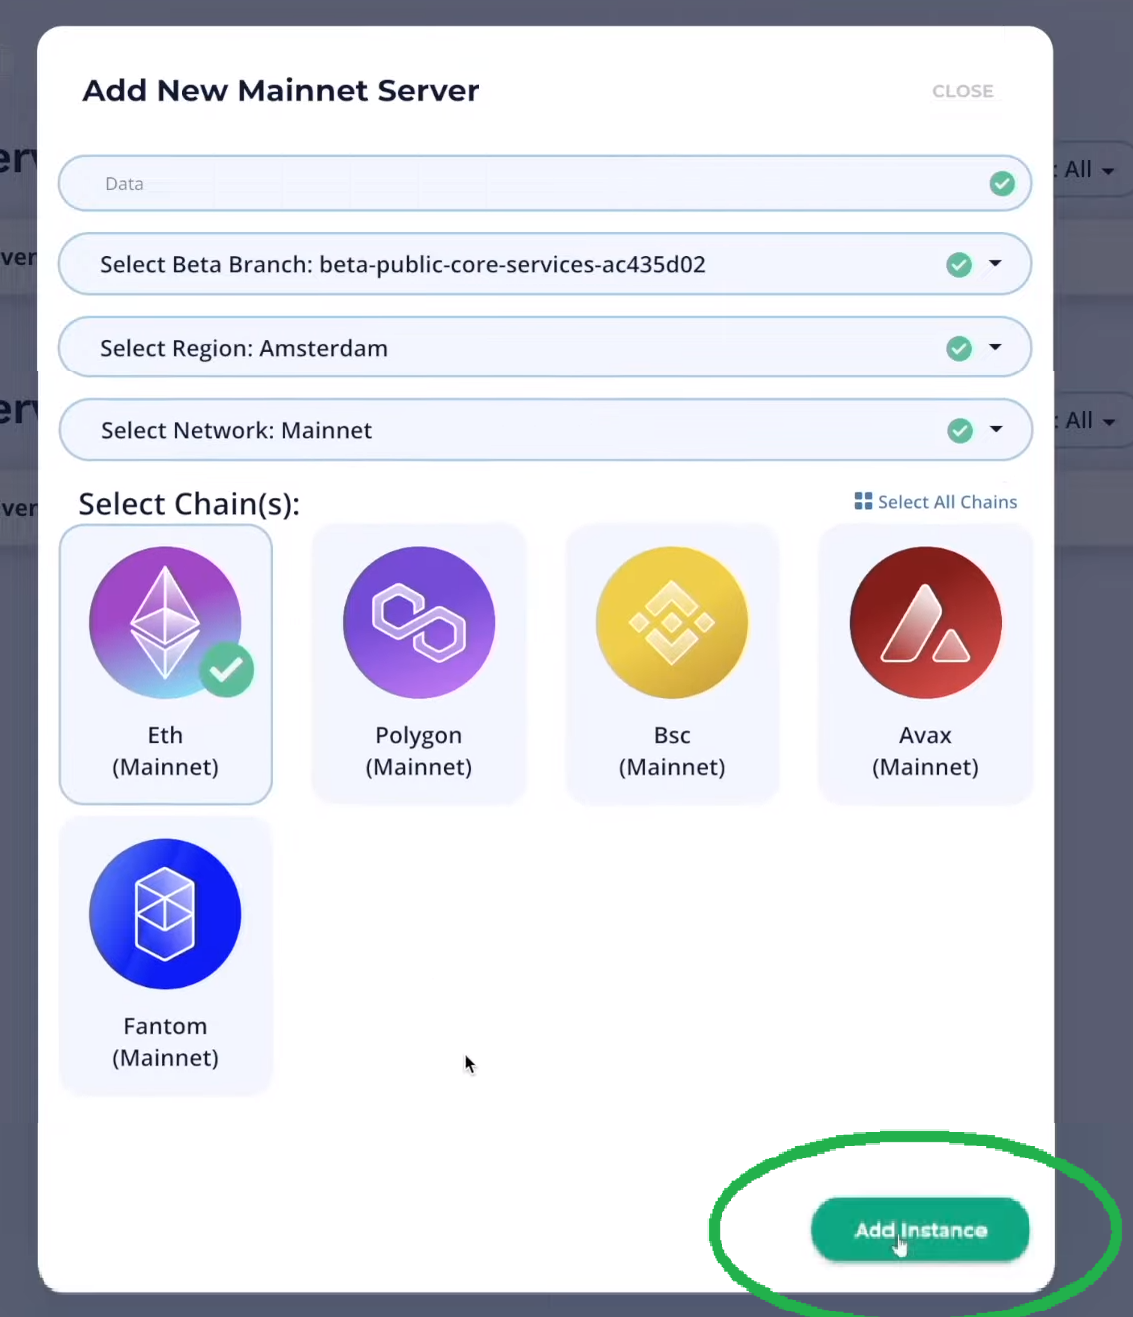
Create a Moralis Server – Once logged in, you will access your Moralis admin area. Next, make sure you are in the “Servers” section (as shown in the image below). There, click on the “+ Create a new Server” button in the top-right corner. From the drop-down menu, select the appropriate network type. Since CryptoPunks are a live project on Ethereum (we will use CryptoPunks in our example), select the “Mainnet Server” option. However, when testing dApps or working on example projects, we recommend selecting the “Testnet Server” option (see our Ethereum testnet guide).

After selecting the server type, a pop-up window will appear asking for server details. Thus, enter your server’s name (this can be anything you want), then select region, network, and chain(s) (CryptoPunks are on Ethereum). Finally, spin up your server by clicking on the “Add Instance” button.
With your Moralis server up and running, you are ready to tackle the process of importing on-chain events. How? Well, every server comes with a full set of tools, including the above-mentioned “sync” feature and a powerful database (the Moralis dashboard). Both of these tools are essential when it comes to using Moralis for Web3 data science.
Importing On-Chain Events using Moralis’ “Sync” Feature
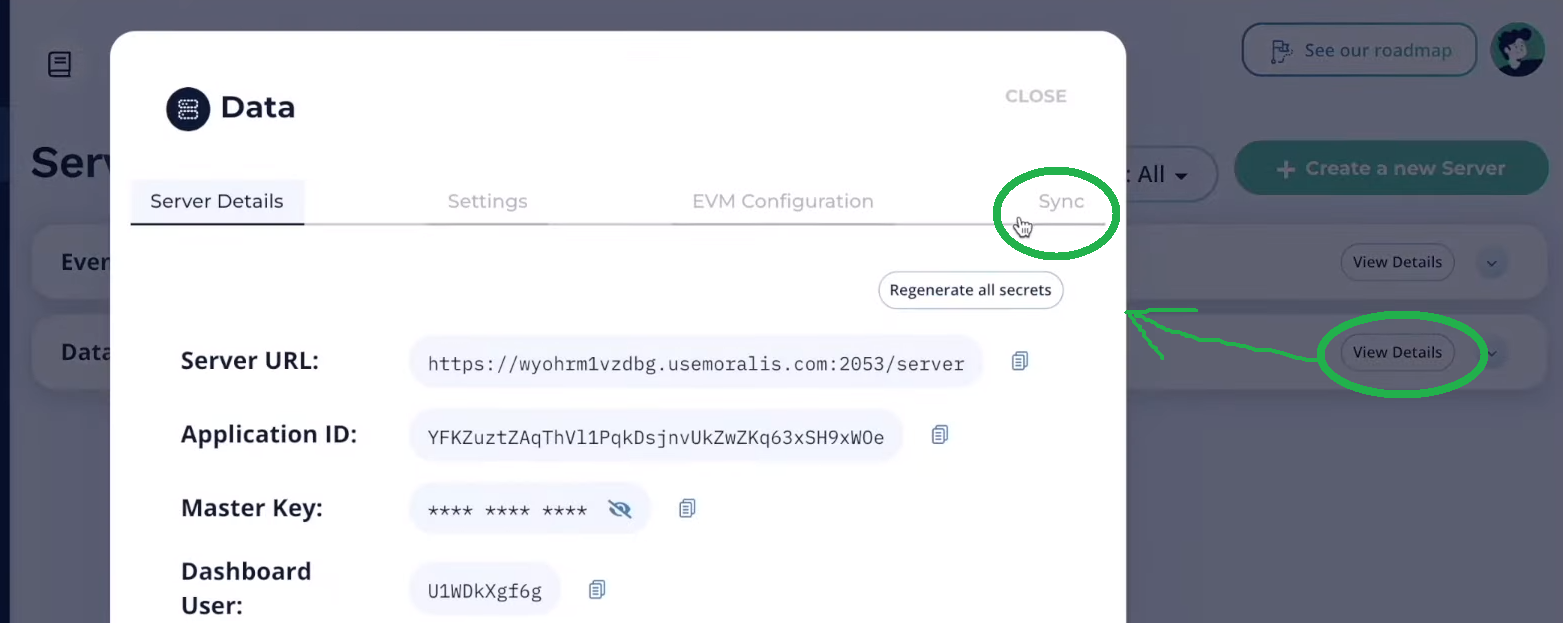
To access the “sync” feature, you need to click on the “View Details” button for the above-created server. Then, you’ll see the “Sync” tab on the far-right side of the window that will appear:
To start importing on-chain events, you need to click on “Add New Sync”. After clicking this, select the “Sync and Watch Contract Events” option:
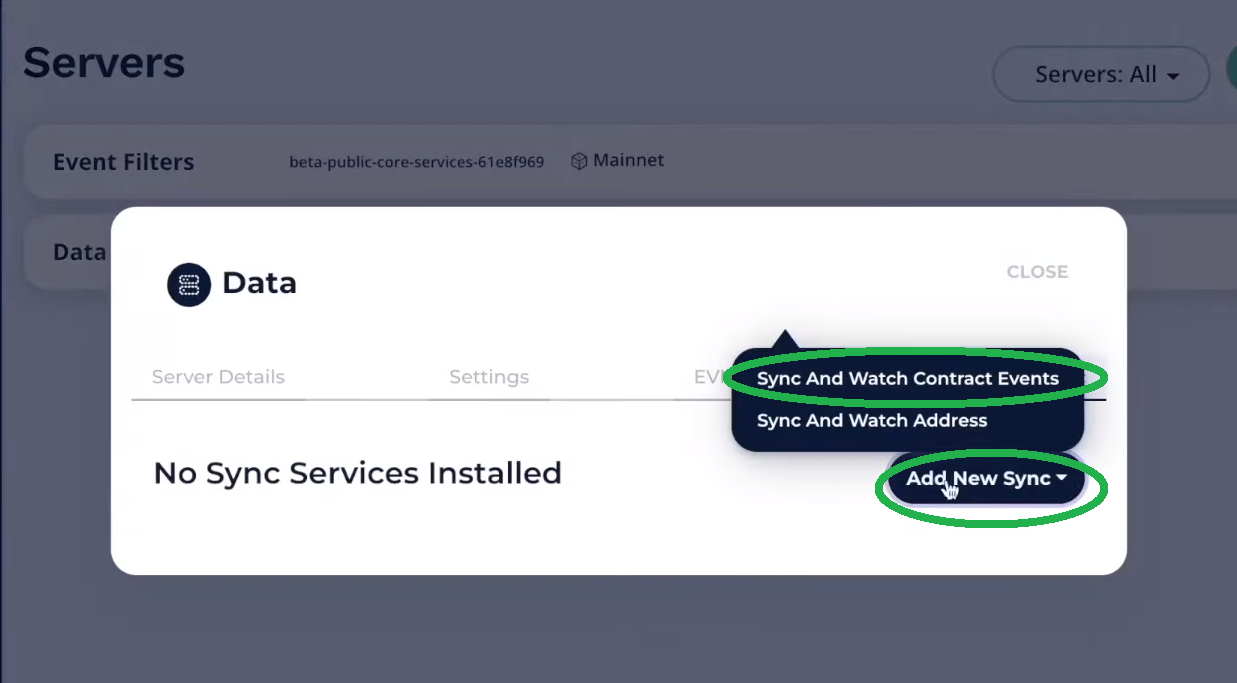
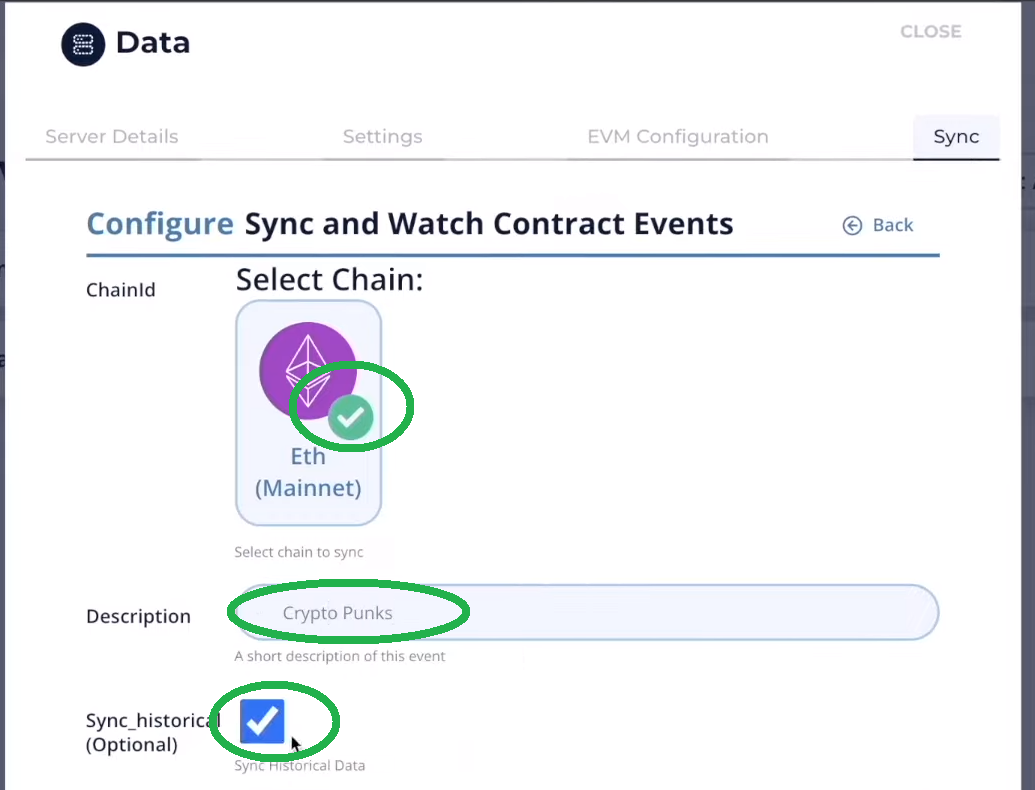
Next, you’ll see the “Configure” options. Since you’ve created the above server for the Ethereum mainnet, this will be the only option under the “ChainId” category. Thus, click it in order to select it. Then, add a description (this can be anything you want) and click on the “Sync_historical” option:
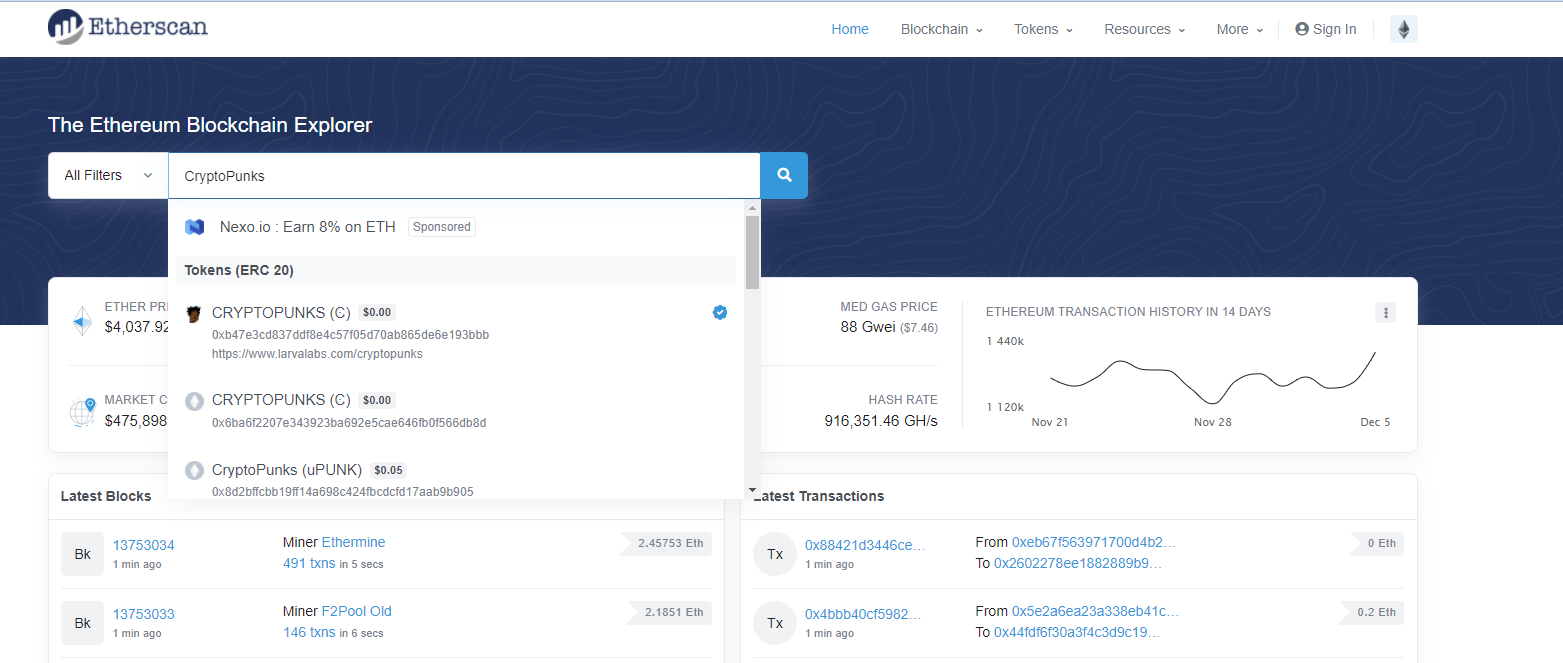
Using Etherscan to Obtain the Topic
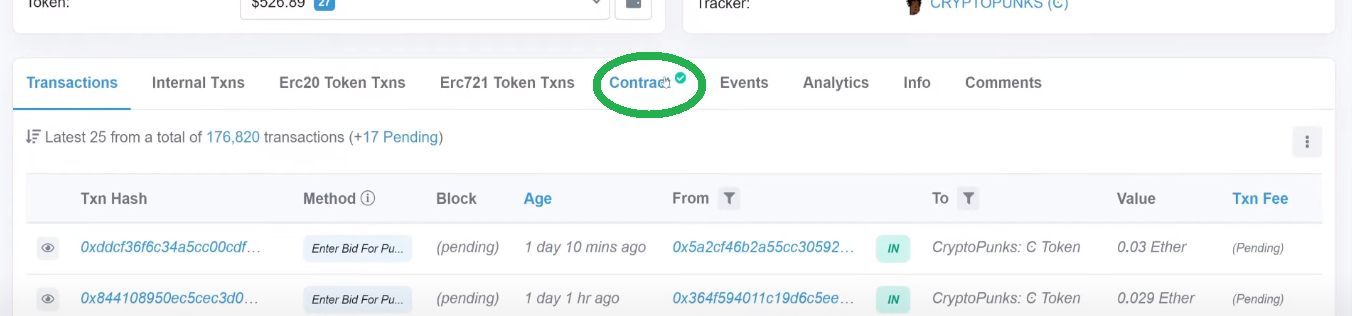
When it comes to “Topic”, things get more specific. As such, you need to enter a set of specific values for the smart contract in question. Since CryptoPunks are an Ethereum-based project, we can use Etherscan. Once on Etherscan, we type “CryptoPunks” in the search bar:
Among the returned search results (the “Transfers” tab), you need to click on one of the transaction hashes that have the “Transfer Punk” methods:

After viewing the “Transaction Details” page, select the “Logs” tab:

In the “Logs” tab, you’ll see the “Transfer” and “PunkTransfer” next to “Name”. By now, you know that “PunkTransfer” is the one that interests us. Moreover, to finally get the topic, you need to use the details (only the types) inside the parentheses following “PunkTransfer”:

Now, enter the above details into the entry field next to “Topic” in the “Configure Sync and Watch Contract Events” window:

Moreover, you can do the same for the “PunkBought” event. As a matter of fact, let’s do that now by using another valid way to obtain that event’s topic. So, for starters, click on the contract address of CryptoPunks:
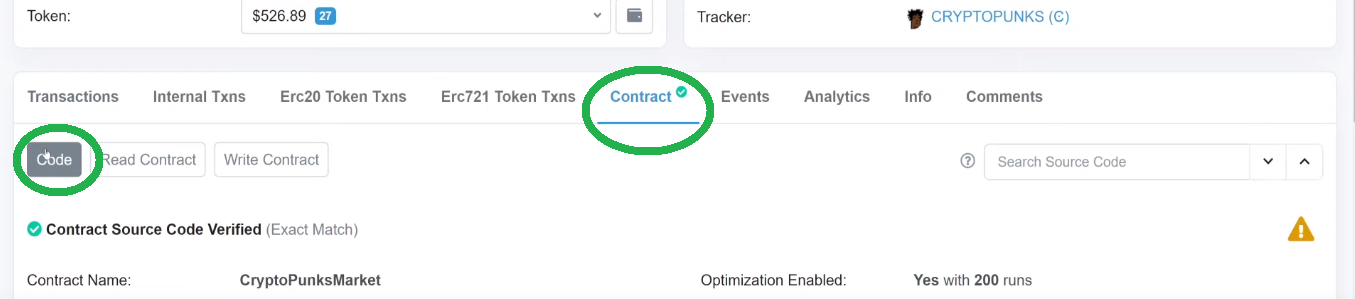
On the next page, scroll down slightly and click on the “Contract” tab:
Now you should be on the “Contract” tab. If so, make sure that the “Code” section is selected.
Move forward by scrolling down again. At the fifty-third line of the contract source code, you will see all events:
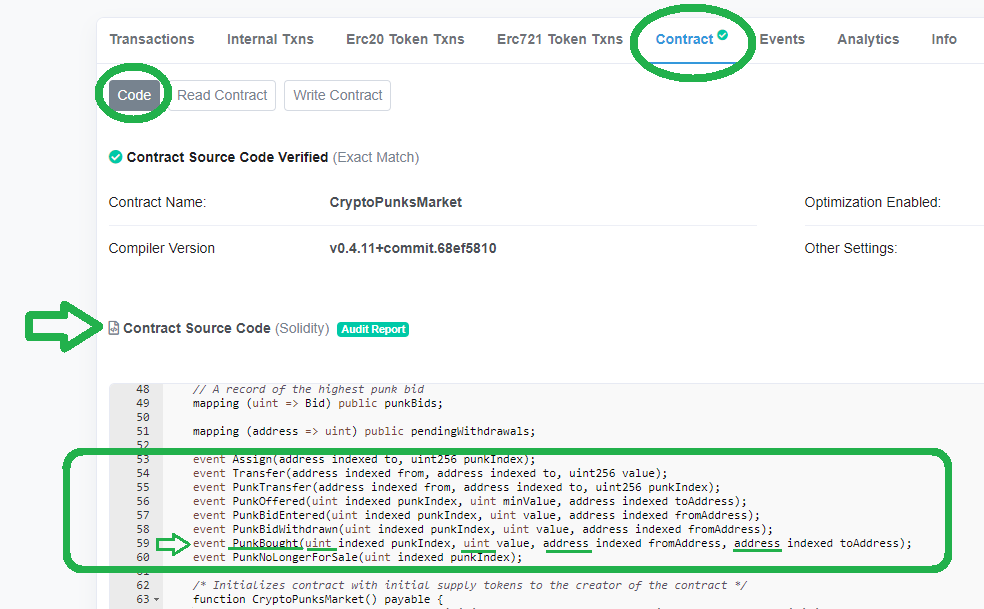
All that’s left to do is to copy the event types into the topics entry field:

Note: Moving to the next categories of the “Configure Sync and Watch Contract Events” window, we will focus on the “PunkBought” event.
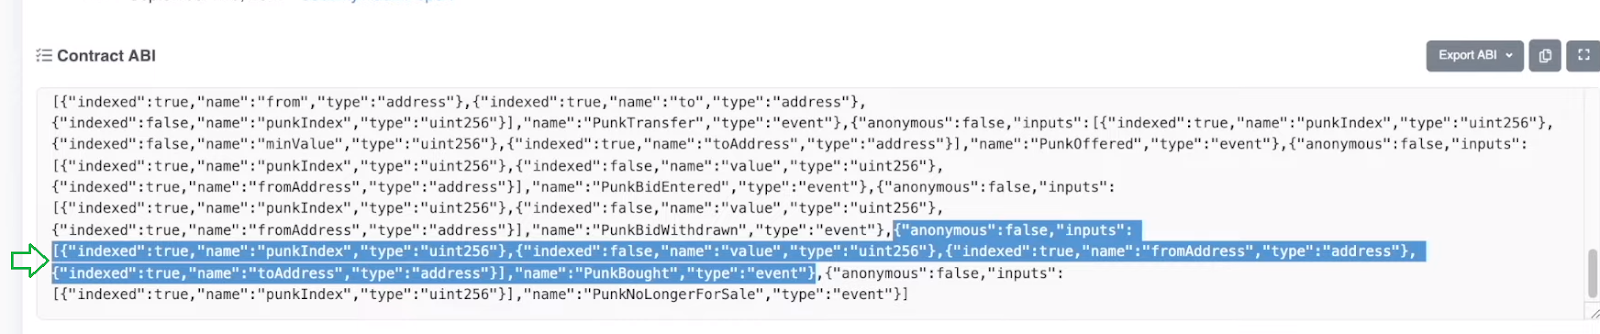
Using Etherscan to Obtain the ABI
The ABI details are also available on Etherescan. In fact, they are just below the “contract source code” covered above. As such, return to Etherescan and scroll down a bit further until you see “Contract ABI”:
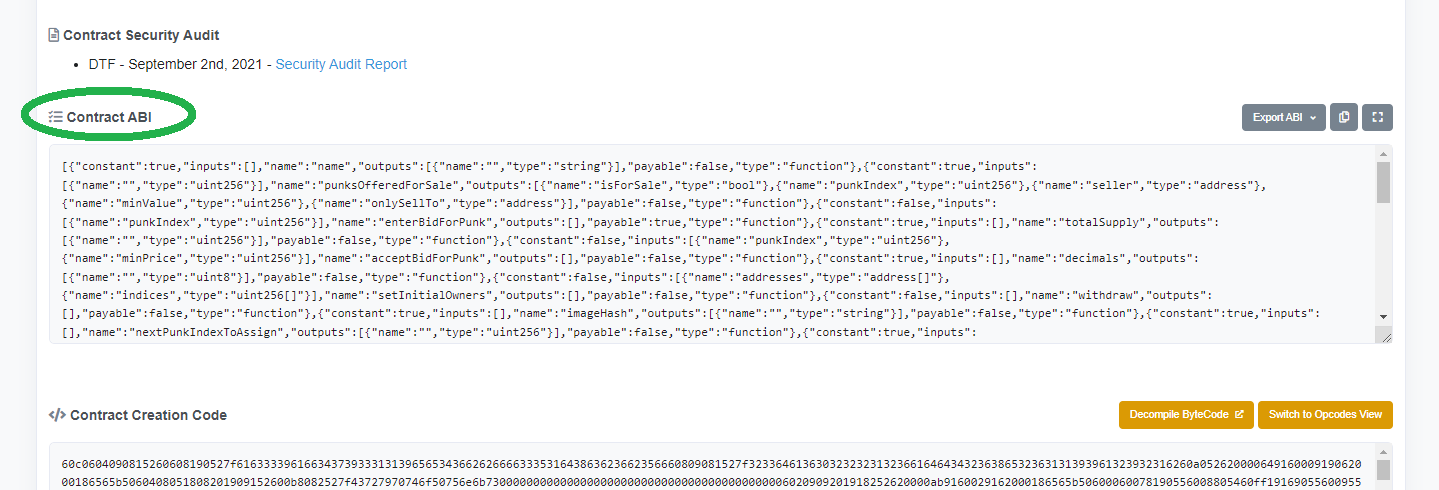
You can look for the “PunkBought” event manually or use your browser’s search option. Once you find it, select everything inside the curly brackets containing the event in question and copy the selection:
Head back to “Configure Sync and Watch Contract Events” and paste the information in the entry box next to “Abi”:

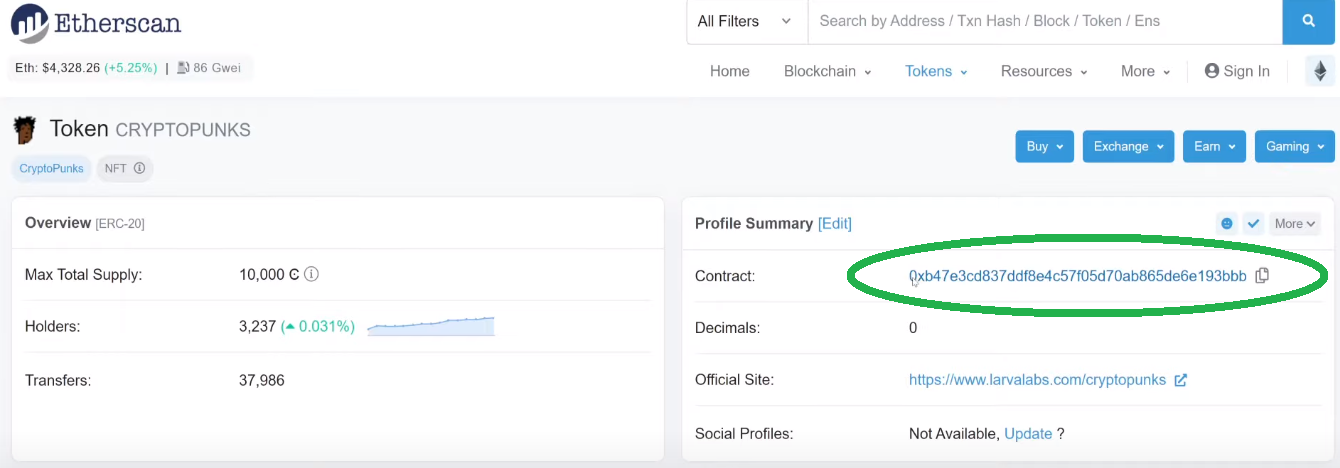
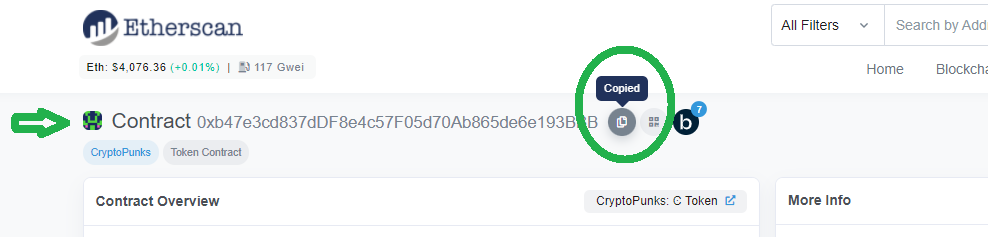
Using Etherscan to Obtain the Contract Address
The next entry requires the relevant contract address. Of course, Etherscan has that piece of information as well. Moreover, this is the contract address that you’ve clicked on in one of the previous steps. However, it is also located on the current page of Etherscan as well (if you are following our lead). You’ll see it if you scroll to the top. Next, just click on the copy icon:
Head back to the “Sync” tab and paste the address:

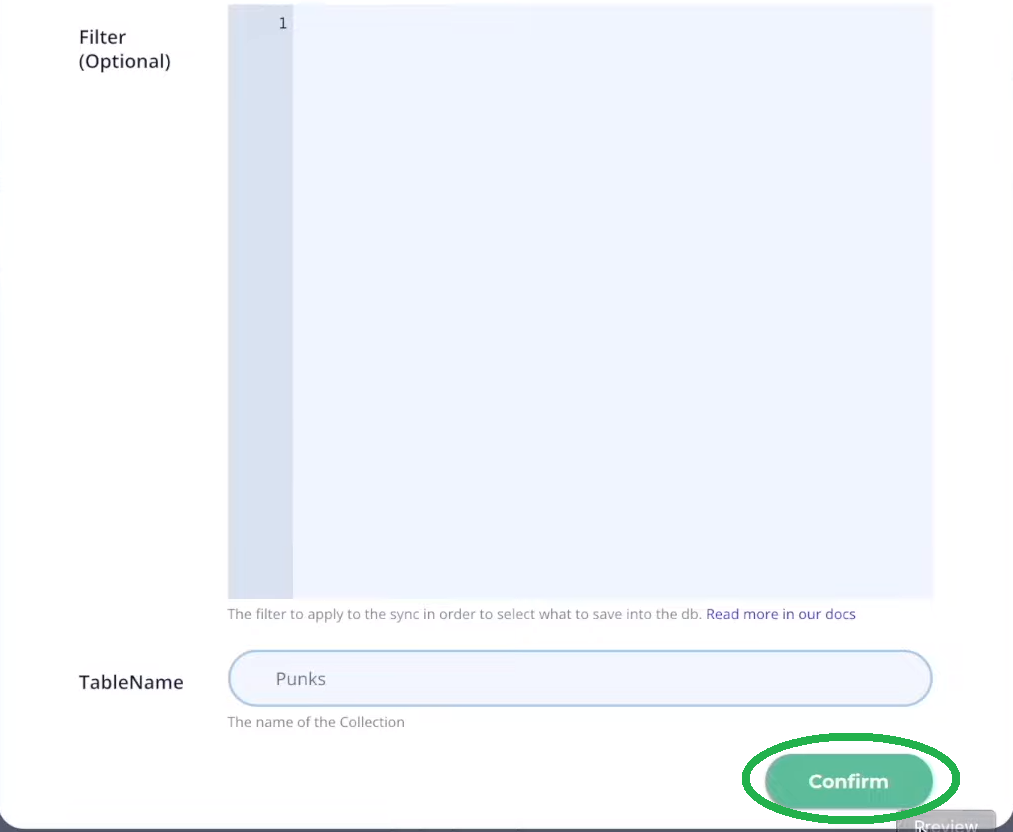
Below the “Address” category, you’ll see “Filters”. This optional category is extremely powerful, and we will use it soon. However, for now, just enter “Punks” (this could be anything without space) next to “TableName” and click on “Confirm”:
Web3 Data Science Made Easy with Moralis Dashboard
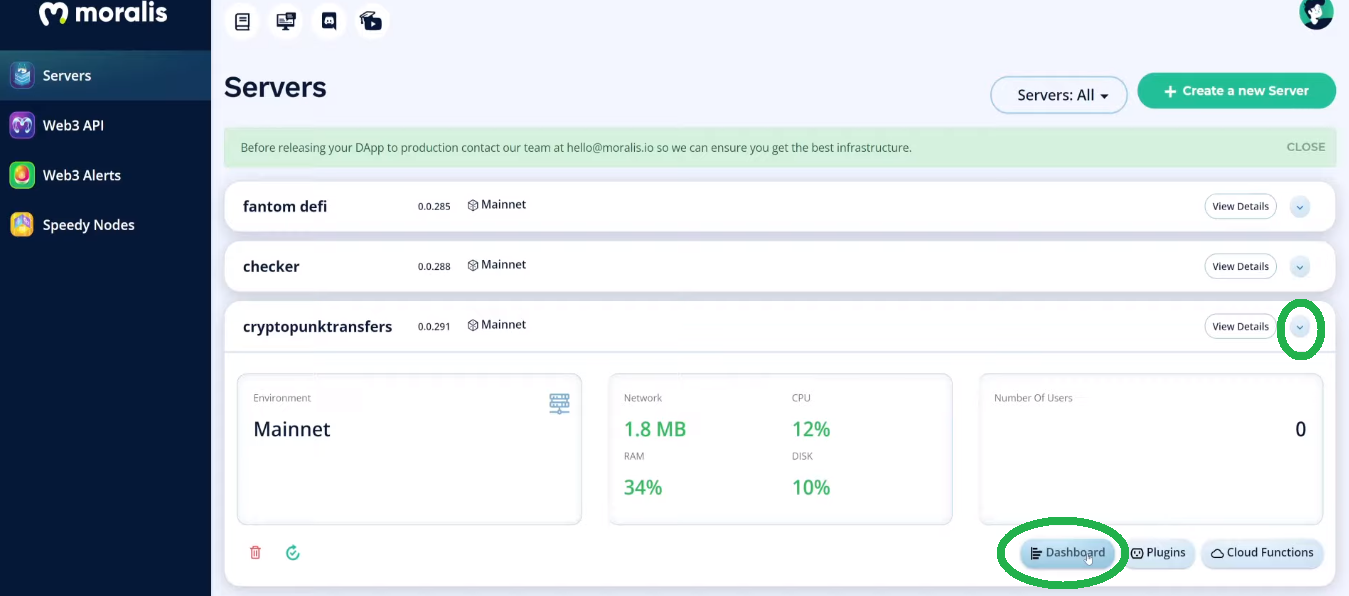
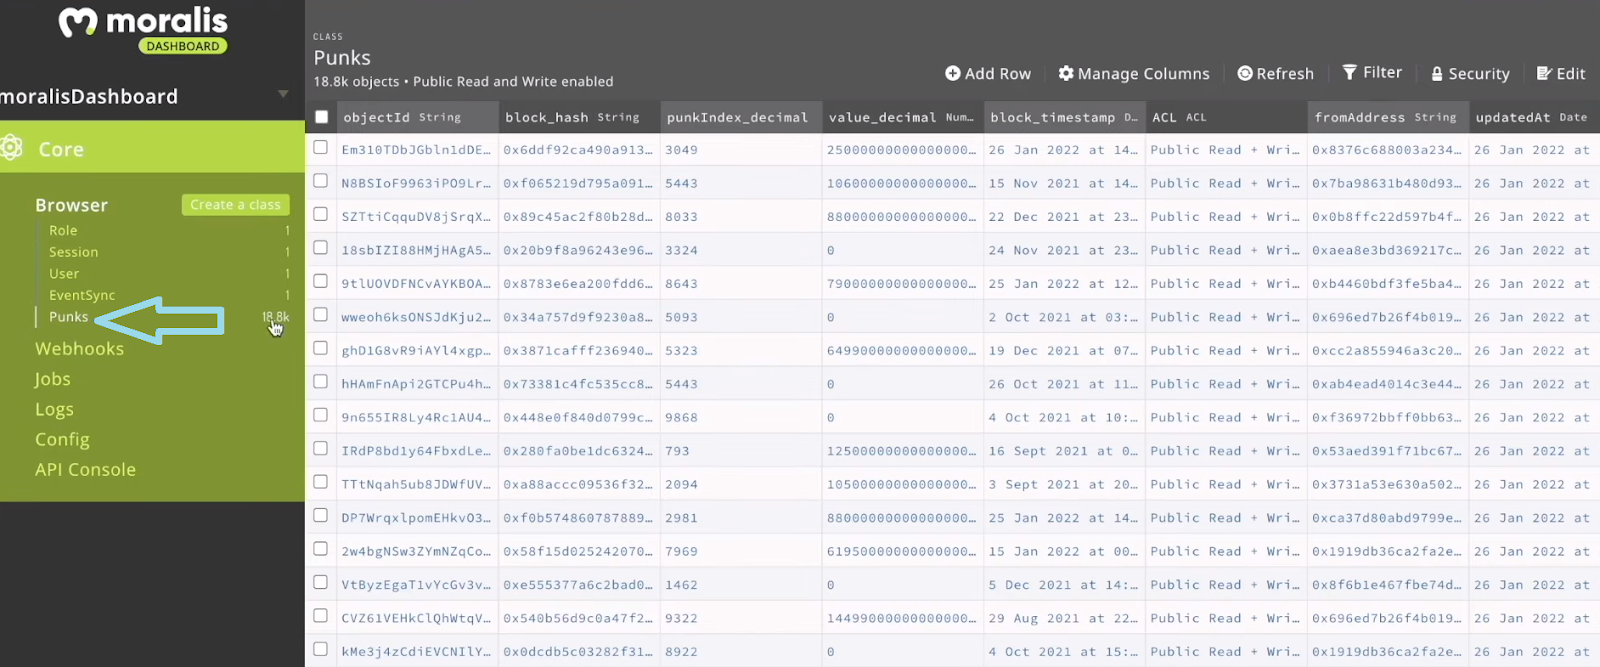
After creating your sync and watch contract event (as guided above), your Moralis dashboard (database) will automatically populate a newly created class called “Punks”. To access your server’s dashboard, first, close the “Sync” window. Then, click on the arrow icon next to the “View Details” button, followed by a click on “Dashboard”:
If you’ve done everything as instructed, you should now be looking at your Moralis dashboard. The latter should contain all default classes and the “Punks” class:
The incredible thing is that your database has already completed importing on-chain events. That means you can further use that data according to your wants and needs. How’s that for Web3 data science? Furthermore, as mentioned, we can use various filters to eliminate all data that doesn’t interest us. Moreover, if you are interested in learning how to set specific filters in place, make sure to watch the video below (4:15). A Moralis expert will show you how to filter out transactions that have values of zero ETH. In addition, as an example, he’ll even show you how to obtain transactions only completed in 2021.
Using Web3 Data Science Tools
Now that you have learned how easy importing on-chain events can be, you are ready to use Web3 data science tools. Of course, there are many options available; however, for the sake of this example project, we will focus on Python and R. In the video below, a Moralis expert will show you how to export the above data to either of these two options. But before that, he’ll also guide you through the setup steps that will enable that option (7:55). Moreover, as far as the “Python” Web3 data science goes, it starts at 8:50. However, in case you’re interested in the “R” tutorial, jump over to 11:50. Nonetheless, you’ll also have a chance to see some examples of data exploration at 13:58.
Here’s the video we’ve been referring to:
Web3 Data Science – Importing On-Chain Events – Summary
We’ve covered quite a bit of information above. At this point, you should know why Web3 data science is worth focusing on. Moreover, you now know that Moralis offers you all the tools you need for importing on-chain events. By using Moralis’ “sync” feature and your server’s database, you first index the blockchain of your interest. In that step, you can further refine the data by using filters that suit your focus. Then, you get to set things up properly to easily import that data into various Web3 data science tools. In the video above, you’ve had a chance to see that done for Python and R.
If you are interested in learning more about blockchain development and taking on additional example projects, make sure to visit the Moralis YouTube channel and the Moralis blog. Some of the latest topics dive deep into the ERC721 smart contract standard, Web3UI kit, how to get an OpenSea API key in 2022, how does Web3 work, the ultimate Web3 tech stack, a Web3.js vs Ethers.js comparison, NFT API alternatives, gasless transactions, Web3 login, and much more. Moreover, there may be some of you who are determined to take your blockchain development game to the next level even quicker. Fortunately, there is a fast lane available, and it’s called Moralis Academy. By enrolling, you get access to a supportive community, the highest quality courses, and professional mentorship. As such, you can become a blockchain developer and go full-time crypto in no time.