You probably know that Unity is one of the leading cross-platform game engines that supports various desktop, mobile, console, and VR platforms. However, you might not be aware that you can use Unity in your Web3 game design and blockchain gaming endeavors, thanks to Moralis. By using Moralis in your Unity projects, you can easily incorporate numerous Web3 elements such as NFTs. For example, you can have a simple Unity NFT minter dapp (decentralized application) up and running in minutes by simply copying and pasting short snippets of code provided by Moralis. If you’d like to use this “Firebase for crypto” platform to mint a Unity NFT quickly and easily, follow along with the content herein and pay close attention to the video at the end of this article!
If you are new to Unity Web3 programming, don’t worry; you will have a chance to follow our lead as we move forward. Herein, we illustrate the exact steps you need to complete to gain the complete functionality of this Unity NFT minter dapp. Also, we will walk you through the most crucial script to provide you with a proper understanding of how this dapp functions. Along the way, you’ll also learn what makes Moralis the best Web3 backend platform. But, before we show you how to create your own Unity NFT minter, we’ll do a quick demo of this Unity dapp. Hence, you will have a proper understanding of what to expect moving forward and whether or not you want to actually use it. So, if you want to start building this Unity NFT minter dapp, create your free Moralis account and follow our lead!

Unity NFT Minter Demo
As mentioned above, let’s do a quick demo of our Unity NFT minter dapp. By looking at the screenshot below, you can see that our dapp starts with Web3 authentication:

In order to use this dapp, you need to click on the “Connect” button, which initializes the Web3 login process. Hence, you can use your mobile Web3 wallet (e.g., MetaMask) to scan the QR code and confirm the login inside your wallet. Once logged in, you see the following screen:

As shown above, there are three buttons in our Unity NFT minter dapp. In the top-right corner, we have the “Disconnect” button, which disconnects the connected Web3 wallet. Then there’s the “View Contract” button that opens the smart contract currently used in a chain explorer (PolygonScan in our case). Last but not least, there’s the “mint” button, which is the one that triggers the minting process. So, when you click the “mint” button, this Unity dapp takes your metadata link (a URL currently provided in Unity) and executes the minting transaction. Of course, you need to confirm the transaction in your connected wallet:

Once you confirm the transaction, the smart contract mints an NFT. Moreover, as soon as the NFT is minted, the dapp also displays the “View on OpenSea” button:
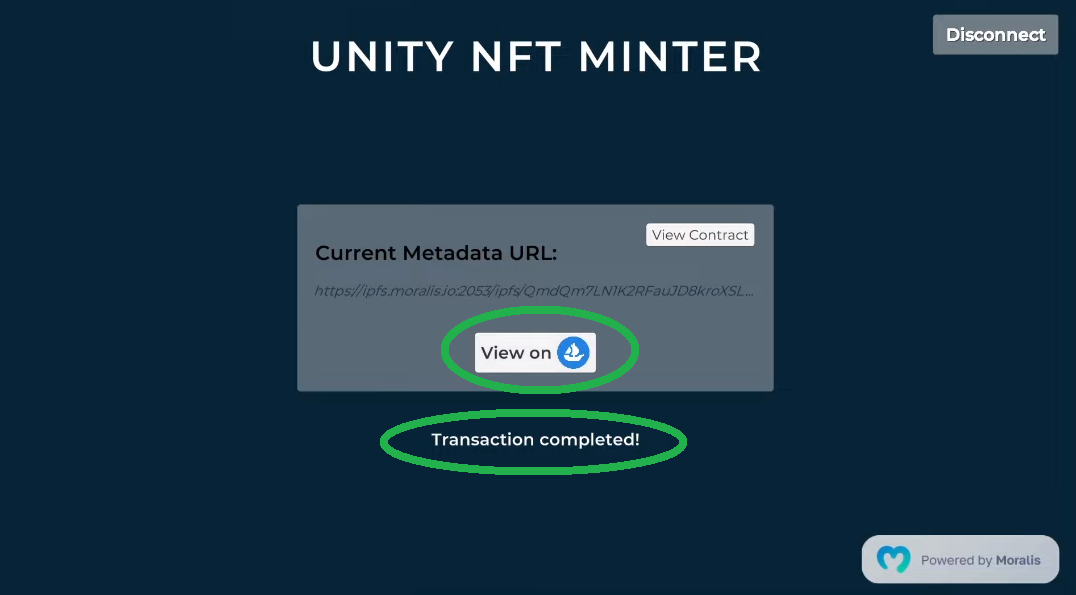
So, if you click on the “View on OpenSea” button, you get to see the above-minted NFT on this popular NFT marketplace:

Unity NFT Minter Powered by Moralis
As mentioned in the introduction, and as indicated by the “Powered by Moralis” icon that you might have spotted during the above demonstration, this ultimate Web3 development platform is the key to using Unity for Web3 development. As such, it seems appropriate that we tell you more about Moralis.
Meet Moralis
Moralis provides a single Web3 workflow for building high-performance dapps. It enables you to use JavaScript or Unity proficiency and create Web3 applications effortlessly. For starters, Moralis enables you to cover multiple types of Web3 authentication. Accordingly, you can authenticate with MetaMask, WalletConnect, or even focus on Web3 authentication via email and Web3 social login. The latter two options are particularly powerful for boosting Web3 user onboarding. Also, Moralis enables maximum flexibility regarding identity and session management. In addition, thanks to Moralis monitoring, you get all the data regarding users’ transfers, trades, mints, burns, and other actions relevant to your dapp. Essentially, you get to index the blockchain without dealing with the limitations of RPC nodes.
Furthermore, the Moralis SDK is cross-platform, interoperable, and includes a web SDK, a game SDK, and a backend SDK. As such, you can cover the Web3 frontend (web3uikit) and backend in a single place. You should also note that Moralis is all about cross-chain interoperability. Hence, you never get stuck to any specific blockchain, as you can use the same code for multiple networks. As a result, your work becomes future-proof. Lastly, Moralis offers endless integrations with an ecosystem of plugins.
In addition, Moralis offers devs to build with the support of its community by joining weekly Web3 projects from Moralis. Since Moralis has a free plan, everyone has a chance to become a Web3 developer. So, the only question that remains is whether or not you want to become a blockchain developer.
How to Mint a Unity NFT in Minutes
Start by downloading our project from GitHub and open it in Unity. This is the screen you should be looking at:

Note: In case you closed the above window, make sure to open it again:

The “Moralis Web3 Setup” window prompts you for your dapp information: dapp URl and ID, to be exact. As indicated by the instructions below the two entry fields, you need to use Moralis to obtain these details. Here are detailed instructions that will help you with that:
- By now, you probably already have your Moralis account ready. Hence, just log in. On the other hand, if you don’t have an account, make sure to create your free Moralis account:

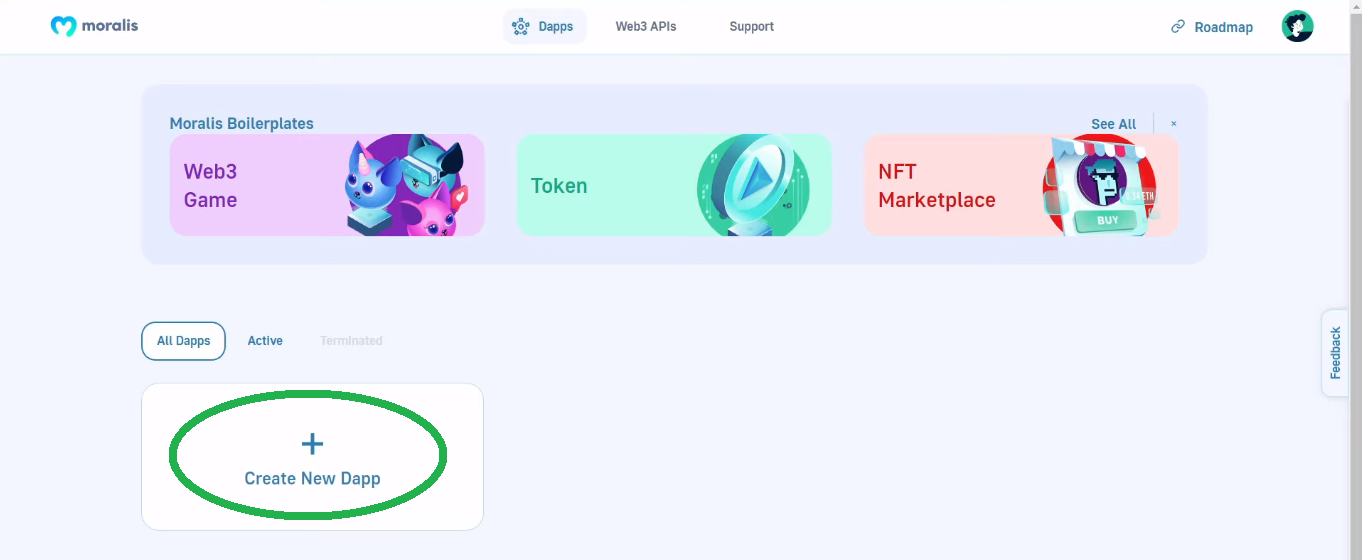
- Once inside your Moralis admin area, click on the “Create New Dapp” button:
- Next, select the “Testnet” environment:

- Then, click on the “Polygon Mumbai” and use the “Proceed” button to move forward:

- Make sure to select the city closest to you. Then again, click on the “Proceed” button to go to the next step:

- This is where you need to name your dapp. This can be anything you want. Finally, run your Moralis dapp by clicking on the “Create Your Dapp” button:

- With your dapp up and running, you get to access its details via the “Settings” button:

- Copy your dapp credentials:

- Go back to Unity and paste the above-copied details into the designated entry fields. To complete the Moralis Web3 setup in Unity, click on “Done”:

With the above setup completed, go to “Assets” > “_Project” > “Scenes”, where you need to open the “Main” scene:

Note: By default, the Unity NFT minter uses our smart contract and metadata, which means you will be minting the Moralis logo. As such, we need to show you how to use Unity NFT minter for other smart contracts and metadata.
Mint Unity NFT Tokens Using Your Smart Contracts and Metadata URLs
The minting panel represents the core of our Unity NFT minter. The latter is activated as soon as you connect your wallet as displayed in the demo:

Looking at the screenshot above, you can see the smart contract’s data and NFT metadata fields. You need to populate these fields with your smart contract and metadata details to use this dapp to mint any NFTs you want. So, these are the details you need:
- For smart contract: address, ABI, and contract function
- Metadata URL
Fortunately, you can easily obtain these details. Every programmable blockchain has its explorer, and this is where all of the above details regarding all deployed Web3 contracts await you. In our case, we are using Polygon’s testnet, Mumbai. Hence, PolygonScan (Mumbai) is the explorer we need to utilize.
On the other hand, as far as the metadata URL goes, there are various ways to go about it. In order to do this in a decentralized manner, we recommend using decentralized cloud storage services. Again, there are several reputable options available; however, we recommend using IPFS. Moreover, Moralis also integrates IPFS, which means you can seamlessly work with this storage solution. Once you upload Unity assets to IPFS, you get your metadata URL.
Minting Panel Script Walkthrough
For a detailed code walkthrough, watch the video at the bottom of this article, starting at 9:41. However, we want to briefly look at the main function of our minter dapp, “MintNft()”, which is called by the “mint” button:
   public async void MintNft()
        {
            if (contractAddress == string.Empty || contractAbi == string.Empty || contractFunction == string.Empty)
            {
                Debug.LogError("Contract data is not fully set");
                return;
            }

            if (metadataUrl == string.Empty)
            {
                Debug.LogError("Metadata URL is empty");
                return;
            }

            statusText.text = "Please confirm transaction in your wallet";
            mintButton.interactable = false;

            var result = await ExecuteMinting(metadataUrl);

            if (result is null)
            {
                statusText.text = "Transaction failed";
                mintButton.interactable = true;
                return;
            }

            // We tell the GameManager what we minted the item successfully
            statusText.text = "Transaction completed!";
            Debug.Log($"Token Contract Address: {contractAddress}");
            Debug.Log($"Token ID: {_currentTokenId}");

            // Activate OpenSea button
            mintButton.gameObject.SetActive(false);
            openSeaButton.gameObject.SetActive(true);
        }
The code above checks that you’ve provided details and metadata URL from a smart contract. If any details are missing, the function logs a corresponding error. However, if all details are provided, the “MintNft” function returns the “Please confirm the transaction in your wallet” message and triggers the minting action. The latter is done with the “ExecuteMinting” function, which is where we use the power of Moralis.
The “ExecuteMinting” Function and the Power of Moralis
Here’s the “ExecuteMinting” function:
        private async UniTask<string> ExecuteMinting(string tokenUrl)
        {
            // Dummy TokenId based on current time.
            long currentTime = DateTime.Now.Ticks;
            _currentTokenId = new BigInteger(currentTime);

            // These are the parameters that the contract function expects
            object[] parameters = {
                _currentTokenId.ToString("x"), // This is the format the contract expects
                tokenUrl
            };

            // Set gas configuration. If you set it at 0, your wallet will use its default gas configuration
            HexBigInteger value = new HexBigInteger(0);
            HexBigInteger gas = new HexBigInteger(0);
            HexBigInteger gasPrice = new HexBigInteger(0);

            string resp = await Moralis.ExecuteContractFunction(contractAddress, contractAbi, contractFunction, parameters, value, gas, gasPrice);

            return resp;
        }
As you can see above, the function takes in the provided metadata URL, which is now called “tokenURL”. Then, the function creates a token ID. Next, it uses that ID to create token parameters that the smart contract expects.
Note: We used an ERC-721 contract (for more details, use the video below at 12:50). If you were to use an ERC-1155 contract, you’d need to tweak the code.
Next, the “ExecuteMinting” function sets gas configuration. Finally, thanks to Moralis, a single line of code takes care of minting via the “ExecuteContractFunction” function.
Using PolygonScan to Obtain Smart Contracts’ Details
Starting at 12:50 in the video below, you can see our smart contract on PolygonScan. It is a quite simple contract based on a verified OpenZeppelin template. At 13:42, you can see where to obtain your contract’s address, which you need to paste into the Unity minter. Next, the video also shows you where to get your contract’s ABI:

Furthermore, also make sure to change the name of your smart contract’s function (14:13):

Note: When deploying smart contracts using tools such as Remix or Hardhat, you will get smart contracts once you deploy them. However, as shown above, you can always access these details in blockchain explorers.
Here’s the video tutorial we’ve been referencing above. It includes all the details you need about our Unity NFT minter dapp:
How to Mint a Unity NFT – Summary
Even if this article was your first encounter with Web3 programming, you now know that you can easily create dapps with Unity. Thanks to Moralis’ game SDK, you can use Unity for Web3 development. Furthermore, you learned how to use our Unity NFT minter dapp. Along the way, you also had an opportunity to complete the initial Moralis setup. Hence, you now know how to create a Moralis dapp and access its credentials. In addition, you learned how to use PolygonScan to obtain smart contracts’ details.
If you enjoyed this topic, we encourage you to dive deeper into Unity Web3 programming. For instance, you can explore how to communicate with a Web3 database from Unity, store off-chain data, do blockchain game transactions, and connect Unity game with Web3 login. You can also start generating NFTs or create an NFT minting website!
However, if you are more interested in creating DeFi or DAO dapps, we encourage you to explore the Moralis blog and the Moralis YouTube channel. There, you’ll find a ton of explanations and example projects. Some of the latest topics focus on Web3 syncing, Web3 webhooks, how to build on Web3 fast, full stack Web3 development, an AR metaverse NFT, and Web3 augmented reality. As such, these two outlets may serve as your ongoing crypto education. But, taking a more professional approach tends to deliver better results. Thus, you ought to consider enrolling in Moralis Academy. Aside from top-tier blockchain development courses, this is the place to get a personalized study path and expert mentorship. However, the greatest value awaits you in the form of the Moralis community.

