Unity is one of the best cross-platform game engines for creating any type of game – but especially Web3 games. Even if you are used to Web2 programming, now is an excellent time to dive deeper into Unity Web3 development. Fortunately, the transition can be frictionless with the right set of tools. However, regardless of which “web era” we focus on (Web2/Web3), the ability to communicate with a database is crucial. But, since we specialize in Web3, we’ll focus on connectivity between Unity and a Web3 database herein.
Whether you are wondering how to store off-chain data or work with on-chain data, Moralis’ dashboard has your back(end). Moving forward, you will learn how Moralis enables you to communicate with a Web3 database. With Moralis, you can index the blockchain effortlessly. In addition, this ultimate Web3 backend platform allows you to retrieve and save new data efficiently.
In the upcoming sections, you will learn how to cover the initial Moralis setup, which is the key to accessing the Moralis SDK. Furthermore, we will show you how easy it is to connect Unity with Moralis’ Metaverse SDK. After covering the initial setup, we’ll focus on the details of our example project. The latter will clearly demonstrate how to communicate with a Web3 database without breaking a sweat or bank. As such, you will be able to take your Web3 gaming development even further. For instance, you’ll be able to sync and index smart contract events to implement all sorts of functionalities. Hence, you will have no problem incorporating different metaverse smart contract examples. So, are you ready to learn how to communicate with a Web3 database? If so, make sure to create your free Moralis account now. You’ll need it to take on the upcoming example project.

Web3 Unity Games
3D games are something that people from all walks of life and ages enjoy. As such, there’s already a huge existing market. Moreover, people play games whether the markets are up or down. Hence, getting involved with this niche makes you bulletproof to market fluctuations. However, while many Web2 games are already pretty incredible, adding Web3 functionality can create even more engaging games.

For instance, just by incorporating support for Web3 wallets, a whole array of excellent options becomes possible. Users can then complete various on-chain transactions. In addition, they can send each other fungible and non-fungible tokens (NFTs). Thus, all in-game assets can become exchangeable and truly owned by players. What’s more, the value created within the game can then be transferred into real life. As such, GameFi and play-to-earn (P2E) concepts come to life. However, in order to successfully create a Web3 Unity game, a developer needs to be able to communicate with a Web3 database from Unity. This is what you’re about to learn!
Communicate with a Web3 Database – Example Project
We believe it helps a lot to take action and create an example project when wanting to implement new things. Further, having a clear picture of what the example project is all about will also be beneficial. Therefore, we want to quickly show a demo of our example dapp (decentralized application). This is the dapp you’ll get a chance to build yourself as we move further. To simplify things, we decided to create a relatively simple Unity application. As such, we used a basic interface and kept our focus on showing you how to communicate with a Web3 database.
Demo of How to Communicate with a Web3 Database
So, here’s what our dapp’s Web3 authentication screen looks like:

By using Moralis’ WalletConnect integration, we were able to incorporate a neat Web3 login solution. As you can see in the screenshot above, users get to sign in with their Web3 wallets by scanning the QR code. After logging in, users have an option to either edit their usernames or create enemies:
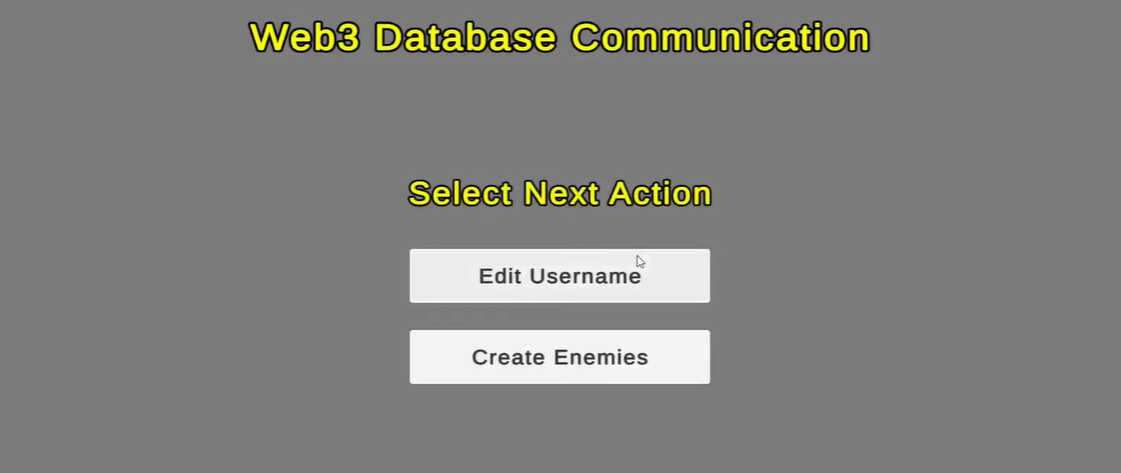
The above two options are just something that appeared appropriate to clearly demonstrate how to communicate with a Web3 database. Moreover, by editing usernames and creating enemies, our example dapp shows you how to retrieve and save new data to your Web3 database. Hence, let’s take a look at each of these two options more closely. For one, when users select the “Edit Username” button, they land on the following screen:
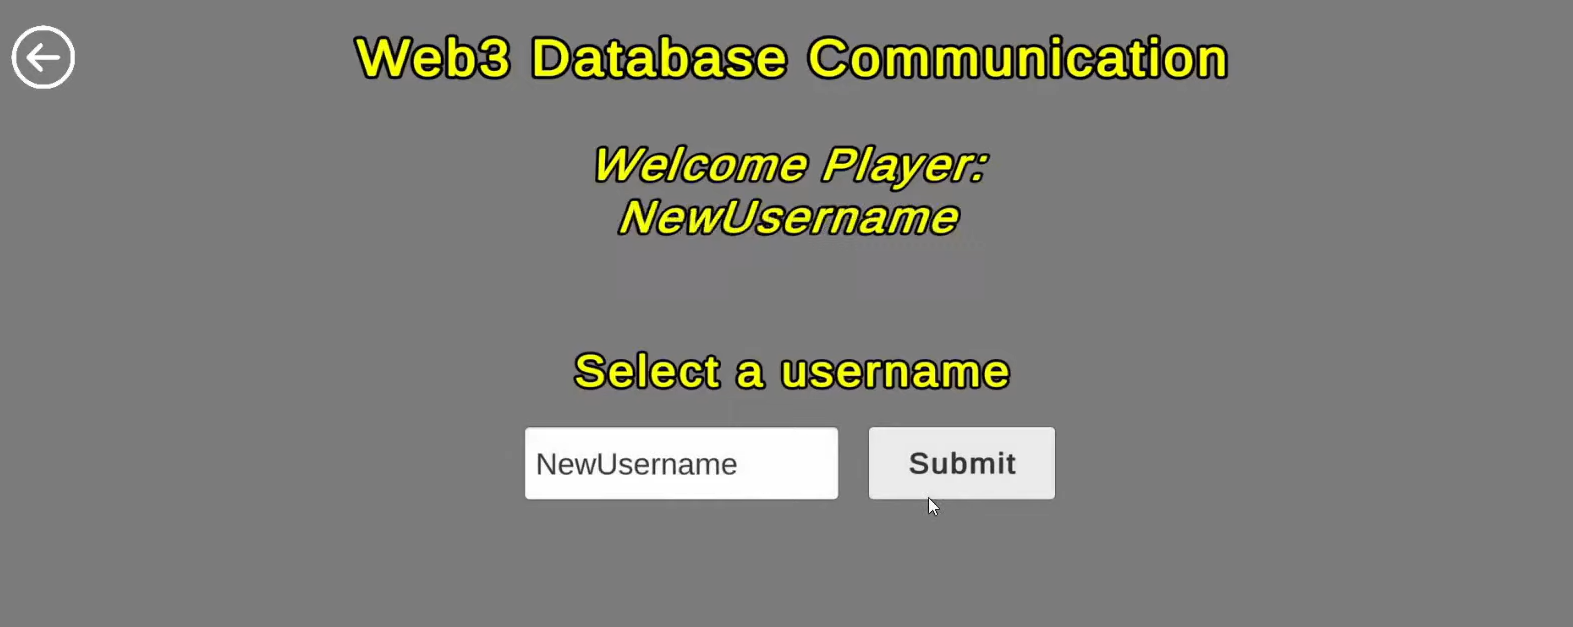
By default, usernames will be users’ wallet addresses. Although, by looking at the screenshot above, you can already see that this example user changed their username into “NewUsername”. They did so using the above entry field and the “Submit” button. Furthermore, these changes are stored in the Moralis database. Moreover, let’s now also preview the “Create Enemies” screen:
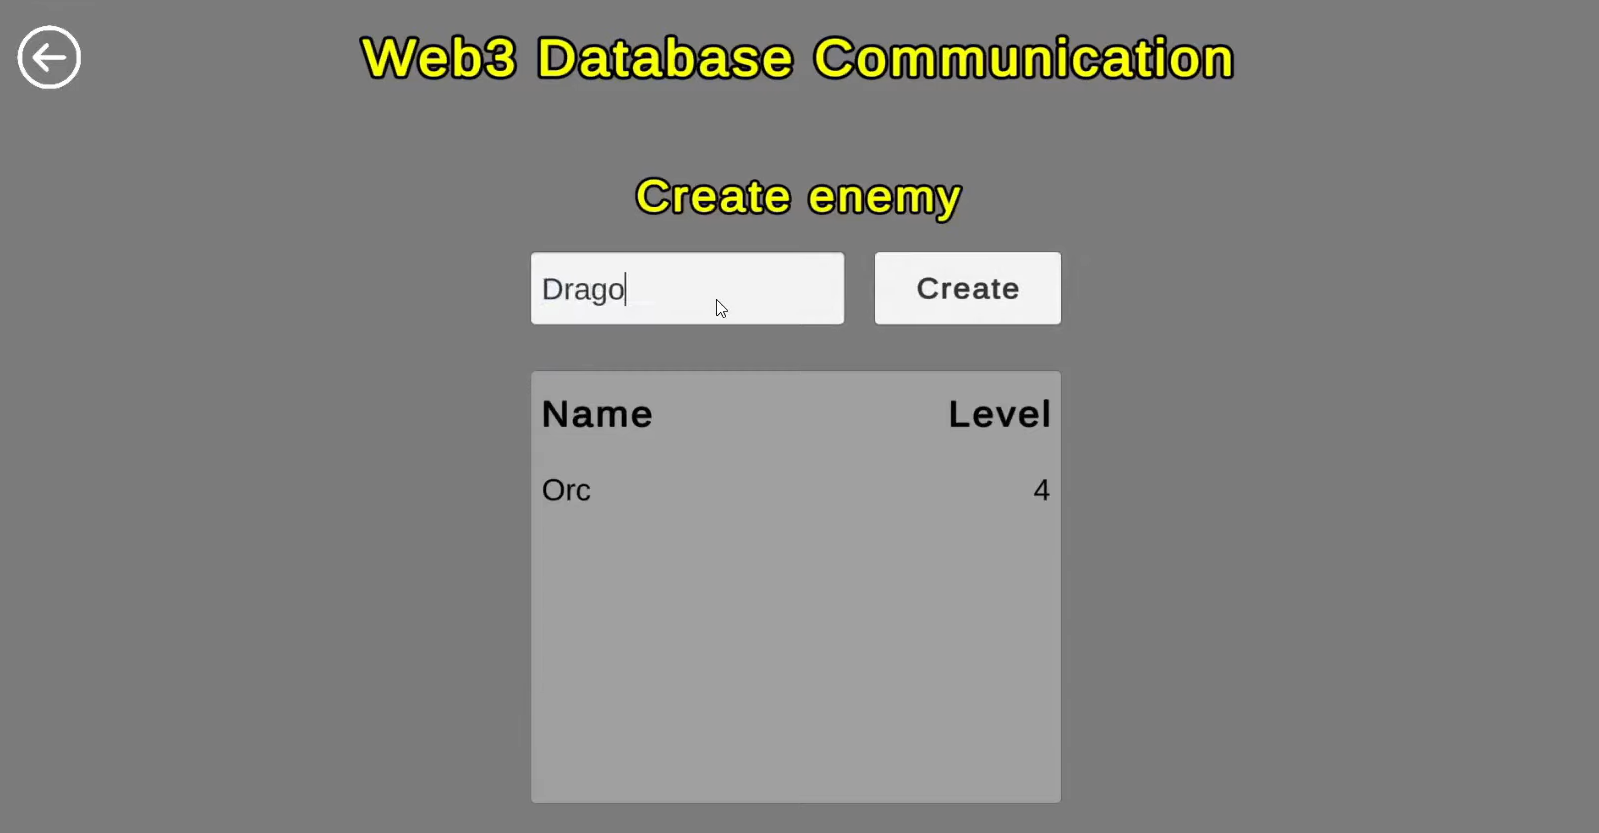
As you can see in the image above, the “Create enemy” panel enables users to name an enemy. Then, they create that enemy by clicking on the “Create” button. Of course, the newly created enemies are also stored in the Moralis database assigned to this dapp. Nonetheless, here’s how both the usernames and the enemies are indexed in our database:
- Using the Web3 database to index our dapp users’ usernames:

- Using the Web3 database to index our dapp users’ enemies:

Communicating with a Web3 Database – The Initial Setup
By looking at the above demo, you now know what our example project is all about. Moreover, we hope you decided to take action and learn how to communicate with a Web3 database firsthand. Hence, roll up your sleeves and follow our lead. We will first guide you through the initial setup and then move on to the code walkthrough.
If this is not your first example project with Moralis, you already know that we make things as straightforward for you as possible. Thus, we made the entire code for this example project available to you on GitHub. Although, the easiest way to get started is to download this example project’s ZIP file:
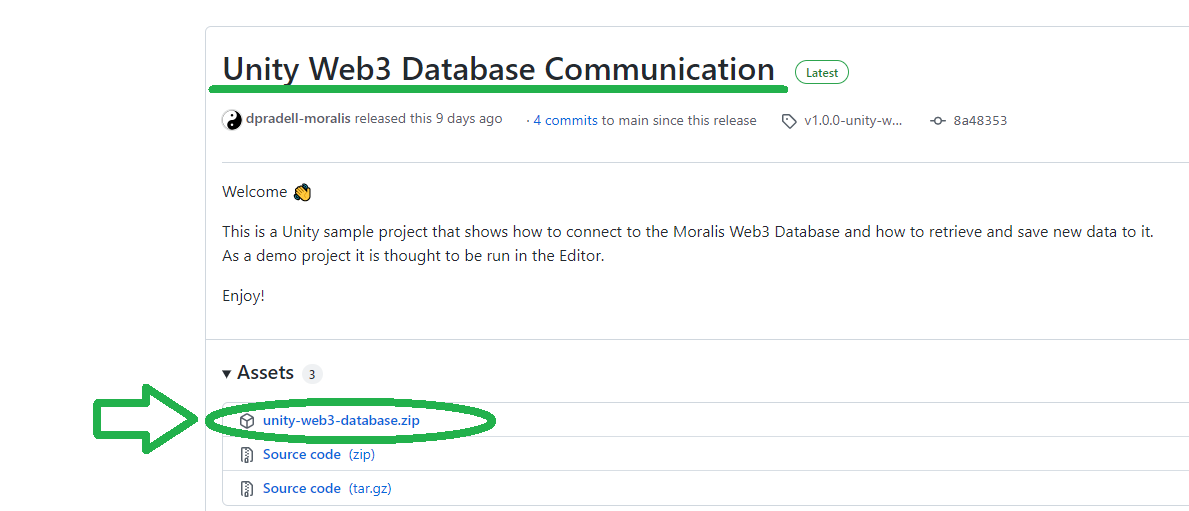
After downloading the above file, unzip it. Then, open it with Unity. With the above file opened in Unity, you can access its “Scenes” folder. This is where you’ll see the “Main” scene. To get to the gist of this example project, open it:

In the screenshot above, you can see that there are two prefabs inside “Main”. These are “MoralisSetup” and “WalletConnect”. When it comes to accessing Web3 functionality, they are both vital. However, we will, in particular, focus on “MoralisSetup” because this is where we need to enter specific details. To obtain these details, we need to complete the initial Moralis setup.
The Key to Connecting Your Web3 Database
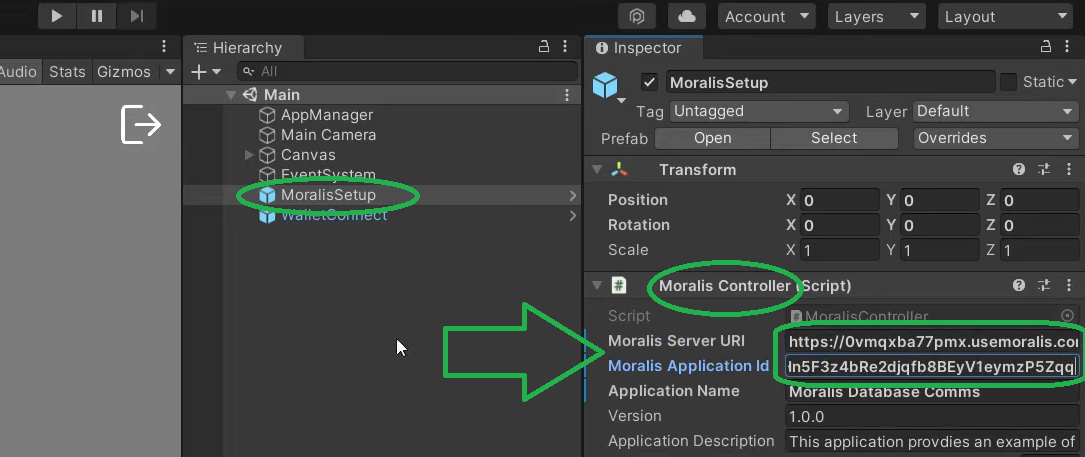
Now it’s time to select the “MoralisSetup” prefab – simply click on “MoralisSetup” from the hierarchy. By doing so, you’ll get to view the details of the prefab in question. The latter will be displayed in the “Inspector” tab on the right-hand side. Next, take a look at the “Moralis Controller” section. There you’ll see two entry fields – “Moralis Server URI” and “Moralis Application ID”:

Thus, you need to obtain a server URL and application ID from Moralis in order to communicate with a Web3 database. Hence, this is the cue to cover the initial Moralis setup.
Initial Moralis Setup
Whenever you want to create dapps from scratch or using Moralis’ Web3 boilerplate, you need to complete the initial Moralis setup:
- Log In to Your Moralis Account – At this point, you most likely have your free Moralis account already up and running. As such, log in. However, if you haven’t created a Moralis account yet, click on the “create your free Moralis account” link mentioned at the beginning of this article. After landing on the signup page, enter your email, create your password, and click on “Next”. Then, finalize the process by clicking on the confirmation link that will be sent to your email’s inbox.

- Create a Moralis Server – After logging in to your Moralis admin area, access the “Servers” tab. There, click on “+ Create a new Server”. If you are new to Moralis, you will be able to go along with the on-page tutorial:

After clicking on “+ Create a new Server”, a drop-down menu will appear (see screenshot below). The “Local Devchain Server” or “Testnet Server” alternatives are the best options when working with example projects and for testing dapps. However, “Mainnet Server” is the option to go with when your dapps are ready to go live.

Moving on, you’ll need to enter your server details. Start by entering your server’s name, then select your region, network type, and chain(s). Finally, click on “Add Instance” to run your server:

- Accessing Your Server’s Details – Now, you should see your new server inside the “Servers” tab. To access its details, click on “View Details”:

As presented below, you’ll see the information you need in a new window. Use the copy icons to copy your server’s URL and application ID:
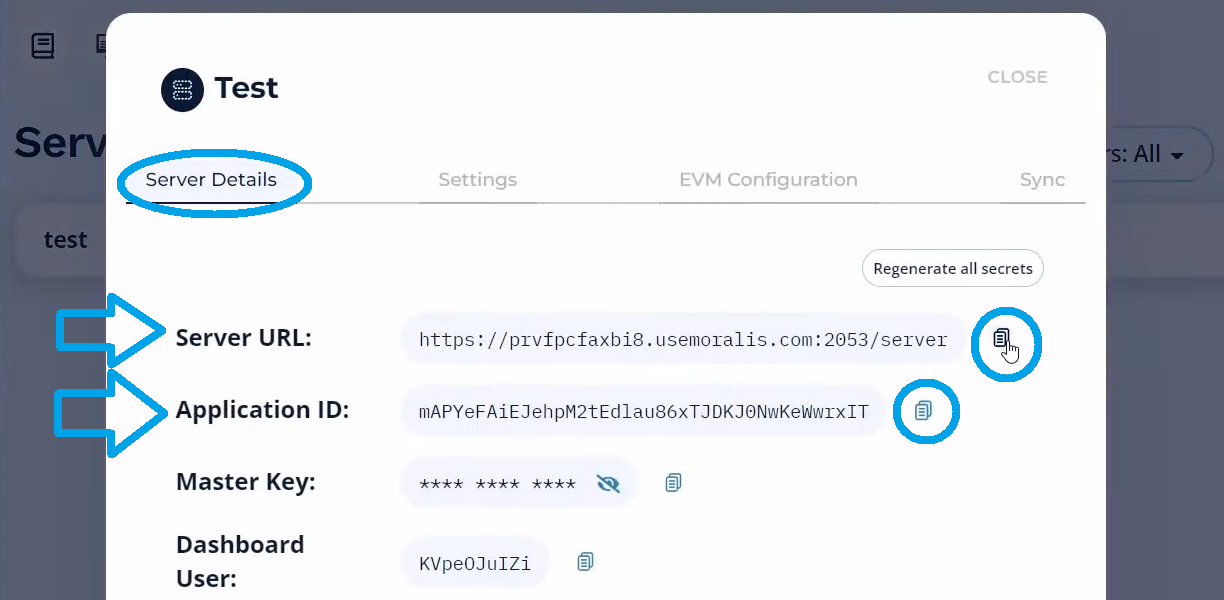
- Populate Unity – Finally, it’s time to paste the above-copied details into the relevant fields within “Moralis Controller”:
Web3 Database at Your Disposal
Every Moralis server comes with a Moralis dashboard, which is essentially a Web3 database. Accordingly, after you’ve successfully created your Moralis server, you get to access your new database. You do this by clicking on the arrow on the right-hand side of “View Details”. This will open up additional server options and details. Furthermore, you’ll also get access to three additional buttons – “Dashboard”, “Plugins”, and “Cloud Functions”:
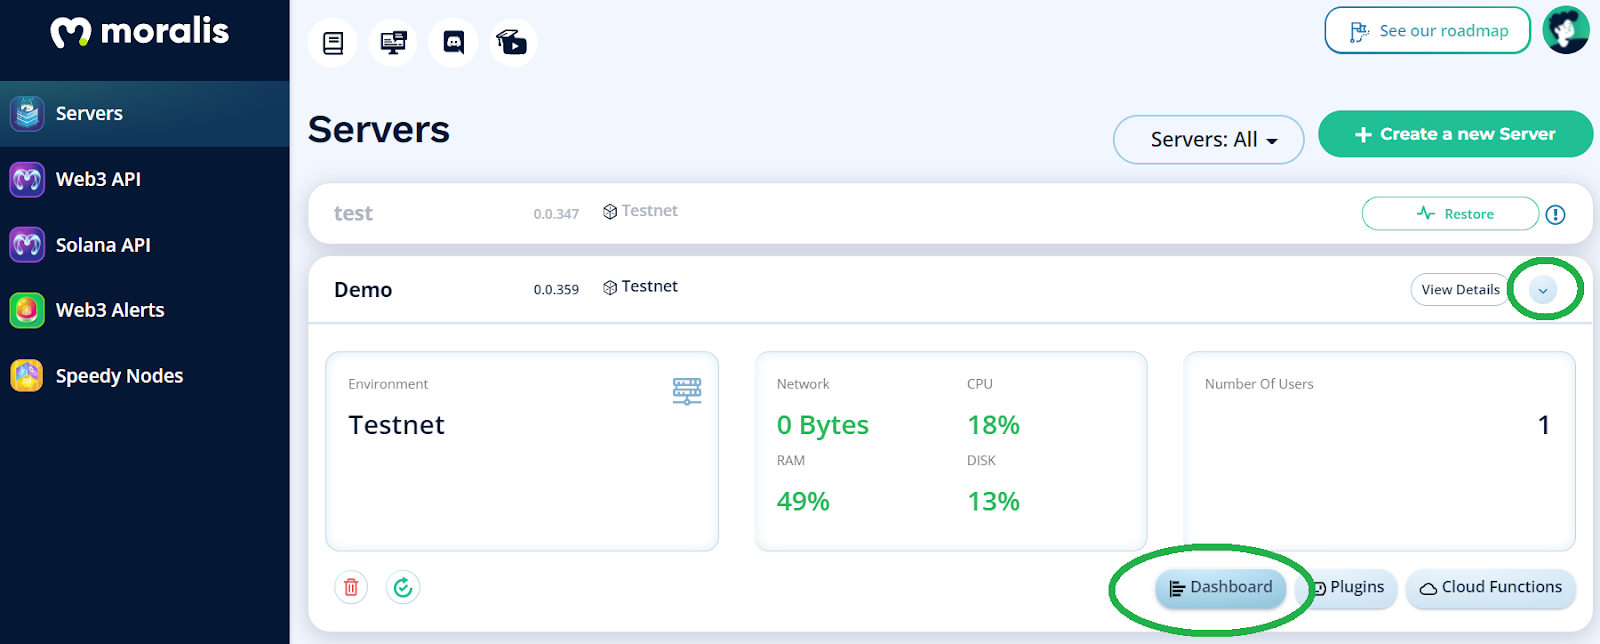
To enter your Web3 dashboard, you need to click on the “Dashboard” button. If you are dealing with a server you’ve created but haven’t used yet, you should be looking at an empty database. Also, there will only be default classes displayed in your new dashboard:

You now know how to complete the initial setup and, in turn, connect your Unity projects with Web3 functionality. As a result, you are ready to learn how to communicate with a Web3 database and how to use that in your Unity games!
Communicate with a Web3 Database – Code Walkthrough
For the final part of this example project, we are handing you over to the capable hands of a Moralis Unity expert. In the video below, he will walk you through the code. He’ll first cover the “Edit Username” feature and the code related to it. Then, he’ll take you through the details of the “Create Enemies” feature as well.
Starting at 4:07, you’ll begin to learn how our example Unity dapp stores data to our Web3 database. Then, you’ll have an opportunity to dive deeper into the “AppManager” script. Hence, you’ll be able to see the details of the login. Moreover, some extra attention will be devoted to “WalletConnectHandler”, which is the key for logging in users. Also, the Moralis expert will show you the inside of the “WalletConnect” prefab. Nonetheless, you’ll be able to see how our example dapp activates the “Username” panel from the “Selection” panel. In order to obtain a solid understanding of this function, starting at 8:14, you’ll get to go through the “UsernamePanel” script.
For a detailed walkthrough of the code related to the “Create Enemies” feature, you’ll need to jump over to 10:16. Again, the Moralis expert will cover the most important parts of involved scripts and snippets of code.
How to Communicate with a Web3 Database from Unity – Summary
At this point, you know how to communicate with a Web3 database using Unity and Moralis. Also, you know that you need to complete the initial Moralis server setup. Furthermore, you have been able to follow along with our steps and create your own version of our example dapp. Moreover, you should now have a clear understanding of the principles that make Web3 game development with Unity possible. As such, you are ready to communicate with a Web3 database in a more extensive manner.
In addition, we invite you to take on some of our other Unity Web3 example projects. In case you’ve missed our beginner’s guide to that topic, use the “Unity Web3” link in the intro. The latter is also a great place to start learning about the metaverse. All in all, this is the best time to dive deeper into Web3 games and GameFi development. Moreover, our other Unity topics also covered how to connect a Unity game with Web3 login, how to connect a Unity app to a Web3 wallet, and how to do blockchain game transactions. Nonetheless, we’ve also ensured you can learn how to build a medieval metaverse game and a Web3 MMORPG.
However, if you are interested in exploring other topics, the Moralis YouTube channel and the Moralis blog are the places to be. Some of the latest articles show you how to reduce Solidity gas costs via gas optimization in Solidity, how to create an Ethereum NFT, how to get into Web3 in 2022, how to build a 2D Web3 game, how to create a Web3 music streaming services, and much more.
Nonetheless, if you want to become a Web3 developer in no time, consider enrolling in Moralis Academy and learn everything from smart contract audits to blockchain basics!

