Anyone involved in the crypto realm would probably agree that 2021 was the year of NFTs. Even though Bitcoin and Ethereum saw huge gains, NFTs were all the rage. Now, as we head towards mainstream adoption of Web3, learning NFT token development is a skill that is trending upwards among aspiring blockchain developers. Moreover, with a solid understanding of JavaScript (JS), it’s now possible to integrate specific functionalities needed in NFT development quickly and easily. One of these functionalities is the mint function, which plays a considerable role when building an NFT infrastructure. Therefore, knowing how to integrate mint function to JS interface is a skill you ought to get under your belt.
Moving forward, you will learn more about the ultimate Web3 development platform – Moralis (a.k.a. Firebase for crypto). This is the tool that enables JavaScript-proficient developers who know how to use MetaMask, to deploy all sorts of excellent dApps in minutes. By using Moralis, you can overcome all of the limitations of RPC nodes. Essentially, Moralis enables you to cover all your blockchain-related backend by copying and pasting short snippets of code. The latter is neatly provided in the Moralis documentation. Moreover, if you are serious about becoming a blockchain developer, make sure to create your free Moralis account before moving forward. That way, you will access Moralis’ SDK, including its ultimate NFT API. The NFT API is what enables you to integrate mint function to JS interface effortlessly.

Why Minting NFTs Matters?
Do you already have a clear idea of what NFTs are? How about what NFT minting is? If yes, then you know why minting NFTs matters a lot. In that case, you also know why you should learn to integrate mint function to JS interface. As such, you are ready to roll up your sleeves and find more details about how to use Moralis for that purpose. However, in case you don’t understand these basics yet, make sure to finish this section.
Non-fungible tokens (NFTs) are a particular kind of crypto asset. Moreover, NFTs include a file (JPG, PNG, MP3, MP4, PDF, etc.) and store it and its metadata on a particular blockchain. While two NFTs may include the same file, their metadata is always unique. As such, there are never two of the same NFTs; hence, the term “non-fungible”. Furthermore, just like fungible tokens, NFTs can be created on various programmable chains, with Ethereum still being the leading choice. Moreover, while fungible tokens on Ethereum follow the ERC-20 token standard, NFTs on Ethereum use ERC-721 or ERC-1155. Having a basic understanding of these standards is crucial when minting NFTs, so make sure to check out the links.
NFT Minting Explained
That’s all great, but what does “minting” even mean? Well, the term was borrowed from the concept of governments stamping metal coins. However, in the case of fungible and non-fungible tokens, minting refers to a blockchain transaction that creates tokens by saving their details (metadata) on the relevant chain using proper smart contracts. With that in mind, without minting, there would be no NFTs.
Of course, when NFTs are used for digital art and collectibles, the files assigned to those NFTs are vital. As such, you may hear digital designers claim that they know how to create NFTs. Although, in fact, they only know how to create a JPEG or PNG in most cases. The latter is just a file until combined with other required details and essentially minted later on. Thus, make sure to learn how to mint NFTs, either in a centralized or decentralized manner. With that covered, we are ready to focus on how to integrate mint function to JS interface with Moralis.
Integrate Mint Function to JS Interface with Moralis
At this point, you know that Moralis is the ultimate Web3 development platform. However, you may not know that it is also all about cross-chain interoperability. As such, it enables developers to deploy dApps and mint NFTs on leading programmable blockchains. This means that your frontend development skills, in combination with MetaMask basics, will get you to the finish line. Furthermore, Moralis offers full integration for MetaMask and IPFS, which is a decentralized protocol for storing content. The IPFS integration is what enables developers to use Moralis to mint and even bulk mint NFTs in a completely decentralized manner.

Since Moralis takes care of your backend, you get to devote your full attention and resources to producing the best possible user interface. This enables you to create an outstanding dApp that will attract new users and keep old ones coming back. In case you forgot, it is the user experience that attracts or repels users. Thus, being able to devote maximum attention to that aspect is priceless.
Moving forward, we’ll take a closer look at some example projects that should help you get your “creative juices” flowing. These examples will show you how to integrate mint function to JS interface rather easily. Nonetheless, you will also learn how to lazy mint NFTs and how to include NFT rarity. However, before you can use Moralis to integrate mint function to JS interface, you need to complete some initial setup steps.
Initial Setup and Your Moralis Server
In case you want to use Moralis to build an NFT trading interface and integrate mint function to JS interface, you need to create your Moralis server first. Below are the steps you need to follow to complete this initial setup:
- Create Your Free Moralis Account – By clicking the link to the left, you’ll get to create your free Moralis account. On the following page, just enter your email, create your password, and then complete the process by clicking on the confirmation link, which will be sent to your email. On the other hand, in case you already have a Moralis account, just log in.
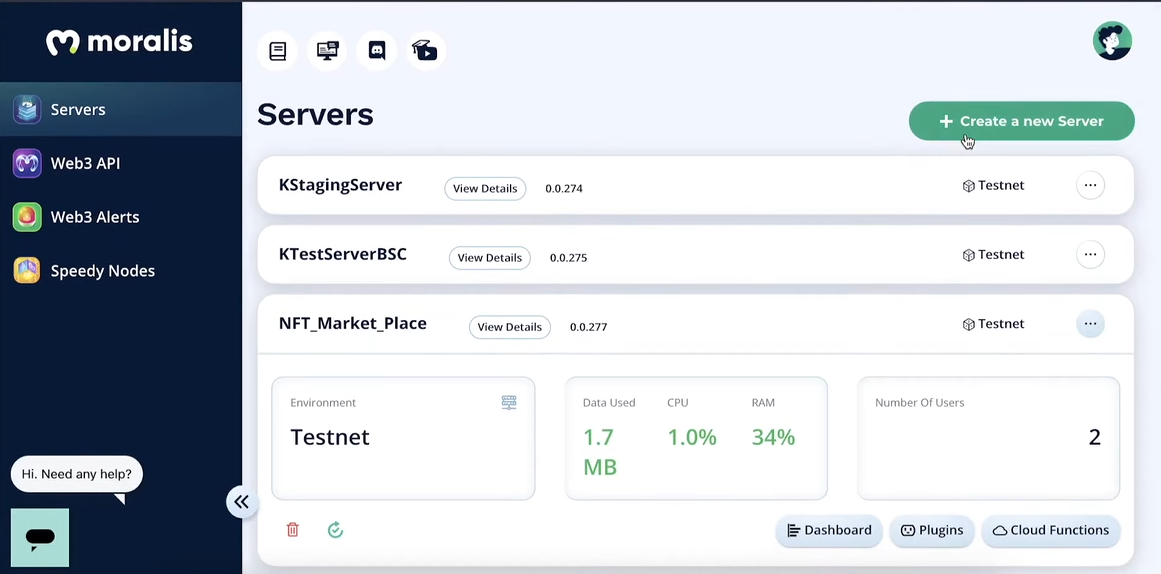
- Create a Moralis Server – Once inside your Moralis admin area, select the “Servers” option on the left-hand side in the navigation tab. Next, click on the “+ Create a new Server” button in the top-right corner. Then select the network type that best suits your needs from the drop-down menu (see the image below). Whenever you are working on example projects or testing while still developing your ideas, it is best to select the “Testnet Server” option (connect to Ethereum testnets).

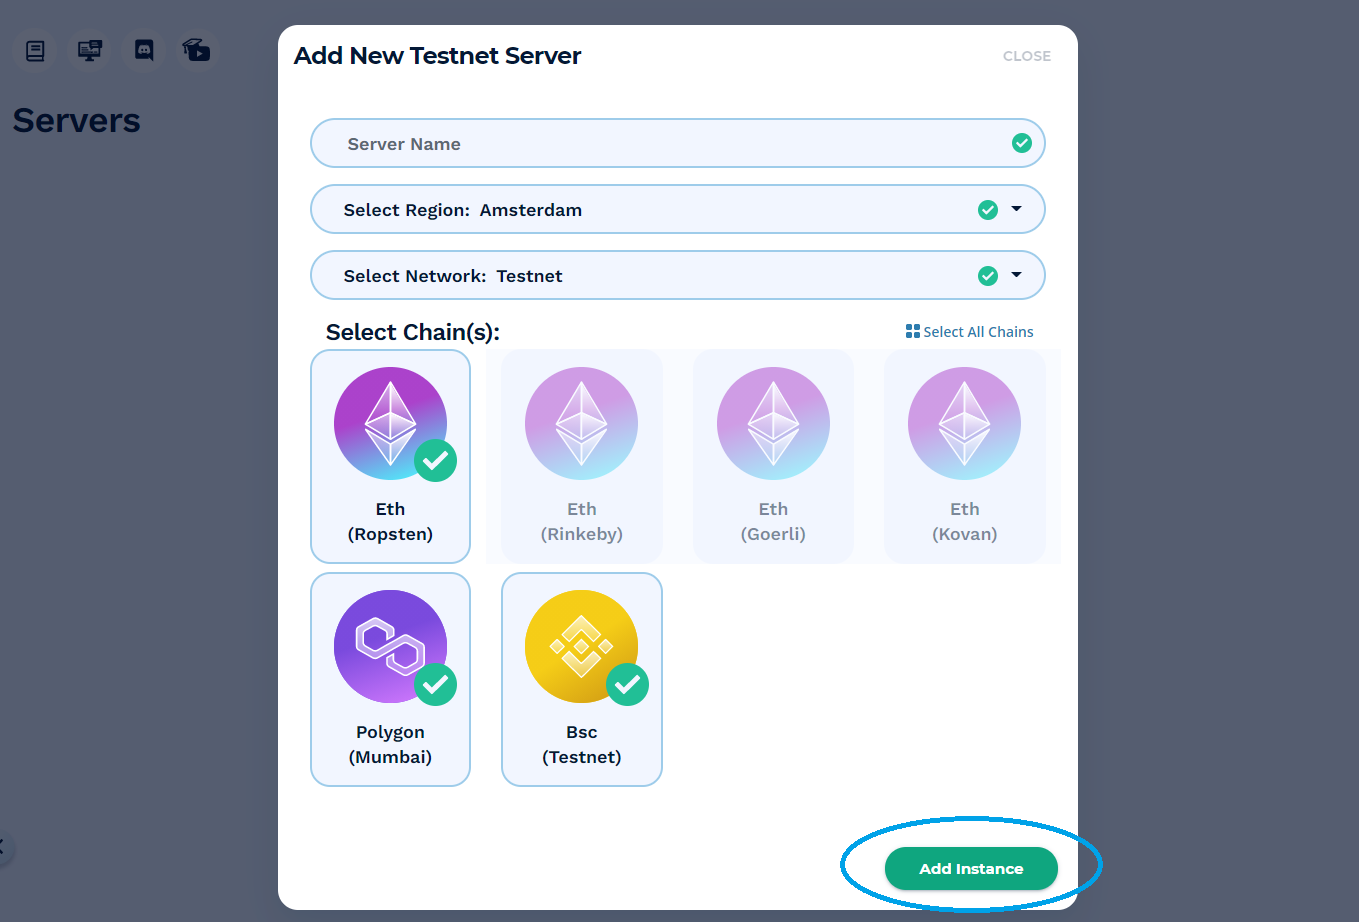
You’ll see a pop-up window asking for server details. This is where you need to enter your server’s name (this can be anything you want), select your region, network type, chain(s), and spin up your server by clicking on “Add Instance”:
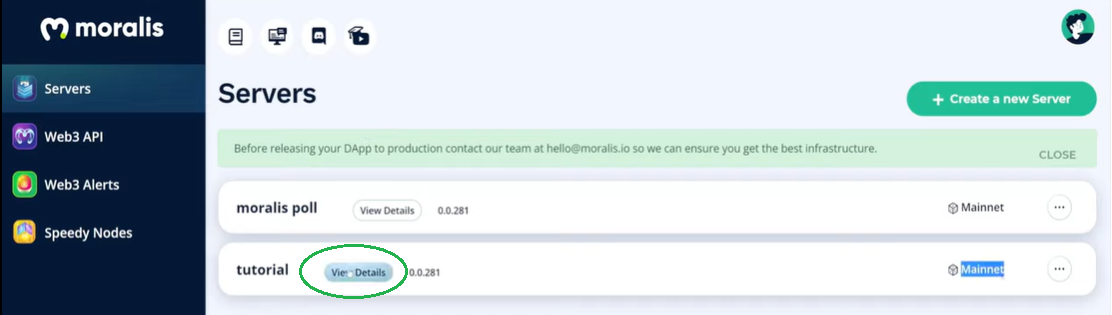
- Access Server Details – After spinning up your server, you get to access its details by clicking on the “View Details” button:
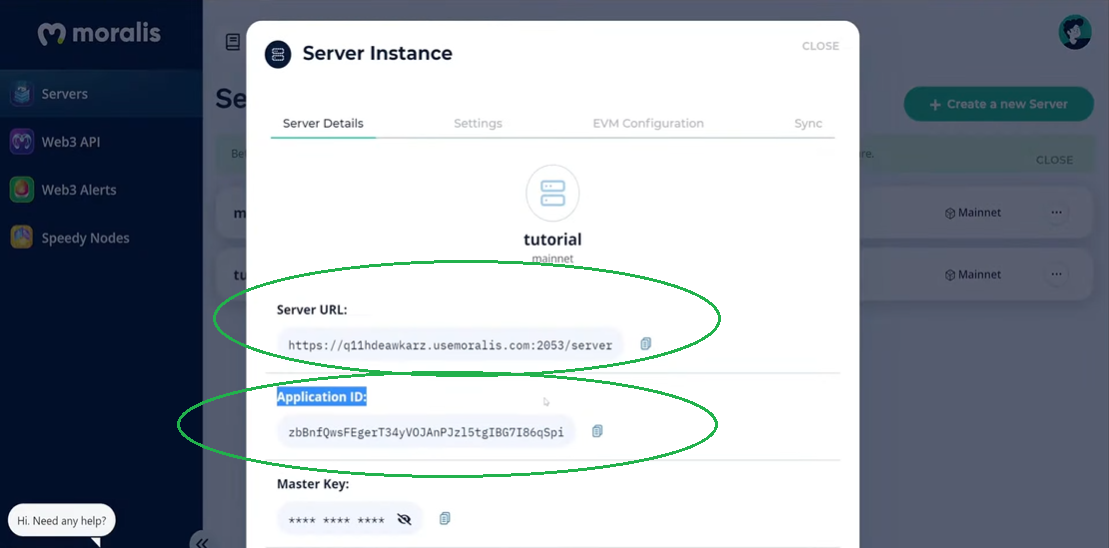
By clicking on the copy icons, you get to copy those details (one by one):
- Initialize Moralis (complete this step when working on a particular project) – By populating your coding files (“.env” [if using the Web3 boilerplate], “.js”, “.html”, “.jsx”, etc.) with the Moralis server details, you obtain the required backend functionality covered by Moralis:

Sync and Watch Contract Events with Moralis
The ability to sync and index smart contract events is another excellent shortcut offered by Moralis. Please keep in mind that you could integrate mint function to JS interface without the use of the “sync” feature. However, it is an important part of creating more advanced NFT trading interfaces. As such, let’s make sure you learn how to use the “sync” option.
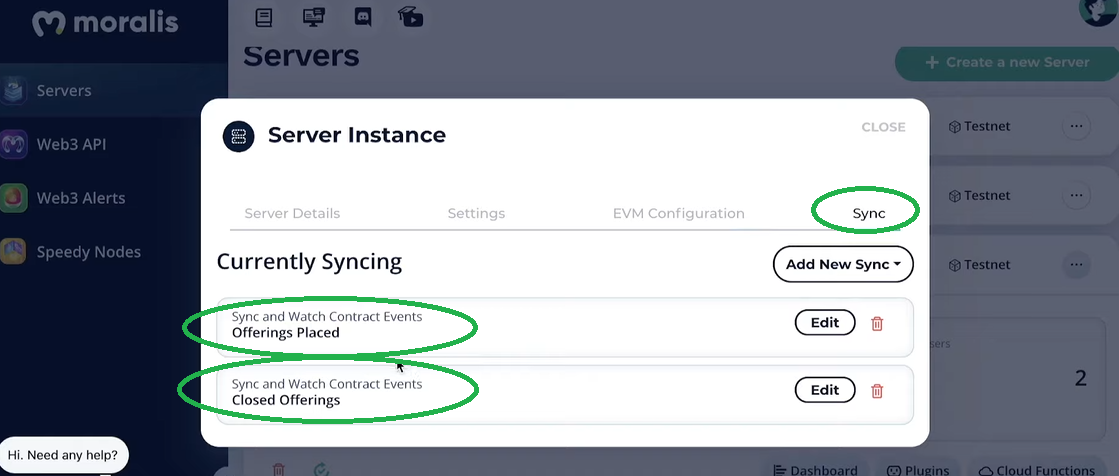
Once you have your Moralis server ready, creating sync events is quite easy. You access this functionality via your server’s “View Details”. Next, you need to click on the “Sync” tab. In the screenshot below, you can see that a proper NFT interface requires two “listeners”. One for detecting when a new offer is placed (selling) and another one to know when an offer is closed (buying). Of course, you can also add listeners related to NFT minting. Further, new “sync” events are added by clicking on the “Add New Sync” button and entering the required details. The latter includes a smart contract ABI. For more details, use the link at the top of this section.
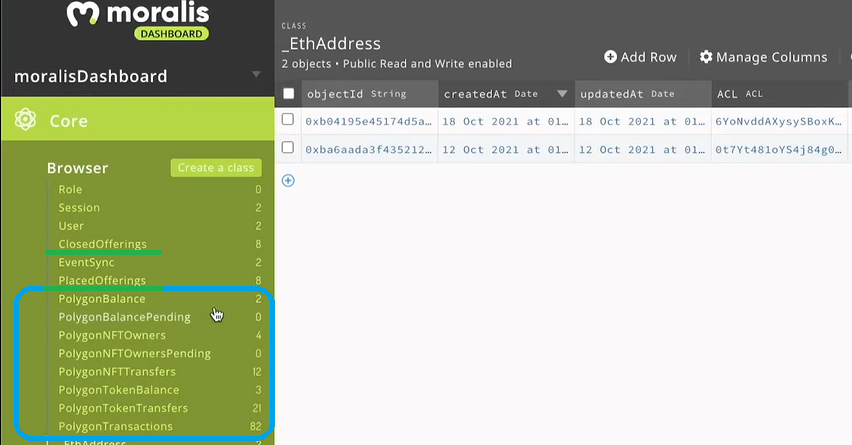
Aside from the “sync” feature, Moralis also equips you with a database (Moralis dashboard). This gives you a simple way of accessing live on-chain data related to your users and relevant on-chain events. That way, you get all the details, including token balances, transaction history, pending transactions, NFTs, and much more. Of course, this is also where the signals from the above-presented listeners show up:
With the two listeners in place and your database at our disposal, you have all the on-chain data you need to create the NFT trading interface as presented in the following video:
How to Integrate Mint Function to JS Interface
With your NFT trading interface ready (you can use our example above), go ahead and integrate mint function to JS interface. Just follow the guidance of a Moralis expert in the video below. He will show you how to build an NFT minter dApp from scratch. However, you may use that guidance to add the mint function to your existing interface. Moreover, by opening the videos shared herein in new tabs or windows, you can access the entire code for each related project (at GitHub) in the videos’ descriptions.
Continue Your NFT Development
With the help of the two video guides above, you should be able to create your own NFT trading and minting interface. However, there are other excellent features that you can easily incorporate using Moralis. For instance, you can incorporate lazy minting. This is where listed NFTs do not get minted immediately but are minted at the time of purchase. That way, the fees related to the minting transaction come to play only when an NFT is actually sold. Furthermore, at that time, the fee can be covered by an NFT creator, a buyer, or the NFT platform.
Lazy minting tutorial:
Another great NFT feature, especially when collectible NFTs such as Bored Ape Yacht Club are in question, is NFT rarity. By following a Moralis expert’s lead, you can easily incorporate NFT rarity ranking and filtering to your NFT platform.
NFT rarity ranking tutorial:
Nonetheless, in case you want to learn the details of creating and launching your own NFTs, make sure to check out the following tutorial:
Integrate Mint Function to JS Interface – Summary
We’ve covered a lot of ground in this article. At this point, you know what NFTs are, what NFT minting is, why it is important, and how to set up Moralis to help you with your NFT development. As such, you now know that with Moralis’ NFT API, it’s easier than ever before to combine NFT functionality with a great frontend experience. Furthermore, Moralis’ experts have shown you how to create your own NFT trading interface and how to integrate mint function to JS interface. In addition, you’ve also had a chance to follow along in video tutorials to add lazy minting and NFT rarity to your NFT platform. Nonetheless, you’ve also had an opportunity to learn how to create and launch your own NFTs.
In case you want to extend your blockchain skills past NFT development, we recommend visiting the Moralis YouTube channel and the Moralis blog. Both of these outlets offer a ton of valuable free content, including detailed example projects. For instance, some of our latest articles discuss ERC20 transfer, The Graph alternative for smart contract indexing, how to connect to Arbitrum nodes, how to connect to Avalanche nodes, building Ethereum dApps in Angular, how do flash loans work, how to build a cross-chain bridge, how to do gasless transactions on Ethereum, details of OpenSea API alternative, and much more.
In addition to your free blockchain development education, you might want to consider a more professional approach. As such, you can enroll in some of the high-quality courses available at Moralis Academy. The latter enables you to optimize your crypto education to the fullest. Aside from excellent courses, you get a chance to access experienced mentors. Thus, Moralis Academy is the best way to go full-time crypto sooner rather than later.