Decentralized finance (DeFi) and its many features, such as taking out flash loans, provide a chance for people to break free from financial institutions that have been exploiting average Joes and Janes for decades across the globe. While only time will tell how the actual mainstream adoption of DeFi will play out, many crypto users have already seen and experienced the power of these public-empowering financial tools. Flash loans, trading, lending, borrowing, providing liquidity, and much more can now be done on decentralized platforms. As such, DeFi is undoubtedly one of the essential use cases of blockchain technology. However, how do flash loans work? We’ll be answering that question in-depth in this full walkthrough guide as we explore the DeFi lending phenomenon and teach you how to build your own flash loan Web3 app.
First, we’ll explain what flash loans are so that we all know the basics. Then, we’ll take a closer look and answer the question, “how do flashloans work?” which will give both users and developers a proper insight into this controversial feature of DeFi. To take things to the next level, we will also take on an example project and create an arbitrage lab that will use the flash loans feature. As such, you’ll have a chance to work with these kinds of DeFi transactions first-hand. With that skill under your belt, you’ll be able to use your blockchain development knowledge to provide your clients and the market with some unique DeFi decentralized applications (dApps).
What are Flash Loans?
Like any definition of various terms, it is great to start by looking at its actual words. “Flash”, in this case, refers to extremely fast, almost instant, and short-lived. Moreover, you already know what “loans” are from traditional finance; it’s where a lender (often a bank) loans out money to a borrower to be paid back in full eventually. With that in mind, it means we are talking about short-lived loans of cryptocurrencies, where a liquidity pool plays a bank’s role.
On a more technical note, flash loans are a subset of smart contracts that enable uncollateralized loans. That’s why flash loans are an uncollateralized loan product in DeFi. This sort of loan is possible thanks to the nature of the confirmation of blockchain transactions. Specifically, it enables transactions to revert automatically before the block in question confirms. Then, flash loans are repaid in the same series of transactions (transaction block). Moreover, the flash loan is valid as long as the liquidity returns to the pool within one transaction block. However, in case the flash loan trade doesn’t return the full liquidity to the pool, the entire transaction gets reversed. This undoes all the previous actions. With that, it can ensure the safety of funds in the reserve pool without extra collateral.
Flash loans may be a useful and powerful tool for arbitrage and quick trades; however, when hacked, they can also be used to exploit any vulnerable DeFi protocol. As such, there is a lot of disagreement whether they are good or bad, which is something we leave up to you to decide. However, we feel obligated to warn you that dealing with this DeFi feature must be approached with some caution.
Examples of Flash Loans
To help you understand what flash loans are even better, let’s look at a hypothetical arbitrage example. Let’s say a cryptocurrency trades for $0.5 on one exchange and for $1 on another. This poses a great opportunity for a savvy trader, who can take out a flash loan of $50 worth of cryptocurrency on the first exchange and sell it for $100 on the second exchange, repay the loan, and be left with an extra $50 in profit.
Aside from arbitrage, you can use flash loans for collateral swaps (by quickly swapping the user’s loan’s collateral backing for another type of collateral). Furthermore, you can use flash loans to lower transaction fees by exploiting the fact that flash loans roll, what would otherwise take several transactions, into one. Since each transaction costs a fee, fewer transactions potentially mean lower fees.
How do Flashloans Work?
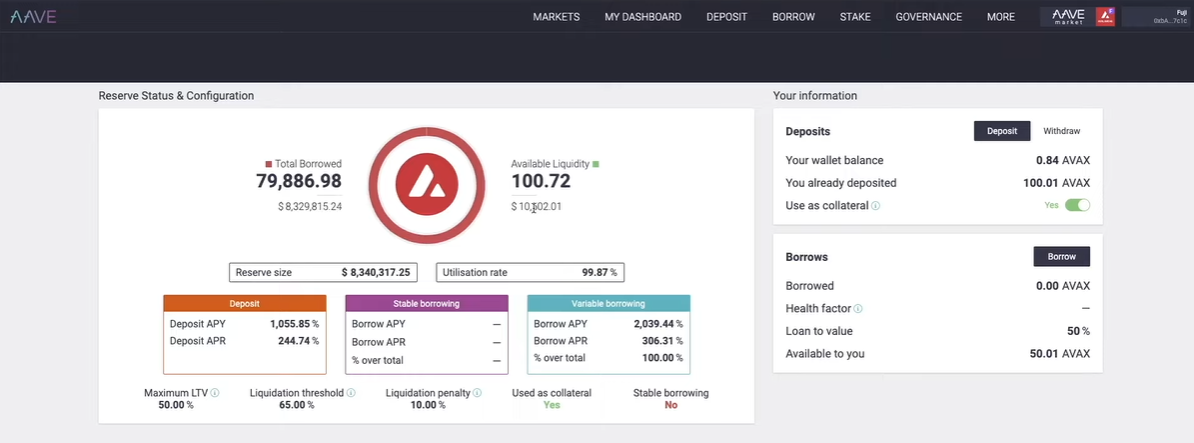
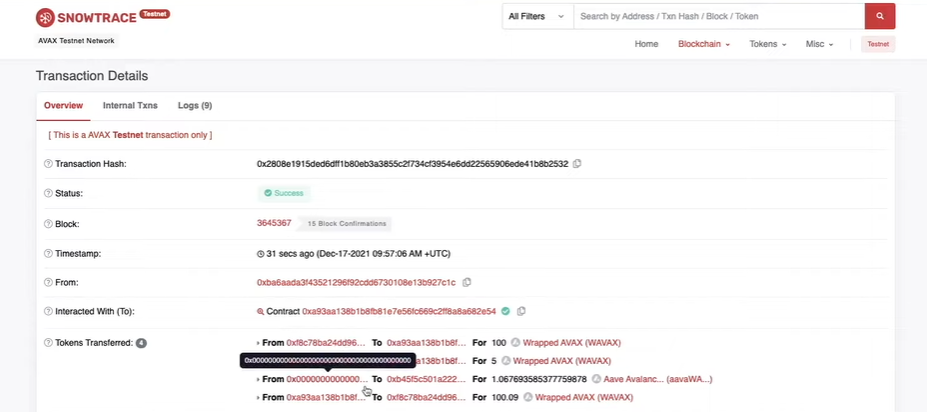
Now that you know what flash loans are, you can probably answer “how do flashloans work?” on your own. The key point that you need to be aware of is that flash loans are not free. For one, all related transaction fees must be covered. In addition, flash loans providers have their additional flash loan fees set in place. For example, the DeFi protocol that we will use herein, AAVE, has its flash loan fee set at 0.09%.
Moreover, since flash loans come from liquidity pools, it’s important to check if the relevant liquidity is sufficient. In the example that we will tackle below, we’ll be using the Avalanche testnet (Fuji), so we’ll need to ensure that AAVE’s liquidity for Fuji is sufficient.
However, flash loan contracts are the key to the proper execution of flash loans. They ensure that several transactions complete within a single transaction block: the transaction of borrowing, repaying, and the covering of flash loans fees. You will have a much clearer understanding of this part after completing the example project in the next section. As such, keep “how do flashloans work?” somewhere at the back of your mind as we move forward.
DeFi Flash Loans – Example Project
In this section and its subsections, you will have the opportunity to build your own flash loans lab following our lead. That way, you’ll get a deep understanding of how flash loans work. As mentioned earlier, we will be working on the Avalanche testnet. Moreover, for our flash loans, we will utilize AAVE’s liquidity pool, Moralis’ SDK, MetaMask for authentication, and Remix for smart contract deployment.
Unless you’ve been living under a rock, you must have heard of Moralis before but just in case, let’s quickly cover the gist of it. This ultimate Web3 development platform is essentially Firebase for crypto, and it is free to use for most projects in their initial stage. Plus, Moralis has built-in cross-chain functionality into its foundations, which means that it enables you to deploy dApps on all supported chains. Furthermore, aside from coming with a full range of Web3 APIs, Moralis also gives you the tools to easily sync and index smart contract events. The latter is possible thanks to Moralis’ cloud functions and the Moralis database, where all on-chain data is provided to you on a silver platter.
In our example project, we will use Moralis Speedy Nodes, which is another excellent product available to all Moralis users. This is why Moralis is also known as the premier choice among Infura alternatives. Moreover, since the Avalanche chain will be of our interest herein, we could call Moralis “Infura for Avalanche”. Aside from the above-mentioned tools, we will also be using SnowTrace, which is the equivalent of Etherscan or BscScan for the Avalanche network.
Building a DeFi Flash Loans Lab
First, we need to set things up properly. The shortest path to the finish line includes cloning the code we made available on GitHub, creating a free Moralis account to access a Moralis server and Moralis Speedy Nodes, and getting some “play” AVAX by utilizing an Avalanche faucet. To make things as simple as possible for you, we have listed all of the setup steps below.
Initial Setup – Clone the Code
These are the steps you need to complete if you want to build a DeFi flash loans lab following our lead:
- Use the GitHub link above to access the code’s webpage. Once there, click on the “Code” button and copy the URL.
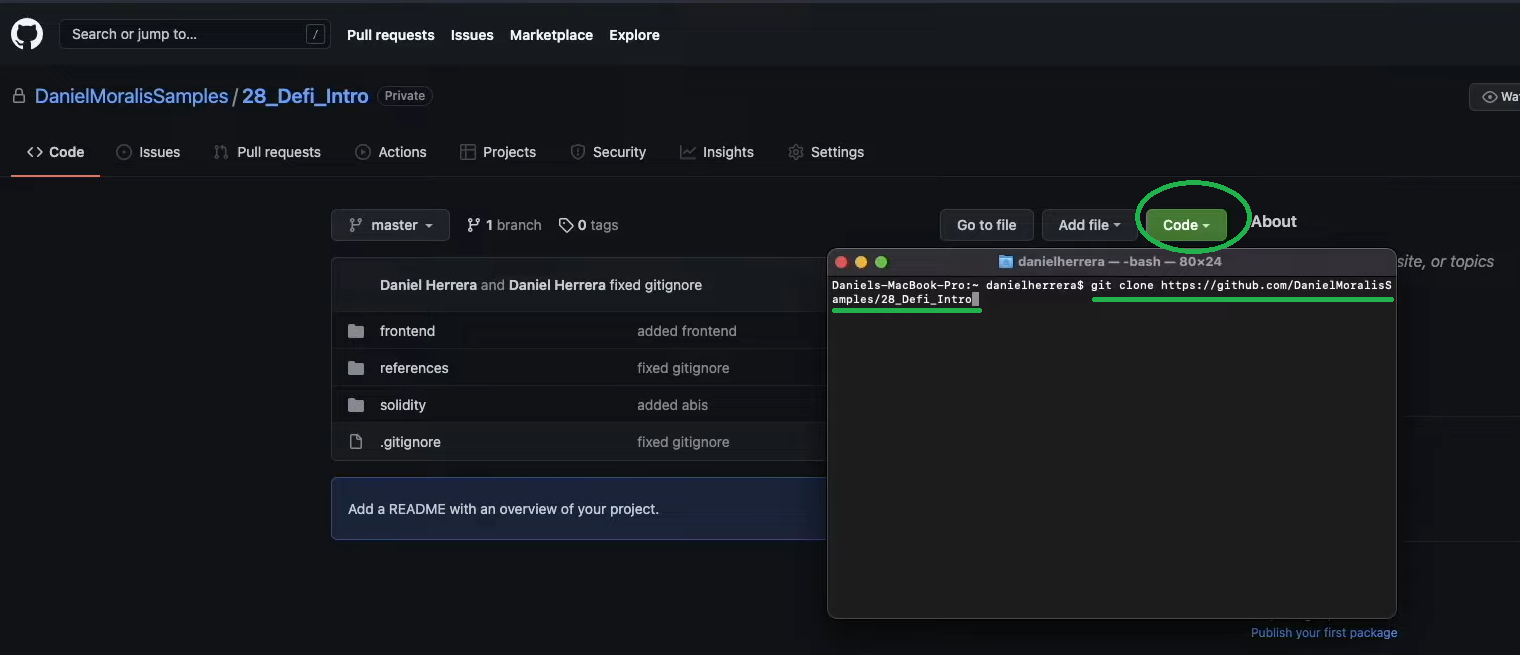
- Use your terminal (inside your code editor) and enter “git clone”, followed by the copied URL, and hit enter. This will clone the code to your computer.
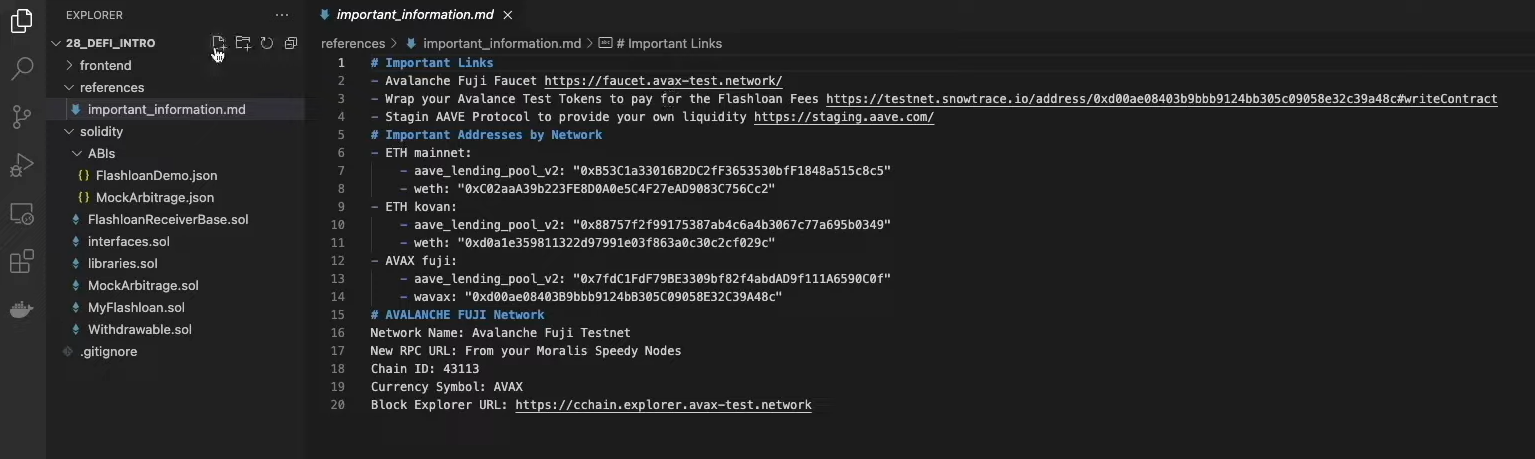
- Next, open your favorite code editor (we prefer Visual Studio Code [VSC]) to access that folder. First, open the “important_information.md” file where you’ll have access to some important and useful links:
Initial Setup – Use Moralis
- Now, create your free Moralis account. Just click the link to the left, enter your email address, create your password. Then, all you have to do is click the confirmation link you’ll receive through your email address. In case you already have an active Moralis account, just log in.
- Once logged in to your Moralis account, it’s time to create a Moralis server. Within your admin area, go to the “Servers” tab, then click on the “+ Create a new Server” button, select network type, enter server details, and finish by clicking on “Add Instance”. If you need more detailed instructions, follow the link at the beginning of this step. With the server created, you will be able to access its details (via the “View Details” button), which you will use when building the UI for your version of our flash loans lab.
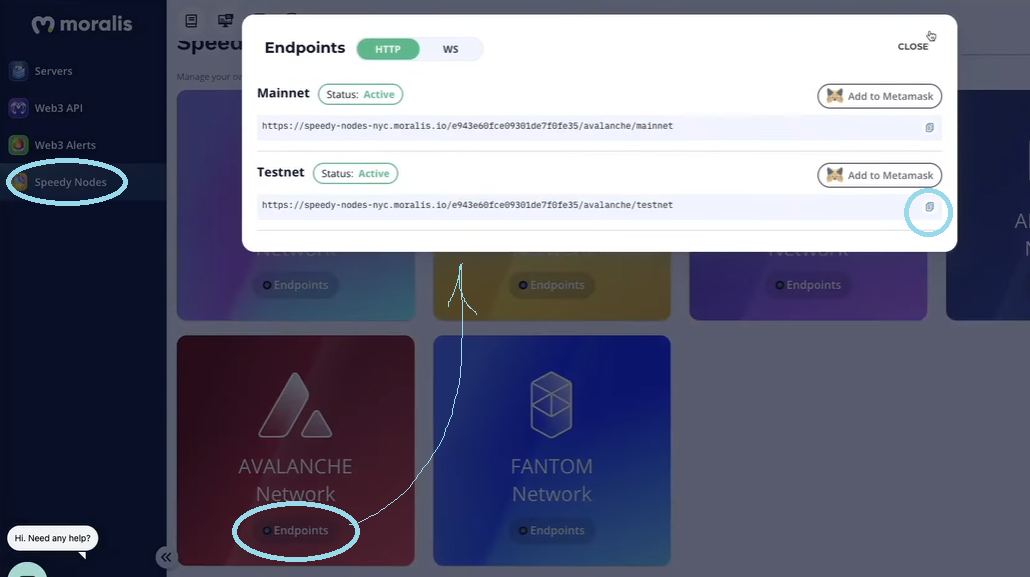
- It’s now time to use Moralis Speedy Nodes. As such, go to the “Speedy Nodes” tab and click on “Endpoints” under the “Avalanche Network” option. Then, copy the URL address under “Testnet”:
- Use the copied address and other details from the bottom of the “important_information.md” file to add the Avalanche testnet to your MetaMask.
Initial Setup – Get and Wrap AVAX
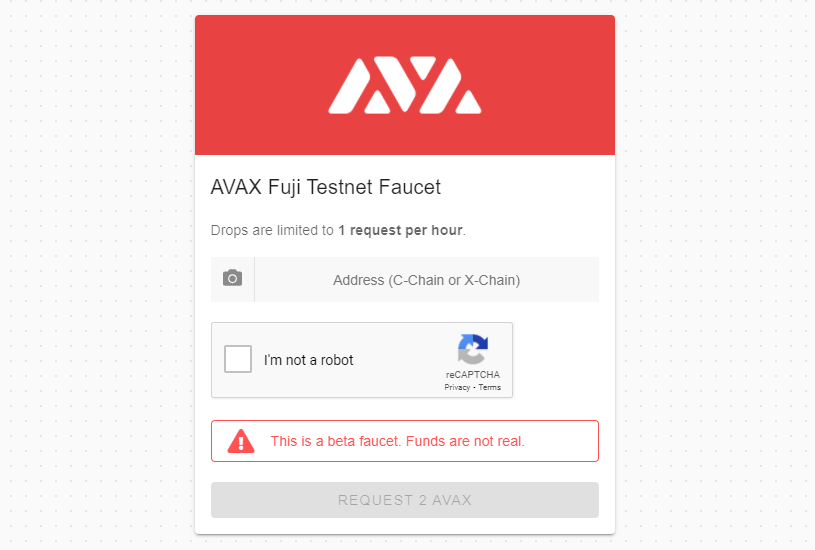
- Use the Avalanche faucet (use the link to the left or the one at the top of the “important_information.md” file) to obtain test AVAX:
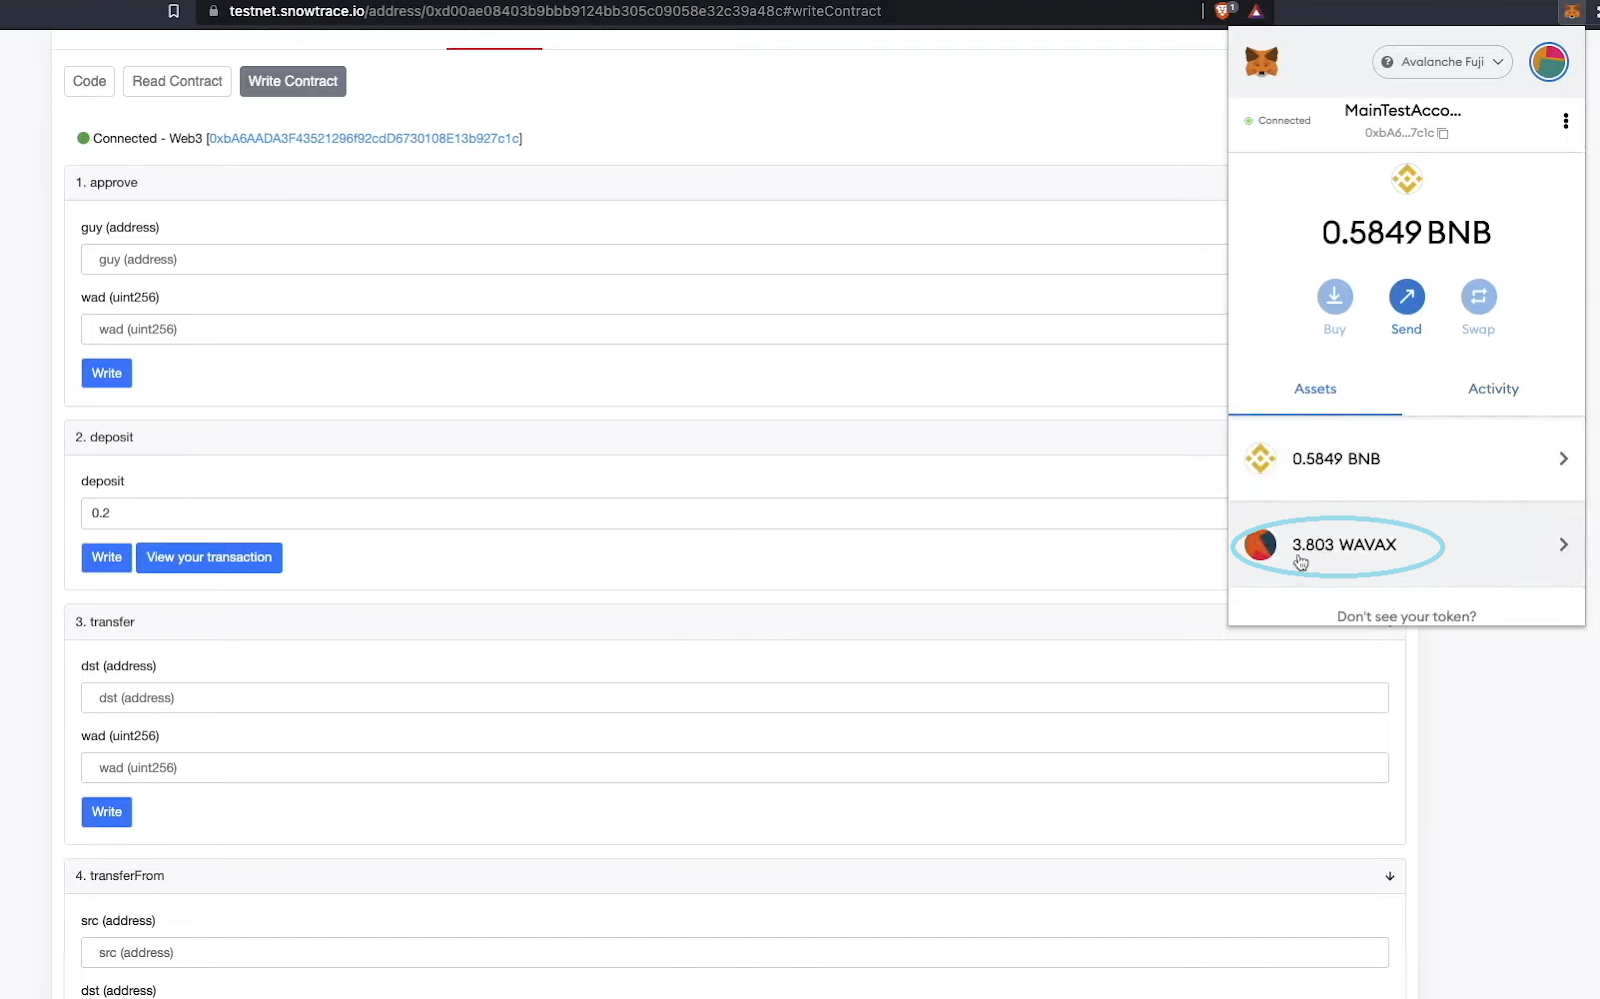
- Wrap test AVAX into WAVAX using your MetaMask and SnowTrace wrapping feature (use the second link from the top in the “important_information.md” file):
With everything set up properly, you are almost ready to build a flash loans smart contract, which will be the core of our example flash loans lab. However, before we hand you over to one of Moralis’ experts, let’s make sure you understand how our flash loans lab functions.
How Does Our Flash Loans Lab Work?
This image shows all of the components of our flash loans lab:
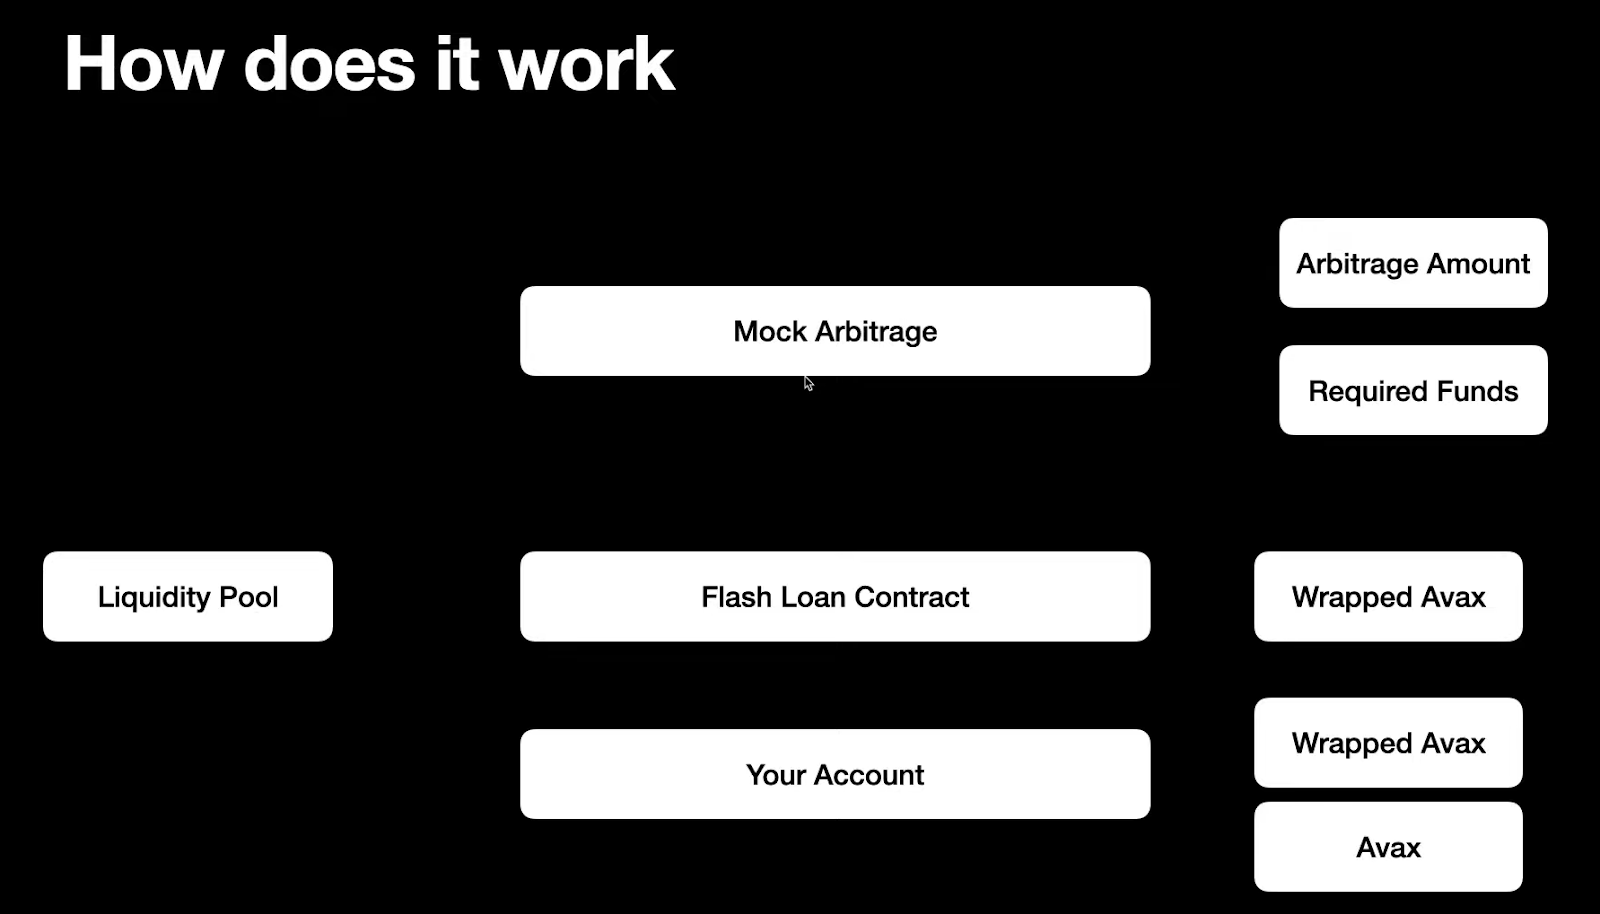
As you can see, the four main components include:
- Liquidity Pool – We will use the AAVE protocol for that purpose.
- Mock Arbitrage – This is a sandbox arbitrage that we will set up to use as an example of utilizing flash loans. It will have two parameters: the arbitrage amount and required funds. The first one is the number of tokens that will be obtained when arbitrage is successfully executed, while the second one is the number of tokens required to participate.
- Flash Loan Contract – It will provide users with the funds that will come from the liquidity pool. The contract needs to have some wrapped AVAX (WAVAX) to pay for the commission of the coin we are borrowing. It will also call the mock arbitrage to get the arbitrage amount (if the required funds are sufficient). Then, it will pay back to the liquidity pool. However, the funds will still be on the contract (a solution revealed in the video below).
- Your Account – You need to have a sufficient amount of WAVAX and AVAX to cover the required arbitrage amount, fees and even provide sufficient liquidity.
If you’d like more information on how our flash loans lab functions, watch the video below starting at 16:04. Moreover, to get an even clearer understanding, check out the lab in action at 41:28.
At this point, you are ready to tackle the details of our flash loan smart contract (video below at 20:20). Finally, you will also learn the details of creating the flash loans lab’s UI at 37:09. To get the most out of this example project, make sure to create your own version of the flash loans lab.
How do Flash Loans Work? – Full Walkthrough – Summary
How do flash loans work? If you’ve covered the above sections properly, you now have a clear understanding of what flash loans are and how flash loans functions. Moreover, you’ve learned how to complete the initial setup required to create your own flash loans lab. Also, following the video above, you should have ended up with a functional flash loans lab at your disposal. With all that under your belt, you may crown yourself with the “semi flash loans expert” title. Nonetheless, in case you are interested in taking your DeFi knowledge even further, make sure to check out the “DeFi 101 – 2022 Ready” course at Moralis Academy.
Furthermore, you can become a blockchain developer by using free content available on the Moralis YouTube channel and the Moralis blog. We post valuable content on both of these outlets regularly. Some of our latest topics teach you how to get Web3 events with SMS messages, how to build a prediction market dApp, how to build a cross-chain bridge, how to create NFT on Binance Smart Chain, the aspects of MetaMask for developers, how to use the OpenSea API alternative, how to create free token, how to do gasless transactions on Ethereum, how to create a DAO in minutes, and much more.

