Are you looking for the easiest way to connect to Avalanche nodes? If so, you’re in the right place. In this guide, we’ll show you how to set up and connect to Avalanche nodes using Moralis, – the industry’s premier Web3 infrastructure provider. With our intuitive user interface, running your own Avalanche node is just a few clicks away. Here’s a quick three-step overview of the process:
- Step 1 – Sign up with Moralis.
- Step 2 – Go to the ”Nodes” tab, click the ”+ Create Node” button, and set up your node:
- Step 3 – Copy one of your node URLs and integrate it into your dapp to connect to Avalanche:

That’s it! Connecting to Avalanche nodes doesn’t have to be challenging when working with Moralis. For a more detailed breakdown, visit our nodes documentation page or continue with this guide!
Ready to connect to Avalanche nodes yourself? Sign up with Moralis for free and gain instant access to our nodes service!
Overview
Setting up and connecting to Avalanche nodes from scratch requires a complex underlying infrastructure, which can be quite challenging to both establish and maintain. For instance, operating archive or full nodes demands considerable bandwidth, high storage capacity, and significant computational power. Additionally, nodes are chain-specific, meaning you need to set up the required infrastructure for each network you interact with. This quickly becomes a resource-intensive and time-consuming task, especially if you’re building cross-chain dapps. But there has to be a better way, right?

With a Web3 infrastructure provider like Moralis, you can seamlessly bypass the challenges above. We handle all the underlying complexities, allowing you to set up and run Avalanche nodes with just a few clicks. So, if you’re a developer looking to learn how to connect to Avalanche nodes, this guide is for you. Let’s dive straight in!
What is Avalanche?
Avalanche is an open-source blockchain platform for building decentralized applications (dapps) within an interoperable and highly scalable ecosystem. Powered by a unique consensus mechanism that’s designed for high throughput and energy efficiency, Avalanche is able to accommodate the scale of global finance with near-instantaneous transaction finality!
So, why should you build dapps for the Avalanche ecosystem?
To answer this question, let’s explore three benefits of the network:
- Speed: Avalanche employs a lightning-fast consensus mechanism, ensuring quick finality and low latency. The network processes and verifies transactions in less than two seconds, making it an ideal ecosystem for dapps that handle a high volume of transactions.
- EVM Compatibility: Avalanche is EVM-compatible right out of the box, allowing you to build dapps using familiar tools. This includes programming languages like Solidity and development environments like Hardhat.
- Security: Avalanche’s consensus mechanism scales to thousands of validators without performance degradation, providing a safe and secure platform for Web3 developers.
What are Avalanche Nodes?
Simply put, Avalanche nodes are computers, servers, or other devices that participate in the network and perform various key tasks needed to maintain the blockchain. These tasks include validating transactions, propagating blocks, and much more. The Avalanche blockchain comprises hundreds of nodes that collectively contribute to the network’s security and decentralization.

There are several use cases for Avalanche nodes, and we’ll explore three examples below:
- Consensus & Transaction Validation: Avalanche nodes participate in the consensus process by validating transactions and adding new blocks to the blockchain. This essential function helps keep the Avalanche network secure.
- Data Storage: Some nodes store a complete copy of the blockchain, including a full record of transactions and smart contract data. These nodes update their data in real time as new transactions occur on the network, ensuring that the information remains accurate and up-to-date.
- Web3 Development: Nodes are used to interact with the Avalanche network, making them essential for Web3 development. With an Avalanche node, you can both read and write blockchain data, two critical aspects of dapp development.
Nevertheless, that gives you an overview of Avalanche and nodes. Let’s now explore the easiest way to set up and connect to Avalanche nodes!
Tutorial: How to Connect to Avalanche Nodes
Let’s now explore how to seamlessly connect to Avalanche nodes. We’ll divide the tutorial into two distinct sections:
- Setting Up Avalanche Nodes
- Connecting to Avalanche Nodes
So, without further ado, let’s explore the easiest way to set up Avalanche nodes!
Easiest Way to Set Up Avalanche Nodes
Your best option for setting up Avalanche nodes is to use Moralis, the industry’s leading Web3 infrastructure provider. With our nodes service, you can effortlessly set up blockchain nodes for 20+ networks with just a few clicks!
So, how does it work?
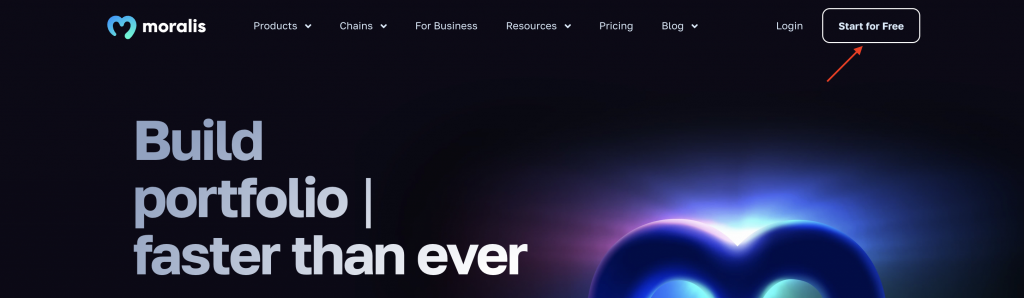
The first thing you’ll need to do is sign up with Moralis. As such, if you haven’t already, click the ”Start for Free” button at the top right and register an account:
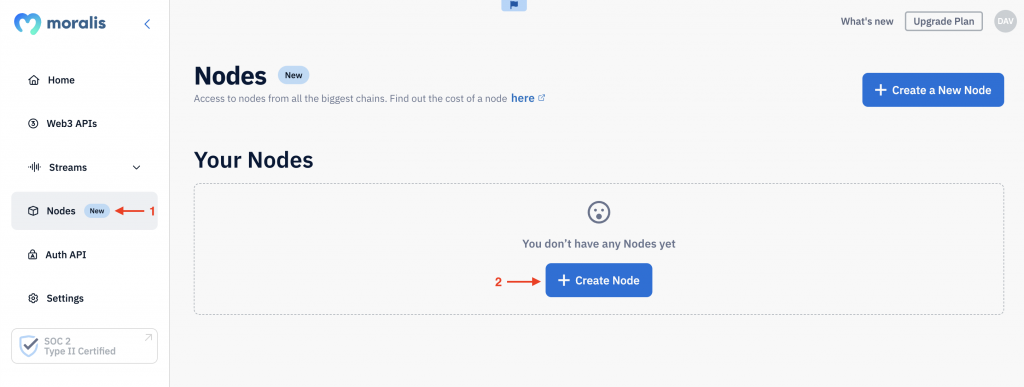
Once you have an account, navigate to the “Nodes” tab and hit the “+ Create Node” button:

Next, select the Avalanche network, followed by the “Mainnet” option:
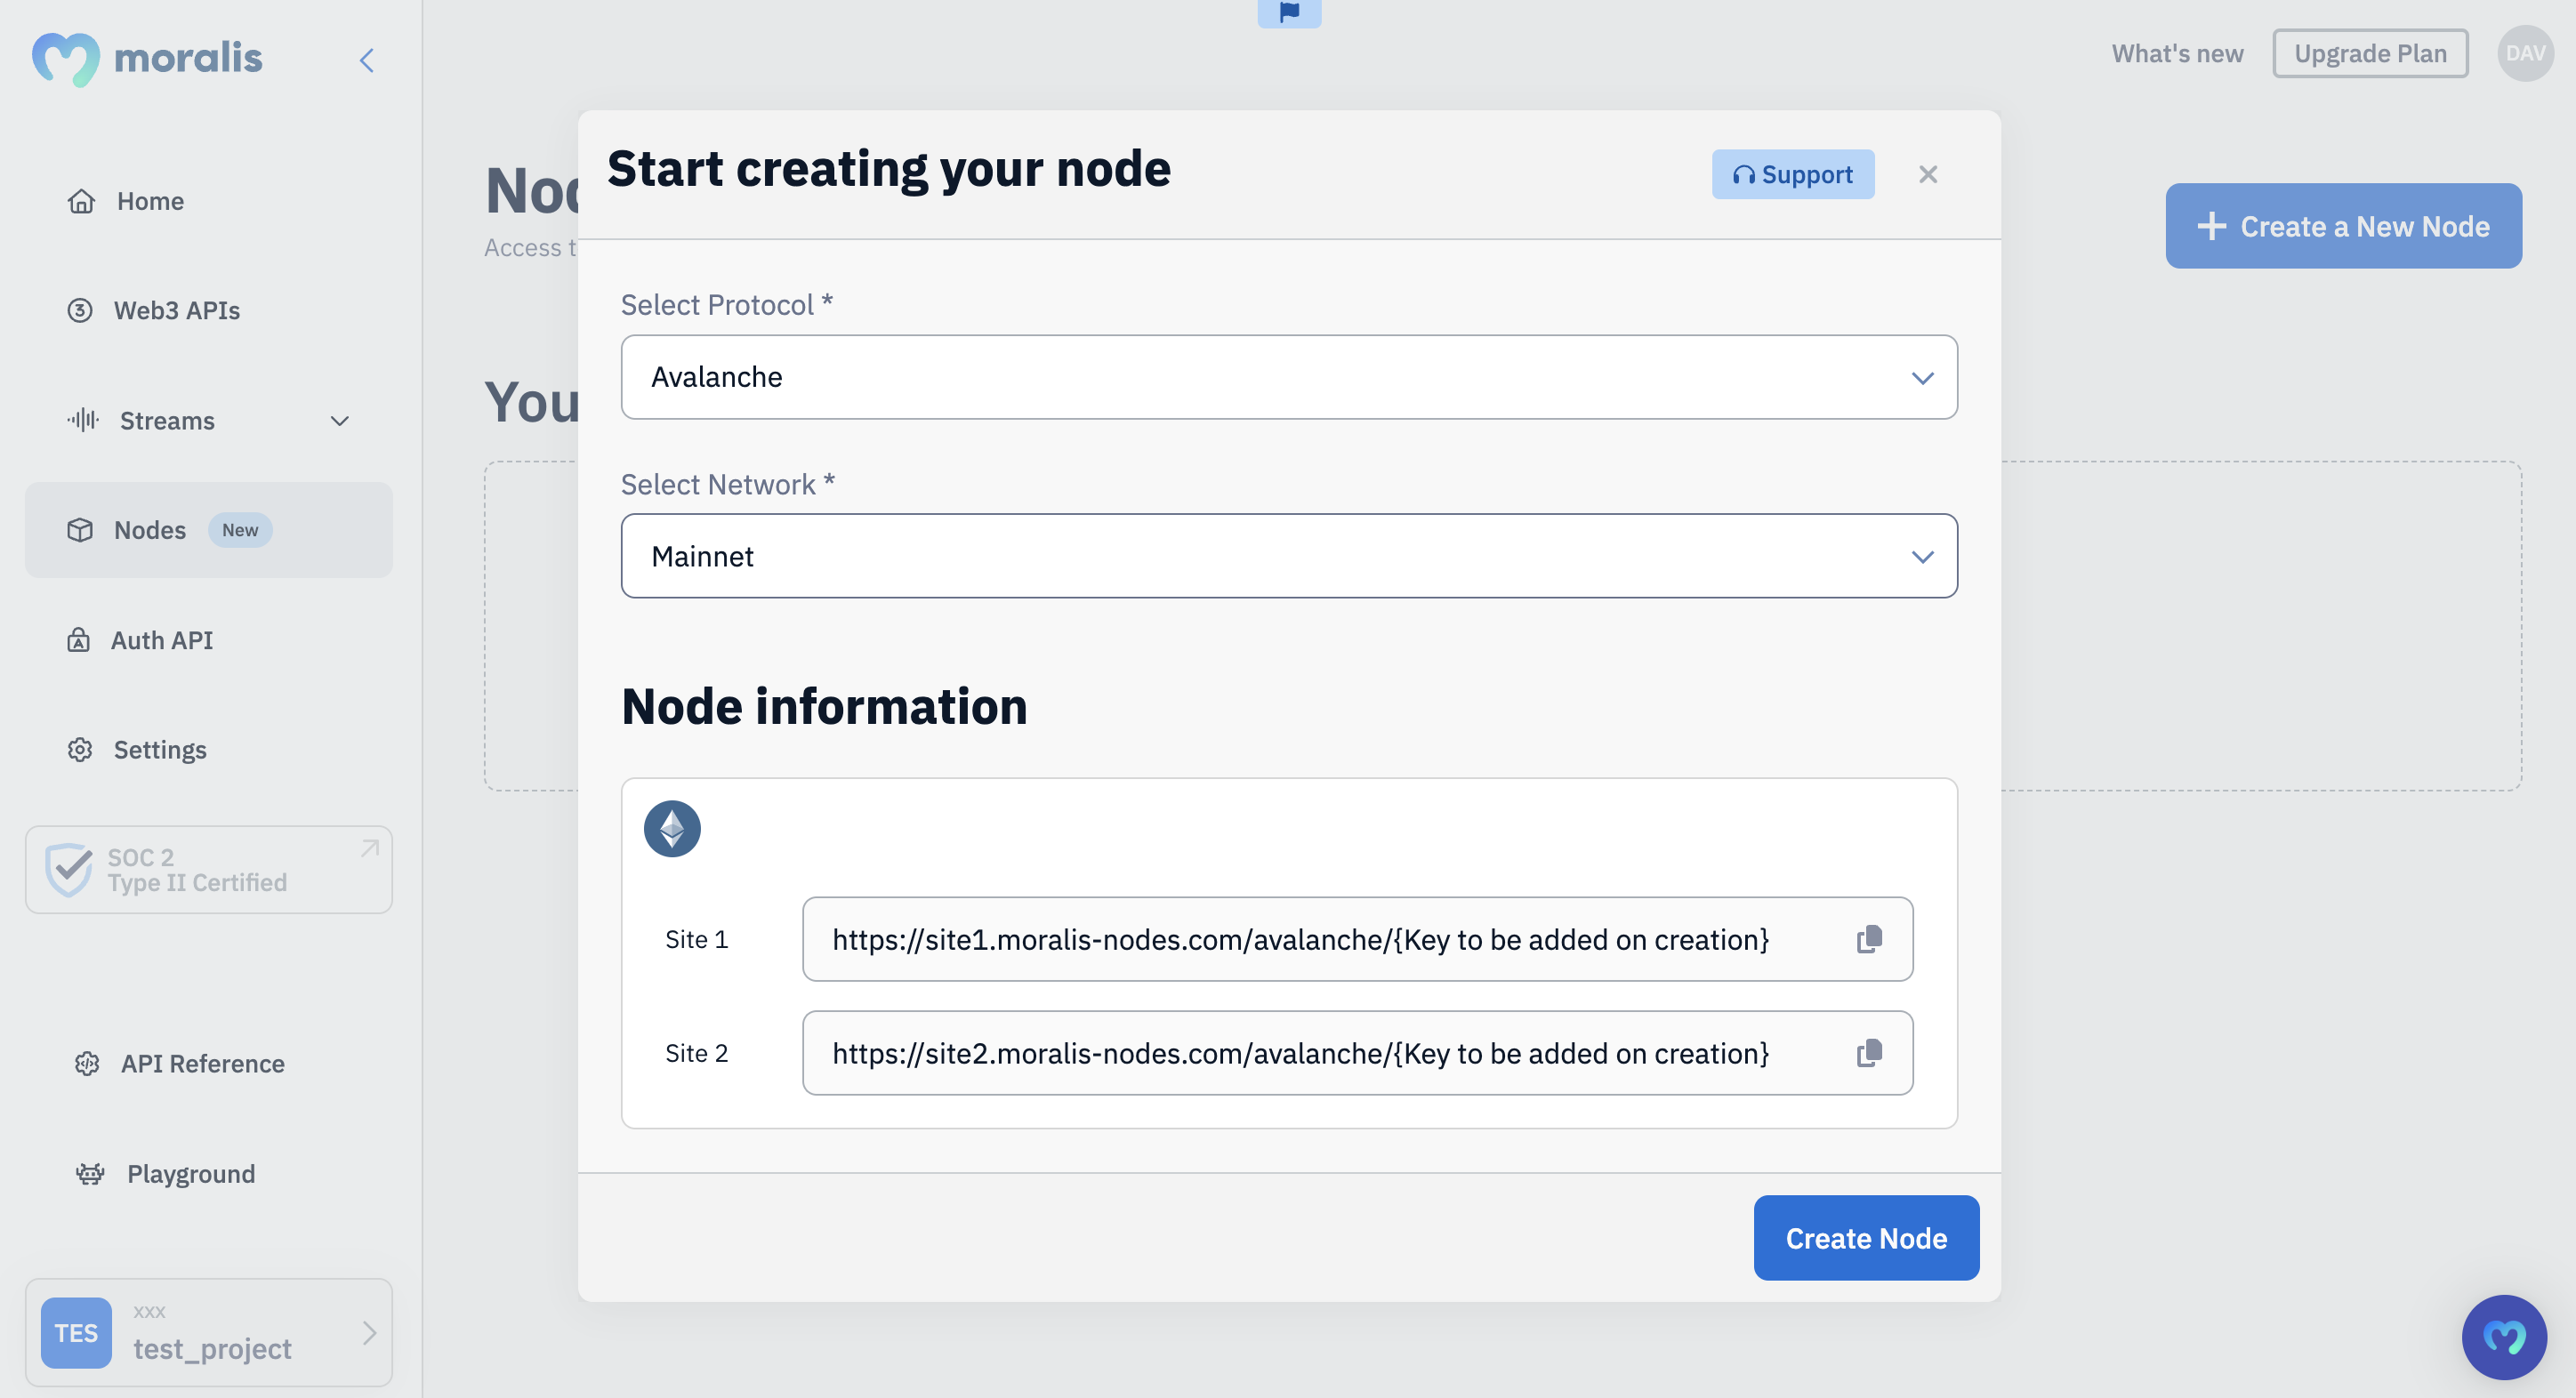
After clicking “Create Node,” you’ll receive two node URLs that you can use to connect to the Avalanche network:
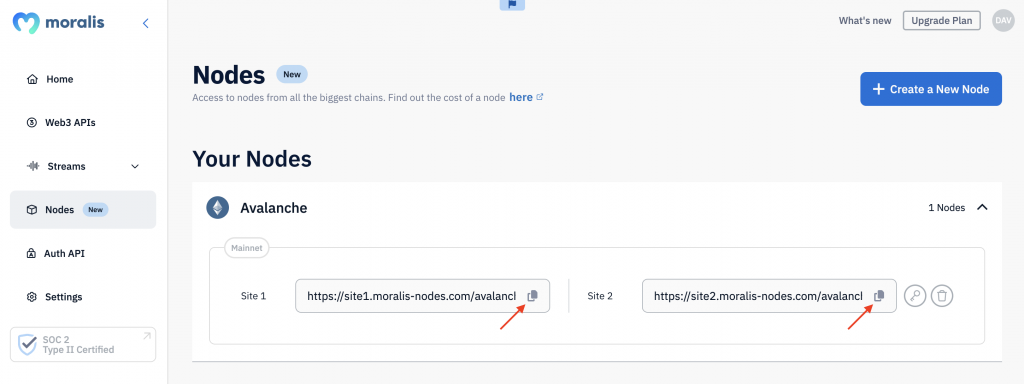
That’s it! Setting up Avalanche nodes doesn’t have to be challenging when using Moralis!
Connect to Avalanche Nodes with Ethers
Now that you have your Avalanche node up and running, we’ll show you how to connect to it. Specifically, we’ll demonstrate how to use your node to fetch the native balance of any Avalanche wallet using ethers.js.
Before you proceed, ensure you have the following ready:
- Node.js v.14+
- Npm or Yarn
From here, launch your preferred IDE, set up a folder, and initialize a project using the following terminal command:
npm init
Next, install ethers with the following terminal input:
npm install ethers
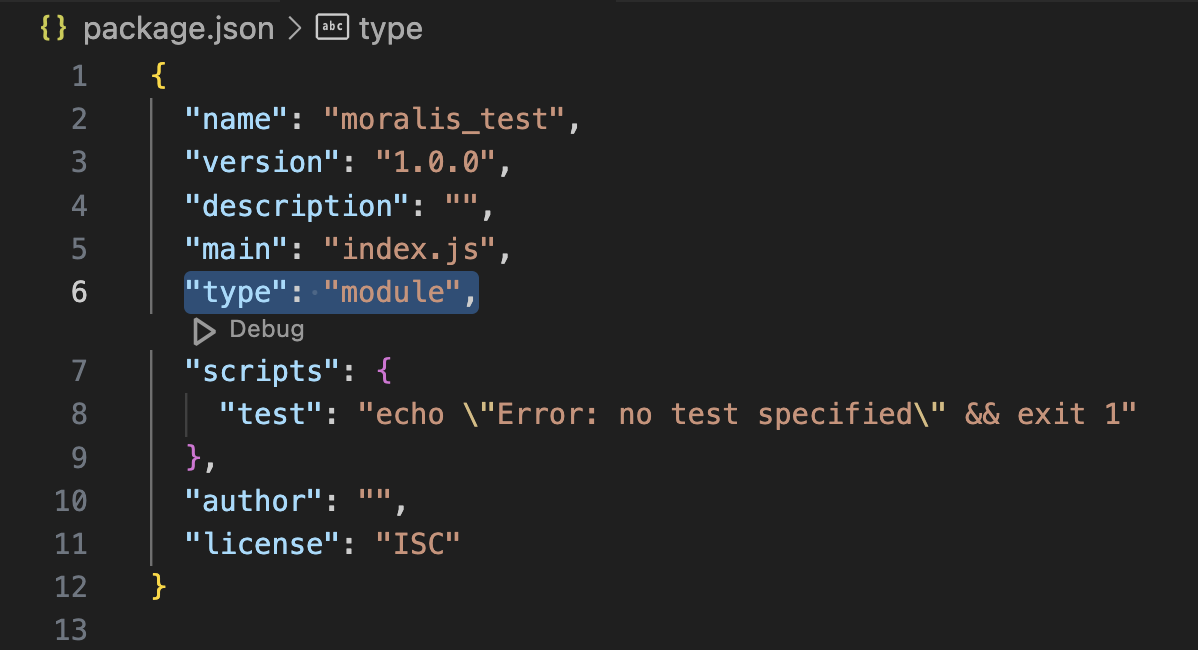
You then need to open your ”package.json” file and add ”type”: ”module” to the list:
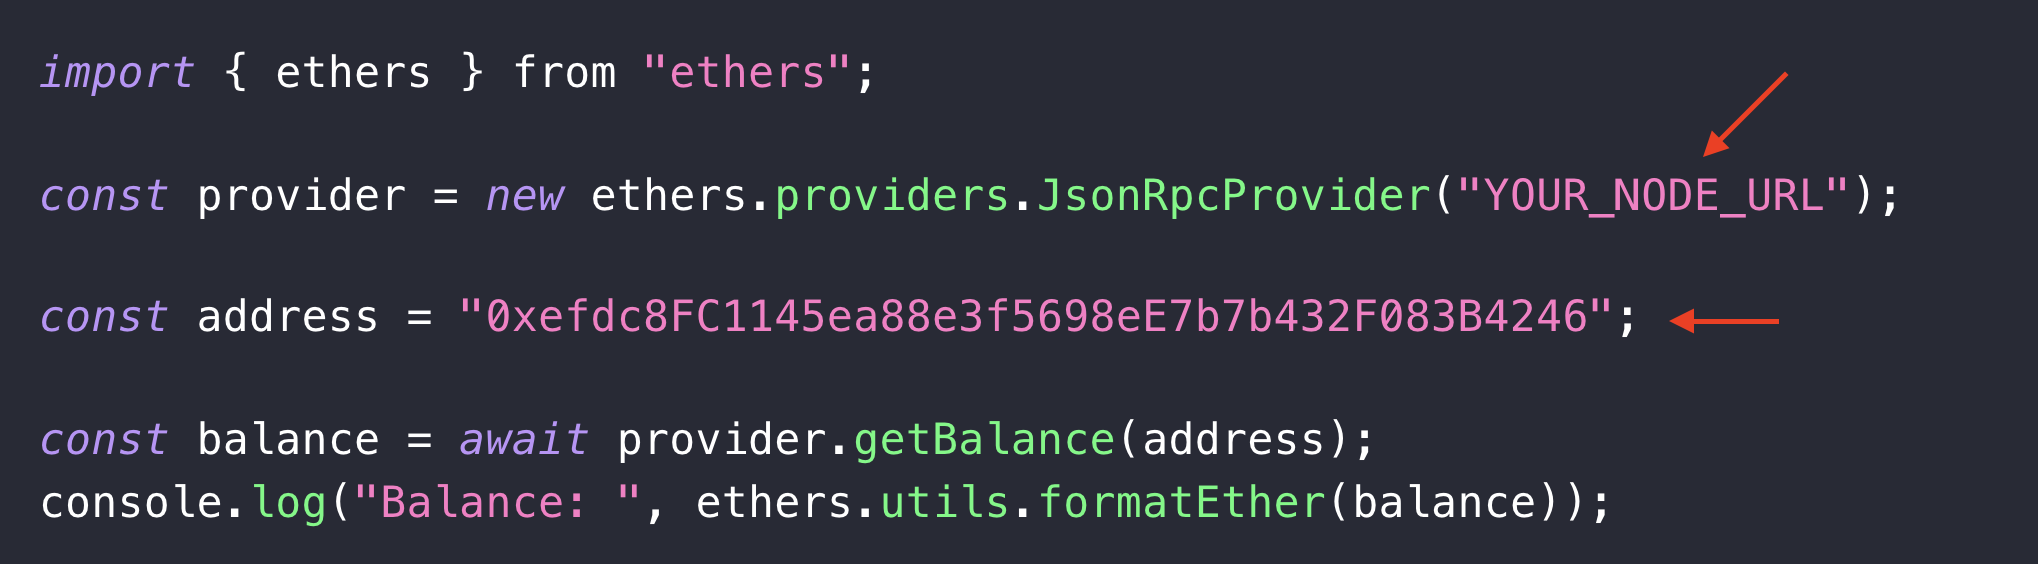
Next, create a new ”index.js” file and add the following code:
import { ethers } from "ethers";

const provider = new ethers.providers.JsonRpcProvider("YOUR_NODE_URL");

const address = "0xefdc8FC1145ea88e3f5698eE7b7b432F083B4246";

const balance = await provider.getBalance(address);
console.log("Balance: ", ethers.utils.formatEther(balance));
From here, you now need to make some minor configurations to the code. Replace YOUR_NODE_URL with one of your Moralis node URLs. Also, configure the address parameter to fit your query:
Finally, open a new terminal, navigate to the project’s root folder, and run the command below to execute the script:
node index.js
In return, you’ll get the native balance of the specified wallet. It should look something like this:
Balance: 4304710.323268324194884503
Congratulations! You now know how to set up and connect to Avalanche nodes using Moralis and ethers.js!
However, if you want a more in-depth tutorial with more examples, please check out the Moralis YouTube video down below:
Limitations of Nodes
Nodes are critical for interacting with a blockchain network. However, when it comes to querying on-chain data, they aren’t always the best option. Let’s explore three limitations of blockchain nodes:
- Complex to Query: Querying blockchain nodes is generally quite complicated. For instance, you can’t simply ask, “What tokens are wallet X holding?” To get this information, you need to make multiple requests and piece together the data yourself.
- Raw Data: When you query a network using a node, you receive raw blockchain data. Before you can use this data, you need to interpret, decode, and convert it into the right format.
- Chain-Specific: Nodes are tied to specific blockchains. This means you need to run a node for each chain you’re interacting with. As you can imagine, this can quickly become an expensive endeavor if you’re building cross-chain dapps.

So, how can we tackle these limitations?
One solution is to leverage a Web3 infrastructure provider like Moralis. With our premier APIs, you can seamlessly query decoded and detailed on-chain data with just a few lines of code. If you’d like to learn more about this, join us below as we explore Moralis’ Web3 API suite further!
Exploring Moralis’ Web3 APIs – The Best Way to Query On-Chain Data
Moralis is the industry’s premier Web3 data provider, offering top-tier APIs that allow you to seamlessly query decoded and comprehensive data with just one line of code. Our toolkit includes more than ten use case-specific APIs, such as the Wallet API, Token API, Streams API, NFT API, and many others. As such, it doesn’t matter if you’re building a crypto wallet, decentralized exchange (DEX), or anything in between; we have got you covered!
But what makes Moralis’ APIs the best in the business?
- Comprehensive: Our APIs are designed with the outcome in mind, providing more data with fewer calls. With Web3’s most comprehensive API responses, you can build dapps faster and more efficiently.
- Simple: Don’t bother with a new API provider for each chain you’re interacting with. Moralis’ APIs are truly cross-chain compatible, offering a unified toolkit for all chains, which significantly streamlines your development experience.
- Trusted: Moralis is trusted by some of the biggest names in Web3, including MetaMask, Blockchain.com, Delta, and many others.

That gives you an overview of Moralis. Let’s now dive deeper and explore three interfaces in our Web3 API suite!
Moralis’ Web3 API Suite
Our suite of development tools includes over ten APIs. Below, we’ll introduce you to five prominent examples!
- Wallet API: Moralis’ Wallet API is the top interface for wallet data. With this premier tool, you only need single endpoints to retrieve any wallet’s history, token balances, net worth, profitability, and more. This is the ultimate API for building wallets, portfolio trackers, and other platforms that rely on wallet data.
- Token API: The Token API is the leading tool for ERC-20 data. Use this industry-leading tool to seamlessly get the full supply of a token, metadata, prices, and much more. It’s perfect for building platforms that need token data, including DEXs, token trackers, and more.
- NFT API: Moralis’ NFT API is the top tool for NFT data. Use this interface to get NFT prices, metadata, balances, and more with just single lines of code. This API is ideal for anyone building everything from Web3 games to NFT marketplaces.
- Streams API: The Streams API is your go-to solution for real-time blockchain data. This industry-leading API allows you to seamlessly establish Web3 data pipelines with just a few clicks, delivering instant updates directly to your project’s backend. Ideal for setting up in-app alerts, populating databases with the latest information, tracking user balances, and more, the Streams API simplifies and enhances your blockchain data management.
- Price API: Moralis’ Price API is the ultimate solution for accessing comprehensive price data. This premier API provides real-time and historical prices for both ERC-20 tokens and NFTs with ease. Additionally, the Price API supports batch requests, enabling you to query prices for multiple tokens in a single API call, making it a highly efficient tool for all your pricing needs.
If you want to know more about these APIs and our other interfaces, please visit our Web3 API page!
Summary: How to Connect to Avalanche Nodes
Setting up and connecting to Avalanche nodes can be time-consuming and resource-intensive. Running full or archive nodes requires substantial bandwidth, computational power, and high storage capacity. Additionally, nodes are chain-specific, necessitating separate setup and maintenance for each network you interact with. Thankfully, with a Web3 infrastructure provider like Moralis, you can effortlessly bypass these challenges.
Moralis simplifies the process of setting up and connecting to Avalanche nodes by handling all the underlying complexities for you. Our intuitive user interface allows you to run an Avalanche node seamlessly with just a click of a button!
Here’s a quick three-step guide to getting you started:
- Step 1 – Sign up with Moralis.
- Step 2 – Log in, go to the ”Nodes” tab, hit the ”+ Create Node” button, and set up your Avalanche node:

- Step 3 – Copy and integrate one of your node URLs into your project:

That’s it! Running an Avalanche node doesn’t have to be more challenging than this when working with Moralis!
If you liked this guide on how to connect to Avalanche nodes, consider reading similar content here on the blog. For instance, check out our Ethereum nodes article or our BSC node guide.
Ready to run your own Avalanche nodes? Sign up with Moralis today. Creating an account is free, giving you immediate access to our top-notch node service!
