With the quickly evolving decentralized Web3 internet and the spike in inflation rates of traditional currencies, we’ve seen that more people find Web3 favorable. For example, when analyzing the number of active users for Web3 wallets, the numbers are surging! Moreover, with Ethereum being the behemoth of programmable blockchains, we realize that having an ETH wallet will be one of the more beneficial alternatives among the various options available. With an ETH wallet, we can emerge into the metaverse and interact with dapps (decentralized applications) we never imagined possible. If you’ve decided to create an ETH wallet to take advantage of the endless opportunities, follow along in this article as we’ll explain how to create an ETH wallet quickly! If you’re new to the crypto space, don’t worry; this article is not only for the experienced one but can also serve as a “beginner’s guide” to creating an ETH wallet.
Herein, you will first learn about the basics related to Ethereum wallets. Also, we’ll do a quick overview of some vital tools. However, we will primarily focus on how to create an ETH wallet that is most suitable for web users. Hence, it is also a “must-have” to become a Web3 developer. If MetaMask is on your mind, you are correct. This reputable hot crypto wallet is easy to create and natively supports ETH. In addition, you can also easily add other EVM-compatible blockchain networks to MetaMask. As such, it supports a broad range of cryptocurrencies and dapps. Furthermore, thanks to Moralis’ MetaMask integration, your JavaScript or Unity skills can be used to create phenomenal dapps. So, if you want to get into Web3, “MetaMask for developers” should be on your radar. In case you already have your MetaMask ready, create your free Moralis account and start building!

What is an ETH wallet?
As mentioned, we’ll first cover some basics to get you all up to speed. However, before we can answer “what is an ETH wallet?”, we need to make sure you all know what ETH is. So, what is ETH? ETH is short for “ether” and is the Ethereum blockchain’s native cryptocurrency. It is a coin or a native token used to power transactions on this most popular programmable chain. It also provides security to the network. Essentially, ETH is digital, global money and a currency of Ethereum dapps. Furthermore, by market cap, ETH is the second-largest cryptocurrency. In case you are new to crypto, here are some key differences between ETH and traditional money:
- You truly own it. Once you create an ETH wallet, ether enables you to be your own bank. No third party is required.
- Despite many critics, digital money is rather safe (of course, that’s not true for all cryptocurrencies). However, ETH is secured by pretty advanced and proven cryptography. The latter protects your ETH wallet and your transactions.
- ETH supports peer-to-peer (P2P) payments. There are no intermediary services (like a bank) required to send your ETH. In a way, it’s like giving another person cash but in a more practical and secure manner. As long as you have an internet connection, you can send ETH from anywhere, anytime.
- Since Ethereum is decentralized and global, so is ETH. Hence, there’s no centralized control. As such, there’s no bank or company that can suddenly decide to print more ETH or change their terms of use.
Now that you know what ETH is, it’s easy to understand what an ETH wallet is. Any Web3 wallet (hot [active] or cold [passive]) that is able to store ETH and interact with your Ethereum account is essentially an ETH wallet.

Create an ETH Wallet with Ease
As was touched on, we believe that MetaMask is the best ETH wallet for web users and also for Web3 developers. Thus, we will cover the details of how to create an ETH wallet with MetaMask below. However, you should know that there are many other reputable options you can explore on your own. Furthermore, there are tools to help you choose the right ETH wallet for your needs. One tool that really stands out in our opinion is “ethereum.org’s” “Find a wallet” page. As such, let us quickly show you how to use this tool to find and create an ETH wallet that is right for you.
Find and Create an ETH Wallet that is Right for You
You can access “ethereum.org’s” “Find a wallet” page by entering “eth wallets” in Google’s search bar. The first result below the potential ads should be the right one (make sure the URL is correct):

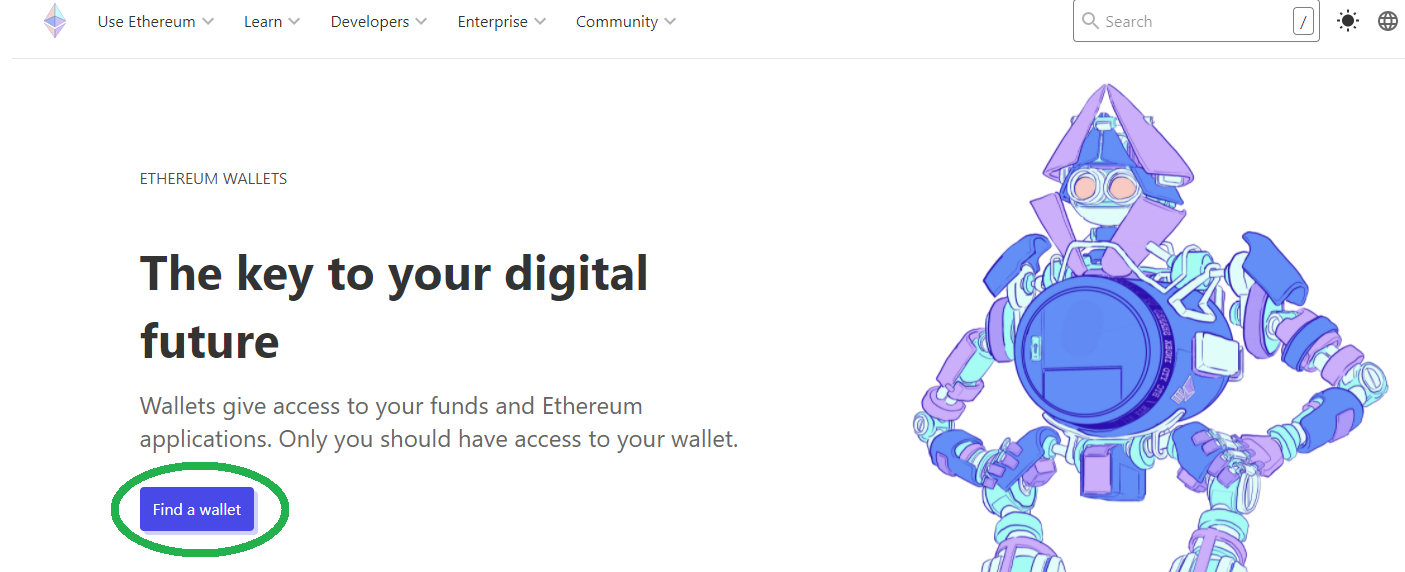
Once on the “Ethereum wallets” page, click on the “Find a wallet” button:
If you’ve followed the above instructions, you should now be on the “Find a wallet” page:

There you have several options. For instance, you can scroll down to the “Ethereum Wallets” section and browse all options. There you can use the “More info” button to see the main features of the wallet in question:
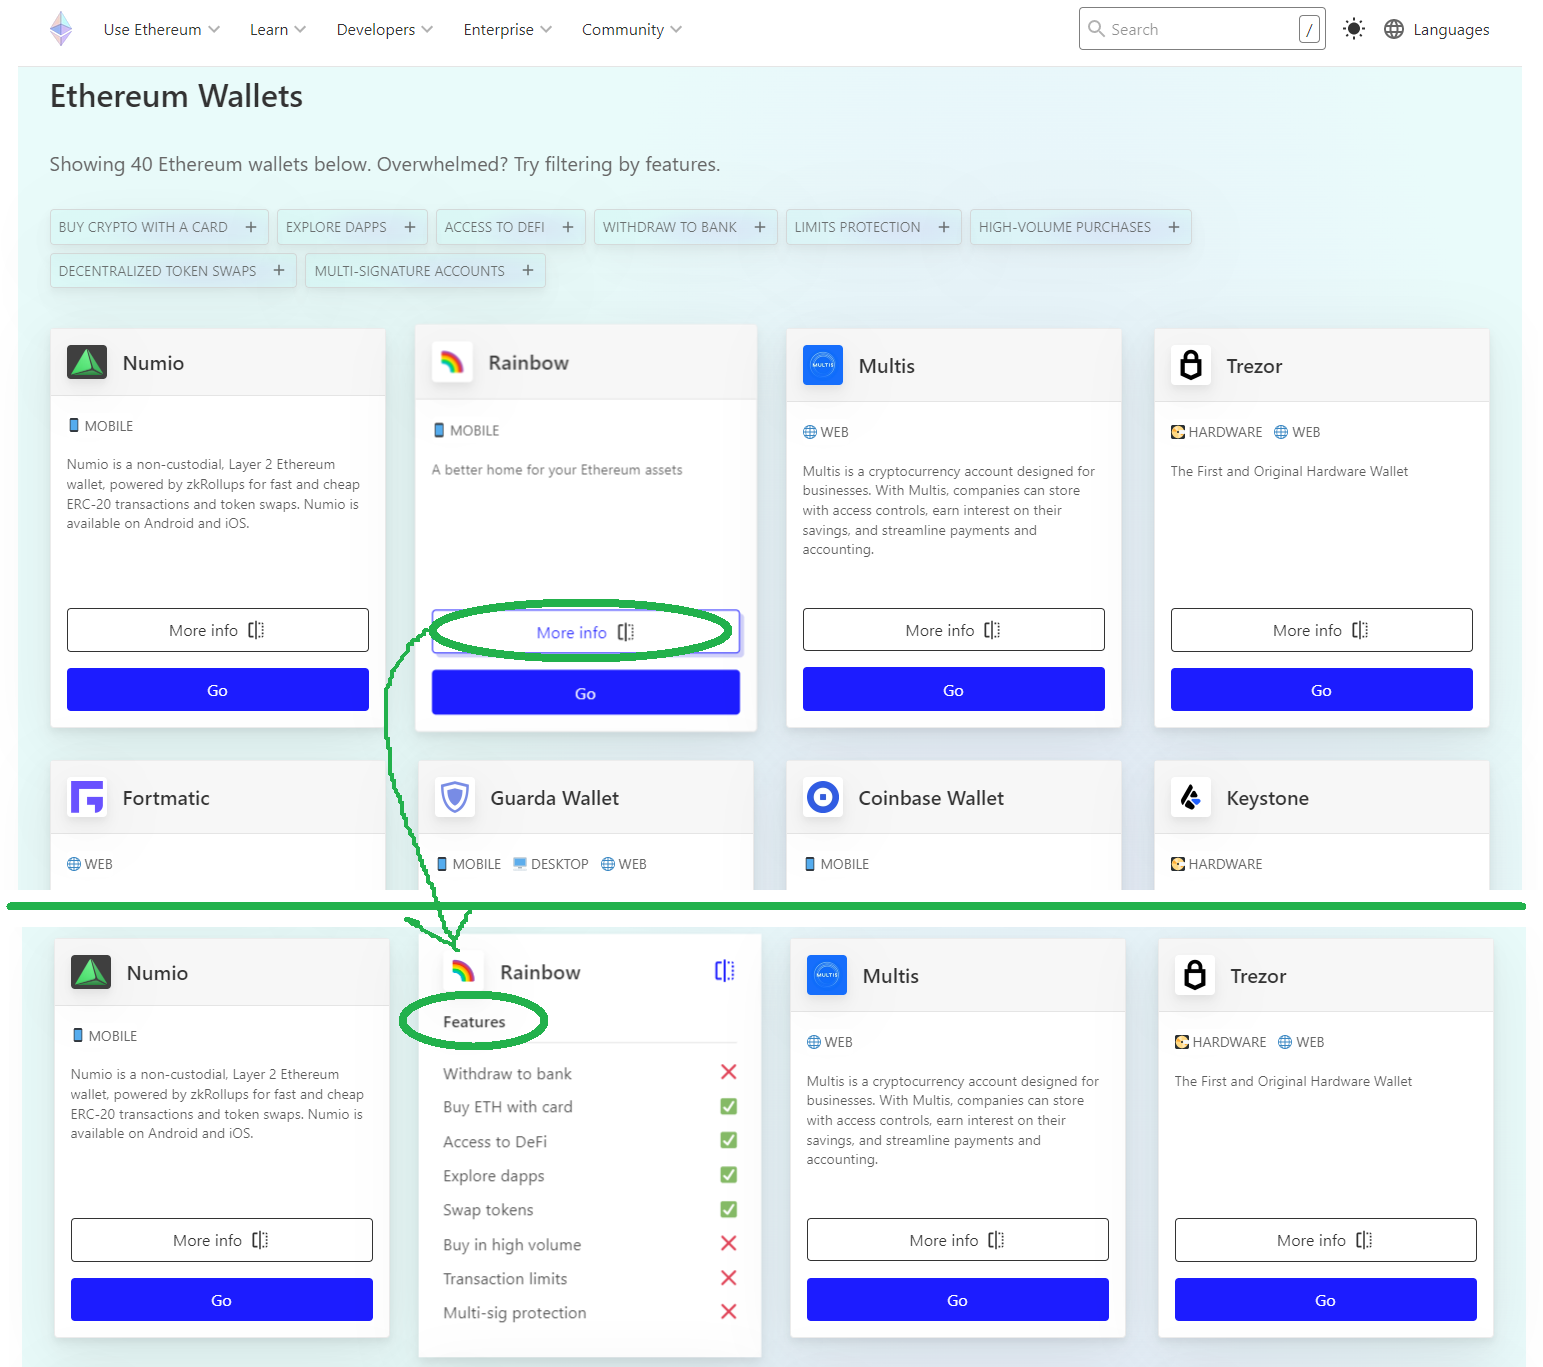
Moreover, you can also click on the “Go” button to get to that ETH wallet’s official website. From there, you can easily create an ETH wallet.
However, to avoid browsing Ethereum wallets cluelessly, the “Find a wallet” page offers a neat feature. You can choose the wallet features you care about. Then, the page will use your selections as filters and display only suitable ETH wallets. To use these filters, click on the “Search chosen features” button after selecting your preferred features:

Using MetaMask to Create an ETH Wallet
By now, you know our opinion about MetaMask. Hence, it is time to show you how to use this powerful tool to create an ETH wallet. In the upcoming sections, we’ll cover all the steps you need to complete to end up with a new Ethereum wallet. Along the way, we’ll guide you through the process of downloading MetaMask, installing it, and setting up your new ETH wallet. Nonetheless, we’ll also show you how to add other popular programmable chains, such as BNB Chain, Avalanche, and Polygon.
Download and Install MetaMask
- Although we recommend using Google Chrome, open your favorite browser and type “MetaMask” into the search bar. Next, click the official MetaMask website:

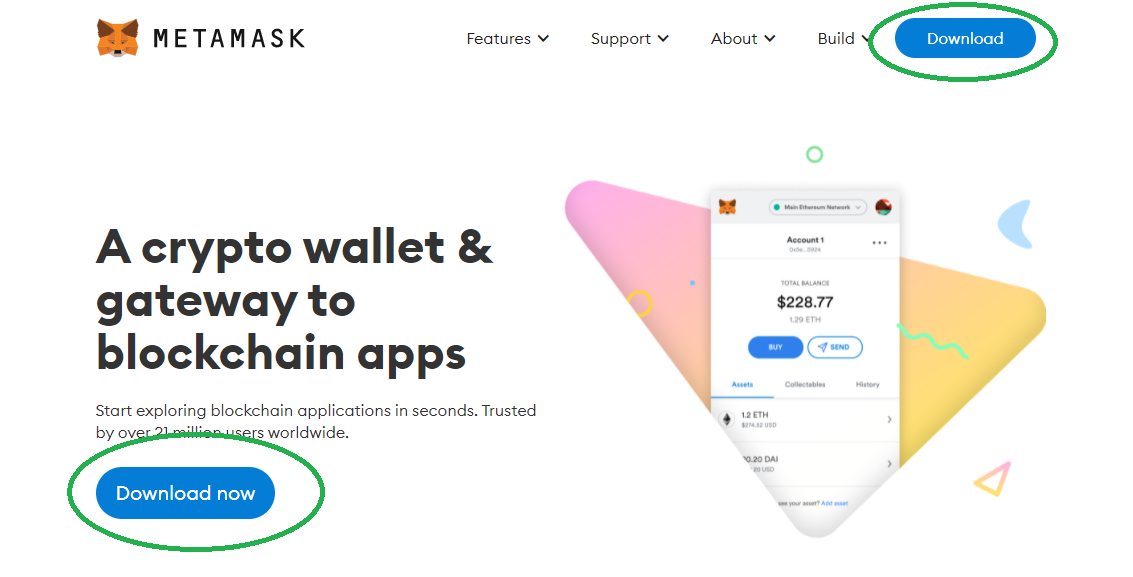
- After landing on MetaMask’s official website, click on the “Download” button. You can find it in the top menu and in the “A crypto wallet & gateway to blockchain apps” section:
- Now you should be on the “Download” page. There, you need to choose between “Chrome”, “iOS”, and “Android”. Since we assume that you also plan on building dapps with MetaMask, we’ll focus on the “Chrome” option. Accordingly, select the “Chrome” option and click on “Install MetaMask for Chrome”:

- After completing the previous step, you’ll be redirected to Google Chrome’s web store. There you only need to click on “Add to Chrome”:

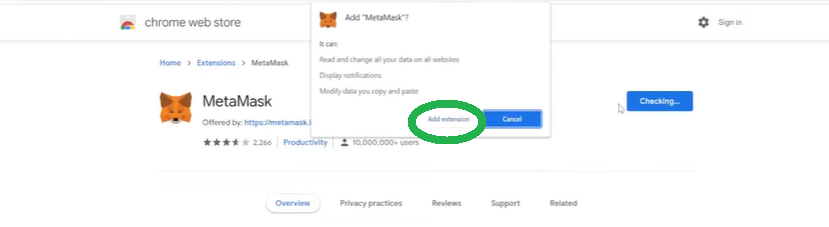
- Next, a pop-up window asking for your confirmation will appear. You need to click on the “Add extension” button in order to proceed:
- By completing all of the previous steps, you should now be greeted by MetaMask’s welcome message. As such, this wraps up the MetaMask extension download and installation process. Nonetheless, since you are probably eager to create an ETH wallet, make sure to click on “Get Started”:

Create an ETH Wallet with MetaMask
The above “Get Started” button will take you to a screen where you’ll get to choose between creating a new wallet or importing an existing one. In case you already have an active ETH wallet, you may use your secret recovery phrase to access it. Hence, click on the “Import wallet” button. However, we’ll focus on the “Create a Wallet” option since this is how you create an ETH wallet with MetaMask:
- Click on the “Create a Wallet” button:

- Then, you need to create your password and confirm it by re-entering the same combination of characters. Also, checkmark the “Term of Use” box to activate the “Create” button:

- In some regions, the MetaMask setup guide includes an instructional video. If that’s the case for you, we encourage you to watch it. Now, the next important step revolves around the secret recovery phrase that you should store safely. To view the phrase, click on “click here to reveal secret words”:

- With your secret words revealed, copy or write them down. Make sure to do so in the correct order – the order of the words matters. Most importantly, store your copy or note someplace safe. Hand-writing the phrase on a piece of paper might be the safest practice. However, make sure to double-check your spelling. Take your time with this vital step to do things right. You will use your secret recovery phrase to access your wallet from any other device or recover your account if your current device resets. Now that you have your secret words securely stored, click on “Next”.
- Enter your phrase’s words from the previous step in the correct order. By doing so, you’ll activate the “Confirm” button that will enable you to complete the process:

Adding Other Chains to MetaMask
Using the above instructions, you’ve successfully created your ETH wallet. Moreover, your new ETH address serves as a wallet for the Ethereum testnets and the mainnet. These are the networks that MetaMask supports by default. However, you can add other EVM-compatible chains with ease.
When adding other blockchain networks to MetaMask, you have two options:
- You can do it manually. Since this is a safer method, it is the one we recommend.
- Or, you can do it automatically. In that case, you use a reputable website, where you click on the correct button, which adds the chain in question to your MetaMask. If you decide to use the automatic option, you need to be careful. It is definitely a faster method; however, it is potentially dangerous. Only use this method if you trust the website. Of course, there are many valid websites that offer this shortcut. However, these sites are not under our control; therefore, we can’t vouch for any of them. The only platform with that option we can vouch for is Moralis (via Moralis Speedy Nodes).
How to Add Other Chains to MetaMask Manually
- Start by opening your MetaMask extension. Next, click on the “account” icon. As shown in the image below, select “Settings” from the drop-down menu.

- Next, click on the “Networks” option inside the “Settings” menu:

- To add an EVM-compatible blockchain manually, click on the “Add Network” button in the top-right corner.
- Finally, you’ll need to enter (copy and paste) the required details and click on the “Save” button. Here are the required details for some of the popular EVM-compatible networks (available in the blockchains’ docs):
- Details to add BNB Chain’s mainnet:
- Network Name: Smart Chain
- New RPC URL: https://bsc-dataseed.binance.org/
- Chain ID: 56 (if 56 doesn’t work, try 0x38)
- Symbol: BNB
- Block Explorer URL: https://bscscan.com
- Details to add BNB Chain’s testnet:
- Network Name: Smart Chain – Testnet
- New RPC URL: https://data-seed-prebsc-1-s1.binance.org:8545/
- Chain ID: 97 (if 97 doesn’t work, try 0x61)
- Symbol: BNB
- Block Explorer URL: https://testnet.bscscan.com
- Details to add Polygon’s mainnet:
- Network Name: Polygon Mainnet
- New RPC URL: https://polygon-rpc.com/
- Chain ID: 137
- Symbol: MATIC
- Block Explorer URL: https://polygonscan.com/
- Details to add Polygon’s testnet (Mumbai):
- Network Name: Matic Mumbai
- New RPC URL: https://rpc-mumbai.maticvigil.com/
- Chain ID: 80001
- Symbol: MATIC
- Block Explorer URL: https://mumbai.polygonscan.com/
- Details to add Avalanche’s mainnet:
- Network Name: Avalanche Network
- New RPC URL: https://api.avax.network/ext/bc/C/rpc
- Chain ID: 43114
- Symbol: AVAX
- Block Explorer URL: https://snowtrace.io/
- Details to add Avalanche’s testnet (Fuji):
- Network Name: Avalanche FUJI C-Chain
- New RPC URL: https://api.avax-test.network/ext/bc/C/rpc
- Chain ID: 43113
- Symbol: AVAX
- Block Explorer URL: https://testnet.snowtrace.io/
How to Add Other Chains to MetaMask Automatically
In order to use Moralis for your backend needs, you’ll need to create your free Moralis account. By doing so, you’ll gain access to your Moralis admin area. Furthermore, this is where you’ll be able to access Moralis Speedy Nodes and add certain networks with the click of a button. For example, here are the steps you need to follow to do so for BNB Chain (formerly BSC):
- Click on “Speedy Nodes” from the side menu tab:

- Click on the “Endpoints” button under “BSC Network” (see the image above).
- Use the “Add to MetaMask” buttons to add the mainnet or testnet:

- You also need to confirm network switching within MetaMask:

How to Create an ETH Wallet – Summary
You now have a proper understanding of ETH and ETH wallets. Further, you’re aware of several ways to create an ETH wallet. Also, you’ve learned how to use a practical tool to help you select the most suitable Ethereum wallet. However, since we want to help you become a blockchain developer, we’ve shown you how to create an ETH wallet using MetaMask. In addition, to empower you even further, we’ve provided you with the details you need to add some of the most popular programmable chains to your MetaMask. As a result, you can turn your ETH wallet into a BSC wallet (BNB), Polygon wallet, or Avalanche wallet. Nonetheless, along the way, you’ve also read about Moralis (a.k.a. Firebase for crypto). This is the pinnacle of the current Web3 tech stack and is your ultimate shortcut to creating excellent Web3 applications.
The best way to learn how to use Moralis is to take on some interesting example projects. You can take your pick at the Moralis YouTube channel or the Moralis blog. Some of the latest topics focus on how to incorporate NFT power-ups, DeFi staking, how to build a metaverse game, how to reduce Solidity gas costs, how to communicate with a Web3 database from Unity, how to create an Ethereum NFT, why Web3 is important, how to build a 2D Web3 game, how to create a GameFi game, and much more. Moreover, both of these outlets are great resources for free ongoing crypto education.
However, you might be eager to go full-time crypto sooner rather than later. If so, you may need to take a more professional approach. Hence, Moralis Academy might be exactly what you need. Top-tier blockchain development courses, a personalized study path, professional mentors, and an empowering community await you on the other side!
