Mainstream crypto adoption is still some time away. However, things are definitely moving in that direction. This should really excite you because as we are entering the era of Web3 there are countless opportunities for developers. Eventually, most websites will incorporate some sort of blockchain feature. It may be just to authenticate users or to enable users to complete transactions using their cryptocurrencies. Of course, the details will depend on the purpose of a website and the business behind it. Moreover, essentially most websites will want to offer their users to interact with smart contracts through a website. However, average Joes and Janes will probably never know about smart contracts doing the heavy lifting in the back. As such, it’s up to developers to implement this interaction in a seamless manner.
Luckily, today’s article will show you how to interact with smart contracts through a website in an effortless way. The latter can be achieved with the use of the ultimate Web3 development platform Moralis. This Firebase for crypto is Mecca for any JavaScript-proficient frontend developer interested in becoming a blockchain developer. Moreover, Moralis is a lot more than just the best of Infura alternatives. It equips you with the ultimate Web3 SDK, including the most powerful Web3 API. As such, it enables you to cover all your blockchain-related backend needs with short snippets of code. The latter are neatly provided by the Moralis’ documentation. Furthermore, Moralis also helps you future-proof your work by offering full cross-chain interoperability. Nonetheless, it is completely free to start using this amazing tool, so make sure to create your account today.

What are Smart Contracts?
Before we take a closer look at how to interact with smart contracts through a website, let’s make sure you all know the basics. So, what are smart contracts? If we zoom out, smart contracts are computer programs. They are pieces of code running on programmable blockchains such as Ethereum. Of course, that is the simplest and rather broad way to look at smart contracts.
But let’s dive a little deeper. Smart contracts ensure that specific predefined actions are automatically executed when specific predefined conditions have been met. Hence the “smart” title. As such, they are a great way to reinforce rules, guidelines, and even execution in a safe manner. This incorporates a great level of trust and enables all involved parties to not worry about the rules being violated. However, it is important to keep in mind that the performance of a smart contract is only as good as the code behind it.
Moreover, note that there are many different smart contracts targeting specific aspects. Use cases for Solidity smart contracts alone basically know no limits. However, one of the most popular contract types are ERC20 contracts. They ensure that ERC20 tokens are created and handled properly. Furthermore, DAO smart contracts are the core of every decentralized autonomous organization. If you are interested in creating DAOs, make sure to check out our DAO smart contract example. Also, we suggest you learn how to create smart contracts.

Interact with Smart Contracts Through a Website with Moralis
Did you know that you can create dApps (decentralized applications) with rather advanced features without creating your own smart contracts? In that case, you build the functionality around existing smart contracts. And this is what we will be doing as we take a closer look at how to interact with smart contracts through a website. However, even if your project calls for the creation of smart contracts, you don’t have to start from scratch. Instead, you can access countless open-source smart contracts at OpenZeppelin.
Moving forward, we will first show you how to set up Moralis. With this initial setup completed, you’ll be able to use Moralis to interact with smart contracts through a website. Next, we will show you how you can create a simple dApp enabling donations in e.g. MATIC from scratch. However, we will also present you with an even faster alternative using the ultimate Ethereum dApp boilerplate. The latter provides you with a very impressive UI straight from the gate. In both cases, you will have a chance to create your own dApp and thus interact with smart contracts through a website.

Initial Moralis Setup – Part 1
Whether you will be starting from scratch or using the most practical Web3 boilerplate, you need to complete the Moralis setup. By following the steps below you will have things ready to create your dApps in no time. Here are the action steps:
- Create Your Free Moralis Account – In case you still haven’t created your free Moralis account, do so now. You may use the link at the end of the introduction, which will take you to the signup page. There, enter your email and create your password. Then click on the confirmation link, which will be sent to your email. On the other hand, in case you already have a Moralis account, simply log in to your admin area.
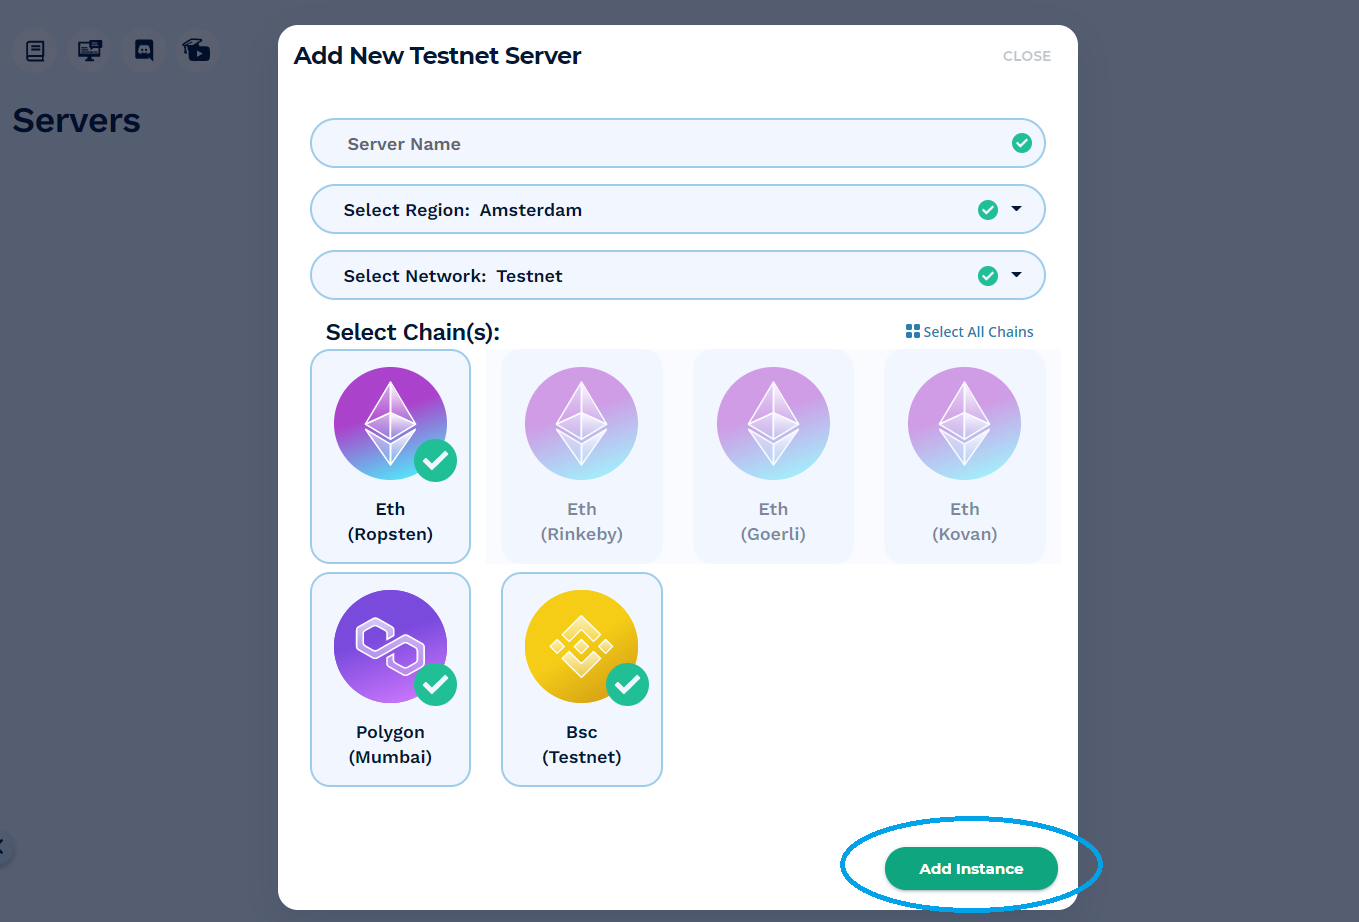
- Create a Moralis Server – Inside your Moralis admin area, navigate to the “Servers” tab (on the left-hand side in the navigation tab). There click on the “+ Create a new Server” button in the top-right corner. From a drop-down menu select the network type that best suits your needs (see the image below). When working on example projects, you’d normally focus on the “Testnet Server” option (connect to Ethereum testnets). For instance, we will be using Polygon’s testnet Mumbai. Though, when you are ready to present your dApps to the users, you’ll need to create a “Mainnet Server” to reach your audience.

Next, a pop-up window will ask you to enter your server’s name (this can be anything you want), select your region, network type, and chain(s). Finally, you get to spin up your server by clicking “Add Instance”:
Note: Since it can take a couple of minutes for your server to get ready, skip steps three and four in part two below for now. We’ll return to that part of the Moralis setup once you have your “.js” file or “.env” ready
Initial Moralis Setup – Part 2
- Access Server Details – With your server up and running and your “.js” or “.env” file ready, you want to access your server’s details. Just click on the “View Details” button:

That way you access all the information you need (mainly “server URL” and “application ID” in a new window. Copy those details (one by one) by using the copy icons on the right-hand side:

- Initialize Moralis – To finally gain full access to the power of Moralis, which will cover your backend need, populate your coding file (“.js” or “.env”) with the application ID and server URL:
- When starting from scratch, you will normally be using the “.js” file to connect to an initialize Moralis:

- When using the Web3 boilerplate, you will populate your “.env” file:

How to Interact with Smart Contracts Through a Website – an Example Project
As mentioned above, we will guide you through an example project where we will create a simple MATIC donation dApp. MATIC is Polygon’s native token. We will first do this by starting from scratch. This option is great to learn how to quickly start your own projects. Of course, it requires you to create your own UI. However, we will also show you the fastest way to create dApps with a clean and eye-catching UI. The latter will be possible thanks to the ultimate Ethereum boilerplate, which we made publicly available at GitHub.
Creating MATIC Donation dApp – Starting From Scratch
We will start off with a Vanilla JS (plain JavaScript) project. For one, we will use a very simple HTML code to serve as a backbone for our dApp. Here’s the HTML code we will start with:
<html>
     <head>
          <tittle>Vanilla Boilerplate</title>
          <script src=”https://cdn.jsdelivr.net/npm/web3@latest/dist/web3.min.js”></script>
          <script src=”https://unpkg.com/moralis/dist/moralis.js”></script>
   </head>

     <body>
          <button id=”btn-login”>Moralis Metamask Login</button>
          <button id=”btn-logout”>Logout</button>
          <script type=”text/javascript” src=”./main.js”></script>
   </body>
</html>
As promised, you can see that this is a very simple and basic UI in the screenshot below. Aside from the HTML file, we also need a JS file to cover our dApp’s backend functionality. This is also where you’ll get to complete steps three and four from the “Initial Moralis Setup – Part 2” section. Here’s the code we use inside our “main.js” file:
  /** Connect to Moralis server */
        const serverUrl = "https://xxxxx.yourserver.com:2053/server";
        const appId = "YOUR_APP_ID";
        Moralis.start({ serverUrl, appId });


        async function login() {
            let user = Moralis.User.current();
            if (!user) {
                try {
                    user = await Moralis.authenticate({ signingMessage: "Authenticate" })
                    console.log(user)
                    console.log(user.get('ethAddress'))
                } catch (error) {
                    console.log(error)
                }
            }
        }

        async function logOut() {
            await Moralis.User.logOut();
            console.log("logged out");
        }

        document.getElementById("btn-login").onclick = login;
        document.getElementById("btn-logout").onclick = logOut;
Looking at the code above, you can already see some of the amazing shortcuts offered by Moralis. For instance, just by using “Moralis.authenticate” you get to log in users using Moralis’ MetaMask integration. Furthermore, logging users out is covered by “Moralis.User.logOut()”.
Note: When using the above JS code, make sure to use your server’s details.
Starting with the Basics – Preview
When running the above code, we get to see our current dApp in action:

Looking at the screenshot above, you can see that the UI has two buttons as per our code. When we click the “Moralis Metamask Login” button, the MetaMask extension prompts us to confirm the authentication.
Time to Interact with Smart Contracts Through a Website
The next step is to add a contract integration, which will enable us to make a MATIC donation using a signed-in wallet. For the purpose of adding this functionality, let’s start by adding an additional button to our HTML code:
<button id=”btn-donate”>Donate</button>
The above line of code will display the button; however, to assign functionality to it, we must also tweak our JS file. We need to add the “donate” function, which includes some details related to our example donation smart contract. Our example project is on Mumbai, as such, we will use an example donation contract on that testnet. Moreover, all of the required details can be accessed on PolygonScan, which is an equivalent of Etherscan or BscScan:

And, here is the code for our “donate” function:
 async function donate() {
        let options = {
          contractAddress: "0x356d2E7a0d592bAd95E86d19479c37cfdBb68Ab9",
          functionName: "newDonation",
          abi: [
            {
              inputs: [
                { internalType: "string", name: "note", type: "string" },
              ],
              name: "newDonation",
              outputs: [],
              stateMutability: "payable",
              type: "function",
            },
          ],
          Params: {
            Note: "Thanks for your work",
          },
          msgValue: Moralis.Units.ETH(0.1),
        };
        await Moralis.User.logOut();
        console.log("logged out");
      }
Moreover, we need to enable Web3 functionality by adding “await Moralis.enableWeb3();” line inside the “login” function (above the “console.lo(use);”). We also need to add the following line of code at the bottom:
document.getElementById("btn-donate").onclick = donate;
This is how you interact with smart contracts through a website. If we run the updated code, we see that all is running smoothly:

Note: In case you are more of a video person, use the video at the end of the article. The part focused on using Vanilla JS to build our example dApp from scratch starts at 1:45.
Creating Donation dApp – Using the Ultimate Web3 Boilerplate and React
As promised, we want to show you an even faster way that enables you to interact with smart contracts through a website. Moreover, this shortcut also provides you with a neat UI and several additional useful components. Here is the preview of the finished example dApp using this method:

If you want detailed guidance setting up “ethereum-boilerplate”, make sure to watch the video below starting at 9:20. A Moralis’ expert will show you how to clone the code, initiate all the instances in a code editor, and how to tweak the code. This is also where you get to populate the “.env” file with your Moralis’ server details. Moreover, starting at 14:13, he will also show you how to add a message informing users of successful donations:

Here’s the video we’ve been referencing above:
How to Interact with Smart Contracts Through a Website – Summary
If you’ve covered all of the above sections, you now know how to interact with smart contracts through a website with maximum ease. You know that thanks to Moralis, you get to create dApps in minutes by using its ultimate Web3 SDK. The latter enables you to cover all your backend needs with short snippets of code. Furthermore, you’ve also seen that you have an additional shortcut at your disposal. The most practical Web3 boilerplate enables you to create dApps with a clean UI. In addition, it comes equipped with many useful components. As such, you can have a user-ready dApp with quite impressive features up and running in no time by just cloning the code. And don’t forget that your dApp can be functional across multiple chains.

If this simple tutorial inspired you, we got more for you. Check out the Moralis’ YouTube channel and the Moralis’ blog, where you’ll find a ton of high-quality free content. From explanations to example projects in all crypto niches. For instance, some of our latest articles show you how to integrate mint function to JS interface, how to index the blockchain with smart contract indexing, how to transfer ERC20 tokens, how to develop an NFT rarity ranking dApp, how flash loans work, and much more. However, if you want to become a blockchain developer as soon as possible, we recommend you enroll with Moralis Academy. Aside from high-quality courses, you’ll also gain access to a welcoming and supportive community and expert mentors.
