The blockchain industry is growing rapidly, and new dApps (decentralized applications) spring up in various blockchain ecosystems on a daily basis. The most prominent blockchain development platform is Ethereum, which is home to a vast selection of innovative platforms. However, Ethereum is far from the only platform suited for Web3 development. Other examples are Polygon, BSC (Binance Smart Chain), and Avalanche. In fact, Moralis just announced full support for Avalanche last week. As such, we’ll take a closer look at how to create an Avalanche dApp in four steps using Moralis.
If this isn’t your first time visiting Moralis’ blog, then you might have stumbled upon other tutorials such as learning to build ETH dApps, or how to build Polygon dApps. Moreover, this article will expand on the same theme but for the Avalanche chain instead.
For this tutorial, we’ll be utilizing Moralis and its ultimate Web3 development platform. Moralis provides a selection of valuable and excellent development tools along with an already developed backend infrastructure. Since we’re going to be utilizing Moralis, it is possible to significantly shorten the development process, allowing developers to save valuable time and resources. This is due to Moralis’ native cross-chain compatibility, which makes it as easy to learn how to build Ethereum dApps and NFT programming as Avalanche dApp development!
So, if you haven’t already, you should take the opportunity and sign up with Moralis right away. It is entirely free, and you’ll receive immediate access to tools, such as Moralis Speedy Nodes, the NFT API, Price API, and much more!
What is Avalanche?
Avalanche was first introduced in 2020 by the organization Ava Labs, and Avalanche is an open, programmable smart contract platform. One of the most pressing issues when it comes to Web3 development has been the congested networks that, for example, Ethereum has experienced. This has driven up gas prices to absurd amounts, which have called for a solution. Moreover, this is precisely what Ava Labs set out to solve with the founding of Avalanche. As such, the main point of Avalanche’s platform is to provide a scalable option to other chains.

According to their official website, Avalanche labels itself as the fastest smart contract platform on the crypto market based on time-to-finality. Furthermore, the platform possesses the most active validators securing the activity of the chain compared to other proof-of-stake (PoS) alternatives.
With Avalanche, it is possible to build low-cost, fast, Solidity compatible dApps that can confirm transactions instantly and outperform any decentralized blockchain platform today. Furthermore, the platform also allows for customized blockchains that entirely fit the dApps needs and specifications. As such, it is possible to build your own virtual machine and decide how the blockchain should function.
This means that the Avalanche platform provides some excellent functionalities and features, giving the chain some competitive advantages. In essence, Avalanche sets out to solve three main issues:
- Scalability.
- Interoperability.
- Transaction fees.
If you are interested in learning more about what Avalanche is, then feel free to check out their official website for more in-depth information on how the platform works and why you should use it when developing dApps in the future.
How to Create an Avalanche Wallet Tracker dApp in 4 Steps
Now that we have a better idea of what Avalanche is, we can move on to the article’s main topic and dive deeper into the process of building an Avalanche dApp. We’re going to create a wallet tracker dApp, and since we’ll be using Moralis, it’s all possible in four simple steps:
- Creating a Moralis server.
- Setting up a project.
- Creating the app component.
- Displaying the balances.
These steps are pretty straightforward; however, we’ll go through the process along with all the necessary code for making the tracker work as intended. As such, if you follow along as we create the Avalanche dApp, the interface will look something like this once finalized:

However, we won’t be going through all of the code, such as styling the dApp with CSS, but instead, we’re simply going to link the GitHub page here with the complete code. Nonetheless, let’s get going and start off this tutorial by creating a new Moralis server!
Step 1: How to Create an Avalanche dApp — Creating a Moralis Server
In order to create a Moralis server, you’ll need to be signed up with the platform. So, if you haven’t already, then we suggest joining the platform right away.
Once you have an account and you’ve signed in, we can move on to creating our own server. On the Moralis admin page, click the ”+ Create a new Server” button at the top right to get the process going. As you click this button, a drop-down menu with three different alternatives will appear, and in this case, we selected the ”Mainnet Server” option.
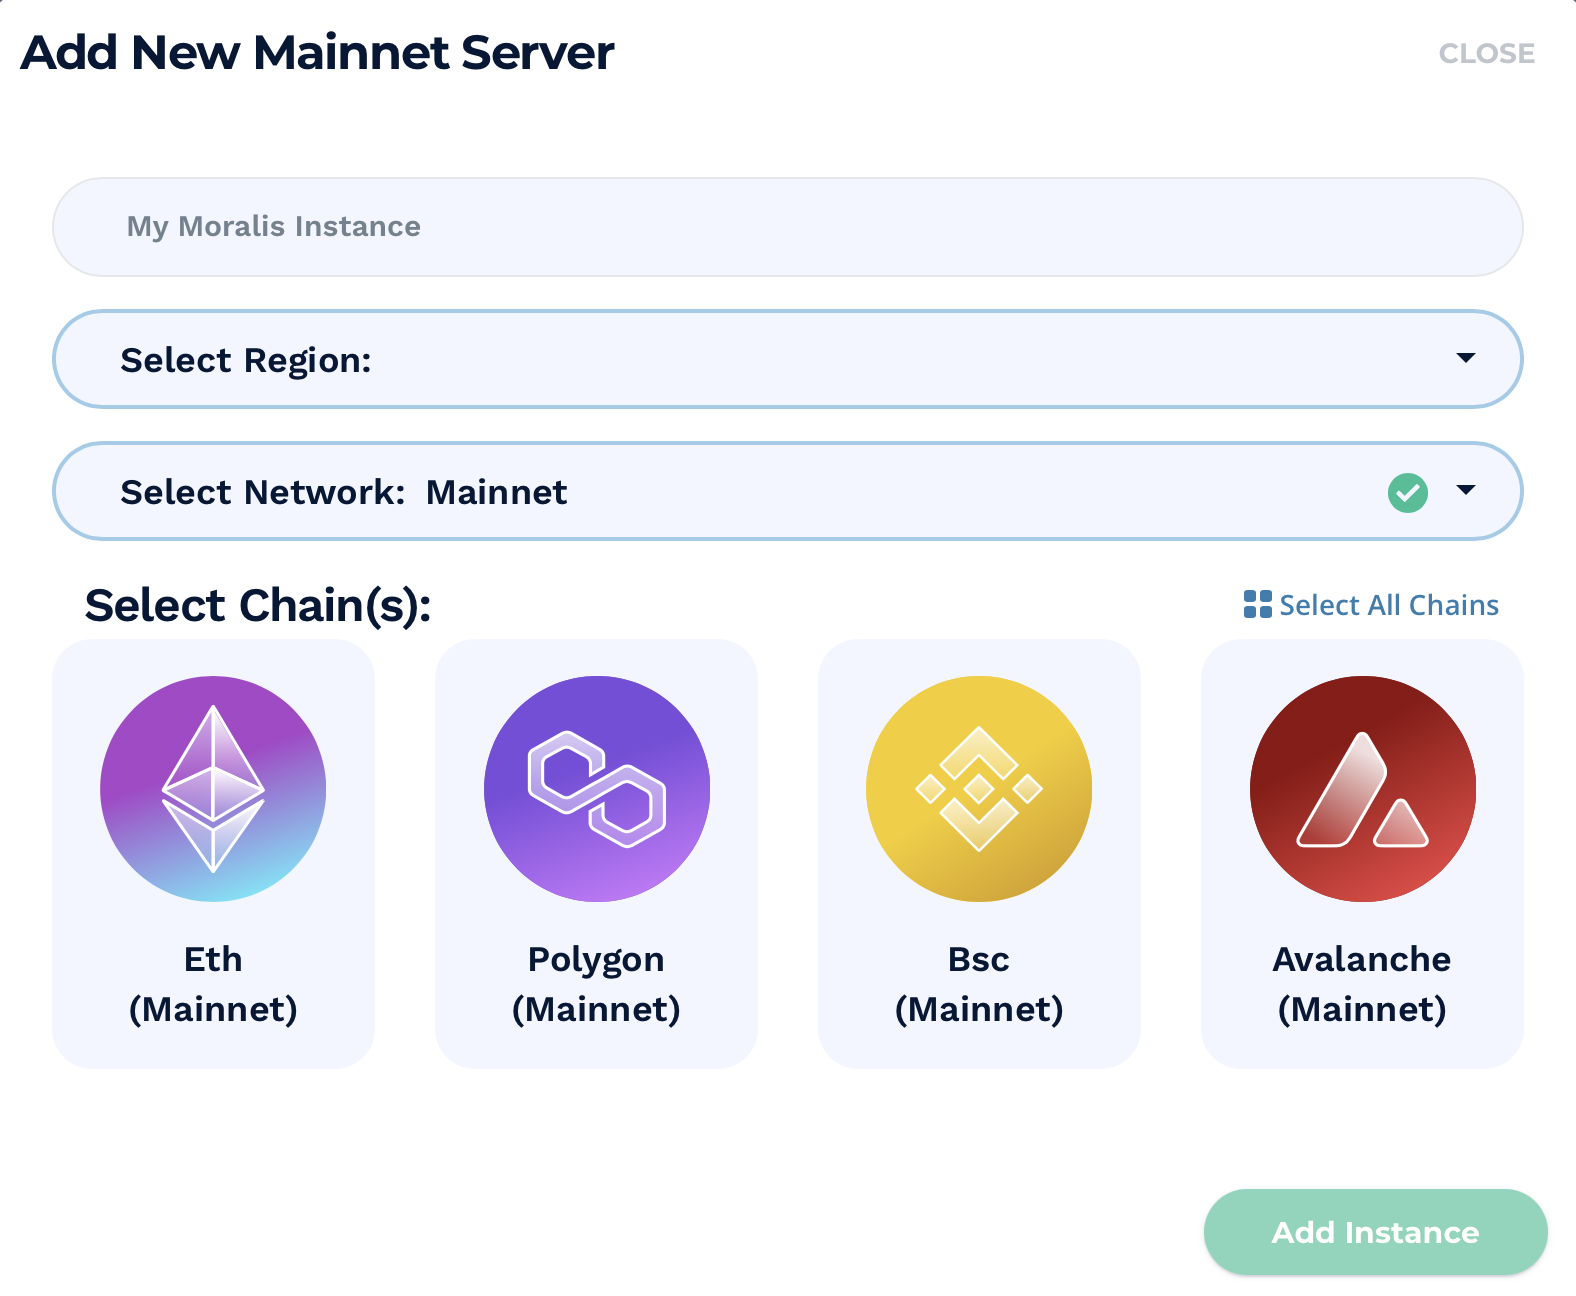
However, once either of the alternatives is clicked, a new window will open where you’ll need to input some information. The first thing you need to choose is the name of the server. After this, you also need to select the proper region and select one or multiple chains. Since we’re creating an Avalanche dApp, Avalanche is the chain we’re going to choose.
Now, with all the proper information, you can simply spin up the server by clicking the ”Add Instance” button at the bottom right of your screen. There is a small setup period for the server to come online; however, the instance will be up and running momentarily.
Step 2: How to Create an Avalanche dApp — Setting Up a Project
For our Avalanche wallet tracker dApp, we’ll set up a basic React project where we use an already developed React app template. The template provides us with an already developed structure for the dApp, making the setup process extremely straightforward. However, this is only a “skeleton” for our dApp, and a few alterations are required.
First, we’re going to add a few packages to the ”package.json” file. The NPM packages we need to add are ”moralis”, ”react-moralis”, and ”@chakra-ui/react”. However, the latter is of personal preference when building a dApp’s UI, and you can choose something that better suits your preferences if you’d like.
Next up, we also need to navigate ourselves to the ”index.js” file, which is a JavaScript file, where we need to initialize Moralis. To do so, you’ll need to fetch the application ID and server URL from the server we previously created in the first step. You’ll need to go back to the Moralis admin panel and go to the ”Servers” tab to get this information. Then you need to click the ”View Details” button for the server in question. This will provide various information, and you can simply go ahead by copying and pasting the information into the JavaScript file. As such, this is what it will look like:

This means that we added two constants with the information, which we then provided to the Moralis provider. Furthermore, we then follow this up by wrapping the application around it. This is what it looks like in the code itself:
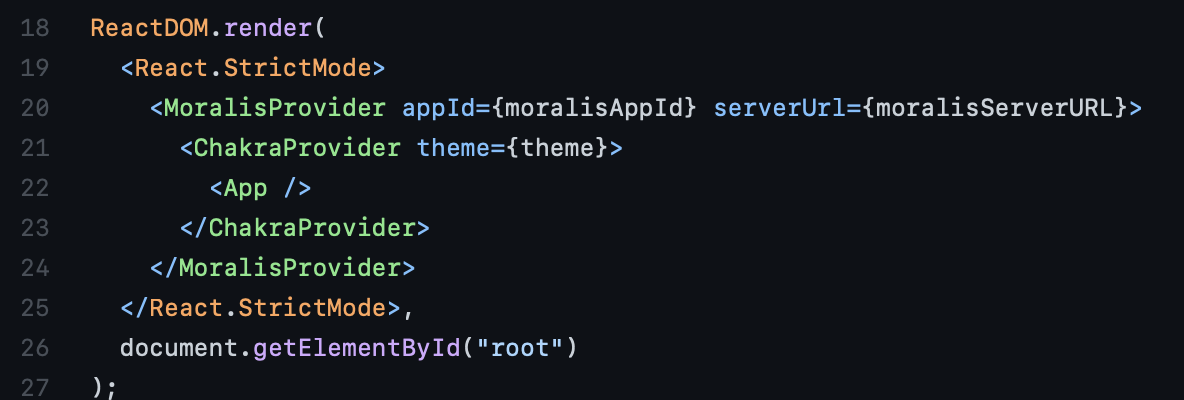
As such, we have now initialized Moralis, enabling us to use all the functions provided by the platform.
Step 3: How to Create an Avalanche dApp — Creating the App Component
The next step in the dApp development process is to create the app component itself. This component contains a variety of different calls and functions needed to fetch the on-chain data in real-time and display it to the users of the dApp.
Three Calls
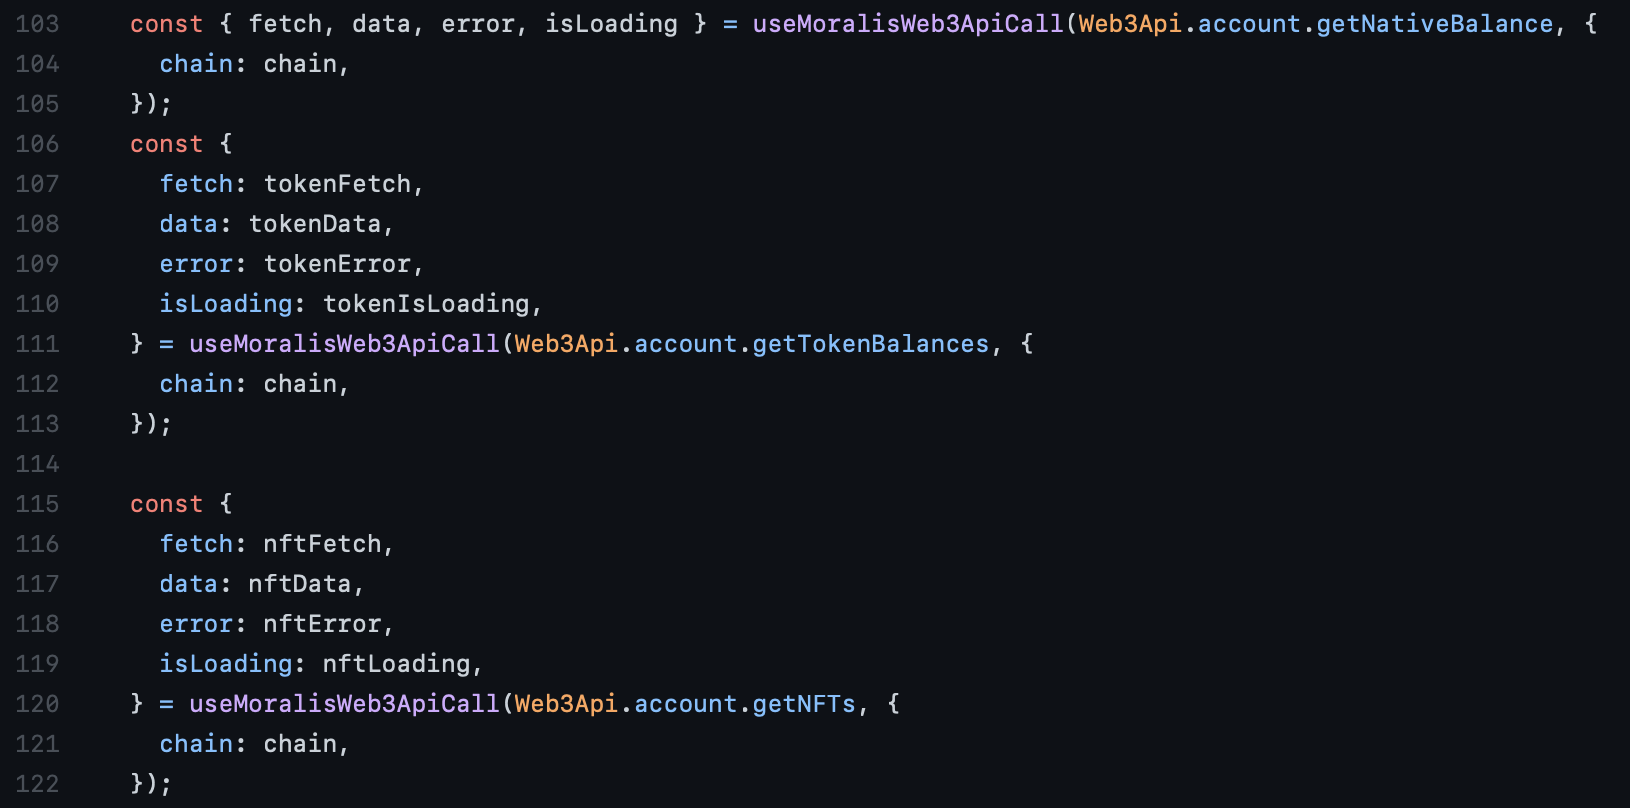
The first part of the app component consists of three different main calls to the Web3 API that we have available:
- “getNativeBalance()”.
- “getTokenBalance()”.
- “getNFTs()”.
Each call fetches real-time data of three different types of tokens directly from the blockchain nodes. The first function, as the name suggests, fetches the data regarding the account’s native balance. In this case, since we’re fetching the data from the Avalanche chain, the native currency AVAX is the one displayed in the interface.
The next call fetches the balances of all the account’s ERC-20 tokens. As such, this would fetch information such as the amount of ETH that the user has available in their wallet. Finally, we also have a similar call for all the NFTs that the user has. As such, these are what the calls look like in the code:
After this, we also implement a ”useEffect()” function which continuously executes the calls every fifth second. This allows the dApp to frequently update the data regarding the various types of tokens, which are then displayed to the application’s users. This is what the function looks like:

The “onChainChanged()” Function and User Authentication
Following the three calls and the ”useEffect()” function, we have the ”onChainChanged()” function. This call looks like this:
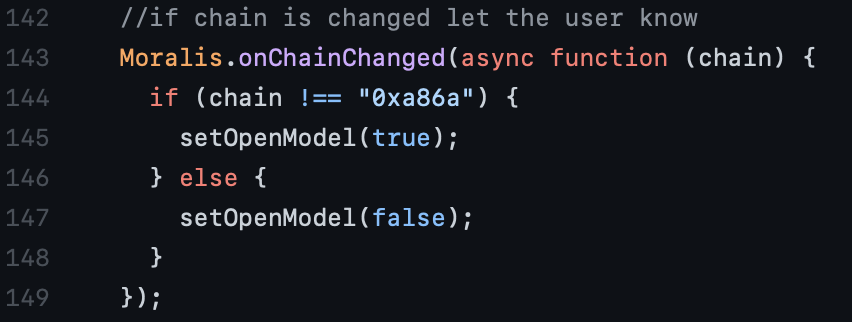
This will notify the users of the dApp if the chain changes from Avalanche to any other chain.
Furthermore, below ”onChainChanged()”, the code checks if the user is authenticated. With Moralis, it is possible to implement the functionality to authenticate users with various options such as WalletConnect. However, by default, the Moralis authenticate function utilizes MetaMask. In this instance, if a user isn’t authenticated, they will be asked to log in with MetaMask.
For more information regarding how to authenticate users with MetaMask, check out the following article from Moralis’ blog: “How to Authenticate with MetaMask”.
Step 4: How to Create an Avalanche dApp — Displaying the Balances
The fourth step is to simply display the token balances to the users. As such, the code following the authentication section takes care of this matter. The first thing we have here is the native balance component, where we fetch the native balance and display it to the users. This is what the component looks like:

Following the native balance component, we have a similar one for the ERC-20 tokens. Once the information regarding the tokens is fetched, we display the data in a table. We have a simple table with a few rows to which we map the information regarding the tokens. This is what the code for the token component looks like as well as the code for the table:
Token Component:
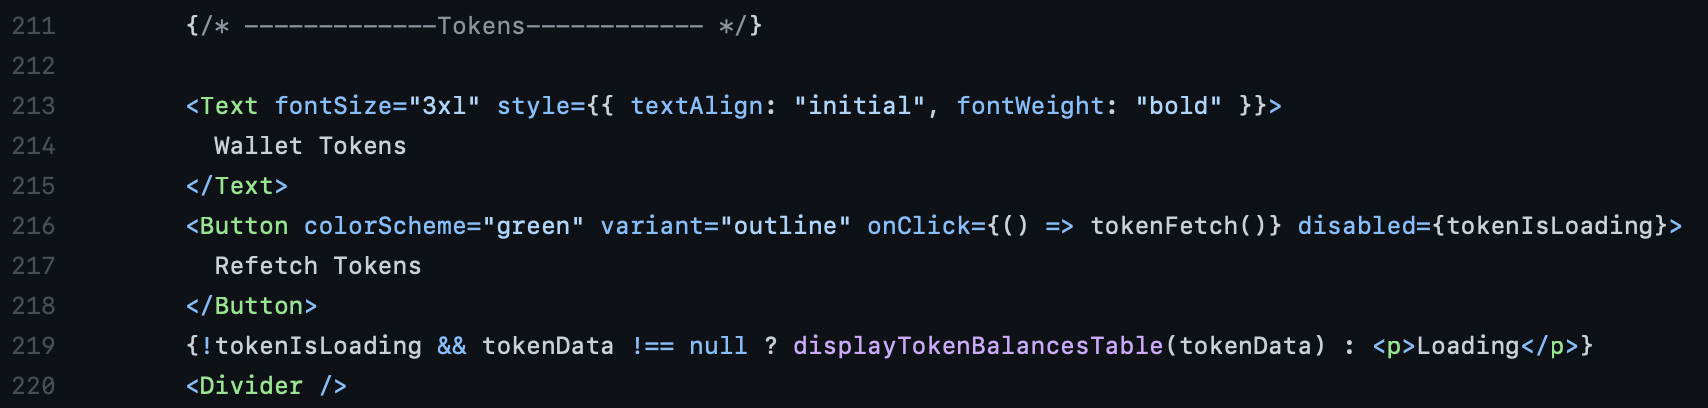
Table:

Finally, we also have a similar component for the NFTs. As such, we simply fetch the data regarding the non-fungible tokens and populate the table with this information. Furthermore, the code looks similar to that of the token component, but here are two images for you to make the tutorial even more straightforward:
NFT Component:
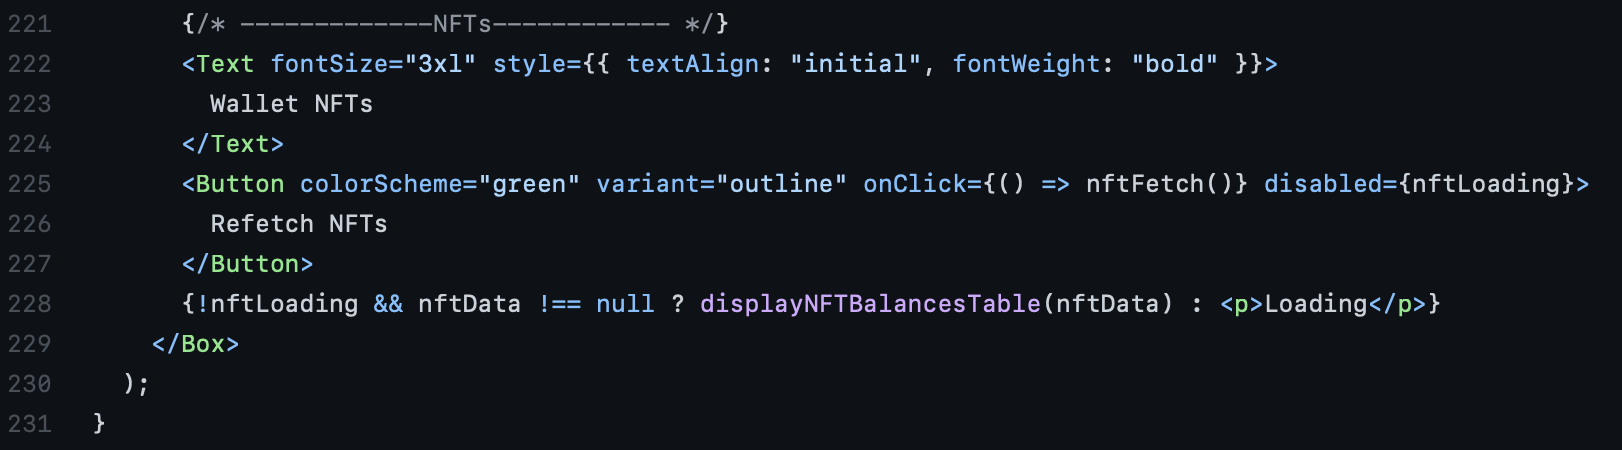
Table:

Now, that’s basically it for the complete application. However, if you would like to check out the complete code, then you can visit the linked GitHub page.
Furthermore, if you would rather watch a video tutorial explaining the process in more detail, then check out the following video from Moralis’ YouTube channel. This video demonstrates how the dApp works along with a clear explanation of all its functionalities:
How to Create an Avalanche dApp in 4 Steps — Summary
By using the Moralis platform, we could create an Avalanche dApp in just a matter of minutes. This efficiency is mainly due to the tools and the infinitely scalable backend infrastructure that Moralis provides for its users. Backend development has, from a conventional perspective, been a tedious and challenging part of Web3 development. However, this is now avoidable with Moralis as we can cut down on development time significantly.
As such, we were able to create the Avalanche wallet tracker dApp in the following four steps:
- Creating a Moralis server.
- Setting up a project.
- Creating the app component.
- Displaying the balances.
However, this is far from the limits of Moralis, and it is possible to utilize the platform for any future blockchain projects. For example, Moralis is already emerging as one of the top Infura alternatives, and is a leading BSC testnet provider. Furthermore, the tools of the platform will enable and make Web3 development much more accessible. As such, it should be a no-brainer to join the Moralis platform. So, if you are looking to become a dApp developer, then sign up with Moralis right now! It’s entirely free, and you can, for example, use the platform to create a DEX, send ETH with one line of code, and much, much more!
