Building a decentralized cryptocurrency exchange might seem quite cumbersome. However, you can actually create a DEX in about 90 minutes if you rely on the right tools. If you follow along in this article’s tutorial, you’ll use React, NodeJS, and two Web3 tools that are the backbone of today’s article: the Moralis Web3 Data API and the 1inch aggregator. Thanks to these tools, you can learn how to build a decentralized cryptocurrency exchange without breaking a sweat! Now, let’s look at the core code snippets that will help you fetch prices of two crypto assets involved in a swap:
const responseOne = await Moralis.EvmApi.token.getTokenPrice({
  address: query.addressOne
})

const responseTwo = await Moralis.EvmApi.token.getTokenPrice({
  address: query.addressTwo
})
As far as the actual exchange functionality goes, the 1inch API enables you to implement it with the following lines of code:
const allowance = await axios.get(`https://api.1inch.io/v5.0/1/approve/allowance?tokenAddress=${tokenOne.address}&walletAddress=${address}`)
const approve = await axios.get(`https://api.1inch.io/v5.0/1/approve/transaction?tokenAddress=${tokenOne.address}`)
const tx = await axios.get(`https://api.1inch.io/v5.0/1/swap?fromTokenAddress=${tokenOne.address}&toTokenAddress=${tokenTwo.address}&amount=${tokenOneAmount.padEnd(tokenOne.decimals+tokenOneAmount.length, '0')}&fromAddress=${address}&slippage=${slippage}`)
If you are interested in learning how to implement the above snippets of code, create your free Moralis account and dive into the tutorial on how to build a decentralized cryptocurrency exchange below!
Overview
The first part of today’s article is all about showing you how to build a decentralized cryptocurrency exchange. This is where you can follow our lead, use our code snippets, and create the backend and frontend portions of your DEX dapp.
Below the tutorial, you can catch up with the theory behind today’s topic and get your fundamentals of building a DEX for cryptocurrencies in order. This is where we’ll explain what a decentralized exchange (DEX) is, how it works, and how it compares to a centralized exchange. We’ll also examine the tools you need when building a decentralized cryptocurrency exchange.
Tutorial: How to Build a Decentralized Cryptocurrency Exchange
In this tutorial, you’ll combine your JavaScript proficiency with the power of Moralis and the 1inch aggregator to build your own instance of our example cryptocurrency DEX. To make the process as straightforward as possible, we decided to break it down into several stages and substages. First, we’ll walk you through the initial project setup. Then, we will show you how to build your decentralized cryptocurrency exchange’s header. Next, we’ll focus on creating a swap page, which will be the frontend of all exchange-related functionalities. With the frontend in place, we’ll guide you through the process of implementing your backend of the crypto exchange. This is where you’ll finally learn how to implement the above-outlined snippets of code.
Setting Up Your Project
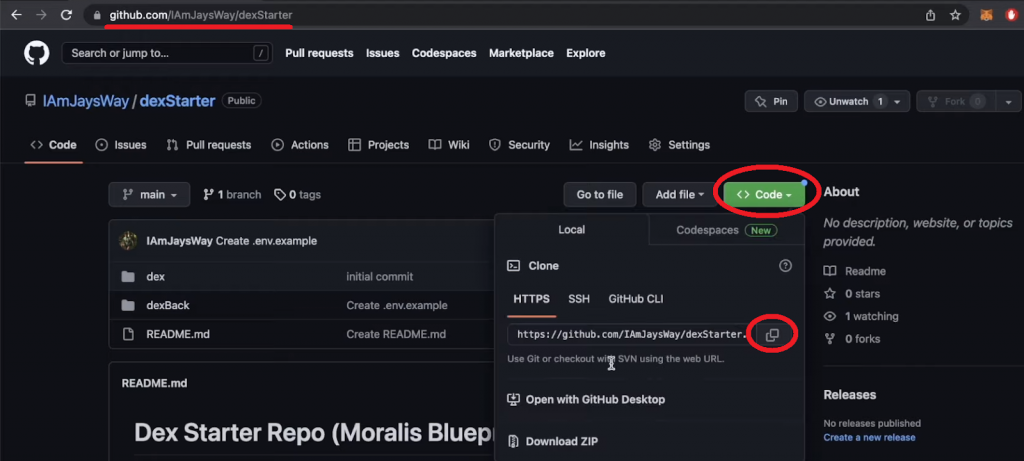
Instead of starting from scratch, visit the “dexStarter” GitHub repo and copy the URL address as shown in the image above. By cloning our code, you don’t have to worry about styling and will be able to devote your maximum attention to implementing Web3 functionality.
After copying the above GitHub URL, open a new project in Visual Studio Code (VSC). Then, use VSC’s terminal to clone the code with this command:
git clone https://github.com/IAmJaysWay/dexStarter
Next, access the “dexStarter” folder manually or use the “cd dexStarter” command. Inside the folder, you can see the “dex” and “dexBack” folders. The former holds the frontend components and the latter the backend scripts. By cloning our code, you are starting with simple React and NodeJS apps. To make them work properly, you need to install all the required dependencies. Starting with the frontend, “cd” into “dex” and enter the following command that will install all the frontend dependencies:
npm install
With the dependencies in place, you can start your React app:
npm run start
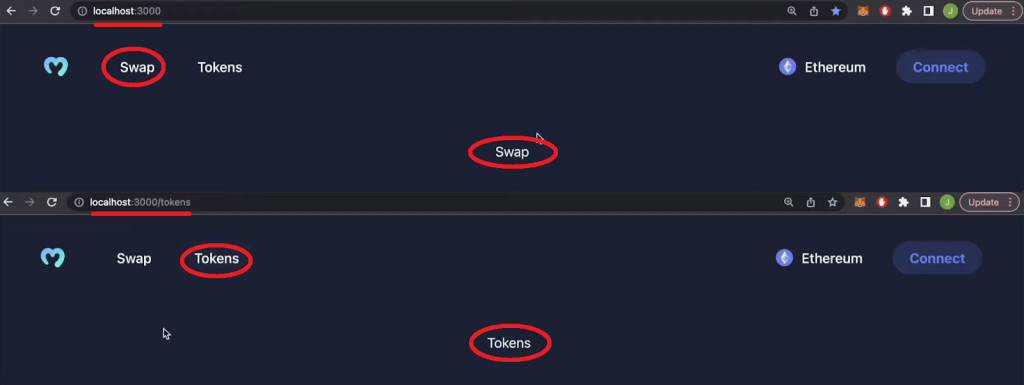
If you go to “localhost:3000”, you will see this:

Building the Header of the Decentralized Cryptocurrency Exchange
From the “dex/src” folder, open “App.js” and import the “Header.js” component at the top:
import Header from "./components/Header";
Next, use that component in your “App” function:
function App() {

  return (

    <div className="App">
      <Header />

     </div>
  )
}
Then, go to “dex/src/components” and open the “Header.js” file to add a logo, page options, and the “Connect” button. At the top of the script, import the logo and icon images:
import Logo from "../moralis-logo.svg";
import Eth from "../eth.svg";
Add the following lines of code to ensure that the “Header” function displays the logo, page options, and the “Connect” button:
function Header(props) {

  const {address, isConnected, connect} = props;

  return (
    <header>
      <div className="leftH">
        <img src={Logo} alt="logo" className="logo" />
        <div className="headerItem">Swap</div>
        <div className="headerItem">Tokens</div>
      </div>
      <div className="rightH">
        <div className="headerItem">
          <img src={Eth} alt="eth" className="eth" />
          Ethereum
        </div>
        <div className="connectButton" onClick={connect}>
          {isConnected ? (address.slice(0,4) +"..." +address.slice(38)) : "Connect"}
        </div>
      </div>
    </header>
  );
}
With the above additions to “App.js” and “Header.js”, your frontend should reflect those changes:

Moving on, you need to activate the “Swap” and “Tokens” options. To do so, return to “App.js” and import “Swap”, “Tokens”, and “Routes”:
import Swap from "./components/Swap";
import Tokens from "./components/Tokens";
import { Routes, Route } from "react-router-dom";
Next, focus on the “Header” div, where you need to add a “mainWindow” div with the proper routes:
      <Header connect={connect} isConnected={isConnected} address={address} />
      <div className="mainWindow">
        <Routes>
          <Route path="/" element={<Swap isConnected={isConnected} address={address} />} />
          <Route path="/tokens" element={<Tokens />} />
        </Routes>
      </div>
Return to “Header.js” and import “Link”:
import { Link } from "react-router-dom";
You also need to wrap your “Swap” and “Tokens” divs in their link components:
        <Link to="/" className="link">
          <div className="headerItem">Swap</div>
        </Link>
        <Link to="/tokens" className="link">
          <div className="headerItem">Tokens</div>
        </Link>
Now, the “Swap” and “Token” options take you to their matching routes:
Creating the Swap Page
Open “Swap.js” and import several Ant Design UI framework components:
import React, { useState, useEffect } from "react";
import { Input, Popover, Radio, Modal, message } from "antd";
import {
  ArrowDownOutlined,
  DownOutlined,
  SettingOutlined,
} from "@ant-design/icons";
Then, focus on the “Swap” function where you want to add a “tradeBox” div. By utilizing Ant Design, it’s easy to include a slippage setting option:
function Swap() {
  const [slippage, setSlippage] = useState(2.5);

  function handleSlippageChange(e) {
    setSlippage(e.target.value);
  }

  const settings = (
    <>
      <div>Slippage Tolerance</div>
      <div>
        <Radio.Group value={slippage} onChange={handleSlippageChange}>
          <Radio.Button value={0.5}>0.5%</Radio.Button>
          <Radio.Button value={2.5}>2.5%</Radio.Button>
          <Radio.Button value={5}>5.0%</Radio.Button>
        </Radio.Group>
      </div>
    </>
  );

  return (
      <div className="tradeBox">
        <div className="tradeBoxHeader">
          <h4>Swap</h4>
          <Popover
            content={settings}
            title="Settings"
            trigger="click"
            placement="bottomRight"
          >
            <SettingOutlined className="cog" />
          </Popover>
        </div>
      </div>
    </>
  );
}
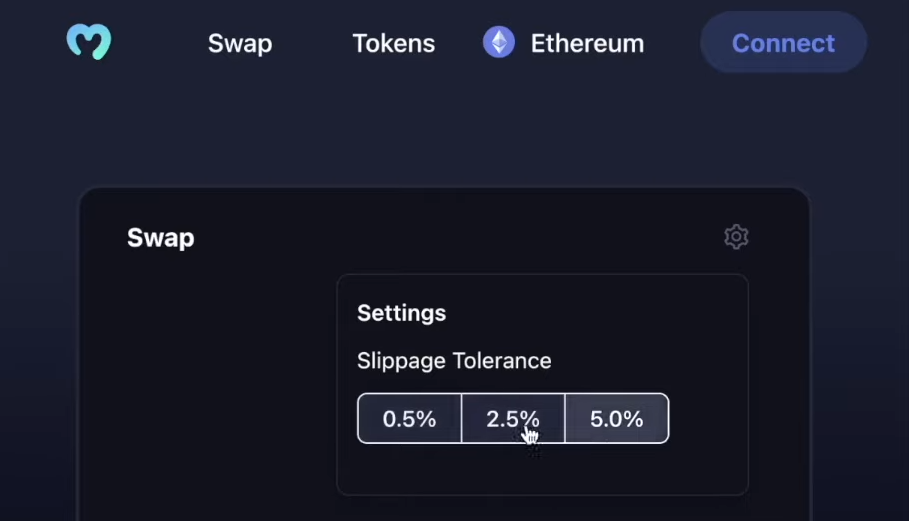
As a result of the above lines of code, your “Swap” page should have a “Swap” frame with a gear icon that opens the slippage tolerance setting:
Adding Exchange Input Fields
Your exchange must include proper input fields if you want to swap tokens. These fields should allow users to select the tokens they want to swap and their amounts. Hence, you need to apply some tweaks to your “tradeBox” div. So, create an “inputs” div below the “tradeBoxHeader” div:
        <div className="inputs">
          <Input
            placeholder="0"
            value={tokenOneAmount}
            onChange={changeAmount}
            disabled={!prices}
          />
          <Input placeholder="0" value={tokenTwoAmount} disabled={true} />
          <div className="switchButton" onClick={switchTokens}>
            <ArrowDownOutlined className="switchArrow" />
          </div>
          <div className="assetOne" onClick={() => openModal(1)}>
            <img src={tokenOne.img} alt="assetOneLogo" className="assetLogo" />
            {tokenOne.ticker}
            <DownOutlined />
          </div>
          <div className="assetTwo" onClick={() => openModal(2)}>
            <img src={tokenTwo.img} alt="assetOneLogo" className="assetLogo" />
            {tokenTwo.ticker}
            <DownOutlined />
          </div>
You also need to add appropriate state variables. So, add the following lines below the “Slippage” state variable:
  const [tokenOneAmount, setTokenOneAmount] = useState(null);
  const [tokenTwoAmount, setTokenTwoAmount] = useState(null);
  const [tokenOne, setTokenOne] = useState(tokenList[0]);
  const [tokenTwo, setTokenTwo] = useState(tokenList[1]);
  const [isOpen, setIsOpen] = useState(false);
  const [changeToken, setChangeToken] = useState(1);
Next, add proper functions to handle the changing of amounts of tokens and the “from/to” switching of the tokens. Add the following snippets of code below the “handleSlippageChange” function:
  function changeAmount(e) {
    setTokenOneAmount(e.target.value);
    if(e.target.value && prices){
      setTokenTwoAmount((e.target.value * prices.ratio).toFixed(2))
    }else{
      setTokenTwoAmount(null);
    }
  }

  function switchTokens() {
    setPrices(null);
    setTokenOneAmount(null);
    setTokenTwoAmount(null);
    const one = tokenOne;
    const two = tokenTwo;
    setTokenOne(two);
    setTokenTwo(one);
    fetchPrices(two.address, one.address);
  }
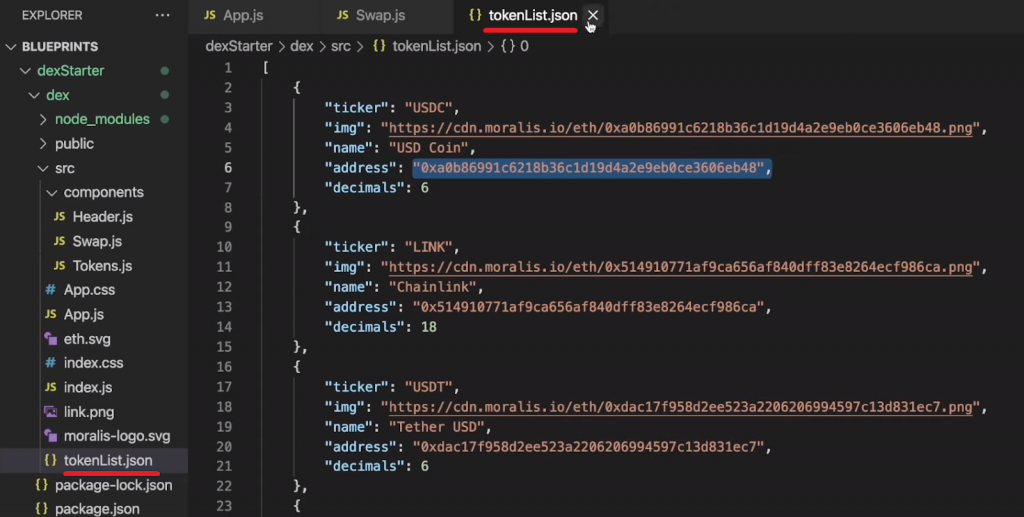
To offer a proper selection of tokens, you need a good list. Fortunately, you can use our “tokenList.json” file for that purpose. The latter is basically an array of tokens that includes tickers, icons, names, addresses, and decimals:
So, add the following line under the existing imports inside “Swap.js”:
import tokenList from "../tokenList.json";
Adding Token Selection Modals
You probably noticed that the above-implemented “inputs” div includes two “openModal” functions. In order to make these functions work, you need to equip your “tradeBox” div at the top of “return” with the following lines:
  return (
    <>
      {contextHolder}
      <Modal
        open={isOpen}
        footer={null}
        onCancel={() => setIsOpen(false)}
        title="Select a token"
      >
        <div className="modalContent">
          {tokenList?.map((e, i) => {
            return (
              <div
                className="tokenChoice"
                key={i}
                onClick={() => modifyToken(i)}
              >
                <img src={e.img} alt={e.ticker} className="tokenLogo" />
                <div className="tokenChoiceNames">
                  <div className="tokenName">{e.name}</div>
                  <div className="tokenTicker">{e.ticker}</div>
                </div>
              </div>
            );
          })}
        </div>
      </Modal>
Also, make sure you add the “openModal” and “modifyToken” functions as well:
  function openModal(asset) {
    setChangeToken(asset);
    setIsOpen(true);
  }

  function modifyToken(i){
    setPrices(null);
    setTokenOneAmount(null);
    setTokenTwoAmount(null);
    if (changeToken === 1) {
      setTokenOne(tokenList[i]);
      fetchPrices(tokenList[i].address, tokenTwo.address)
    } else {
      setTokenTwo(tokenList[i]);
      fetchPrices(tokenOne.address, tokenList[i].address)
    }
    setIsOpen(false);
  }
To complete the “Swap” page, add the “Swap” button. You can do this by adding the following line of code below the “inputs” div:
<div className="swapButton" disabled={!tokenOneAmount || !isConnected} onClick={fetchDexSwap}>Swap</div>
If you successfully implemented all of the above, you should have your “Swap” page ready:
With the frontend under your belt, it’s time to implement the backend functionality. Since the backend is the main focus of today’s article, this is where you’ll finally learn how to build a decentralized cryptocurrency exchange.
Build a Decentralized Cryptocurrency Exchange
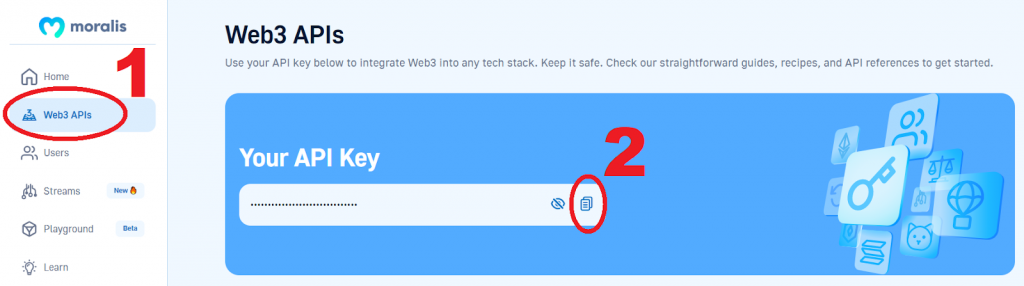
Before moving forward, obtain your Moralis Web3 API key. To do so, create your free Moralis account. With your account up and running, you’ll be able to access your admin area. From there, you get to copy your API key in two clicks:
Next, paste your key into the “.env.example” file that awaits you inside the “dexBack” folder. Then, rename that file to “.env”.
The core of your NodeJS backend dapp is the “index.js” script. This is the file you need to tweak to fetch token prices. However, first, use a new terminal and “cd” into the “dexBack” folder. Then, install the backend dependencies by entering the “npm install” command.
With the dependencies in place, open “index.js” and implement the “getTokenPrice” lines of code from the intro. Furthermore, you need to update the “app.get” function, which fetches token prices in USD and provides them to the “/tokenPrice” endpoint:
app.get("/tokenPrice", async (req, res) => {

  const {query} = req;

  const responseOne = await Moralis.EvmApi.token.getTokenPrice({
    address: query.addressOne
  })

  const responseTwo = await Moralis.EvmApi.token.getTokenPrice({
    address: query.addressTwo
  })

  const usdPrices = {
    tokenOne: responseOne.raw.usdPrice,
    tokenTwo: responseTwo.raw.usdPrice,
    ratio: responseOne.raw.usdPrice/responseTwo.raw.usdPrice
  }

  return res.status(200).json(usdPrices);
});
With the above lines of code in place, save your “index.js” file, and run your backend with the following command:
node index.js
Note: The final “index.js” backend file is available on GitHub.

Getting Token Prices to the Frontend
At this point of the “how to build a decentralized cryptocurrency exchange” feat, we’ll focus on getting token prices from the above-presented backend to the “Swap” page. As such, you need to refocus on the “swap.js” file. Below the existing imports, import Axios – a NodeJS promise-based HTTP client:
import axios from "axios";
Then, go to the part of “swap.js” where other state variables are located and add the following:
const [prices, setPrices] = useState(null);
To fetch the prices from your backend, you must also add the “fetchPrices” async function below the “modifyToken” function:
 async function fetchPrices(one, two){

      const res = await axios.get(`http://localhost:3001/tokenPrice`, {
        params: {addressOne: one, addressTwo: two}
      })


      setPrices(res.data)
  }
Below the “fetchPrices” function, also add a corresponding “useEffect”:
  useEffect(()=>{

    fetchPrices(tokenList[0].address, tokenList[1].address)

  }, [])
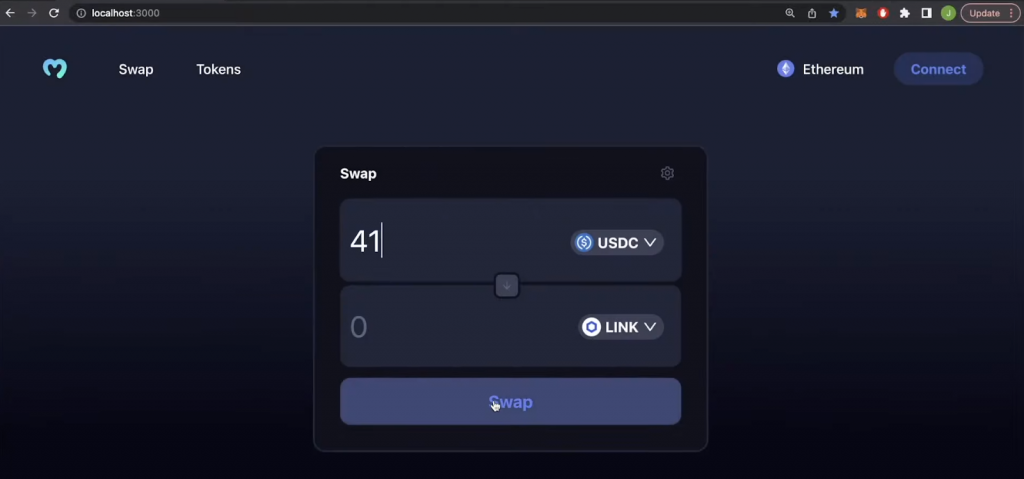
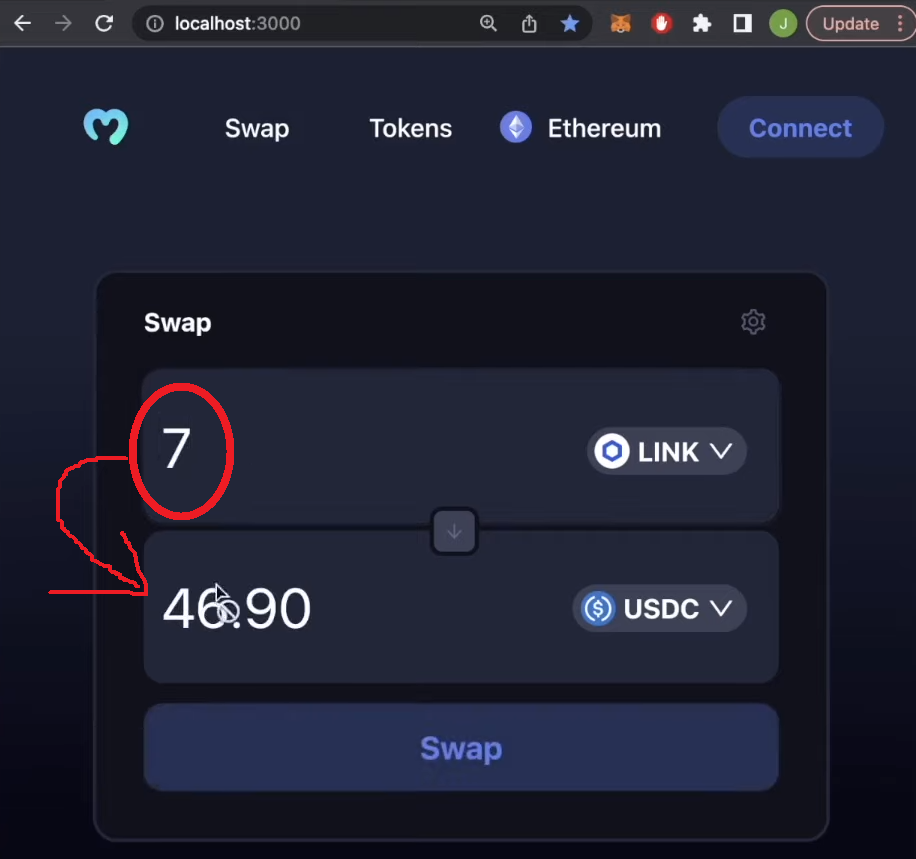
Once you implement the above lines of code, your “Swap” box will be able to use token prices and their ratios. As such, once users enter the amount of the first token, it will automatically populate the amount of the other token:
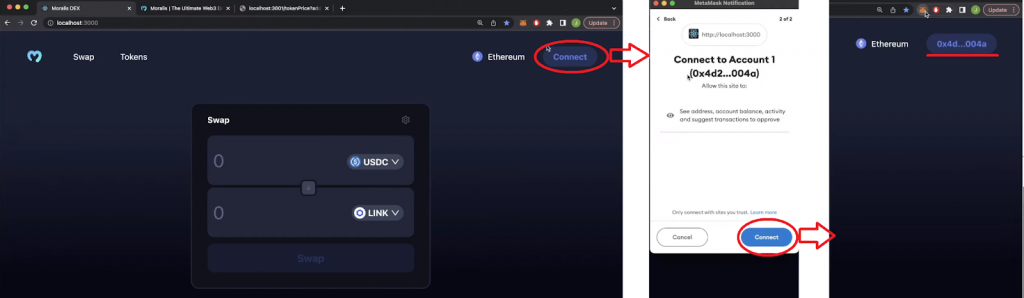
Web3 Authentication: Connecting MetaMask
Your decentralized exchange is coming along nicely; however, its “Connect” button is still inactive. Fortunately, you can use the wagmi library to add the required Web3 login functionality. To that end, open your frontend “index.js” file located in the “dex/src” folder. At the top of that script, import several wagmi components and a public provider below the existing imports:
import { configureChains, mainnet, WagmiConfig, createClient } from "wagmi";
import { publicProvider } from "wagmi/providers/public";
Then, you need to configure the chains and create a client. You can do that by adding the following code snippet below the above imports:
const { provider, webSocketProvider } = configureChains(
  [mainnet],
  [publicProvider()]
);

const client = createClient({
  autoConnect: true,
  provider,
  webSocketProvider,
});
Next, wrap your app with “WagmiConfig”:
 <React.StrictMode>
    <WagmiConfig client={client}>
      <BrowserRouter>
        <App />
      </BrowserRouter>
    </WagmiConfig>
  </React.StrictMode>
Note: The final frontend “index.js” script awaits you on GitHub.
To ensure that the “Connect” button does its thing, reopen “App.js” and import the MetaMask connector and wagmi components below the existing imports:
import { useConnect, useAccount } from "wagmi";
import { MetaMaskConnector } from "wagmi/connectors/metaMask";
Next, add the following lines of code inside the “App” function (above “return“) to destructure the address and connect a new user:
  const { address, isConnected } = useAccount();
  const { connect } = useConnect({
    connector: new MetaMaskConnector(),
  });
Note: The “App.js” and “Header.js” lines of code provided in the initial stages of this tutorial already include these variables, so your scripts should be in order. In case you want a more detailed code walkthrough behind the “Connect” button functionality, watch the video at the top, starting at 57:25.
After tweaking “App.js”, the “Connect” button triggers MetaMask:
Adding the Exchange Functionality via the 1inch Aggregator
At this point, your decentralized exchange is able to authenticate users and connect their MetaMask wallets, allow users to select tokens, and provide token amounts. However, it’s not yet able to execute the actual exchange of tokens. To add this final piece of the “how to build a decentralized cryptocurrency exchange” puzzle, you need to implement the 1inch aggregator.
Essentially, you just need to add the 1inch API endpoints presented in the introduction to “Swap.js”. All in all, below are the lines of code that you need to add to “Swap.js”:
- Import wagmi hooks under the existing imports:
import { useSendTransaction, useWaitForTransaction } from "wagmi";
- Inside the “Swap” function, add “props” :
function Swap(props) {
  const { address, isConnected } = props;
- Add new state variables that will store transaction details and wait for transactions to go through:
  const [txDetails, setTxDetails] = useState({
    to:null,
    data: null,
    value: null,
  });

  const {data, sendTransaction} = useSendTransaction({
    request: {
      from: address,
      to: String(txDetails.to),
      data: String(txDetails.data),
      value: String(txDetails.value),
    }
  })

  const { isLoading, isSuccess } = useWaitForTransaction({
    hash: data?.hash,
  })
- Below the “fetchPrices” function, add the “fetchDexSwap” async function:
  async function fetchDexSwap(){

    const allowance = await axios.get(`https://api.1inch.io/v5.0/1/approve/allowance?tokenAddress=${tokenOne.address}&walletAddress=${address}`)

    if(allowance.data.allowance === "0"){

      const approve = await axios.get(`https://api.1inch.io/v5.0/1/approve/transaction?tokenAddress=${tokenOne.address}`)

      setTxDetails(approve.data);
      console.log("not approved")
      return

    }

    const tx = await axios.get(`https://api.1inch.io/v5.0/1/swap?fromTokenAddress=${tokenOne.address}&toTokenAddress=${tokenTwo.address}&amount=${tokenOneAmount.padEnd(tokenOne.decimals+tokenOneAmount.length, '0')}&fromAddress=${address}&slippage=${slippage}`)

    let decimals = Number(`1E${tokenTwo.decimals}`)
    setTokenTwoAmount((Number(tx.data.toTokenAmount)/decimals).toFixed(2));

    setTxDetails(tx.data.tx);

  }
Note: If you wish to learn how to obtain the above 1inch API links from the “Swagger” section of the 1inch documentation, use the video at the top (1:09:10).
- Finally, add three “useEffect” functions below the existing “useEffect“. They will cover transaction details and pending transactions:
  useEffect(()=>{

      if(txDetails.to && isConnected){
        sendTransaction();
      }
  }, [txDetails])


  useEffect(()=>{

    messageApi.destroy();

    if(isLoading){
      messageApi.open({
        type: 'loading',
        content: 'Transaction is Pending...',
        duration: 0,
      })
    }

  },[isLoading])


  useEffect(()=>{
    messageApi.destroy();
    if(isSuccess){
      messageApi.open({
        type: 'success',
        content: 'Transaction Successful',
        duration: 1.5,
      })
    }else if(txDetails.to){
      messageApi.open({
        type: 'error',
        content: 'Transaction Failed',
        duration: 1.50,
      })
    }

  },[isSuccess])
Note: You can access the final “Swap.js” script on GitHub.
Fundamentals of Building a Decentralized Exchange for Cryptocurrency
Knowing the theory about decentralized cryptocurrency exchanges and the tools to build them is by no means a must. After all, you might have already built your own decentralized exchange following the above tutorial without a more profound knowledge of the theory. However, if you wish to learn what decentralized exchanges are, how they work, how they compare to centralized exchanges, and the gist of the tools to build a decentralized exchange for crypto, dive into the following sections.
What is a Decentralized Exchange?
A decentralized exchange (DEX) is a peer-to-peer marketplace where users get to trade cryptocurrency without any middlemen. These types of exchanges are decentralized because there’s no central entity involved and, thus, no single point of failure. After all, the backends of DEXs exist on the blockchain. So, thanks to decentralized exchanges, we can execute financial transactions without banks, brokers, payment processors, or any other type of traditional intermediary.
How Does a Decentralized Cryptocurrency Exchange Work?
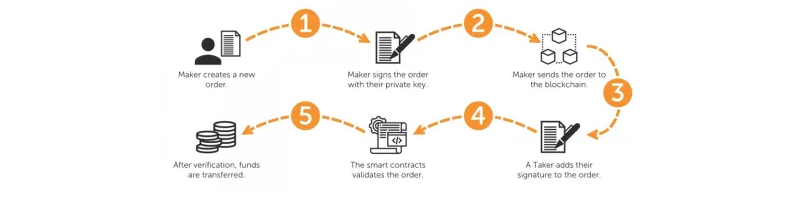
DEXs’ options and degrees of decentralization may vary; however, smart contracts are the core tech behind their transparent and trustless operations. A decentralized exchange relies on “liquidity pools” – stacks of cryptocurrency assets that sit beneath the exchange’s surface. So, sufficient liquidity pools are required to fulfill buy or sell orders. The assets in the liquidity pools come from investors, who profit from transaction fees charged to “pooling” users.
When using a decentralized cryptocurrency exchange, users need to connect their Web3 wallets, such as MetaMask. This enables them to be in complete control of their assets. Once connected, users can exchange their assets, invest in liquidity pools, and perform other DeFi (decentralized finance) actions. The actual options vary; however, the simplest options are DEXs with token swaps, just like the one you had a chance to build in the above tutorial.
The key components to secure exchanging of assets without intermediates are smart contracts. These on-chain pieces of software are programmed to automatically execute predefined actions when specific predefined conditions are met. As such, transactions either go through or are reverted. It’s important to note that token swaps involve on-chain transactions. Consequently, users need to cover the transaction gas fees, which vary depending on the blockchain network and current demand.
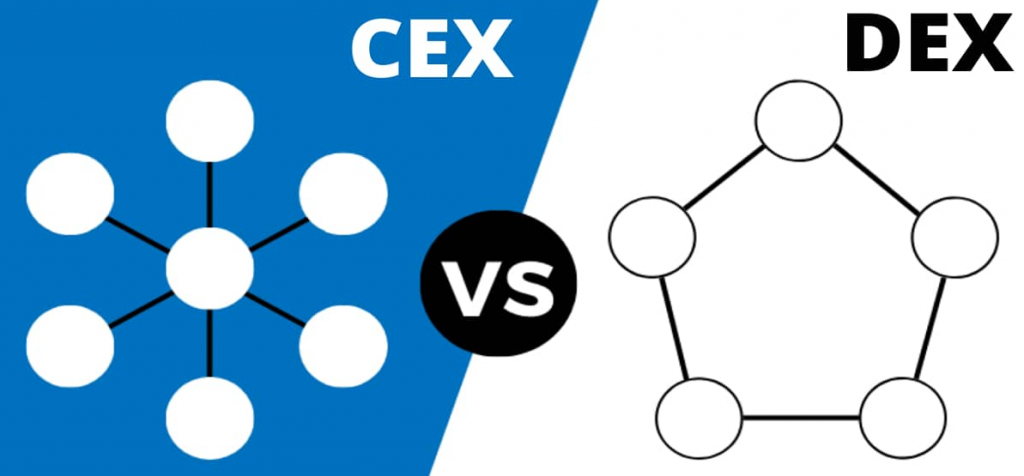
Decentralized vs Centralized Exchange
The following list outlines the main differences between DEXs and CEXs:
- Decentralization:
- CEXs: Operated by centralized organizations.
- DEXs: Operated by users and liquidity providers – no central authority and control.
- Custody of assets:
- CEXs: The exchange fully controls access to crypto assets.
- DEXs: Users have exclusive control over their assets.
- Impermanent loss:
- CEXs: No concerns of impermanent loss due to high liquidity.
- DEXs: Impermanent loss is a highly possible risk in the event of market fluctuations.
- Regulations:
- CEXs: Regulated – not anonymous.
- DEXs: No KYC and AML standards – anonymous.
- Liquidity:
- CEXs: Institutional investors and a large user base ensure higher liquidity.
- DEXs: Lack of regulatory standards and competition from CEXs reduce liquidity.
- Trading options:
- CEXs: Advanced tools – multiple trading options, including spot trading, futures trading, and others.
- DEXs: Basic features – often limited to swaps, crypto lending and borrowing, and speculative investments; however, DEXs are evolving, and new trading options are introduced often.
- Security:
- CEXs: Greater risk of hacks and server downtime.
- DEXs: Lower security risks.
- Convenience:
- CEXs: Easy to use.
- DEXs: It can be tricky for newcomers.
- Source of funding:
- CEXs: Banks and credit cards.
- DEXs: Crypto wallets (e.g., MetaMask).
- Trading:
- CEXs: Order book via a centralized intermediary.
- DEXs: Peer-to-peer trading based on an automated market maker.
- Tradable tokens:
- CEXs: Limited selections of tokens.
- DEXs: Numerous options.
Tools to Build a Decentralized Cryptocurrency Exchange
If you further explore how to build a decentralized cryptocurrency exchange, you’ll learn that the above-covered tutorial is not the only way. As such, the tools required to build a DEX also vary. However, when it comes to building a neat-looking and fully functional DEX with minimum effort, the method outlined herein is the way to go. In that case, you need the following tools to build a decentralized cryptocurrency exchange:
- JavaScript:
- ReactJS framework to cover the frontend.
- NodeJS framework to cover the backend.
- The Moralis Web3 API to fetch on-chain data.
- The 1inch aggregator to implement the exchange features.
- Axios to effortlessly bridge the data from the backend to the frontend.
- The wagmi library to easily implement Web3 authentication.
- CSS for frontend styling.
- MataMask to connect to your DEX and test its functionalities.
- You need testnet crypto faucets to get testnet cryptocurrencies and test your DEX without any actual cost (e.g., a Goerli faucet, Mumbai faucet, BNB faucet, Aptos testnet faucet, etc.).
Of course, if you wish to build more advanced decentralized exchanges and perhaps even introduce some unique on-chain functionality, you’ll need other Ethereum development tools. In that case, you’ll also want to learn about smart contract programming and smart contract security. You may also be interested in replacing your NodeJS backend with Python, in which case you ought to explore “Web3 Python” options.
Now, if you wish to steer away from Ethereum and EVM-compatible chains and, for instance, focus on Solana, learning about Solana blockchain app development and related tools is a must.
How to Build a Decentralized Cryptocurrency Exchange – Summary
In today’s article, you learned how to build a decentralized cryptocurrency exchange. As such, you were able to utilize your JavaScript proficiency and combine it with the power of Moralis and the 1inch aggregator to build a neat DEX. In the sections above, you also had an opportunity to learn the basics of decentralized exchanges.
DEXs are just one of the countless dapps you can build with the right tools. In fact, using JavaScript and the Moralis JS SDK gives you nearly limitless options regarding blockchain app development around existing smart contracts. Aside from the Moralis Web3 Data API, Moralis offers many enterprise blockchain solutions. For instance, you can listen to any wallet and smart contract address with the Moralis Streams API. The latter is a superior Notify API alternative that makes Web3 libraries obsolete in many ways. Another excellent tool is its IPFS API – you can learn more about it in our IPFS Ethereum tutorial. If you wish to mint NFT from contract, you’ll want to get your gwei to ETH (and vice versa) conversion right when covering transaction fees.
To learn more about dapp development with Moralis, make sure to explore the Moralis documentation, Moralis YouTube channel, and Moralis blog. With these resources, you can become a Web3 developer for free. However, if you wish to take a more professional approach to your blockchain development education, consider enrolling in Moralis Academy.
