Implementing the ability to transfer NFTs without the proper tools can be a cumbersome task for dApp developers. The reason for this is that, from a conventional point of view, the process requires setting up a complex data structure, finding an API, and so forth. As such, there is a lot of undesired work involved, which can become costly and time-consuming. However, with Moralis, we can significantly shorten this process, making it significantly easier and quicker. Therefore, we’ll look closer throughout this article at how to transfer NFTs with one line of code using Moralis.
”Just one line of code to send NFTs?” you might ask. It might sound too good to be true. However, using one line of code for this task is all we need when working with Moralis. Moralis provides a complete solution for developing and deploying dApps, making it the premier choice for Web3 development. The platform supplies all users with an underlying infrastructure allowing you to offload the heavy lifting to Moralis. As such, you can allocate your time and effort to other essential functions to create the best blockchain projects on the market.
Furthermore, if you’re a frequent reader of Moralis’ blog, then you’ll know that the platform provides guides on how to improve your development skills. As an example, the blog has excellent guides explaining how to create smart contracts and how to create Ethereum dApps.
So, if you want to become a better blockchain developer and learn how to send NFTs, then the first step is to sign up with Moralis. You’ll get access to the underlying backend infrastructure of the platform and several helpful development tools. Joining Moralis is also completely free, so don’t hesitate; sign up today!
What are NFTs?
NFTs is an abbreviation for ”Non-Fungible Tokens”, which is exactly what they are, non-fungible. The term ”non-fungible” is a traditional economic term to describe goods or products with unique characteristics and properties. As such, NFTs are entirely unique and are therefore not interchangeable assets.
Two examples of non-fungible traditional assets would be songs or houses. Both songs and different properties have unique characteristics making it hard to change one for the other as they won’t be valued at the same price. Furthermore, this means that NFTs are tokens with the ability to represent ownership of a unique item.
NFTs have spiked in demand over the past years, even gaining the attention of the mainstream media. However, this is not strange since some tokens have sold for astronomical amounts, reaching as high as several millions of dollars. Furthermore, it has revolutionized the digital art world, allowing artists to get financial support like never before.
It wasn’t too long ago that creating unique digital assets was an issue, and it has been hard to ensure scarcity, uniqueness, and proof of ownership when it comes to all digital assets. However, this is no longer the case with technologies such as blockchain and NFTs. As such, these tokens enable a new decentralized internet of assets.
What is Moralis?
Before we dive deeper into the process of how to transfer NFTs with just one simple line of code, we’re going to get a better understanding of what Moralis is to provide you with a better idea of how this is possible.
![]()
Moralis is the ultimate Web3 development platform enabling a quicker and easier development process. The platform offers everything needed to develop and deploy dApps, and there are currently more than 5,000 blockchain projects using the platform’s tools. As such, these projects have managed to scale and build their dApps without unnecessary cost or complexity.
From a traditional point of view, one of the most pressing issues with Web3 has been backend development. However, this is why Moralis has entered the Web3 space. The platform supplies users with an infinitely scalable underlying infrastructure allowing you as a developer to avoid the heavy lifting in the development process. Therefore, it’s possible to put the complexity of backend development in the hands of Moralis. At the same time, you can focus your time on developing the frontend and smart contracts of your application.
Furthermore, Moralis also provides a selection of excellent development tools such as Moralis Speedy Nodes, the Web3 API, NFT API, native support for IPFS, etc. These are just some of the platform’s tools, and they can all aid tremendously when developing.
So, if you want to develop dApps, tokens, or any other blockchain projects, then we highly recommend joining Moralis. This will give you access to all the platform’s development tools and significantly shorten your route to market.
How to Transfer NFTs with One Line of Code
From a conventional perspective, it has been an arduous task to create dApps that enable the transfer of NFTs from one account to another. One of the reasons for this is that it requires a vast data structure that is complex and time-consuming to develop. However, this is no longer the case since we can utilize the already established infrastructure of the Moralis platform. By using Moralis, we can accomplish the same results with just one simple line of code.
In this article, we’ll showcase the power of Moralis by creating a basic web application allowing us to send NFTs. We’ll create a project from scratch where we will set up a single HTML file containing all of the necessary code. However, for our application to work, users have to have a MetaMask account. For this reason, we’re going to kick off this tutorial by taking a closer look at MetaMask and how you can set up an account easily.
However, if you’d rather watch a video explaining the process, then make sure to check out this video from the Moralis YouTube channel. Here you can follow along as Ivan walks you through the complete tutorial:
What is MetaMask?
MetaMask is the largest crypto wallet on the market, with more than ten million active users per month. As a crypto wallet, MetaMask provides users with the necessary functionalities to fully manage their assets. Furthermore, MetaMask provides users with a secure login, key vault, token wallet, and access to various exchanges. As such, it’s possible to perform essential tasks such as purchasing, selling, and swapping coins/tokens through the platform.
![]()
Furthermore, along with being a well-established crypto wallet, MetaMask also acts as a gateway to the significant Ethereum ecosystem of dApps. As such, MetaMask allows users to access decentralized exchanges (DEXs), DeFi platforms, games, and other exciting apps.
Setting up an account with MetaMask is really simple, and the first step is to download the extension to your browser. To initiate the process, you need to visit the MetaMask website and click ”Download” in the top right corner of your browser.
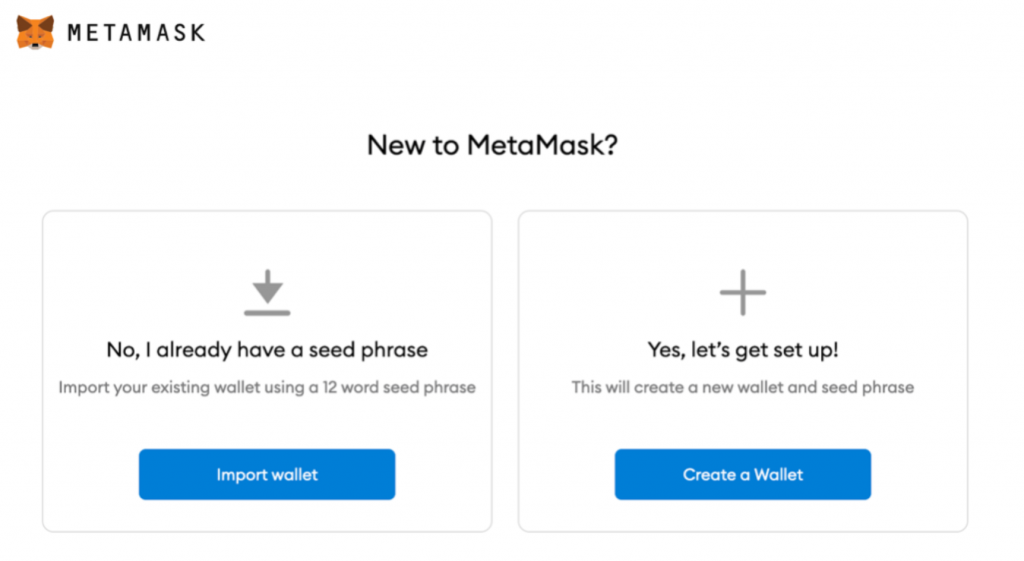
Next up, you’ll need to press the ”Get Started” button, which will provide you with two alternatives. You can either import an existing wallet or create a new one from scratch. If you already have a wallet, you can create the account using your existing seed phrase. If you prefer to create a new one, simply follow the instructions, and you’ll be provided with a completely new phrase.
Moreover, it’s essential that you have an account as you need one when transferring NFTs. Setting up a MetaMask account is a relatively simple task that only takes a couple of minutes. However, if you want more information regarding the process and the extension itself, then check out the following article from Moralis explaining what MetaMask is in further detail: “MetaMask Explained – What is MetaMask”.
How to Transfer NFTs with One Line of Code – Create an HTML File
With a MetaMask account and the extension installed, we can move on to create our application. The first thing we’re going to do is create a new HTML file that we’ll call ”index.html”. This file will contain a few imports: the HTML code for our application and a function for executing the transaction. As such, this is what the code looks like before adding the logic of the function:
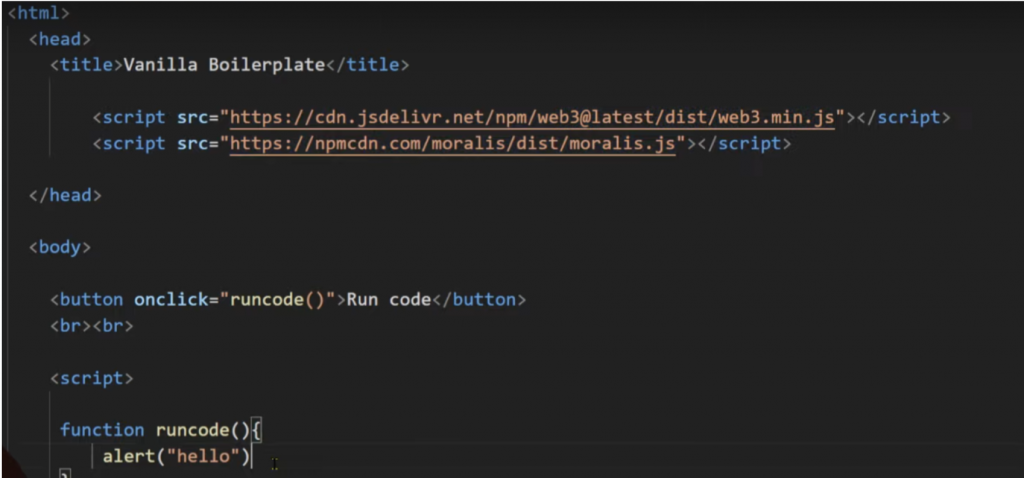
First, we need to make two imports just below the “Vanilla Boilerplate” line, as seen on the image above. One of the lines is for importing Moralis, and the other is for importing Web3. Once we’re done importing the Web3 and Moralis script, we create a ”Run code” button. This button has an ”onclick” event which means that something will trigger once a user clicks the button on the website.
In this example, we’ll run the function ”runcode()” whenever the button is clicked. As you can see now from the image above, all that this function does for now is print ”hello”. Now, we’ll continue by adding the logic giving us the opportunity to transfer NFTs.
How to Transfer NFTs with One Line of Code – Add Logic to the ”runcode()” Function
Finally, we’re going to add logic to the “runcode()” function, allowing us to transfer NFTs. To do so, we can begin by visiting the Moralis documentation, where we’ll find some already prepared code. From this page, we’re interested in the code for sending NFTs or ERC-721 tokens, which looks like this:
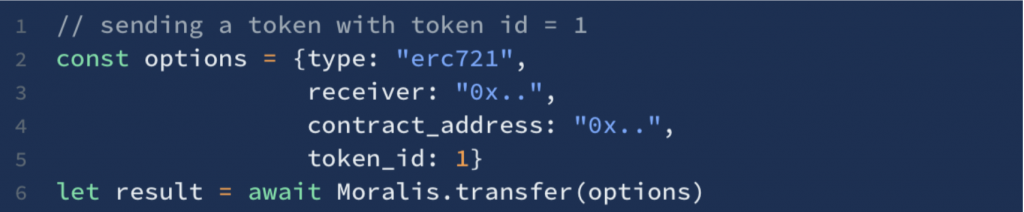
We can go ahead and copy this code and implement it into the ”runcode()” function. As you can see from the code, we first create an object called ”options” with a few properties: the type, receiver, contract address, and token ID.
The type will already be set to ”erc721”, which is the correct type for sending NFTs or ERC-721 tokens. Therefore, we can leave this line as it is. Then, we need to add a receiver, which is the wallet address to where we would like to send the token. After this, we add the contract address followed by the token ID. Finally, we use this object as an argument when we call the Moralis transfer function.
As you might have noticed, we only added the address about to receive the NFT, and there is no mention of the address from which we are sending the token. However, this is exactly the reason why we created a MetaMask account previously in the article. As such, the sending address will be the MetaMask account that you are currently logged into.
Now, all that remains is to launch the application and execute the code by clicking the “Run code” button.
Congratulations! That’s everything needed to allow us to send NFTs with one line of code using the Moralis platform!
How to Transfer NFTs with One Line of Code — Summary
Adding the functionality to enable dApps to transfer NFTs has traditionally been a relatively demanding task. The reason for this is that the process generally requires a complex data structure. Developing such a structure is a difficult and time-consuming process. However, this can be avoided by utilizing Moralis.
As such, we can use the platform to transfer NFTs from one address to another with just one simple line of code. The process essentially consists of two parts: getting a MetaMask wallet and creating a simple application. The application only consists of one HTML file containing imports, HTML code, and a simple function.
All the function does is call an additional Moralis transfer function with a few parameters. These parameters are the token type, the receiving address, contract address, and token ID. Now, this is all there is to it, and it doesn’t get any simpler than this.
Moreover, adding the ability to send NFTs isn’t the limit of Moralis’ platform, there’s a lot more you can do, and the use cases are endless. Moralis is the best platform for Web3 development, and along with its infrastructure, the platform also features tools such as the Moralis Price API, cross-chain compatibility, real-time alerts, etc.
Furthermore, the Moralis blog is frequently updated with matchless Web3 content. Just the latest two articles explaining Binance Smart Chain development and that Moralis now supports Avalanche makes the blog worth checking out!
So, signing up with Moralis is the first step in becoming a dApp, token, or NFT developer. Joining the platform provides you with immediate access to all the platform’s tools and the already established infrastructure. As such, you can save both time and resources by increasing efficiency when developing your future blockchain projects.
