In this article, we’re going to break down the process of how to mint 10,000 NFTs. To make the tutorial more accessible, we’ll be using an already prepared Moralis template for an NFT minting engine. So, if you’d rather skip the tutorial and immediately take a closer look at the GitHub repository, check out the following link:
Full NFT Engine Documentation – https://github.com/ashbeech/moralis-mutants-nft-engine
NFTs (non-fungible tokens) are some of the most exciting features of Web3 development, and innovative new ideas have been generated as a result of the utilization of these tokens. One of the hottest trends within the world of crypto is digital collectibles. These are NFTs generated in bulk to create collections consisting of thousands of tokens. The two most prominent examples are Bored Ape Yacht Club and CryptoPunks. These collections contain around 10,000 entirely unique NFTs, some of which are selling for astronomical amounts. Due to this sector’s incredible success, we’ll take a closer look at how to mint 10,000 NFTs and create your own series of tokens with Moralis.
In the following tutorial, we’ll utilize the Moralis operating system to create a collection of NFTs. As Moralis users, we can tap into the platform’s backend infrastructure and create our very own collection in no time!
Moreover, along with the already developed backend infrastructure of Moralis, the platform also provides valuable development tools such as Moralis Speedy Nodes, native support for IPFS, the NFT API, Price API, and much more.
So, if you’re looking to become a blockchain developer, the next step in your journey is to sign up with Moralis. Joining the platform will allow you to significantly cut down on development time for all of your future blockchain projects!
How to Mint 10,000 NFTs in 3 Steps
In this tutorial, we’ll break down the process of creating a collection of 10,000 NFTs. So, if you haven’t already, we recommend that you familiarize yourself with NFTs before continuing. You can get a full breakdown of these tokens from the following article: ”What are NFTs?”. However, if you feel comfortable in your NFT knowledge, then follow along as we take you through the complete process!

To make this tutorial more understandable, we’re going to break down the process into the following three steps:
- Creating Art Layers
- Generating Art
- Minting 10,000 NFTs
We’ll be using an already prepared Moralis template with an already developed NFT generating engine to save both time and resources. So, with no further ado, let’s get right into the process and start with creating art layers that we can feed right into the NFT engine!
However, if you’d rather watch videos explaining the complete process, then watch the following three clips from the Moralis YouTube channel:
Part 1:
Part 2:
Part 3:
Step 1: How to Mint 10,000 NFTs – Creating Art Layers
The art in these NFT collections is computer-generated pieces that consist of a combination of different art layers. Depending on what you intend for your collection, these layers can vary; however, to name a few, they can be backgrounds, clothing, eyes, noses, accessories, etc. Thus, the first step in our process is to create these layers that we can use later to generate unique digital art pieces.
To initiate the process, we first need to visit the GitHub page and clone all of the files to our local directory. In this step, we will focus on the “Moralis Mutants.psd” file, which contains a template for how we should structure the layers. As such, you can continue by opening the file in your preferred editing software. In our case, we’ll be using Photoshop.

The file already contains a few layers such as accessories, eyes, arms, etc. However, we aren’t really interested in the existing layers; we want the files’ structure. This is because the layers should be entirely dependent on your vision of the final product. As such, it is crucial that you have a clear picture in your mind and a final theme for the NFTs before designing the layers.
Also, when creating the layers, you should keep the amount of unique NFTs that you’d like to make in mind. For example, if you aim to produce 10,000 pieces of art, you’re going to require quite a significantly larger number of unique layers than if you solely set out to create ten.
Exporting the Files
Once you have designed all your layers, the next part of this initial step is to export each layer into separate files. We need all layers separate and in individual files as this will allow our engine to combine these and generate unique art pieces.
Exporting the files is relatively straightforward, and if you’re also working with Photoshop, all you need to do is click on the ”Files” button at the top of the interface. Following this, navigate to ”Exports” and click on ”Layers to Files”.
This will export all your individual layers into separate files. Now, all that remains for the first step is to sort these into separate folders. We’re going to have one for each of the different layer categories. So, for example, one for ”Noses”, one for ”Accessories”, etc.

The folders, in turn, should also have a particular structure. Each folder should contain three additional folders: ”original”, ”rare”, and ”super_rare”. Then, it’s up to you to sort each layer depending on how rare you’d like them to be.
Step 2: How to Mint 10,000 NFTs – Generating Art
In the second step, we’re actually going to generate the art that in the third step will be used to mint 10,000 NFTs. However, before actually creating the art, there are two things we need to do in advance. First, we need to create a Moralis server. A server will provide all the necessary tools that we need to create the art pieces and upload the files to IPFS. Second, we must also make a few configurations to the NFT engine that will generate the art.
How to Create a Moralis Server
The first thing you want to do is to sign up with Moralis. This is entirely free, and as soon as you log in to your account, we’re ready to get going.
To spin up an instance, you can click on the ”+ Create a new Server” button at the top of the Moralis interface. Pressing this will open a drop-down menu with three different alternatives. In this case, and since this is a tutorial, we will choose a testnet server. This is beneficial as it allows us to create the NFTs without paying any gas fees, which will provide us the luxury of getting things right before committing to a mainnet.

Once the desired type of server is selected, an additional window will open up where you’ll need to make a few selections. In our case, we chose Polygons’ Mumbai testnet, and if you’d like to follow along, we suggest you do the same.
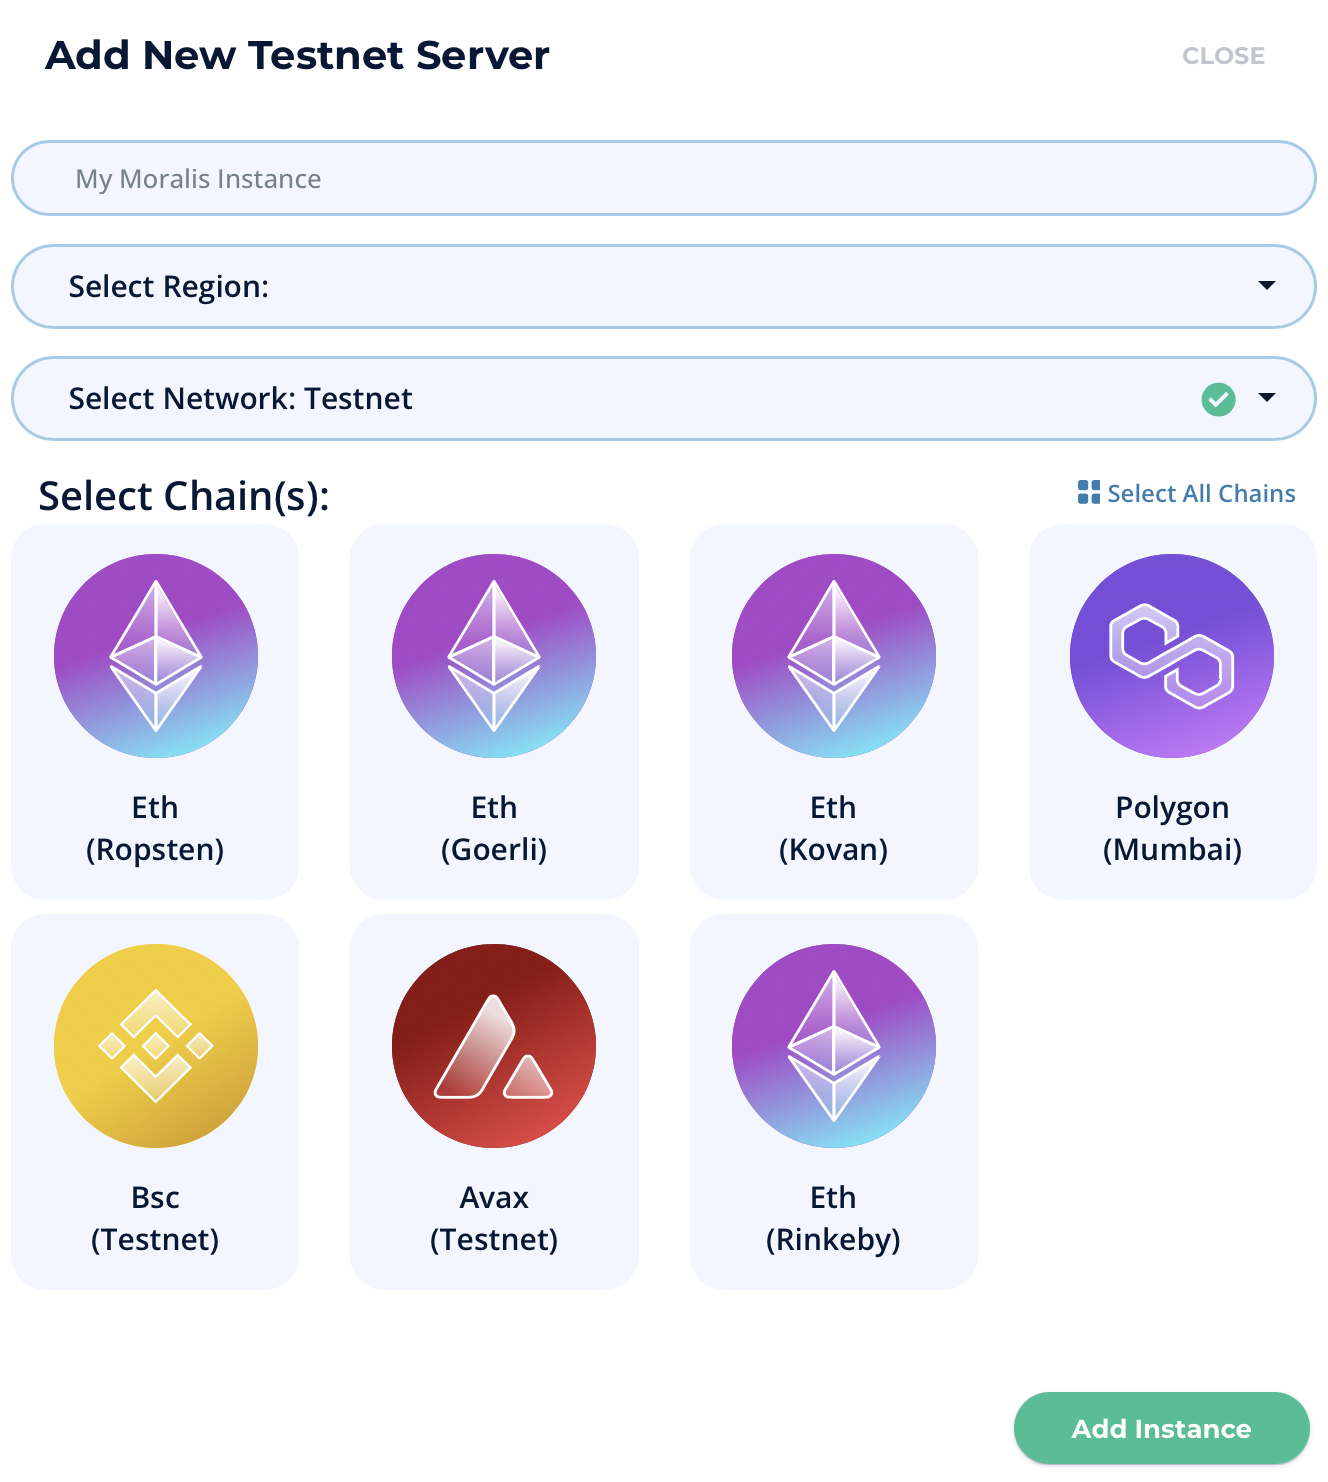
With all the information adequately inputted, all that remains is to click on the ”Add Instance” button to get the server going.
Input Configurations
Now, with a server at our disposal, we can move on to make a few configurations to the engine that will generate the art pieces. First of all, if you haven’t already, you can go ahead and clone down the code from GitHub and add this to your IDE (integrated development environment).
With a local copy of the code, the next step is to navigate to the ”config.js” file, which you can find in the ”input” folder. Once you’re in this file, you can scroll down to the ”BEGIN COLLECTION CONFIG” part.
You should look over each of these elements and make sure they fit your development needs. However, the three most important parts that we need to focus on are to change the ”baseImageUri”, ”editionSize”, and ”layers” constants.
The ”baseImageUri” should be equal to your Moralis server URL. To find this information, all you need to do is click on the ”View Details” button for the server in question and copy-paste this into the code. Moreover, you also want to change the ”editionSize”. If you want to create 10,000 NFTs, this const should be set to that amount.
Layers
Finally, you’ll also need to ensure that the ”layers” const is structured correctly. Initially, this is what ”layers” looks like:
const layers = [
addLayer(“Background”, { x: 0, y: 0 }, { width: width, height: height }),
addLayer(“Base Torso”),
addLayer(“Base Head”),
addLayer(“Torso”),
addLayer(“Arms”),
addLayer(“Mouths”),
addLayer(“Eyes”),
addLayer(“Accessories”),
addLayer(“Noses”),
];
The elements of this const should correspond to the layers you created in the first step of this tutorial. Moreover, the layer furthest ”back” of your art pieces should be at the top of the list. As you can see from the example above, we initiate with ”Background” and then add more layers on top of that. If the ”Background” was at the bottom of the code, it would cover the rest of the layers.
Engine Configurations
With the proper configurations to the ”config.js” file all finalized, we can move on to make the last changes to the NFT engine. To do so, you’ll need to navigate to the ”index.js” file, where the central part of the code is located. This part compiles everything, including the layers, and creates JSON files. Along with this, it also uploaded everything to IPFS and your Moralis server. However, we won’t be delving any deeper into how the actual engine works but rather take a closer look at the necessary configurations we need to take care of.
We can go ahead and scroll down to the ”// Moralis creds” section:
// Moralis creds
const serverUrl = process.env.SERVER_URL;
const appId = process.env.APP_ID;
const masterKey = process.env.MASTER_KEY;
const apiUrl = process.env.API_URL;
// xAPIKey available here: https://deep-index.moralis.io/api-docs/#/storage/uploadFolder
const apiKey = process.env.API_KEY;
We need to make a few alterations here. First, you can add the server URL, application ID, and master key. Once again, this information can be found by navigating back to Moralis and clicking on the ”View Details” button for the server in question:

Finally, you also need to add an API URL and key, and this can be fetched from the address in the code we presented earlier in this section.
Generating the Artwork
With all configurations made to both the ”config.js” and ”index.js” files, we can simply continue and begin generating the art pieces. This is relatively straightforward, and all you need to do is input the following into the terminal:
node index.js
Once you hit enter, the code will run and generate the specified amount of art pieces. However, if you are generating 10,000 pieces of art, it might take a while to upload these to IPFS. But don’t worry; they will be finalized momentarily. Once everything completes, we can move on to minting the actual NFTs.
Step 3: How to Mint 10,000 NFTs – Minting 10,000 NFTs
With our art generated, this tutorial’s third and final part is to mint the actual NFTs. However, to mint the NFTs, we need a couple of things. The first thing we’re going to do is create a MetaMask account, change the network, and add some ”play” MATIC to the wallet. So, let’s begin with taking a closer look at MetaMask.

Setting Up MetaMask
If you don’t have one, then the first thing you need to do is create a MetaMask account. This is pretty straightforward, and all you need to do is follow the steps presented by the extension. Once you have an account, the next step is to change the MetaMask network. In our case, we want to switch to the Mumbai testnet as this was the network we opted for when we created the server.
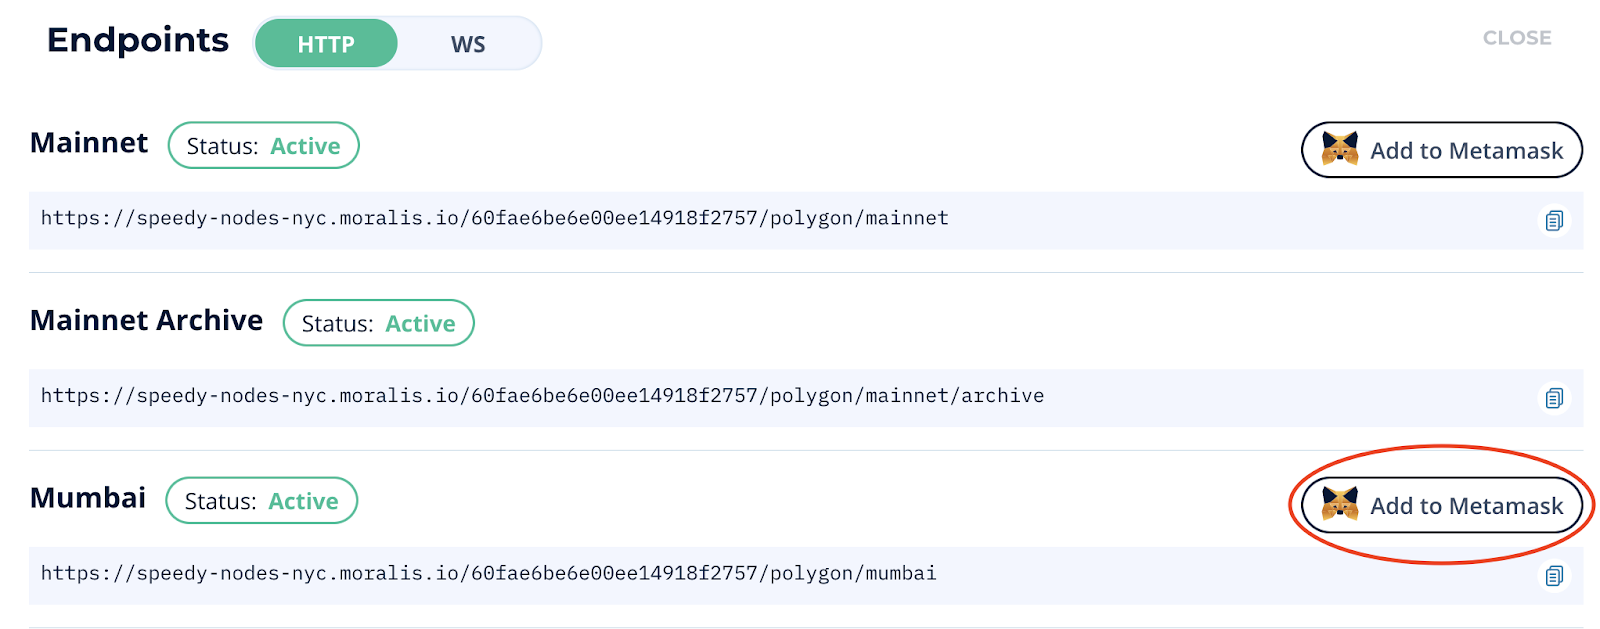
However, Mumbai won’t be one of the default networks of MetaMask, meaning that we need to add this to our wallets. When working with Moralis, this becomes incredibly easy. All you need to do is navigate to the ”Speedy Nodes” tab in the Moralis admin panel, click on the ”Endpoints” button for the Polygon network, and finally click on the ”Add to MetaMask” button for the testnet. Then, all that remains is to make sure this is selected in MetaMask.
So, with the current network selected, we also need to add some MATIC to the wallet. Since we are working with a testnet, it is possible to do so through a Polygon faucet. All you need to do is input your wallet address to receive some ”fake” MATIC in return. However, it’s important to note that these only work for the testnet and aren’t real MATIC.
Creating a Smart Contract
// SPDX-License-Identifier: MIT
pragma solidity ^0.8.0;

//import 1155 token contract from Openzeppelin
import "https://github.com/OpenZeppelin/openzeppelin-contracts/blob/master/contracts/token/ERC1155/ERC1155.sol";
import "https://github.com/OpenZeppelin/openzeppelin-contracts/blob/master/contracts/utils/math/SafeMath.sol";
import "https://github.com/OpenZeppelin/openzeppelin-contracts/blob/master/contracts/access/Ownable.sol";

// Example contract to be deployed via https://remix.ethereum.org/ for testing purposes.

contract NFTContract is ERC1155, Ownable {
    using SafeMath for uint256;

    constructor()
        ERC1155(
            "ipfs://INSERT_YOUR_CID_METAHASH/metadata/{id}.json" // You can get this saved in dashboard of your Moralis server instance.
        )
    {
        // account, token_id, number
        _mint(msg.sender, 1, 1, "");
        _mint(msg.sender, 2, 1, "");
        _mint(msg.sender, 3, 1, "");
    }
However, before compiling and deploying the contract, we must make a few adjustments. As you can see, the first thing we need is the “CID” for our files. You can find this CID by visiting the dashboard for your Moralis server. To get to the dashboard, all you need to do is click on the ”Dashboard” button for the server. From here, you can simply copy the CID and replace ”INSERT_YOUR_CID_METAHASH” with the CID.
Then finally, as you can see from the code above, this is only suited for minting three NFTs. As such, you’ll need to create a loop that covers all your PNG and JSON files. So, if you have 10,000 unique pieces of art, your loop needs to include them all.
Compiling and Deploying
With the alterations made to the smart contract, we must compile and deploy it. So, let’s begin with compiling the contract. We can easily compile the contract with a few simple clicks since we’re working with Remix. First, let’s navigate to the ”Solidity Compiler” tab at the far left of the Remix interface. All you need to do from here is select the right version of Solidity, the correct contract, and click on the ”Compile” button.

With the contract compiled, the next step is to deploy it to the blockchain. To do so, click on the ”Deploy” tab just below ”Solidity Compiler”. Then, select ”Injected Web3”, the right contract, and click on ”Deploy”.
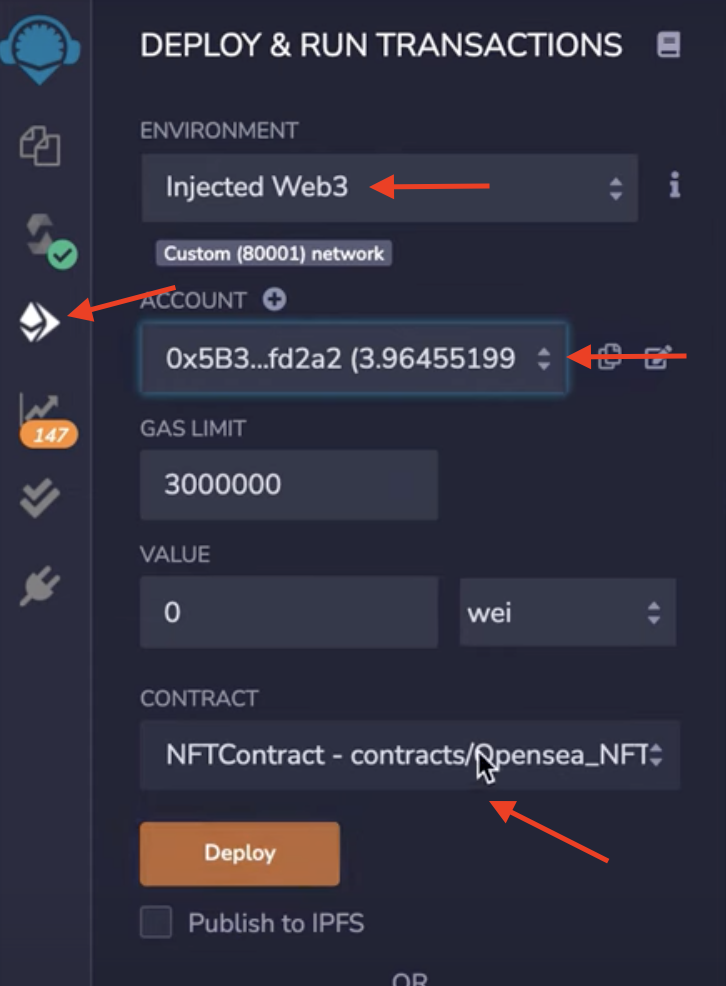
Once deployed, you’ll receive a contract address that you can utilize to view the NFTs on the testnet version of OpenSea.
That’s it for this tutorial on how to mint 10,000 NFTs! This covered how to mint the NFTs on a testnet; however, the process remains entirely the same for a mainnet. As such, once you are satisfied with how the results turn out, you have all the knowledge to take it to the next level!
How to Mint 10,000 NFTs – Summary
In this article, we covered the process of how to mint 10,000 NFTs in just three simple steps:
- Creating Art Layers
- Generating Art
- Minting 10,000 NFTs
We were able to create layers, and then use these layers to generate thousands of unique art pieces, which we later used to mint 10,000 NFTs. Moreover, we were able to do so with ease as we utilized the Moralis operating system. If you’d like to learn more about minting NFTs, we suggest taking a closer look at the article on how to lazy mint NFTs, allowing you to create NFTs without paying any gas fees. Also, to get a deeper understanding of these tokens, read more about the ERC721 contract standard.
However, this is far from the limits of Moralis and if you’d like to learn more about the platform, check out the Moralis blog for more fantastic content. For example, here, you can read more about how to create a great dApp UI, Web3 authentication, Ethereum gas fees, and much more!
So, sign up with Moralis right away and become a blockchain developer! Joining the community is free, and it only takes a couple of seconds, so you have nothing to lose.
