When developing dApps, it’s not uncommon to need information regarding the balance of a user, such as ERC-20 tokens. Developers need this information when, for example, creating tax calculations or portfolio tracking dApps. However, acquiring such information can be quite a bothersome task without the proper tools and resources. The perfect platform to solve this matter is Moralis. Therefore, in this article, we’re going to look closer at the process of how to get user ERC-20 tokens using the Moralis platform.
Moralis is the most powerful Web3 development platform, and with the tools and resources of Moralis, we can acquire user token balances in just a matter of minutes. This is possible as users are provided with a fully managed backend infrastructure. As such, we can offload most of the heavy lifting when developing dApps on the Moralis platform.
Furthermore, the platform offers a vast selection of useful development tools, such as the Moralis Speedy Nodes, the Price API, NFT API, and native support for IPFS. However, these are just some of the tools and benefits provided by Moralis. As such, the platform has a lot more to offer.
Moreover, we are in this tutorial going to use Moralis extensively, which is why we highly recommend signing up. Joining the platform is free, and it will provide you with immediate access to all the platform’s tools. The platform enables you to significantly shorten the time to market for all future blockchain projects allowing you to save both valuable time and resources!
What are ERC-20 Tokens?
Fungible tokens are one of the most potent features of the Ethereum blockchain, along with smart contracts. These tokens can represent virtually anything from skills for a character in a game to fiat currency. This means that the use cases for Ethereum tokens are substantial and therefore widely used. As such, it was deemed necessary to regulate these tokens with the ERC-20 standard. However, what exactly is this standard, and what does it mean for the tokens?
First and foremost, the standard ensures that tokens have the same properties, such as their value and type. Since tokens share the same properties, it’s impossible to change one token for another type of token, making them interchangeable. However, we can swap one Ether for another Ether as they share the same value and type.
Furthermore, this standard was originally implemented on the Ethereum chain; however, it isn’t limited to this blockchain. All chains utilizing the EVM (Ethereum Virtual Machine) generally apply the ERC-20 standard to their own networks. Some examples are Polygon and BSC (Binance Smart Chain), which are some of the most significant development chains on the market, just behind Ethereum.
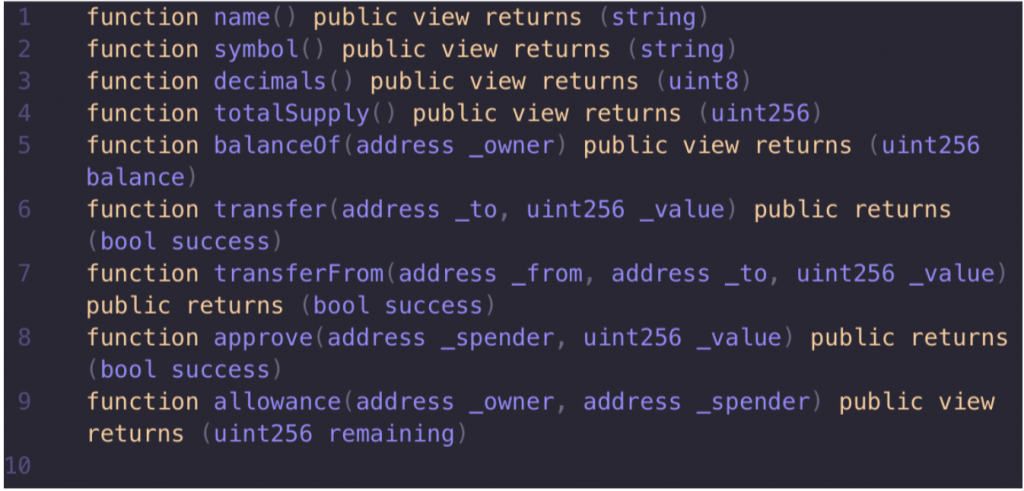
The ERC-20 standard also implements an API for tokens with smart contracts. This provides functionalities such as the ability to transfer tokens from one account to another, set a total supply, and get token balances from accounts, which we’re going to look closer at in this article.
Furthermore, to be considered an ERC-20 token, the token must implement the following events and methods:

How to Get User ERC-20 Tokens in 4 Steps
When developing dApps, it’s in many cases highly beneficial to get user ERC-20 tokens in order to, for example, display their full balances. However, querying this information can be difficult and a time-consuming endeavor. This is not ideal as we don’t want this part to become a bottleneck in our development process.
One of the underlying issues here is the backend infrastructure when developing a dApp. We need a fully functioning backend infrastructure to provide our dApp with the ability to get user ERC-20 tokens, and setting up one from scratch can be a hassle. However, if we utilize Moralis, the process becomes quick and easy!
As the best middleware and premier choice for Web3 development, we can utilize the Moralis platform to get user ERC-20 tokens in four quick and simple steps. These are the following steps:
- Create a Moralis server.
- Initialize an index.html file.
- Create a main.js file.
- Test the app with a web server.
So, to get going with the process, we’ll start with looking closer at how you can set up your own Moralis server with just a few simple clicks.
However, if you’d rather watch a video explaining the complete process, then check out the following video from the Moralis YouTube channel:
Step 1: Create a Moralis Server
As we mentioned in the introduction, we’re going to be utilizing Moralis in this tutorial. The first thing we need to do is sign up with Moralis. Signing up with the platform is completely free, and it provides access to all of Moralis’ tools.
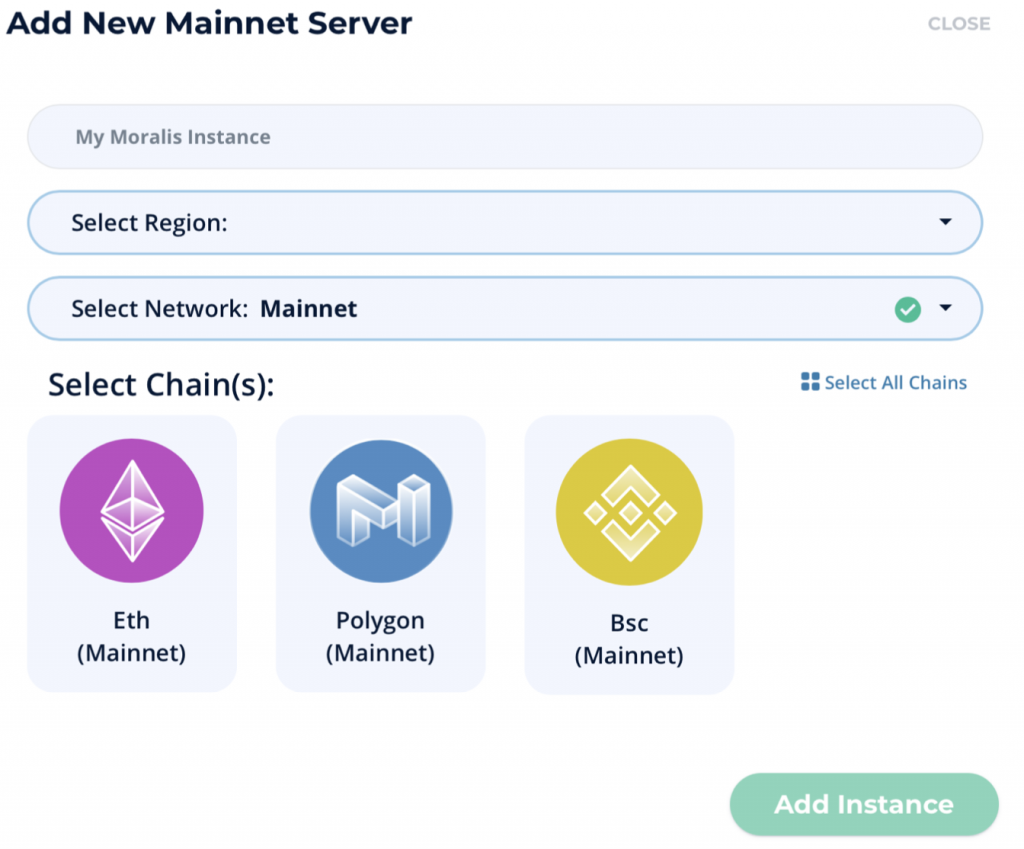
Once you’re signed up and all logged in, we can create our first Moralis server. The first step is to click the ”+ Create a new Server” button at the top right of the Moralis user interface to get the server going.

Clicking this button will present us with a small drop-down menu with three different alternatives: ”Mainnet Server”, ”Testnet Server”, and ”Local Devchain Server”. For this tutorial, it doesn’t really matter which option you choose; however, we’ll use the mainnet server. This decision should be based on where you plan to deploy your dApp in the future.
However, if either of the alternatives is selected, you’ll be provided with a new window where you need to input a name, select a region, and choose network(s). Since Moralis supports cross-chain compatibility, it’s possible to choose several networks in this step. Once you’re done with your options, click the ”Add Instance” button to spin up your server.
Furthermore, if you’re interested in building dApps, we use the same process to set up a server when, for example, creating Ethereum dApps or building BSC dApps.
Getting the server going might take a while, but don’t worry; you’ll have your server up and running in a few minutes. While we wait for the server to finalize, we can create our project in the second step.
Step 2: Create an index.html File
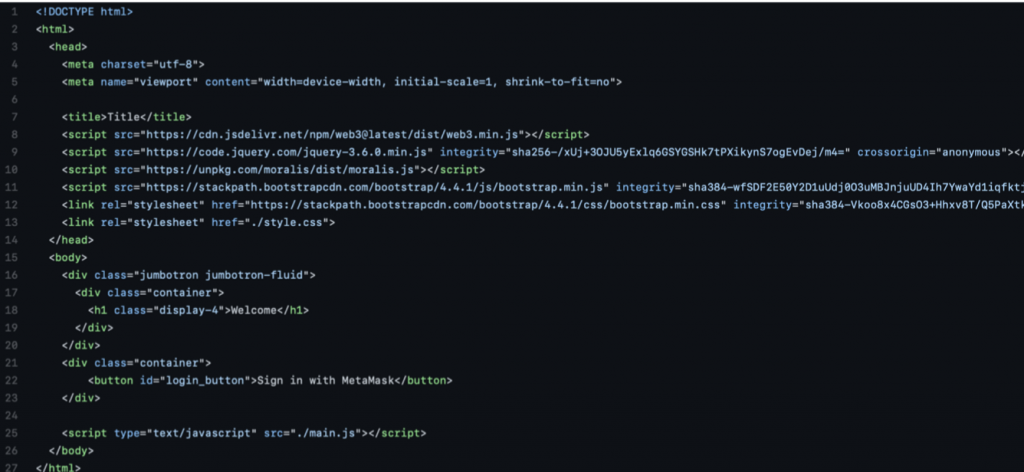
For this example, we’re going to create a project from scratch where we make a simple app that we can use to fetch the balances of our users’ accounts. So, we can begin by creating a completely new project, and the first file that we’re going to add is ”index.html”.
This file will contain all the HTML code of our application, such as a ”Login” button. To begin, we’re only going to copy some boilerplate code that you can find on the Moralis GitHub page, and it will look something like this:
Step 3: Create a main.js File
Once we have the ”index.html” file all set up, we can move on to creating the ”main.js” file. This is a JavaScript file, and just as the previous file, we can fetch some boilerplate code from the same GitHub page. This code will look like this by default, but we are going to make a few adjustments:
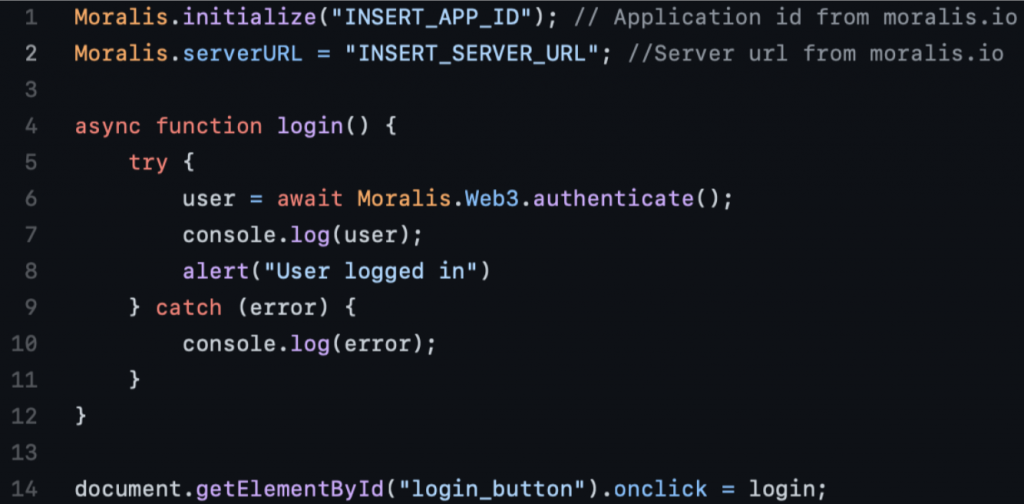
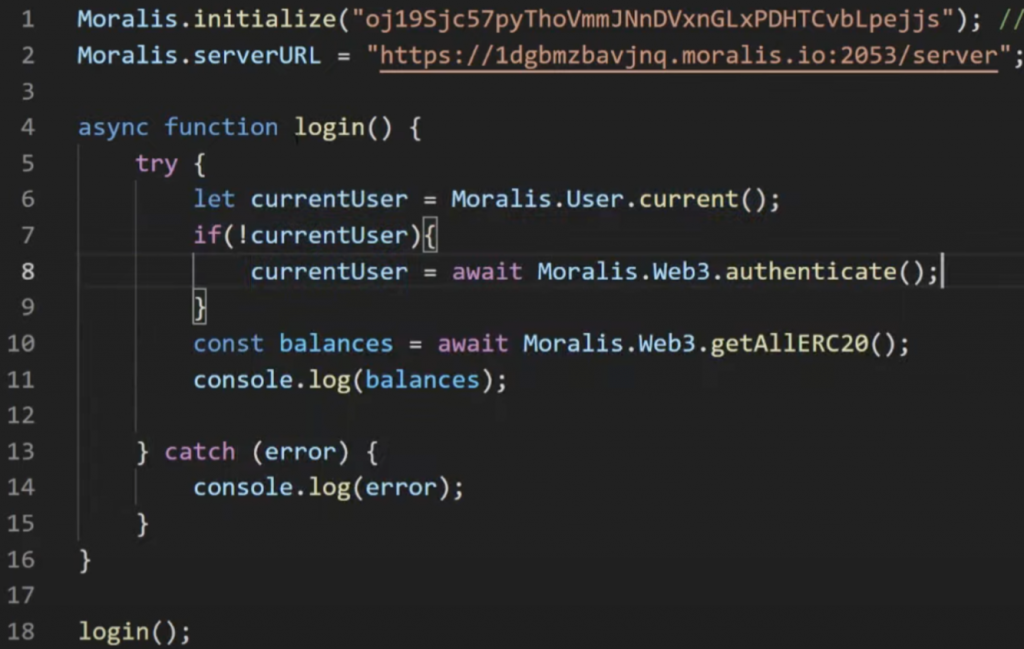
First of all, we’ll fetch both the application ID and the server URL from the server you created in the first step. To acquire this information, we need to find our way back to the Moralis admin panel and go to the ”Servers” tab. Then, all we need to do is click the ”View Details” button, which will provide us with the necessary information that contains both the application ID and server URL. So, all we need to do here is copy and paste both elements into our code.
Furthermore, we’re going to make a few additional modifications to the code. To start off, we are, between the “try” and “catch” statements for the login function, going to add a line just below ”try” to check if there is a user currently logged in. Below this, we add an “if” statement that checks if a user isn’t logged in. If this is the case, the code will trigger the ”authenticate()” function.
Below the “if” statement, once we know that someone is logged in, we fetch the balances by calling the ”getAllERC20()” function. Just underneath this line, we log the variable ”balances” to the console, which simply provides us with the user balance.
Finally, we’re going to remove the ”onclick” at the bottom of the code and simply call the ”login()” function. This will provide us with the following code after the modifications:
Step 4: Test the App with a Web Server
Now, with the proper code at hand, all we need to do is test if the application is working. To do so, we’re going to need a web server. There are a number of ways in which you can acquire a web server, but we’re using a plugin for Visual Studio Code. However, you can also make a Google search for ”Python Web Server”, and you’ll be able to set one up quite easily.
Since we’re using the plugin for our IDE (Integrated Development Environment), we can simply click on ”Go Live” to test the application. The application that we just created will look something like this:
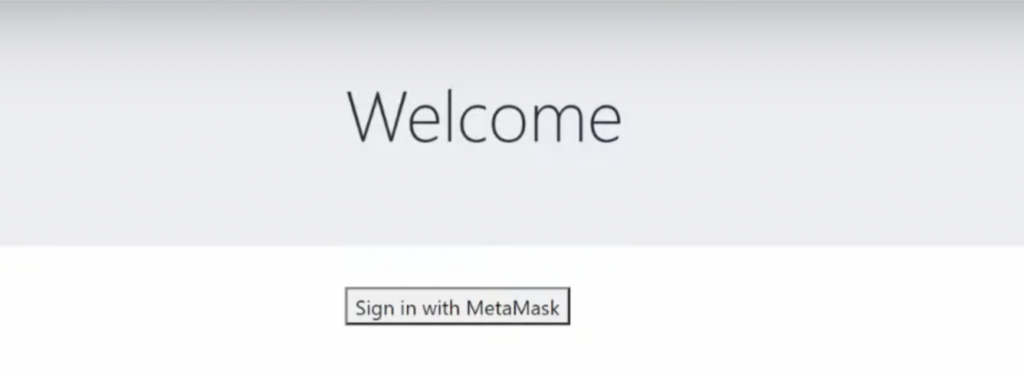
Once we launch the application, if we aren’t already authenticated with MetaMask, we’ll need to use the wallet to log in. If this is the case, a small pop-up window will appear at the top right of your browser, allowing you to authenticate with the extension.
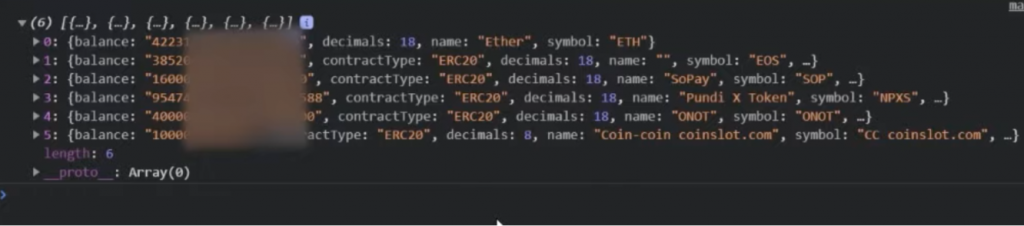
As you might remember from the previous step, we remove the ”onclick” event, which means that the button in our UI doesn’t do anything. However, we can check what is going on by right-clicking the app and click on ”Inspect”. Once we authenticate, we can look at the console, which will display all the ERC-20 tokens that the wallet contains. This might look something like this:
That’s all we need to do to get the tokens of the logged-in address. However, we can also check the balance of any other address. To do this, we just need to make a slight modification to our code. We’re then just adding an address as an argument to the ”getAllERC20()” function, and it will look something like this:
![]()
How to Get User ERC-20 Tokens — Summary
When developing dApps, it’s not uncommon that we need access to the balance of our application’s users. However, acquiring this information can be a cumbersome task without the proper underlying infrastructure. However, by utilizing Moralis, this task will feel like a breeze, and therefore crowning Moralis as the best Web3 development platform.

Moralis is the leading Web3 development middleware, and it provides users with everything needed to develop and deploy dApps. One example is that we can utilize the Moralis platform to get user ERC-20 tokens to view balances. With the power of Moralis, we can accomplish this in just a matter of minutes. In fact, we can get user balances by following these four steps:
- Generate a Moralis server.
- Initialize an index.html file.
- Create a main.js file.
- Test the app with a web server.
In this article, we created a new project from scratch to demonstrate how easy it is to use Moralis. However, it’s also possible to implement the logic from this tutorial into an already existing dApp.
Moreover, this only scratches the surface of what’s possible with Moralis. The platform provides several other great tools and functionalities. For example, you’ll find exceptional guides on how to create your own ERC-20 token and how to authenticate users with WalletConnect on the Moralis blog. Taking a closer look at the blog will also provide you with a better understanding of what’s possible with the Moralis platform.
So, if you’re looking to become a dApp or token developer, the first step is to sign up with the Moralis platform. Signing up is entirely free, and it only takes a few seconds. Once signed up, you’ll receive access to all the platform’s tools and the already managed backend infrastructure. Start today, and let Moralis help you launch your project from start to finish!
