If you want to get the price of any token, you should check out Moralis’ industry-leading Token API. With this development tool, you can query the current and historical price of any token in no time! Further, you can do so with an API call to Moralis’ “getTokenPrice” endpoint while passing an address as an argument:
const response = await Moralis.EvmApi.token.getTokenPrice({
        address,
    });
By familiarizing yourself with Moralis and the blockchain development space, you can seamlessly integrate similar functionality into any future Web3 projects to get the price of any token! Moreover, if you want to learn more about how the Token API and ”getTokenPrice” endpoint work, check out the official get ERC20 token price documentation page outlining the intricacies of this tool. You can also sign up with Moralis and implement the code snippet above right away. However, if you want additional guidance on implementing the above, read on and let Moralis guide you from start to finish!
Overview
When developing any Web3 platform or decentralized application (dapp), you will quickly realize that you need on-chain data regarding various token prices. For instance, if you are creating an exchange, ideally, you want to display this information to improve your customers’ user experiences. So, how can you seamlessly query this data from the various blockchain networks and use it in your development endeavors? An answer to this question is Moralis’ Token API. This API enables you to get any token price through one API call. If this sounds interesting and you want to learn how this tool works, join us in this guide as we show you exactly how!
To kick things off, we will jump straight into Moralis’ Token API and explain why this is the best tool to get any token price. From there, before showing you how the tool works in practice, we dedicate a section to exploring the intricacies of APIs and why they are important. Lastly, we provide a comprehensive tutorial on how to get any token price by showing you how to create an application implementing this functionality. If this sounds exciting, join us as we cover this process from start to finish.
In addition, if you are looking for more Web3 development content, check out Moralis’ Web3 blog. On the blog, you can read about the intricacies of the Sepolia testnet or learn how to use a Web3 JS call contract function!
Now, before continuing, make sure to sign up with Moralis immediately, as you need an account to follow along!
Tools to Get Any Token Price
Suppose you want to get the price of any token. In that case, you will likely want to use Web3 development tools that can aid in this process as it has – from a conventional perspective – been quite troublesome to query data from various blockchain networks. However, as the Web3 development industry has evolved, this is no longer the case thanks to software development kits (SDKs), application programming interfaces (APIs), and other development tools.
In the instance of on-chain token data, you will want to check out the best token price API in 2023 supplied by Moralis. Furthermore, this is the ultimate ERC20 token API, enabling you to integrate real-time token data into your applications and Web3 projects. Moreover, with Moralis’ cross-chain capabilities, you have the option to use the API in development endeavors across multiple different networks.
Nevertheless, the API has three main features:
- Token Transfers – With Moralis’ Token API, you can stay up to date with relevant token transfers.
- Token Balances – Through this tool, you can query a user’s balance of ERC20 tokens with only a single API call.
- Token Prices – The Token API collects prices from various AMMs, such as Uniswap and PancakeSwap, making them available through only a couple of lines of code.
Thanks to this third feature, it is possible to use the API to get the price of any token. What’s more, all it requires is a single API call to the ”getTokenPrice” endpoint. However, we will return to how the API and endpoint work in the ”How to Get Any Token Price” section.
But, before doing so, let us return to basics and explore the intricacies of APIs. This helps us better understand the utility of Moralis’ Token API and why you might want to use it!
APIs
Cross-system communication is vital to the web’s infrastructure, as most applications and platforms do not work optimally in isolation. One way of enabling software systems to communicate seamlessly is through the use of application programming interfaces (APIs)!
Whenever you are using an application or browsing the web, your device connects to the internet in order to send instructions to a database or server. The receiving end then interprets the data, finds an appropriate response, and returns it to your system. From there, your device handles and processes the data, which is then displayed in a readable format.

This entire process is generally facilitated by an API, enabling two decoupled systems to communicate seamlessly by translating a set of instructions for mutual understanding. What’s more, APIs deliver functions reliably on request. This ensures compatible coding in safe and secure environments. As such, through APIs, developers receive a more accessible development experience!
Nevertheless, that briefly covers the intricacies of APIs and why they are useful. In the following section, we will provide an application demo. It will show you what you will be working towards before we dive into the central part of this tutorial!
Get Token Price – What Are You Working Towards?
In the upcoming section, we will teach you how to create a straightforward application using NextJS and NodeJS. In the application, users can get any token price based on an address. However, before diving into the tutorial, this section will provide an application demo. In doing so, you will get a more profound understanding of what you are working towards, making it easier to visualize what the code actually does.
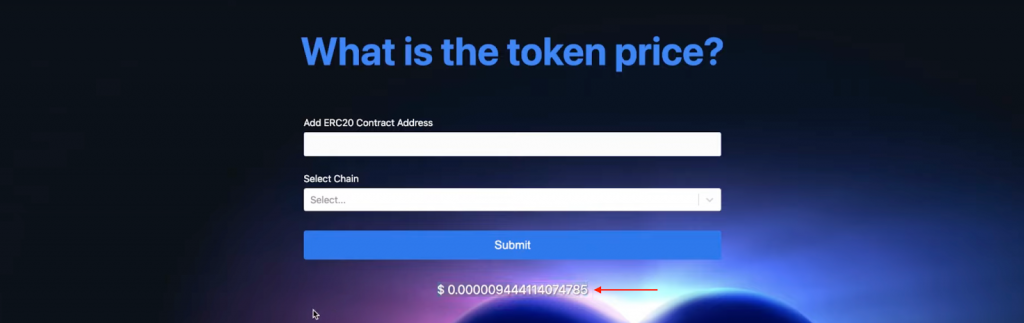
Without further ado, this is what the app’s landing page looks like:

The application features four core elements: a header, two input fields, and a ”Submit” button. So, how does the application work? The user needs to initially input a token address into the ”Add ERC20 Contract Address” field and select a chain using the ”Select Chain” drop-down menu. In this instance, there are two options, ”Ethereum” and ”Goerli”:

Once both input fields are filled in, all that remains is to hit the ”Submit” button, which should return the price of the token in USD:
Nevertheless, now that you have a more profound understanding of what you are working towards, let us jump straight into the tutorial on how to get any token price using Moralis!
How to Get Any Token Price
It is time to show you how to create this NodeJS and NextJS application. Furthermore, in this tutorial, we will use Moralis’ Token API. Thanks to this enterprise-grade Web3 development tool, it is possible to get the price of any token with a single API call to the ”getTokenPrice” endpoint.
We will additionally use an already pre-developed project to make this walkthrough as straightforward as possible. Moreover, we can divide the tutorial into the following two sections:
- Cloning the Project
- Code Creakdown
By following along and covering the sections above, you will learn how Moralis’ Token API works and how to use this development tool to seamlessly get the price of any token. From there, you will be able to apply the same principles to easily implement this functionality into any of your future Web3 development projects!
Now, if you prefer watching YouTube videos to learn, check out the clip below from the Moralis channel. In his video, a talented Moralis software engineer walks you through the complete process step by step:
Otherwise, follow along as we kickstart this NodeJS Web3 tutorial by showing you how to clone the project to your local directory in the next section!
Cloning the Project
In order to make this tutorial as straightforward as possible, we will be using an already pre-made project. Furthermore, we’ll focus on the main functionality of how to get any token price. Consequently, in this initial section, we are going to show you how to set up the project. Meanwhile, the following section provides a breakdown of the code!
To begin with, open your integrated development environment (IDE) and create a new NodeJS project folder. Next, visit the GitHub repository down below and clone the project to your local directory:
Complete Documentation to Get Any Token Price – https://github.com/MoralisWeb3/youtube-tutorials/tree/main/get-any-token-price
From there, with a copy of the project on your local device, you need to add your Moralis API key as an environment variable. To do so, create a ”.env” file in the project’s root folder and add the following variable at the top:
NEXT_PUBLIC_MORALIS_API_KEY = ”replace_me”
What’s more, as you might already have figured, you must replace ”replace_me” with your actual Moralis API key. To get ahold of your key, you need a Moralis account. As such, if you have not already, sign up with Moralis. From there, you will be able to find your key by logging in and navigating to the ”Web3 APIs” tab:

Now that you have added your Moralis key as a variable, the last step is to install the required dependencies. There are a few, and you can get them all by opening a new terminal and running the following command:
npm i moralis @moralisweb3/common-evm-utils
Code Breakdown
After setting up the project by adding your Moralis API key and installing the dependencies, you can launch the application. However, before doing so, let us break down the essential part of the code handling the logic used to get any token price. The central function is called ”handleSubmit()” and can be found in the ”main.js” file:
const handleSubmit = async () => {
  address = document.querySelector("#contractAddress").value;
  const chain = EvmChain.ETHEREUM;

  await Moralis.start({
    apiKey: process.env.NEXT_PUBLIC_MORALIS_API_KEY,
  });

  const response = await Moralis.EvmApi.token.getTokenPrice({
    address,
    chain,
  });

  setResult(`$ ${response.toJSON().usdPrice}`);
  setShowResult(true);
  setChainValue("");
  document.querySelector("#contractAddress").value = "";
};
The function is relatively straightforward. However, let us break it down to get a more profound understanding of what is going on!
To begin with, on the initial two lines within the function’s curly brackets, we specify the ”address” and ”chain” variables. The address and chain values are fetched from the input fields of the app’s UI. From there, we call the ”Moralis.start()” function passing the API key from the ”.env” file as an argument to initialize Moralis.
Next up, we get to the central part of this function. There, an API call is made to Moralis’ ”getTokenPrice” endpoint, passing the ”address” and ”chain” variables as arguments. The return value is stored in the ”response” object. As a result, this object now contains a bunch of data, including the token price in USD.
Lastly, to top things off, the code console logs the USD price from the ”response” object. Also, it clears the input fields of the app’s UI.
That covers the main logic used to get any token price. Other than that, the remainder of the code is responsible for the required imports and the various UI elements. As such, if you want a more detailed breakdown of these, make sure to watch the video from the ”How to Get Any Token Price” section!
Now, all that remains is for you to test the application and apply your new skills in future development endeavors!
Summary – How to Get Any Token Price
This article taught you how to create an application allowing users to get the USD price of any token. Further, they could do so by inputting an address, selecting a network, and hitting a button. In doing so, you learned how Moralis’ Token API works and how to use it to call the ”getTokenPrice” endpoint. In fact, thanks to the accessibility of Moralis, you were able to get any token price through a single API call to this endpoint:
const response = await Moralis.EvmApi.token.getTokenPrice({
      address,
});
If you found this tutorial helpful, we have recommendations for similar articles that you might find interesting. For example, learn how to get wallets native crypto balance or get token metadata in no time! What’s more, if you are serious about becoming a blockchain developer, check the other Web3 APIs Moralis offers. The Web3 Streams API is an excellent example. This tool allows you to stream any on-chain data into the backend of your projects via Web3 webhooks.
As such, if you want to access these enterprise-grade development tools, sign up with Moralis now. You can create an account for free and immediately leverage the full potential of blockchain technology!