Odds are you know that Ethereum’s programmable blockchain is the leader regarding decentralized applications (dApps) and token development. However, with its current proof-of-work (PoW) validation solution and congestion, you also know that Ethereum comes with high gas fees. As such, developers are finding other chains for token development, with Binance Smart Chain gaining the most attention. Moreover, programmers find BEP20 token development a great option as their tokens attract more users since transaction fees with BEP20 tokens are more reasonable. However, while some view BEP20 token development as challenging, the proper tools allow anyone to develop BEP20 tokens with ease. As such, follow along as we show you how Moralis and its ultimate Web3 development platform make BEP20 token development feel like a breeze.
By creating your free Moralis account, you’ll be able to follow along in our step-by-step guide and create your BEP20 token in minutes. However, before we dive into our tutorial by creating an example project, we need to cover the basics regarding BEP20 tokens, including the BEP20 and BEP2 standards and the difference between Binance Smart Chain and Binance Chain.
Basics of BEP20 Token Development
Despite the fact that BSC is popular and used by many other Web3 projects, it is still not something that everyone knows about. However, most in the crypto realm will be familiar with the Binance exchange. Beyond this, Binance is behind the Binance Smart Chain, which underpins all BEP20 token development possible in the first place. As such, let us take a look at BSC and Binance Smart Chain development.
Binance Chain or Binance Smart Chain (BSC)?
As the word “Binance” in “Binance Smart Chain” indicates, the team behind Binance’s leading exchange is who we have to thank since they brought this useful chain to life. Now, the chain may not be as decentralized as we’d like. However, according to the blockchain trilemma, by sacrificing decentralization, you can thus improve security and scalability. That is literally what the developers behind BSC were going after when they forked Ethereum’s blockchain and created BSC in 2020.
Moreover, you should know that Binance Chain and Binance Smart Chain are not one and the same. The former is the original chain created by Binance, designed with a complete focus on storing exchange transactions. As such, it wasn’t able to host smart contracts and all complex transactions on that particular blockchain. Thus, developers came up with a solution and created a new chain – Binance Smart Chain.
Furthermore, also keep in mind that both chains now run parallel with each other, each serving its primary purpose – Binance Chain facilitating trading while BSC handles smart contract development. In addition, Binance’s ecosystem uses something known as “dual-chain” architecture. The latter enables seamless transfers among the two chains. Thus, allocating funds from Binance Chain to BSC and vice versa is an effortless and smooth process. Moreover, the two chains share the same native token, which is BNB.
If you now consider the fact that BEP20 token development requires using a smart contract, you understand that we’ll be using BSC for our example project.
What are BEP20 Tokens?
If you’re familiar with ERC20 tokens, you’ll have no problem understanding what BEP20 tokens are. BEP20 is BSC’s version of ERC20 on Ethereum but with a few minor differences, and since BSC is a fork of Ethereum, it basically offers the same functionalities. Furthermore, BEP20 is the standard for fungible tokens on BSC, and it regulates tokens, including the assurance that tokens are tradeable, that an initial amount can be set, etc.
In addition, keep in mind that while BEP20 is the token standard for BSC, BEP2 is the token standard for Binance Chain. Moreover, there’s also the BEP721 standard for NFTs on BSC, which follows Ethereum’s ERC721 standard. Remember, the easiest method for NFT programming is by using Moralis’ plug-and-play NFT API.
Furthermore, here are some well-known BEP20 tokens:
- BUSD
- CAKE
- ALPHA
- SAFEMOON
- SXP
- WBNB
- BUX
- BURGER
BEP20 Token Development Using Moralis
We’ll dive into BEP20 token development using Moralis, as it offers the simplest and quickest way to create and deploy tokens on BSC. To follow along, make sure to log in to your Moralis account. In case you don’t have an account yet, take the time to register your free account now.
Moreover, keep in mind that there are other ways in which you can develop a BEP20 token; however, we’ll focus on the quickest and simplest way. As such, other than Moralis, we’ll be using various tools such as MetaMask, Remix, and OpenZeppelin.

BEP20 Token Development Preparations
Now that your Moralis account is ready, we can continue with the initial setup process and necessary steps to make our BEP20 token development possible. These steps include getting a MetaMask account and connecting it to BSC’s network, which will entail acquiring a BSC node – which Moralis makes easy, with Moralis being an Infura for BSC. Fortunately, Moralis Speedy Nodes simplifies things considerably, and it’s essentially the best way to connect to BSC nodes.
BSC Mainnet vs Testnet
Before we take a look at the exact steps required to connect to a BEP20 node, we have to inform you about BSC’s testnet. As you probably already know, all blockchain networks basically have a mainnet and various testnets, and BSC is no exception. The great thing about testnets is that they enable you to test your smart contracts and dApps without spending real funds. As such, we always recommend starting with BEP20 token development on BSC’s testnet (this is what we’ll focus on herein). Moreover, keep in mind that the actual steps are essentially the same when you use BSC’s mainnet.
The only key difference is that BEP20 token development on the BEP20 testnet includes using a BNB coin faucet, which provides free BNB coins. However, BEP20 development on the mainnet requires you to obtain real BNB coins, which you can get on any centralized exchange (CEX).
Obtaining MetaMask
We’ll use this popular crypto wallet to upload your new BSC tokens and also to access them upon launch. Obtaining MetaMask is straightforward, and the wallet is free and available for download from https://metamask.io. First, download the MetaMask browser add-on and then complete the installation. Also, make sure to store your recovery words somewhere safe.
Connecting to a BEP20 Node
As part of our preparations for BEP20 token development, we need to connect to a testnet node. Since we’ll be creating our BEP20 token on BSC’s testnet, we need to acquire a testnet node for Binance Smart Chain. Here are the required steps to acquire a testnet node:
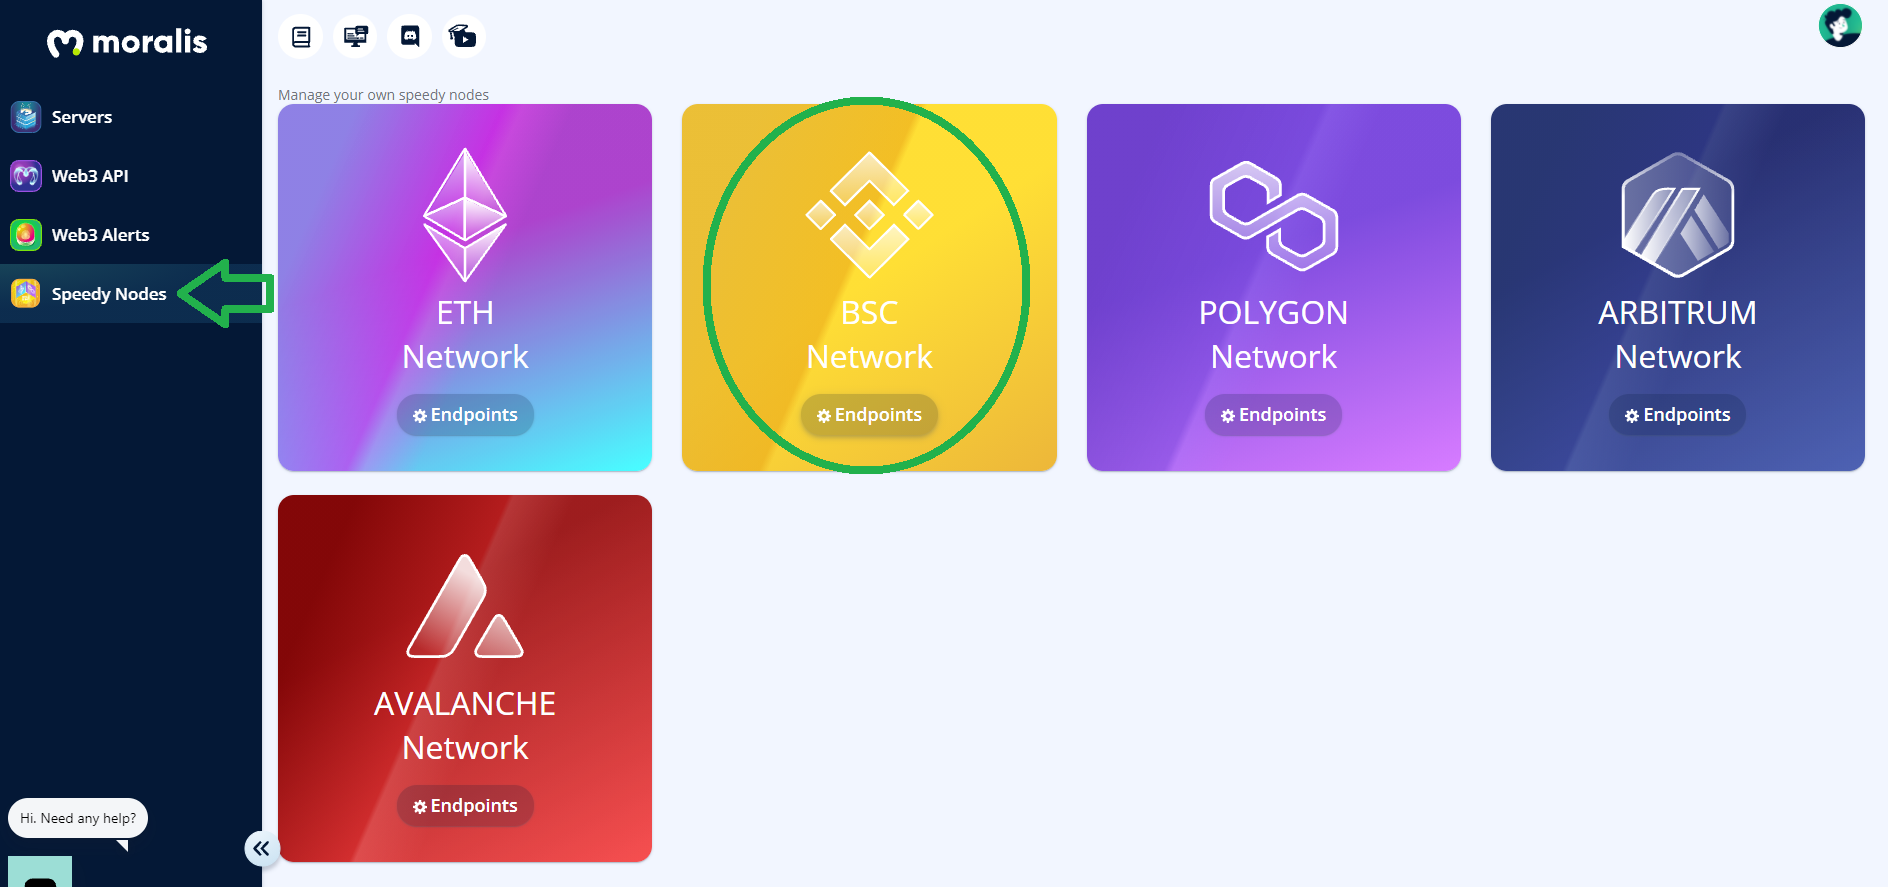
- Log in to your Moralis account to access your Moralis admin panel.
- Click the “Speedy Nodes” tab in the menu on the left-hand side. This will provide you with several network options (as shown in the image below).
- Since we are about to take on BEP20 token development, you need to select BSC’s network. You do this by clicking the “Endpoints” button under the “BSC Network”. This will open a pop-up window containing several URLs, which represent nodes.
- As we’re looking at testnet BEP20 token development, click the “Add to MetaMask” button next to “Testnet”:
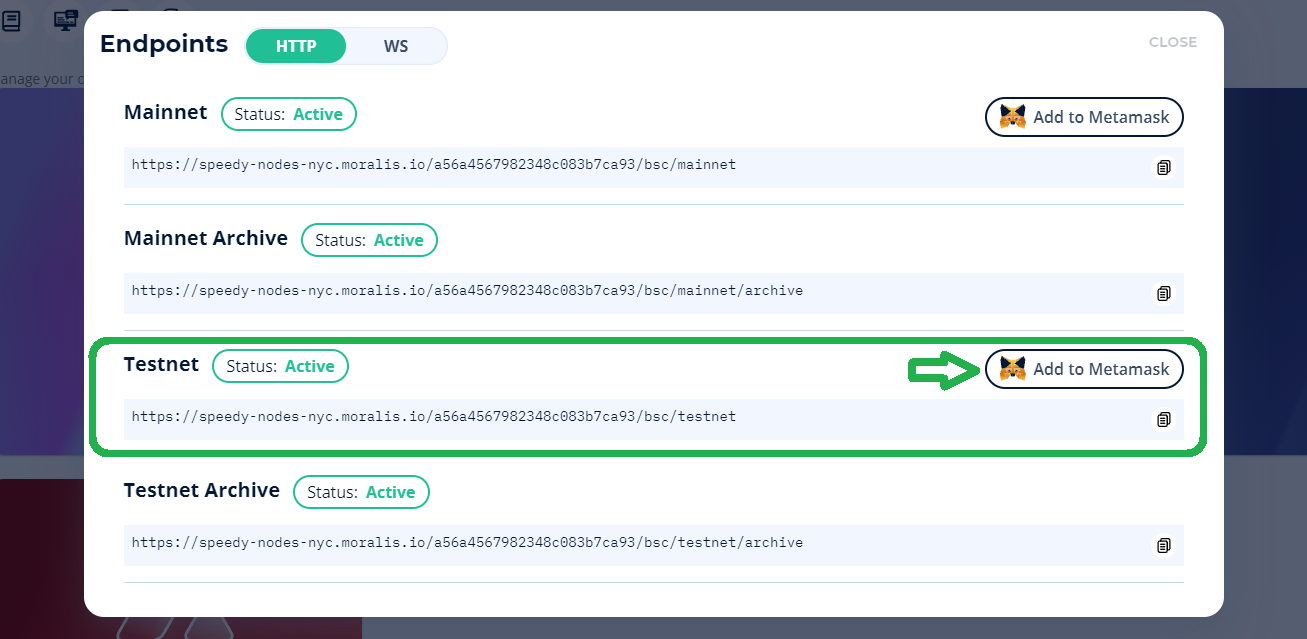
In case you’re working with WebSocket (WS), the “Add to MetaMask” button won’t be displayed. This means that you’ll have to do that part manually. Instructions on how to accomplish this are available further down.
How to Change MetaMask Network
Moralis also offers WebSocket support for all Moralis Speedy Nodes, including BSC nodes. If you’re working with WebSocket, you’ll need to add BSC’s testnet network to MetaMask and switch to it manually.
To change networks, you need to click the ”Networks” tab at the top of the interface. A drop-down menu with various alternatives will appear (the exact options will depend on whether you’ve added other networks before or not). Then select the ”Custom RPC” option:
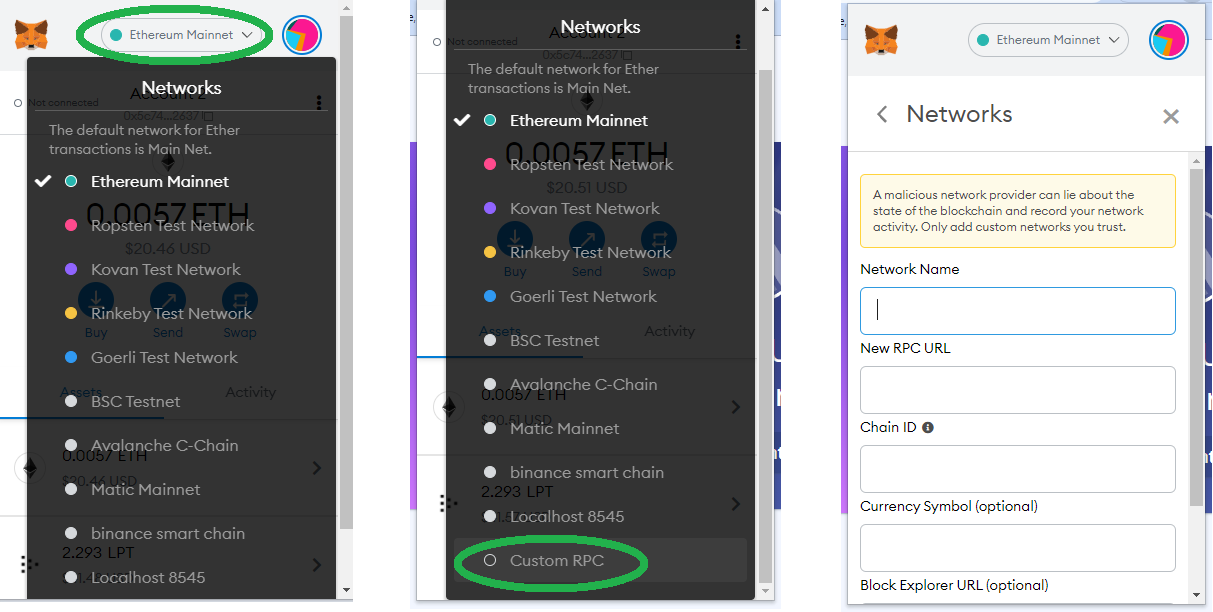
Once a new window opens, you need to add the following information:
- Network Name: BSC Testnet
- New RPC URL: ”Input Moralis Speedy Node URL”
- Chain ID: 97
- Currency Symbol: BNB
- Block Explorer URL: https://testnet.bscscan.com
Complete the process by simply clicking ”Save”. You’ve now successfully added BSC’s testnet network to your MetaMask. All that remains is to select ”BSC Testnet” via the “Networks” tab.
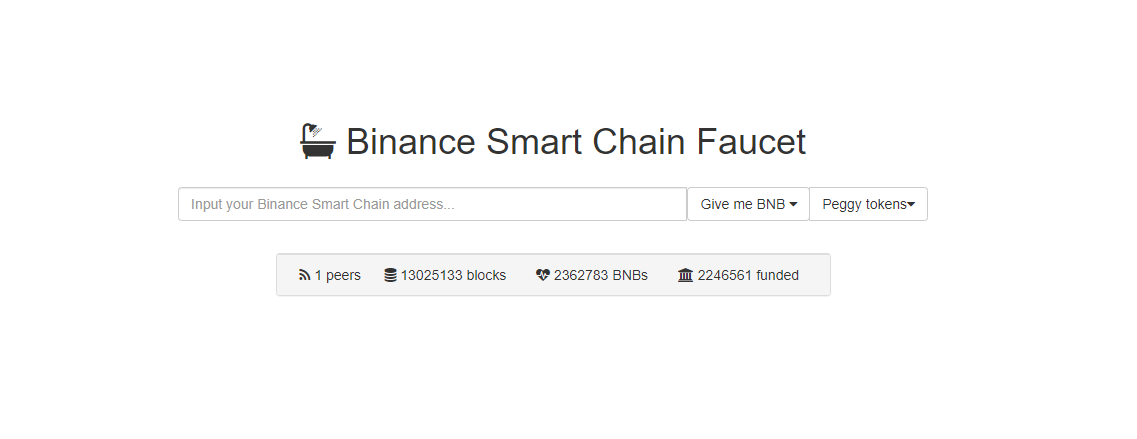
Getting BNB to Fuel Transactions
If we were using BSC’s mainnet, we’d need to get real BNB coins. However, since we’re using the testnet, we can use free BNB. To obtain these “play” funds, visit https://testnet.binance.org/faucet-smart. Once you’re on the website, enter your MetaMask wallet address (click the “account” option at the top of the MetaMask interface to copy the address) into the input field. Complete the process by clicking the “Give me BNB” button.
BEP20 Token Development – Token Creation
By completing the simple tasks above, we have everything set in place to take on the actual token creation process. Fortunately, there are additional shortcuts available. As you know by now, BEP20 tokens follow the same principles as the ERC20 standard; thus, the same tools may be used in BEP20 token development. Moreover, there are code templates available online for both ERC20 and BEP20 tokens. Using these, we don’t have to create anything from scratch, but we can simply apply a couple of simple tweaks to the existing and tested code. Here are the tools we’ll use to complete BEP20 token development:
- Solidity – We’ll use Solidity (an Ethereum programming language) to code our smart contract in order to use an existing ERC20 smart contract template.
- Remix – We’ll use an online development environment called Remix.
- OpenZeppelin – We’ll use OpenZeppelin to get a code template that will require minimal tweaking.

Overview of the Steps to Create and Launch BEP20 Tokens
- Create a Contract File with Remix – Once on Remix’s official website, you’ll have access to this app’s default workspace on the left-hand side of the interface. Just left-click on the “contracts” folder and select “New File”. You can name the file whatever you prefer.
- Use a Token Template Provided by OpenZeppelin – We’ll use a tested ERC20 smart contract template from OpenZeppelin.
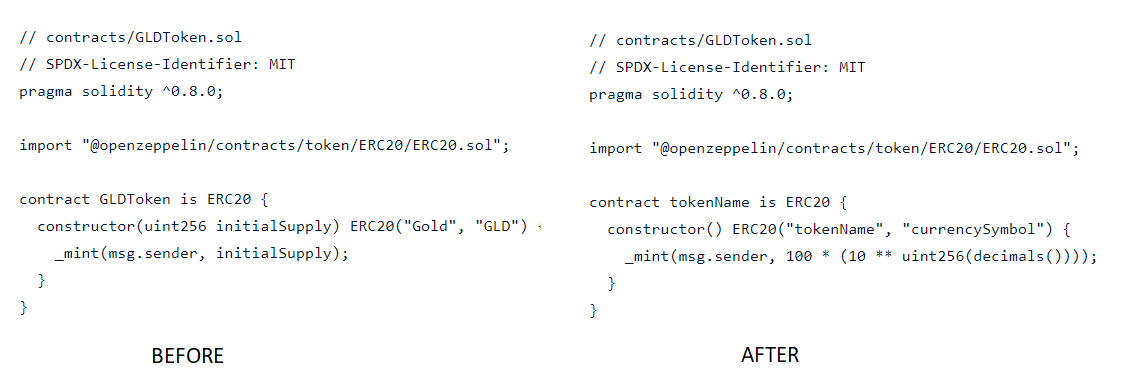
- Code the Smart Contract – We need to make the necessary changes to the template code. This includes the following:
- Changing the current token name (“GLDToken”) to whatever you want.
- Removing ”uint256 initialSupply” from the first constructor (located within the curly braces).
- Changing the current currency symbol (ticker “GLD”) and the name (“Gold”) to whatever you want.
- Within the ”_mint()” function, you can remove ”initialSupply” and replace it with the number of the initial supply you want; however, you can’t simply type the number. As an example, you could type: “100 * (10 ** uint256(decimals())))” which means that 100 tokens will be minted once the contract is deployed.
Here are the before (template) and after (changes applied) code examples:
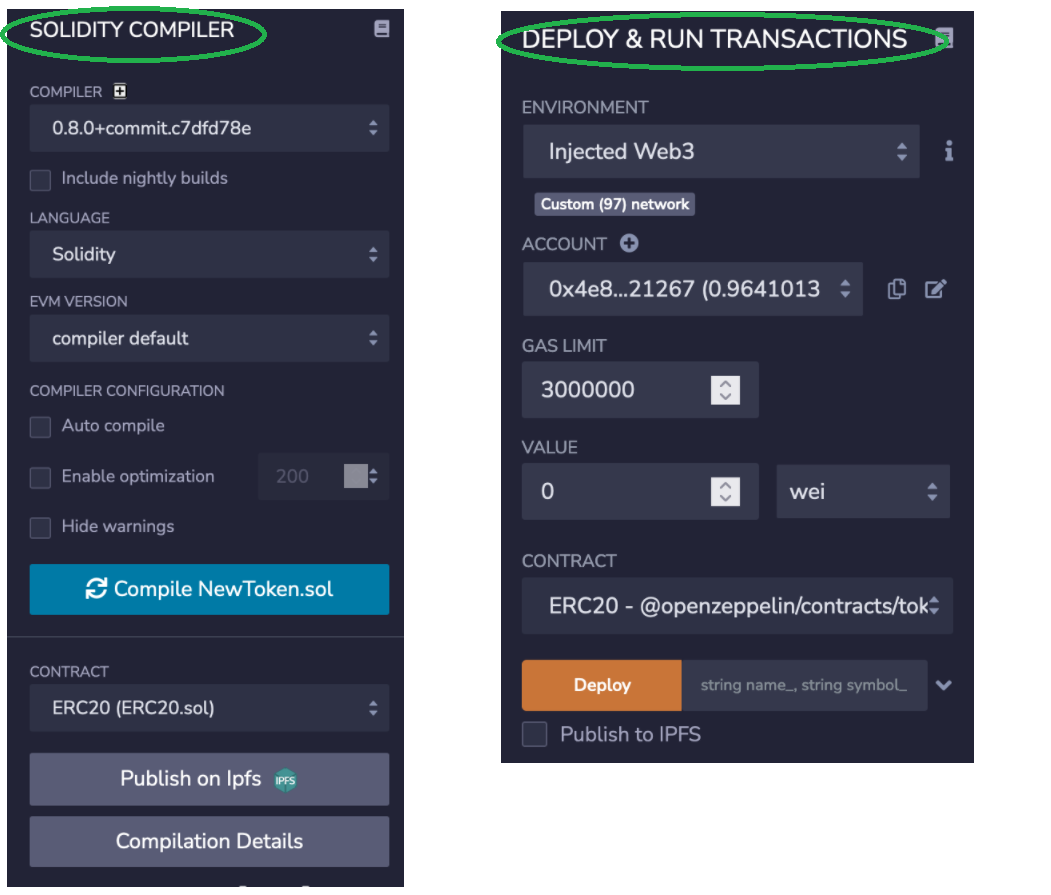
- Compile and Deploy the Contract – Navigate to the “Solidity Compiler” tab in the top navigation bar in Remix. Then select the proper compiler version (matching the pragma line in the code above) and select the valid file. Complete this step by clicking the “Compile” button. Now, go to the “Deploy & Run Transactions” tab, select the ”Injected Web3” environment, and make sure that your MetaMask is set to the correct network.
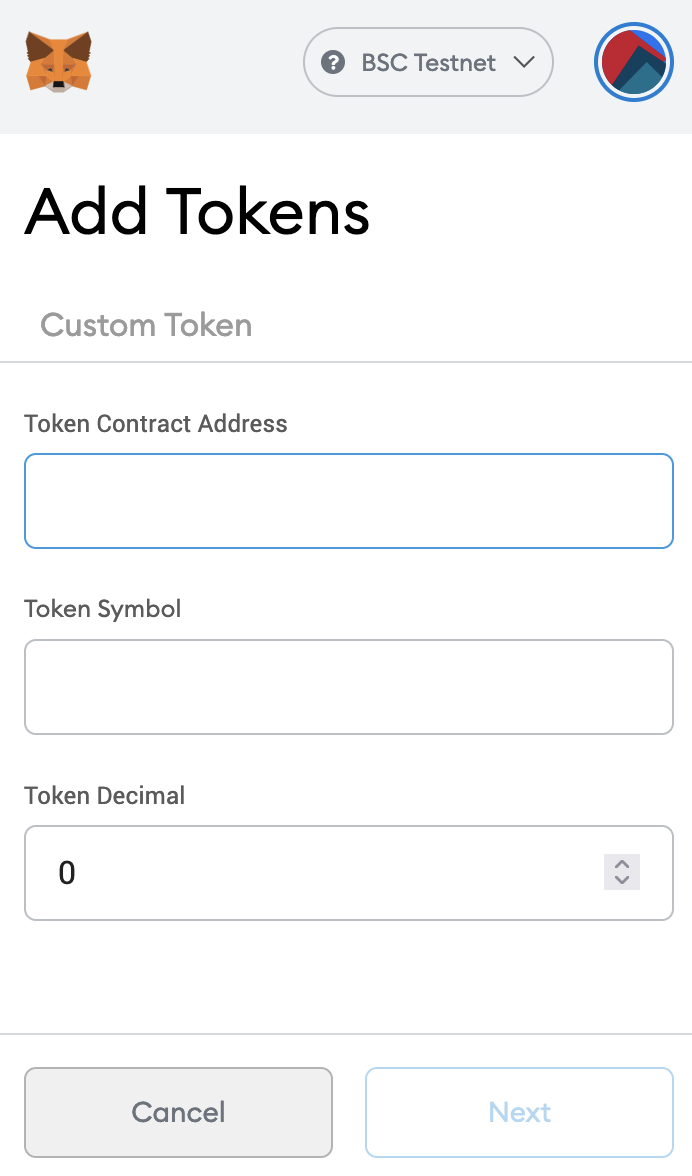
- View the Token in MetaMask – Click the “Assets” tab and then “Add Token”. There, add the details for your token (the address). You get the latter from BscScan (testnet), which you can access directly from MetaMask by clicking the “Activity” tab, clicking on the latest transaction, and then on the small arrow at the top-right.
BEP20 Token Development – Detailed Video Instructions
In addition to the instructions presented above, we recommend watching our video where one of Moralis’ experts takes you step-by-step through the process. By looking over his shoulder, you’ll be able to accomplish all the coding steps easily. Moreover, if you’ve already completed the steps in the BEP20 token development preparations section above, feel free to skip ahead to the 5:00 timestamp in the video.
BEP20 Token Development – Summary
We’ve covered a lot of ground in today’s “BEP20 Token Development” article. At this point, you know that BEP20 tokens are fungible tokens on Binance Smart Chain following the BEP20 standard, which in turn follows the ERC20 standard on Ethereum. You’ve also learned about the BEP2 standard, which applies to Binance Chain. Moreover, you now know that BEP20 token development becomes a straightforward process when using the proper tools. As such, even basic programming skills are enough to create and deploy your BEP20 tokens in minutes. Also, by using Moralis Speedy Nodes, you avoid the complicated node setup process. Finally, you’ve been presented with the five steps you need to complete to create BEP20 tokens:
- Make simple preparations.
- Create a Remix contract file.
- Import an OpenZeppelin template.
- Code the contract (make simple tweaks to the template code).
- Compile and deploy the contract.
If using Moralis for BEP20 token development seems impressive, this only starts to scratch the surface of what Moralis has to offer. Its impressive Web3 SDK includes a full scope of APIs (such as the best API for minting NFTs), native support for IPFS, one of the best documentation in the industry, and much more. As such, when using Moralis, Web3 development on Ethereum, Binance, Polygon, and other reputable chains becomes all about the frontend. Moreover, on Moralis’ blog and Moralis’ YouTube channel, we produce useful content explaining various aspects of blockchain development and take on example projects to help you level up your Web3 development skills. So, make sure to stay tuned and start taking on various Web3 projects today!
