Ethereum’s blockchain is one of the main focus areas for today’s dApp developers. However, many other reputable solutions, such as Polygon, Solana, Cardano, Avalanche, etc., are catching a lot of attention. This has created a more equally distributed use of the various chains both from developers and users. With these chains having their own mainnet and testnet(s), your Web3 applications should incorporate specific functionalities for these networks, one of them being network tracking. As such, we’re going to look at how we can program network tracking and identify which network is currently active. Thus, your dApp will be able to function properly according to the chain in question or at least notify users if a specific chain isn’t supported. In addition, since most users in the blockchain and crypto realm use MetaMask, we’ll explore the power of this digital wallet to perform network identification.
Many dApps require chain-specific code to run smoothly and correctly. As such, it’s crucial to be able to identify which network is active on MetaMask. Fortunately, we can accomplish this quickly and easily when using Moralis, the ultimate Web3 development platform. Moralis is designed to make blockchain development a breeze and make your development process markedly quicker. Furthermore, the platform gives frontend developers a chance to devote their resources to creating high-quality user experiences instead of wasting precious time and money. If this is the first time you’ve heard about Moralis, we recommend watching the linked video that explains what Moralis is in more detail.
In the following sections, you will learn how to create a simple “listener” event that will identify which network is active on MetaMask. However, before we take on an example project that will teach you how to perform network identification and basic network tracking, let’s cover some basics.
What is MetaMask?
MetaMask is one of the most well-established and popular cryptocurrency wallets on the market. In fact, MetaMask already serves over one million users all over the globe. As such, it is a great way to get started in the crypto industry. Its compatibility with decentralized exchanges (DEXs) makes it also popular among users looking to steer away from centralized authorities.
Aside from being a crypto wallet, MetaMask connects to a wide range of blockchains, both mainnets, and testnets. As such, this allows users to access multiple ecosystems via multiple networks. With this functionality, this popular wallet may also be used to authenticate Web3 users. If you’re interested in learning more details about MetaMask, make sure to check out the following article from the Moralis blog: “MetaMask Explained – What is MetaMask?”.
How to Identify Which Network is Active on MetaMask? – Example Project
In case you’ve been following guides on Moralis’ blog, you know that we believe in learning by taking on simple example projects, and we will follow this practice herein as well. In order to best show you how to identify which network is active on MetaMask, we will create a simple dApp using some HTML and JavaScript coding. Moreover, the blockchain-related backend will be fully covered by Moralis; we only need to connect to our Moralis server and insert a few snippets of code to establish a proper connection.
Furthermore, before we can identify which network is active on MetaMask, a user must have MetaMask installed. As such, we also need to be prepared for scenarios where users don’t have MetaMask installed yet. Therefore, we should program our network identification part of our dApp so that it’ll first check if it finds MetaMask. If MetaMask is installed, it should proceed with network identification and return a message displaying the name of that network. However, if it doesn’t find MetaMask, we want the dApp to return a message instructing the user to install MetaMask to continue.
While this may sound like a lot of work, you’ll see that with the use of Moralis’ Web3 SDK, we’ll have it done in no time and with minimum effort.
Setting Up Moralis and Other Tools for Network Identification
For the purpose of this example, we’ll be using Visual Studio Code (VSC), MetaMask’s browser extension, and, of course, Moralis. If you need help with obtaining and setting up the first two tools, please check out our “Ethereum Development for Beginners” guide. As far as the Moralis setup goes, we’ll cover that in the step-by-step instructions below.
How to Set Up Moralis for Network Identification
- Create Your Moralis Account – In case you do not have a Moralis account yet, make sure to create one. It’s completely free. Simply follow the link (or click here), enter your email address, and set up your password. Then finalize your Moralis account creation by confirming your email address (you’ll receive an email with a confirmation link). If you already have an active Moralis account, just log in.
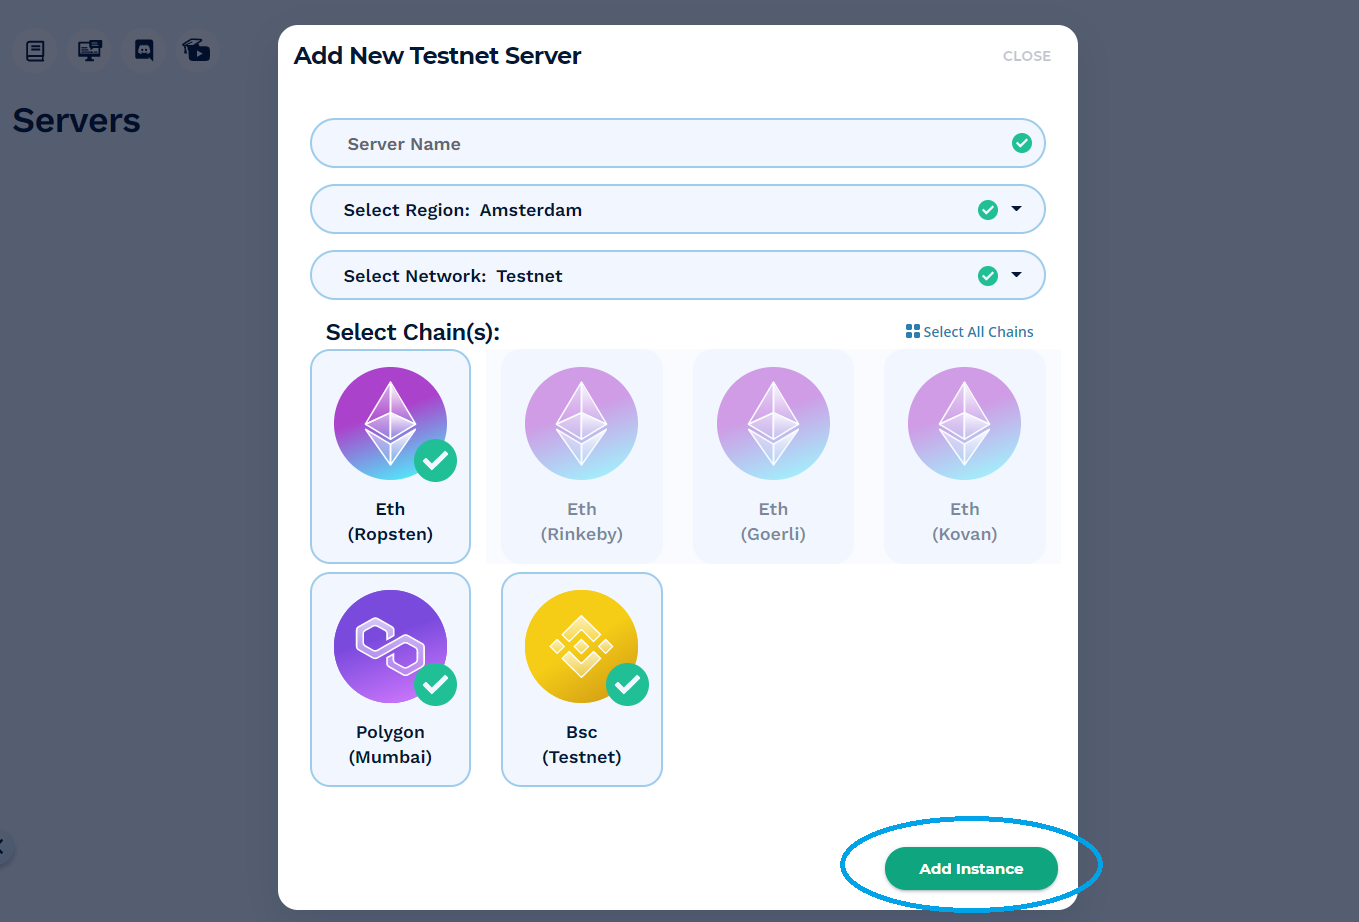
- Create a New Server – Once inside your new Moralis account, you’ll want to create a new server. You do this by clicking the “+ Create a new Server” button in the top-right corner. Following this, you click one of the options from the drop-down menu that will appear (see the image below).

Then enter all the required details. This includes server name (it can be anything you want), region, network, chain(s), and click the “Add instance” button.
- Access Server Details – Once you create your server, you’ll need to obtain some of its details (to use inside our “.js” file. To access the server details, click the “View Details” button next to your server name. Next, a pop-up window will appear containing all of the details. If you’ve used Moralis before, you may already have a server or two set up. In that case, you may use any of those servers.
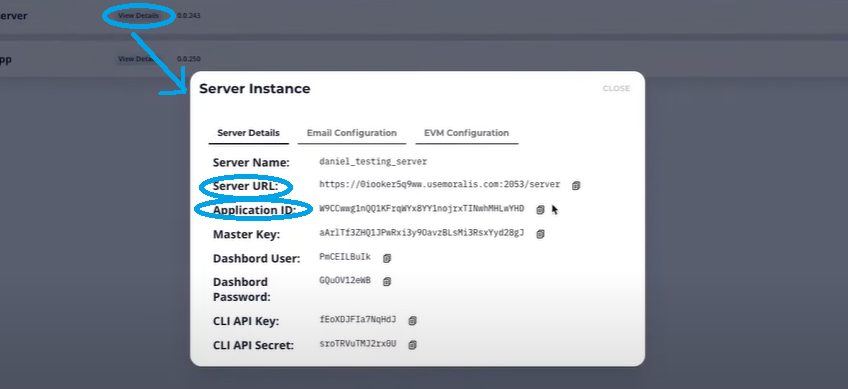
- Initialize Moralis – By populating the “.js” file with the Moralis-related details, we obtain the required backend functionality. For our example, we will be using the “logic.js” file, where we will do all JavaScript coding. At the top of that file, we insert the application ID and server URL obtained in the previous step:

Note: Make sure you use your server’s details and not copy the details from our example.
Programming to Identify Which Network is Active on MetaMask
In this part, we’ll show you how to identify which network is active on MetaMask. As such, we’ll stick to basic HTML and JavaScript (JS) programming. We’ll use the “index.html” and “logic.js” files, which we will edit inside Visual Studio Code. Moreover, we’ll mainly focus on JavaScript since this is where all the logic comes from. The HTML part is basically just a framework that will enable us to display our dApp in a browser.
Here is the HTML code we use in our example:
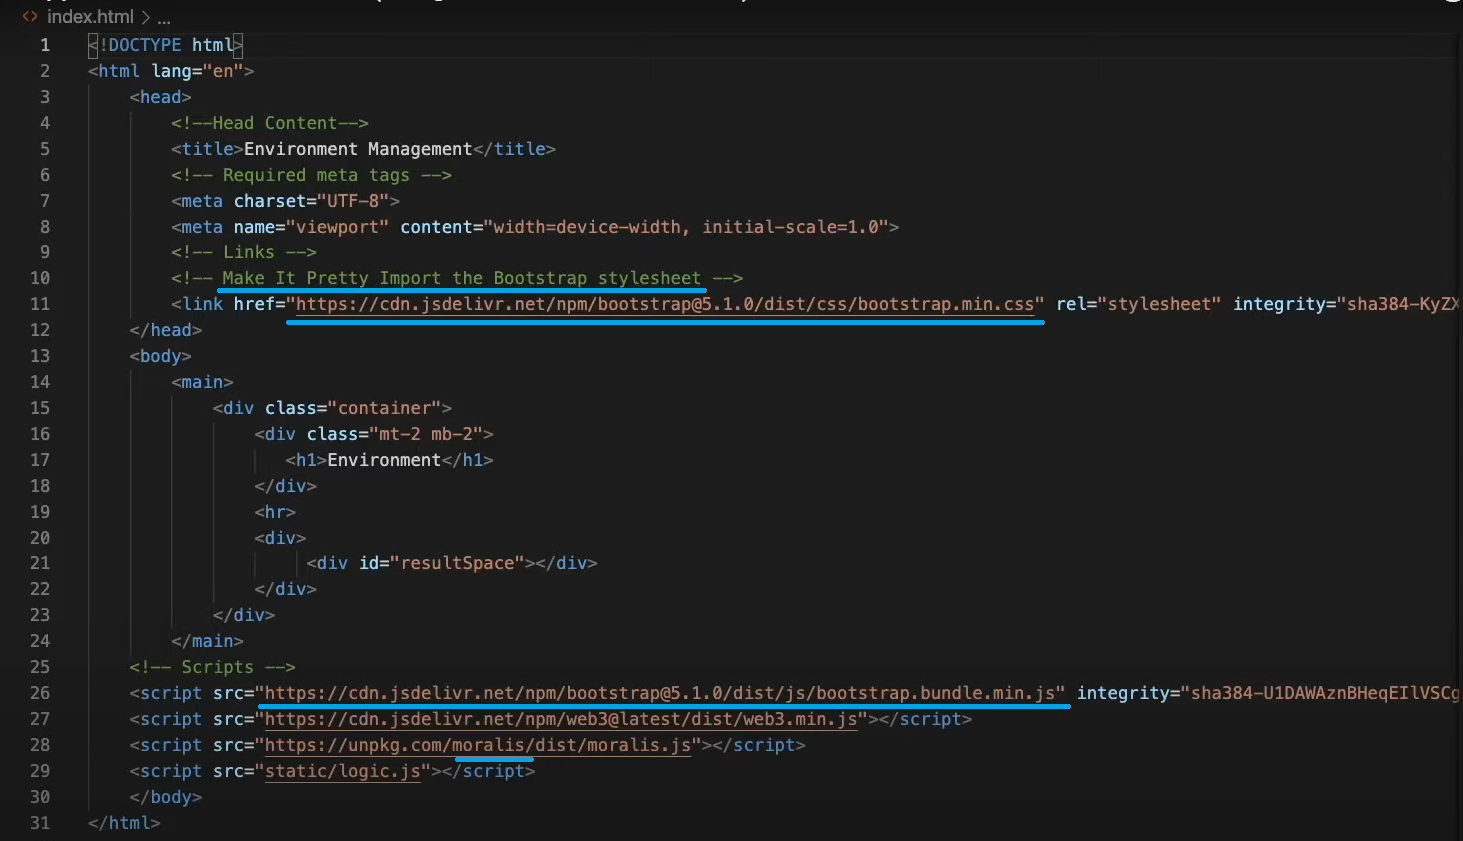
Note: You can access the complete code used for our example in GitHub.
As you can see, the code is straightforward. To help us out with style, we use Bootstrap (this is completely optional). The scripts are an important part of our code, where we import “moralis.js” and “logic.js”.
Using the “Terminal > New Terminal” option from the Visual Studio Code’s top menu bar, we create a new working folder and the “logic.js” file. Yes, this is the file that we use to insert your Moralis server details in, as described in the previous section (step 4). Next, we add the code that will take care of the messages we want our dApp to display to users. For that purpose, we create the “displayMessage” function:
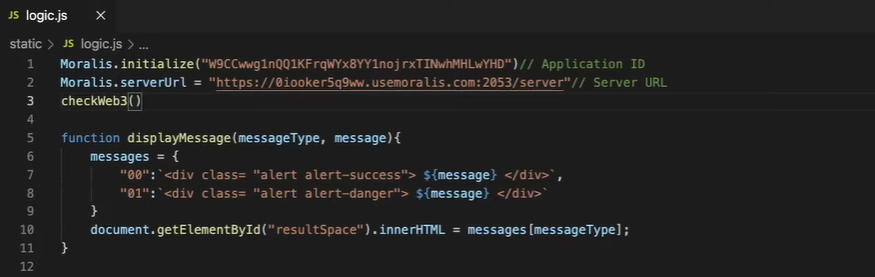
For our network tracking goals, we created two message instances. One for displaying the name of the network after we successfully identify which network is active on MetaMask (“alert alert-success”), and the second message is there in case a user doesn’t have MetaMask installed (“alert alert-danger”). Furthermore, we implement a part that will ensure the message is shown by our HTML code. For that we use the “document.getElementById.innerHTML” snippet of code.
Network Tracking – Checking MetaMask Installation Status
Since we plan on using MetaMask for the purpose of network identification, we must first ensure that a user interested in using our dApp has this useful tool installed. As such, we need to create a function that will serve as the logic, checking whether or not MetaMask is installed, and act accordingly. If MetaMask is installed, the network tracking portion of our dApp will automatically proceed to network identification, which we’ll set in place in the next section. However, if MetaMask is not installed, we want our Web3 application to instruct the user to install MetaMask. We achieve the latter by ensuring that our decentralized application displays the proper message.
Here is the code we use for the purpose of checking if MetaMask is already there:

Looking at the code above, you can see that a simple “if” statement is enough. It displays the “This App Requires MetaMask, Please Install MetaMask” message if it doesn’t detect MetaMask. If MetaMask is already installed, the “MetaMask is Installed” message will be displayed. The following image shows how our dApp works if the above code executes without MetaMask:

Now we’re done regarding the instances when MetaMask is not installed. However, if you remember, we want our dApp to automatically move on to network identification when MetaMask is installed. Specifically, this is instead of showing the “MetaMask is Installed” message. As such, we need to further work on our code.
Network Identification – Identify Which Network is Active on MetaMask
As explained above, network identification takes part after confirming MetaMask’s installation. As such, we change necessary lines of code under the “else” statement of the “checkWeb3()” function. Essentially, we convert the “displayMessage” into a comment and add “setWeb3Environment()”:

Then we define the “setWeb3Environment()” function outside of the “if” statement. Within it, we use “getNetwork()” to identify which network is active on MetaMask and the “monitorNetwork()” function, which will detect if users switch to another network within their MetaMask:

Moreover, you can see that we use the “web3” object inside the function shown above. This means we need to define it. We do this by adding this snippet of code to the top of our “logic.js” file:

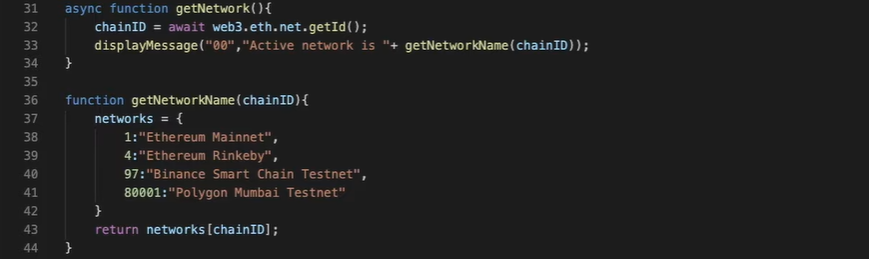
Furthermore, we need to add lines of code to ensure that the “getNetwork()” and “monitorNetwork()” functions do what we want them to do. For the “getNetwork()” function, we need to define the chains’ IDs. In addition, we want to ensure that a proper message displays after we identify which network is active. Here’s the lines of code covering that part of network identification:
As far as the “monitorNetwork()” function goes, we rely on Moralis to provide us with the network tracking functionality. Essentially, we want Moralis to signal our dApp when users change to another network. These are the lines of code covering this aspect:

With that, our dApp is able to cover both scenarios. If MetaMask is not installed yet and if MetaMask is already installed. Moreover, it returns a message after all components of our code identify which network is active on MetaMask. Since we defined (within the “getNetworkName” function) “Ethereum Mainnet”, “Ethereum Rinkeby”, “Binance Smart Chain Testnet”, and “Polygon Mumbai Testnet”, the dApp is able to identify these chains. You can see this in the following images:


How to Identify Which Network is Active on MetaMask? – Summary
At this point, you know that every blockchain network may have some specific code requirements. As such, it’s important to be able to perform network identification so that your Web3 application can respond properly. Fortunately, there are powerful tools available that make network identification an easy and straightforward process. When combining the power of MetaMask and Moralis, you can program dApps to identify which network is active on MetaMask with fewer than forty lines of code, which is exactly what we showcase above.
We hope you’ve followed along and thus learned how to set basic network tracking in place. In case you prefer watching videos over reading, we suggest checking out our “Network Tracking for your dApp with a few lines of code (using Moralis Web3 Functions)” video.
Moreover, we also encourage you to subscribe to Moralis’ YouTube channel, where you can find a ton of valuable content. We constantly upload new videos in which we either explain certain aspects of blockchain development or take on simple example projects. As such, you will learn to make the most out of your JavaScript skills in combination with Moralis. Whether you want to learn how to build a crypto wallet, create your own ERC-20 tokens, or create your own NFT, Moralis has your back.
Furthermore, in case you are eager to take your blockchain development to the next level and start deploying multiple Web3 apps fast, we advise you to dive deep into Moralis’ documentation. It is one of the neatest and well-organized documentation in the industry, created to make the use of Moralis’ SDK even easier.