If you’ve been looking for a chain that’s interoperable with both Ethereum and Cosmos, odds are you’ve heard of Cronos. This – combined with Moralis’ recent announcement of the Moralis Cronos Web3 Gaming Metaverse Hackathon and Moralis’ rollout of Cronos support – means there’s never been easier to get started with Cronos development. As such, we’ll take this article to dive deeper into the intricacies of the Cronos blockchain and how to easily build a Cronos dapp with Moralis!
Make sure to sign up for the Moralis Cronos Gaming Metaverse Hackathon now for a chance to win from the hackathon’s total prize pool of $100,000! The hackathon’s registration deadline is August 15th!
Traditionally speaking, the biggest hurdle in blockchain development has been Web3 backend development. Web3 frontend development, on the other hand, is more akin to traditional Web2 practices. As such, those developing Web3 projects would prefer to focus on crafting a great frontend, and to leave the backend complexities to someone else. This is where Moralis comes in.
Moralis is one of the leading platforms for Web3 development. All Moralis users get access to Moralis’ powerful backend infrastructure, meaning devs won’t have to worry about their backend. Moralis provides a more seamless developer experience for all facets of Web3 development. One example is Moralis’ web3uikit, which makes user interface (UI) development more accessible. As such, with Moralis, you’ll be able to create a great dapp UI for all your future projects with ease!
So, if you’re looking to build a Cronos dapp, make sure to sign up with Moralis for free now! We’ll be using Moralis throughout this guide. Now, without further ado, let’s take a closer look at what building dapps on Cronos entails!
What is Cronos?
The Cronos network was launched in 2021, and from the start, it has been running parallel to Cronos POS Chain (formerly Crypto.org Chain) that powers Crypto.com’s “Pay” feature. Moreover, Crypto.com has been around since June 2016 and is the organization behind both aforementioned chains.
Cronos is an EVM-compatible blockchain supporting IBC or “inter-blockchain communications” networks based on the Cosmos SDK. This means that Cronos is compatible with both Cosmos-based ecosystems and Ethereum. As such, it allows for accessible porting of Ethereum dapps and smart contracts.
Cronos is fueled by “Ethermint”, which is the source of the opportunity to rapidly and easily port dapps and smart contracts from Ethereum and other EVM-compatible chains. The chain was built with IBC protocol support from its initial launch, contributing to its interoperability and efficient bridging to other IBC-enabled blockchains. Moreover, the base settlement currency of the Cronos network is “CRO”, which is the native token of Cronos POS Chain. Furthermore, CRO constitutes an essential component of both Cronos POS and the entire Cronos ecosystem.
Cronos utilizes a proof-of-stake (PoS) consensus mechanism. This means that network validators stake a part of their assets to induce good behavior while transactions are validated. The main benefit of using PoS is that it’s more scalable than other alternatives. Now, take Ethereum as an example. Ethereum applies a proof-of-work (PoW) mechanism instead of PoS, which is partly the origin of the network’s congestion issues, resulting in high Ethereum gas fees.
So, now that we have an overview of Cronos, we can move on to the central part of this article to showcase how you can build a Cronos dapp with Moralis easily!
How to Build a Cronos Dapp in 3 Steps with Moralis
For the rest of this tutorial, we’ll allocate our time to show you how to build a Cronos dapp. To illustrate just how simple the process is, we’ll create a simple dapp where users can authenticate with MetaMask and sign in. Once logged in, users can view their transaction history and available assets in their Web3 wallets. Below, you’ll see two screenshots of the final dapp illustrating what we’re working towards:
Login Component:

Dashboard:

In short, we’ll show you how to build a Cronos dapp using the following three simple steps:
- Setting Up Your Development Environment
- Building the Login Component
- Creating the Dashboard
We’ll then dissect each step to take a closer look at how to build a Cronos dapp. If you would rather watch a video explaining the process in further detail, please watch the clip below from the Moralis YouTube channel. The video – on which this tutorial is based – shows how to build a dapp on Ethereum; however, the process is essentially the same for the Cronos network – it just requires a few tweaks to make it suitable for this ecosystem.
Step 1: How to Build a Cronos Dapp – Setting Up Your Development Environment
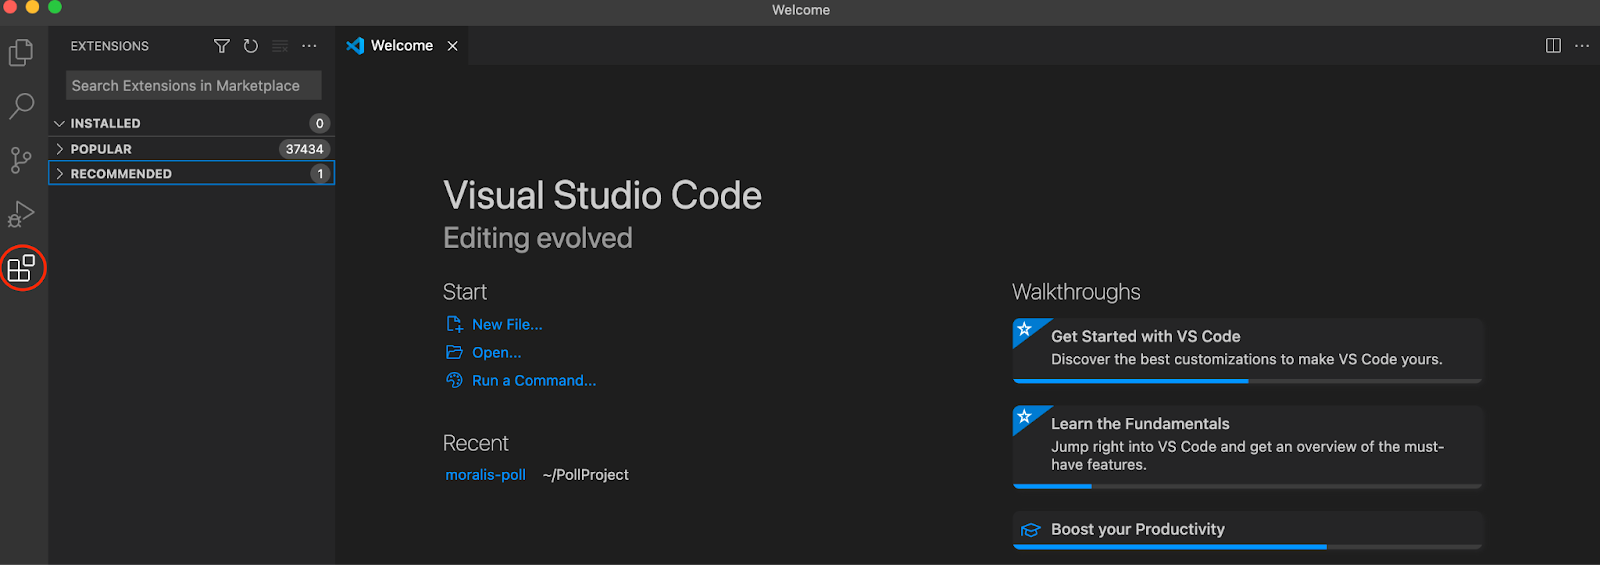
For this tutorial on how to build a Cronos dapp, we will use the IDE from (integrated development environment) VSC (Visual Studio Code). So, if you haven’t already, you need to download Visual Studio Code before moving forward. Alternatively, you also have the option to use another IDE that you might be more familiar with, but that is entirely up to you.
With the IDE at hand, we’ll add a few extensions you can install to provide a more seamless development experience. To do so, you can click on the extensions tab at the far left of the VSC interface. Once there, we recommend you install the following three extensions:
- Live Server
- ES7 React
- Solidity
Once you have installed the extensions, you should additionally download node.js, as this is necessary for installing some npm packages. Nonetheless, you can find the complete VSC setup process at the 2:17 timestamp of the video if you’d like further details on how to get going.
Nevertheless, that’s it for the initial preparations regarding the setup process of your IDE. Now, let’s explore the intricacies of acquiring a Moralis server for your dapp!
Creating a Moralis Server
If you haven’t already, you’ll need to create a Moralis account, as this will allow you to set up a server in no time. Once you have an account at your disposal, you can navigate to the Moralis admin panel and click on the “Create New Dapp” button at the left of the interface.

Once you click on this button, the page will prompt you to choose a development environment. This choice should depend on your needs and where you plan to launch your dapp. However, since this is only a tutorial, we recommend picking either the “Testnet” or “Local Dev Chain” alternative. Once you plan on launching your dapp when everything is working as intended, you should go for a mainnet server and choose the Cronos network as one of your options. Lastly, all that remains is selecting a region, naming your server, and clicking on “Create Your Dapp”.
With a server at hand, we can move on to take a closer look at how we create the login and dashboard components of the dapp!
Step 2: How to Build a Cronos Dapp – Building the Login Component
In the following two sections, we’ll allocate our time toward implementing the login and dashboard components. We’ll use templates from Bootstrap as a foundation and make a few adjustments. For clarity, we’ll divide this part into two sections – one section for each component. However, we can begin by downloading both templates from the Bootstrap webpage.
Once you navigate to “getbootstrap.com“, you’ll find the “Examples” tab at the top of the website. From there, you can locate the “Sign-in” and “Dashboard” components and proceed by downloading both of them. With these templates at hand, we can break them down individually, starting with the former.

The Login Component
Once the login component is added to our local directory, we need to make a few adjustments as the bare-bones states of these templates aren’t perfect. As such, removing unnecessary elements from the HTML code can be a good idea, or perhaps adding anything else you feel is missing. In addition, you might want to style these HTML elements using CSS to make them look more aesthetically pleasing.
In our case, the HTML file for the login component will be called “index.html”. This is where you need to add or remove HTML elements to ensure that the login component fits your needs. However, as this depends on your preferences, we won’t be diving deeper into this process. Instead, we’ll take a closer look at some of the essential components used to add functionality to the fields and buttons of the login interface. If you’d like to learn more about adding/removing HTML elements and styling your interface, you can jump to the 27:18 timestamp in the video for a full breakdown of the login component.
Once you are satisfied with how your login interface looks, you’ll quickly notice that the fields and buttons don’t actually do anything. For this reason, we need to add some JavaScript logic to make the elements interactive. As such, we’ll create a JavaScript file called “main.js”.
What’s more, an additional essential step is installing the Moralis SDK and initializing Moralis. To install the SDK, all you need to do is input the following into the ”index.html” file:
<script src="https://cdn.jsdelivr.net/npm/web3@latest/dist/web3.min.js"></script>
<script src=”https://unpkg.com/moralis/dist/moralis.js"></script>
To initialize Moralis, you can simply input the following into the ”main.js” file and add your server URL and application ID:
const serverUrl = "https://xxxxx.yourserver.com:2053/server";
const appId = "YOUR_APP_ID";
login()
In the ”main.js” file, we need to create a function that takes care of the logic for authenticating users. To make the process easier, we’ll use Moralis, allowing us to authenticate with MetaMask using only a few lines of code. As such, this is what the function might look like:
login = async () => {
    Moralis.authenticate().then(async function (user) {
        console.log(user.get(’logged in’))
        user.set(”name”, document.getElementById(’user-username’).value)
        user.set(”email”, document.getElementById(’user-email’).value)
        await user.save();
        window.location.href = ”dashboard.html”;
    })
}
Once a user clicks the ”Login” button of our dapp’s UI, this function will trigger, allowing users to authenticate themselves. When they authenticate, it will save information regarding the wallet address they used to sign the message, along with their name and email. Lastly, the function redirects the users to the dashboard page.
Step 3: How to Build a Cronos Dapp – Dashboard
The second component of our dapp is the dashboard, where users can see their transaction history and all available assets. For this, we’ll change the name of the ”index” file for the Bootstrap dashboard component to ”dashboard.html”.
Once again, this template’s bare-bones state isn’t aesthetically pleasing. Thus, we must follow the same “tidy-up” process as we did for the login component. However, as this should depend on your particular dapp and your preferences, we won’t be diving deeper into this process. Instead, if you need further help with this or simply want some inspiration, you’ll find the complete process at the 51:06 timestamp of the video.
Once you are satisfied with how the dashboard looks and have included all the elements you want to display to the users, we can add some additional logic to the “main.js” file. As you can see in the initial screenshot of our dapp’s dashboard, we have a logout button at the top right of the interface. As such, we’ll look closely at the “logout()” function.

logout()
logout = async () => {
    Moralis.User.logOut();
    window.location.href = ”index.html”;
}
The above is quite a straightforward function with a clear purpose that we can easily follow. All the function does is log out and redirect the users to the login component. Next up, we have the “getTranascations()” function, which will fetch the transaction history of a particular Web3 wallet.
getTransactions()
To acquire information regarding a user’s transaction history, we can use Moralis’ Web3 API with only a couple of lines of code. This is what the initial part of the function looks like for getting a user’s transaction history:
getTransactions = async () => {
  console.log(’get transactions clicked’);
  const options = {chain: "rinkeby", address: ”0x3d6…” };
  const transactions = await Moralis.Web3API.account.getTransactions(options);
  console.log(transactions);
}
Since we’re working with the Moralis API, fetching users’ transaction histories becomes super easy. Now, all that remains for the “getTransactions()” function is to use the acquired information and display it to the users. However, for more information on how to do so, please look closely at the 1:14:23 timestamp. From there, you can see how the data from the function is fed into the dapp and displayed in a table.

getBalances()
The following function, “getBalances()”, is used to fetch data regarding users’ balances. Once again, since we are working with Moralis, we can fetch balances easily, and it only takes a couple of lines of code:
getBalances = async () => {
  console.log(’Get balances clicked’);
  const ethBalance = await Moralis.Web3API.account.getNativeBalance();
  const ropstenBalance = await Moralis.Web3API.account.getNativeBalance({ chain: ”ropsten"});
  const rinkebyBalance = await Moralis.Web3API.account.getNativeBalance({ chain: rinkeby"});
}
As you can see from the code above, this function will fetch the balance for Ethereum, Ropsten, and Rinkeby tokens. However, you can add other networks or remove the ones you aren’t interested in. With this information, all that remains is to feed the data to your dapp using a similar process to that of the “getTransactions()” function. You can also watch the video, starting at 1:55:06, for a more detailed description of the process.
getNFTs()
The final function we’ll be taking a closer look at is “getNFTs()”. With Moralis’ NFT API, we can fetch a user’s NFT balance with only a single line of code. As such, this is what the first part of the function might look like:
getNFTs = async () => {
  console.log(’get nfts clicked);
  let nfts = await Moralis.Web3API.account.getNFTs({ chain: ’rinkeby’ });
  console.log(nfts);
}
This simple function will fetch all of the current user’s NFTs. All that remains from there is to loop through each token and fetch the metadata. However, you can look at the video to see how this is done starting at 2:04:53.
Now that’s it for this tutorial! However, even though the linked video details creating an Ethereum dapp on the Rinkeby testnet, the process doesn’t differ much when it comes to the Cronos chain. Accordingly, the fundamentals will be the same, and all you’ll need to do is change a few parameters!
If you have any further questions, please check out the video, as this provides a more detailed explanation of the entire process. For example, the video explains how to set up your local blockchain, connect the different files in the directory, and more!
How to Build a Cronos Dapp in 3 Steps – Summary
With Moralis’ recent support for the Cronos blockchain, now is the perfect time to look at how you can build a Cronos dapp. What’s more, since we’re working with Moralis, it was possible to do so in the following three steps:
- Setting Up Your Development Environment
- Building the Login Component
- Creating the Dashboard
Even though the video tutorial was about Ethereum development, the process for building Cronos dapps with Moralis remains relatively similar. As such, it’s possible to use the same processes and fundamental basics to build a Cronos dapp following the same three steps!

This illustrates the power of Moralis; however, this only scrapes the surface of the potential of working with Moralis. If you want to learn more about the operating system, please browse the Moralis blog. Here you’ll find additional exciting content to help you become a better Web3 developer.
For example, you might have an interest in Moralis’ metaverse SDK, allowing you to create sophisticated metaverse projects. If so, you can, for example, learn to build a metaverse smart contract, or even create your own metaverse!
So, if you’re looking to become a blockchain developer, sign up with Moralis right now and begin creating Web3 projects in no time! What’s more, creating an account is entirely free, making it a no-brainer to join the community. Also, don’t forget to join the Moralis Cronos Gaming Metaverse Hackathon before the registration deadline on August 15th, 2022!
