Do you know your way around Unity? If so, you are already equipped to become a Web3 developer and tackle Web3 game development. Did you know that this is all you need to also create a Web3 map game. Of course, there are several moving parts and setups involved in completing such a project. However, when you use the right tools, things are much simpler than expected. This is where Moralis, the ultimate Web3 development platform, makes a world of difference. Its Unity SDK allows you to effortlessly incorporate Web3 functionality, starting with Web3 authentication. Furthermore, thanks to Moralis’ ultimate Web3 APIs, you get to do most of the heavy lifting with single singles of code. While Unity enables you to create an attractive frontend, Moralis takes care of the blockchain-related backend. This includes handling the on-chain and off-chain data, communicating with smart contracts, and much more.
Moving forward, we will take a closer look at our Web3 map game. We will start with a quick demo of this example game so that you can decide if you want to get your hands dirty. Then, we’ll show you how to complete all the necessary setup in both Moralis and Unity. Moreover, our Web3 map game uses NFTs (non-fungible tokens) to represent the properties in our game. Thus, we’ll also show you how to deploy a smart contract to mint in-game NFTs. This is where you will learn more about Hardhat and how it simplifies the deployment of Web3 contracts. Furthermore, we will take a closer look at the main script to provide you with additional insight into how our Web3 map game works. Of course, you’ll be able to use our code, which awaits you on GitHub. So, create your free Moralis account to follow along!
Our Web3 Map Game Demo
Not all parts of our game are happening on-chain; however, we still decided that only authenticated users can play. As such, our Web3 map game starts with the following screens:

Users that want to proceed, need to click the “Authenticate” button. Next, they need to click the “Connect” button:

Then, the game displays the login QR code:
This is where users need to use their WalletConnect-compatible Web3 mobile wallets to scan the code. Moreover, they also need to confirm their Web3 login inside their mobile wallets:

Once users are logged in, they see the main menu:

And, it is the “View Map” button that will take them to the core of the game. By default our map targets Manhattan:

The green pin indicates the center point of the map. However, users can simply move the map around by click-and-drag mouse action and zoom in or out with a mouse scroll. Moreover, in the bottom-right part of the screen, there are various command buttons. If players want to add a property, they need to click the plus button:

After they click the plus button a building appears on the screen (see the image above). Then users get to pan the map to have the building hovering on top of the land where they want to place their property. They do that by clicking the “Accept” button. Of course, they can also cancel their action. On the other hand, players can also delete properties. In that case, they need to select an existing building and click the minus button:

That’s the gist of our Web3 map game. For a more detailed demonstration, check out the video at the bottom of the article.
How to Build a Web3 Map Game with Unity, Moralis, and Hardhat
If you found the above demo interesting, we invite you to roll up your sleeves and follow our lead. As mentioned in the introduction, aside from cloning our project, you also need to complete some initial setup. Hence, we will first show you how to complete the initial Moralis setup. Also, now would be a perfect time to make sure that you have the following tools ready:
- Unity
- Node JS
- MetaMask (mobile and web)
- Visual Studio Code (VSC) or your preferred code editor
Moreover, we will focus on the Polygon’s testnet (Mumbai) for this example project. The latter is a popular EVM-compatible testing chain that has very low transaction fees. Furthermore, you can utilize the Polygon faucet in order to obtain some test MATIC. As such, we will also show you how to easily add the Mumbai network to your MetaMask and how to use the Polygon faucet. Next, we will show you how to use Hardhat to create, compile, deploy, and verify a rather simple ERC721 smart contract. With the initial setup under your belt and your smart contract deployed, we’ll finally focus on Unity. This is where you’ll learn where to enter your Moralis dapp’ credentials. Moreover, we will also do a more detailed code walkthrough to provide additional context.
Initial Moralis Setup
- In case you haven’t done so yet, create your free Moralis account now. On the other hand, use your credentials and log in:

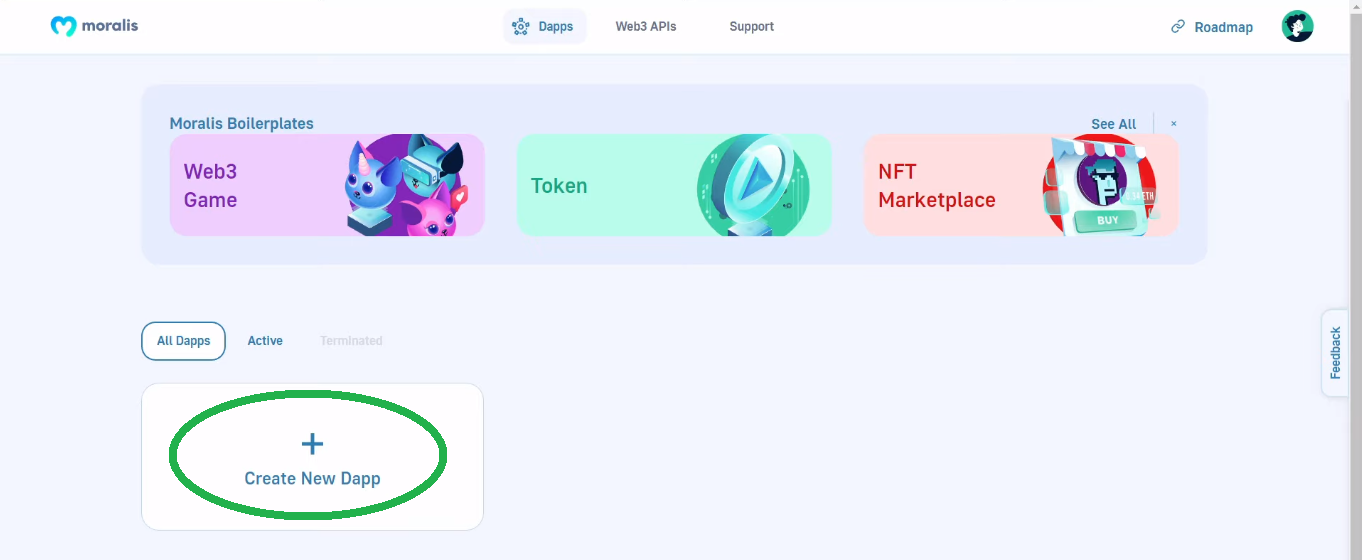
- Inside your Moralis admin area, use the “Create New Dapp” button:
- On the first step of the “Select Environment” pop-up window, choose the “Testnet” option:

- Next, select the “Polygon Mumbai” network and confirm your selection by clicking the “Proceed” button:

- Then, choose the city closest to your location and move forward by clicking the “Proceed” button again:

- Finally, you need to name your dapp. Since this can be anything, you can be as creative as you want. Though, you can also follow our lead and go with “test-dapp”. With the name in place, start your Moralis dapp by clicking “Create Your Dapp”:

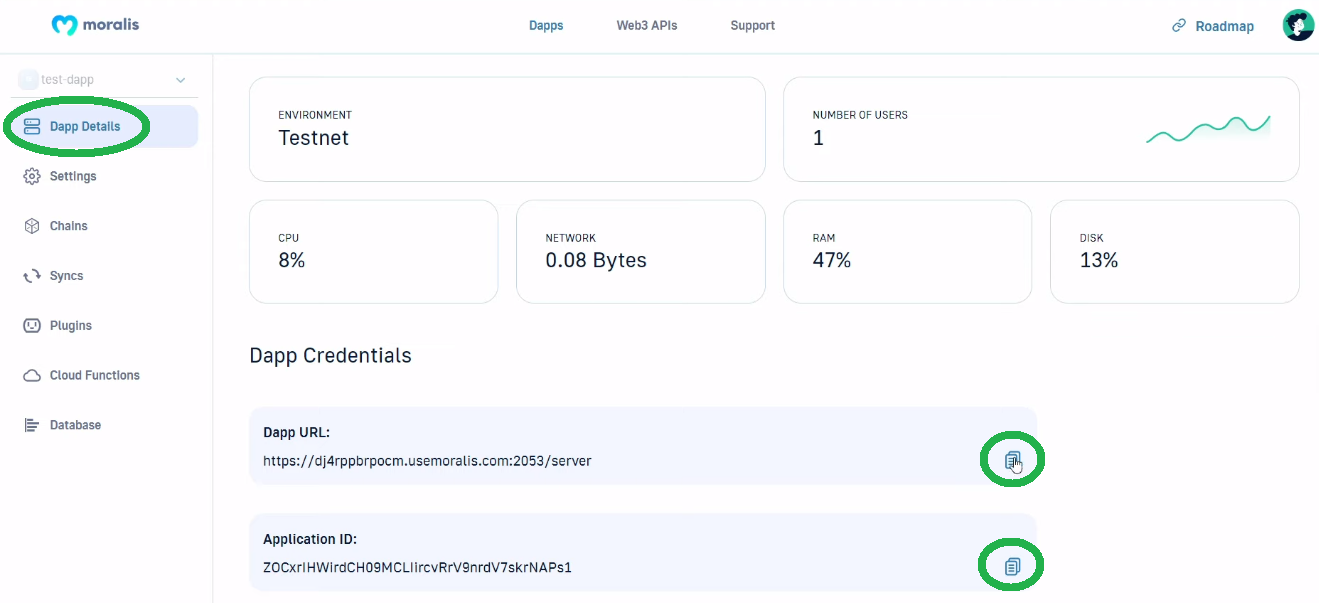
- Once your dapp is up and running, you access all its details and features via the “Settings” button:

- This is where you find the credentials that you’ll need to paste into Unity after cloning our code:
Adding Mumbai to Your MetaMask and Getting Play MATIC
At this point, you should have your MetaMask browser extension installed and your Web3 wallet ready. Hence, you can easily add the Mumbai network. Using the same “Setting” button as above, you get a chance to access the “Networks” tab:

As indicated in the screenshot above, click the “Settings” button next to “Polygon Mumbai), which will open that network’s details. And, that’s where you’ll see the “Nodes” section:

All you have to do is click the “Add to Metamask” button and confirm this action in your MetaMask.
With the Mumbai network added to your MetaMask, you are ready to obtain some play MATIC. As such, go to the Polygon Faucet website:

There, you need to select the “Mumbai” network and “MATIC Token”, paste your wallet address (copy it from your MetaMask), and hit “Submit”:

Our Smart Contract for a Web3 Map Game
Before moving on, go to GitHub and clone or download our example project:

When it comes to using Hardhat to manage smart contracts, we have created a special file with step-by-step instructions. You can find the “Instructions.txt” file inside the “SmartContracts” folder. This file contains the following steps:
- Install Node JS
- Create an empty folder outside of GIT. Open in a text editor (e.g.: VSC)
- Use your command line to install Hardhat. These are the command you need to enter:
npm i -D hardhat
npx hardhat - Use your command line to install Hardhat. These are the command you need to enter:
npm i -D @openzeppelin/contracts
npm i -D @nomiclabs/hardhat-waffle
npm i -D @nomiclabs/hardhat-etherscan - Rename “./contracts/Greeter.sol” to “./contracts/{YourContractName}.sol” (without “{}” of course)
- Change “./scripts/sample_script.js” to “./scripts/deploy{YourContractName}.js” (again without “{}”)
- Inside “./scripts/deploy{YourContractName}.sol”, rename “Greeter” to {YourContractName} and “greeter” to {yourContractName} (respect existing letter-casing)
- In “./scripts/deploy{YourContractName}.sol”, ensure the “deploy()” function has the correct contract constructor parameters
- Inside “./scripts/deploy{YourContractName}.sol” add the code blow (replace {YourContractName} with an actual name):
await {YourContractName}.deployTransaction.wait(5);
// We verify the contract
await hre.run(“verify:verify”, {
address: {YourContractName}.address,
constructorArguments: [],
});
- In “./hardhat.config.js”, add this line of code at the top:
require(“@nomiclabs/hardhat-etherscan”);
- Inside “./hardhat.config.js”, add these fields before “module.exports” part:
const PRIVATE_KEY = “”;
const MUMBAI_NETWORK_URL = “”;
const POLYGONSCAN_API_KEY = “”;
- In “./hardhat.config.js”, modify “module.exports”:
module.exports = {
solidity: “0.8.7”,
networks: {
mumbai: {
url: MUMBAI_NETWORK_URL,
accounts: [PRIVATE_KEY]
}
},
etherscan: {
apiKey: POLYGONSCAN_API_KEY
}
};
- Use these commands to compile your smart contract:
- npx hardhat clean
- npx hardhat compile
- Deploy your smart contract with this command:
- npx hardhat run scripts/deployProperty.js –network mumbai
Note: You can also use the video below (16:11).
An ERC721 Smart Contract
Since you can simply copy our smart contracts, there’s no need to know Solidity to build your Web3 map game. However, if you are interested in learning more details about our ERC721 smart contract, use the video below, starting at 21:32. This is where you’ll learn how this contract enables you to use on-chain or off-chain storage.

Moreover, after deploying your contract, you will get your smart contract’s address and ABI in the terminal:

However, you can also view all your contract’s details on Polygonscan (27:53):

A Web3 Map Game and Unity
Start by opening our example project in Unity. Then, you can use “Read me” to view everything you need to know (28:38):

At this point, our Web3 map game’s Web3 functionality is not yet at your disposal. To include that, you need to connect it with the Moralis’ SDK. Hence, now is the time to copy your Moralis dapp’s credentials (step eight from the “Initial Moralis Setup” section) into the “Moralis Web3 Setup” window:
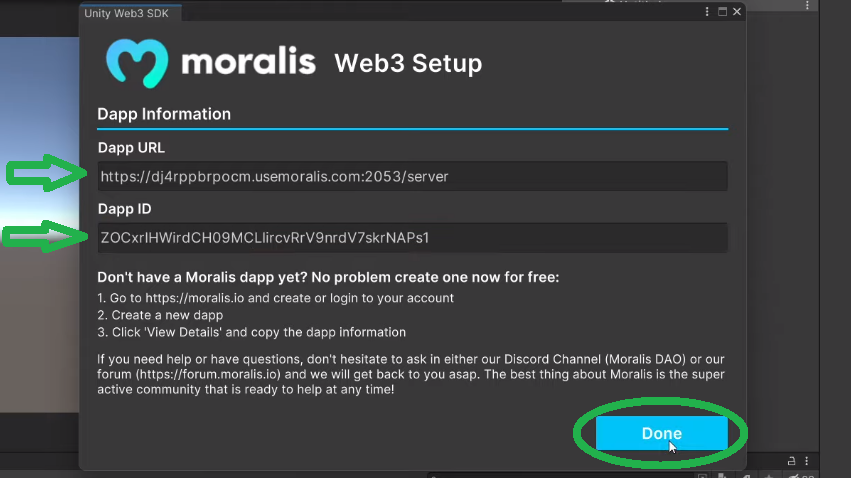
In case, the above window didn’t open for you automatically, you can access it via “Window > Web3 Unity SDK > Open Web3 Setup”:

Next, focus on “SimCityWeb3Configuration.asset”. Ther, you’ll see that by default, our project is set to work with off-chain data:

The “Web3ContractService” Script
However, to make this example game into a proper Web3 map game, you want to switch the above option to “Contract”. For a closer look at the “SimCityWeb3ServiceFactory” script, use the video below, starting at 34:30. However, we want to focus on the “SimCityWeb3ContractService” class. In case you want to code it yourself, you can follow along with our in-house expert in the video below (35:05). That way you’ll get the most out of this project and learn how to manually implement all the functionality that the above-deployed smart contract offers. This is also where you’ll see the power of Moralis firsthand and how hooks like “GetNFTOwners” make a world of difference.
On the other hand, you can use our finished code and just provide your contract’s address and ABI. This is where the “PropertyContract” class enters the scene. As such, this is the only piece of code you need to update:
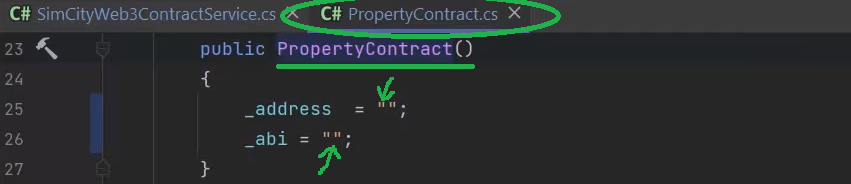
So, just paste the two values (either copy them from your terminal or Polygonscan) and save it:

By pasting in your smart contract’s details, your version of our Web3 map game is fully functional. As such, you can run it yourself and play around. You’ll see that adding and removing properties are now on-chain transactions that you’ll need to confirm with your Web3 wallet:

Note: The way we designed our project required on-chain transaction confirmation using a mobile Web3 wallet. We could also design it as a WebGL project, in which case players could confirm transactions with their web browser MetaMask extensions.
Finally, here’s the video tutorial we’ve been referencing throughout the article:
How to Build a Web3 Map Game – Summary
At this point, you already know that thanks to Moralis, creating a Web3 map game is not at all complicated. That’s particularly true if you decided to copy our code. However, even if you are starting from scratch, with Moralis’ Unity SDK, you get to save a ton of valuable development time. And, by completing the above example project, you learned how to complete the initial Moralis setup and how to obtain your dapp’s credentials. In addition, you also learned how to add the Mumbai chain to your MetaMask and how to get some play MATIC. As such, you are now ready to tackle your own projects.
On the other hand, you might need some additional practice to get more comfortable with Unity Web3 programming. In that case, we encourage you to use the Moralis’ YouTube channel and the Moralis’ blog. These two outlets host many other Unity Web3 example projects. Furthermore, there are many example projects and topics that focus on other crypto topics as well. For instance, our latest articles show you how to do NFT on-chain analysis, deal with the on-chain data, or learn how to begin generating NFTs in mere minutes.
Moreover, if you are interested in going full-time crypto sooner rather than later, Moralis Academy might be the place for you. There, you can enroll in a vast range of professional blockchain development courses. As such you can learn about specific crypto niches and most reputable blockchains from experts. In addition, this is also the place to get a personalized study path, mentorship, and membership in an amazing community.
