Integrating Firebase Web3 authentication is a straightforward process when using Moralis. By utilizing the following code snippets from Moralis’ “App.js” file, you’re off to a good start in creating a Web3 Firebase sign-in:
const firebaseConfig = {
	 "GET": "FROM FIREBASE ADMIN PANEL"
	};

	const app = initializeApp(firebaseConfig);
	const moralisAuth = getMoralisAuth(app);
	const auth = getAuth(app);

	function App() {

	 const [user, setUser]= useState(null);

	 async function login(){

	 const res = await signInWithMoralis(moralisAuth);
	 setUser(res.credentials.user.uid)
	 }
If you’d like to use the above immediately, you can head straight to our GitHub repo, access the complete code, and start integrating Web3 Firebase authentication. Or, if you need assistance on the entire process of how to set up a Firebase Web3 sign-in application, read on!
Overview
Web3 authentication is a vital part of blockchain development as it enables Web3’s unified authentication layer, resulting in a more seamless user experience. What’s more, this highly benefits businesses alike since Web3 authentication mechanisms contribute to lower onboarding friction. This being such an essential part of Web3 development, programmers desperately need tools to integrate Web3 authentication flows with other services like Firebase. This is precisely where Moralis enters the picture by facilitating accessible Web3 Firebase authentication integration!
This tutorial will teach you how to easily create a Firebase Web3 sign-in with MetaMask using Moralis’ authentication extension. Moreover, the article additionally shows you how to set up a straightforward React application to test out Firebase Web3 authentication. So, by the end of the tutorial, you will know how Moralis Web3 Firebase authentication works and can apply the same principles to any future Web3 projects! In short, we’re going to complete this tutorial using the following five steps:
- Firebase Setup
- Initializing the Firebase CLI
- Moralis’ Authentication Extension Setup
- Deploying the Authentication Extension
- Creating a React App
The accessibility of this tutorial partly originates from the enterprise-grade Web3 APIs offered by Moralis. For instance, check out the Web3 Auth API, allowing you to easily add various authentication methods to your blockchain projects. If this sounds exciting, you can, for example, check out our guide on how to add Coinbase Wallet login functionality!
Nevertheless, if you are interested in Firebase Web3 authentication, sign up with Moralis immediately and use the APIs to unlock the full potential of blockchain technology!
What is Firebase?
Firebase is a development platform for building, growing, improving, and maintaining everything from straightforward applications to more complex games. Firebase is backed by and built on top of Google’s infrastructure, and millions of businesses are currently using the platform worldwide. Some prominent examples are Twitch, Glovo, 9gag, etc. What’s more, multiple tools feature Firebase integrations, such as Google-based Google Ads, business messaging apps such as Slack, and, of course, Moralis Web3 APIs!

Firebase supplies a selection of features and tools developers – from a traditional perspective – generally need to build themselves. This includes database solutions, analytics, file storage services, push messaging, etc. Moreover, Firebase provides excellent scaling opportunities, demanding next to zero effort from developers. Consequently, with Firebase, you can avoid “reinventing the wheel” and direct your attention towards creating value for your customers through seamless application experiences.
Furthermore, with Moralis’ Firebase integration, you can now easily integrate Firebase features in all your blockchain-based projects. This includes quick implementation of, for example, Web3 webhooks via Moralis’ Web3 Streams API and Web3 authentication flows without the need for setting up complex backend infrastructures. As such, you can instead rely on Moralis and Firebase to take care of most of the heavy lifting by supplying a comprehensive hosting solution.
If you are looking to learn more about Moralis’ Firebase integration, read on as this article dives deeper into Web3 Firebase authentication. In doing so, you will learn how to create a Firebase Web3 sign-in with MetaMask!
Firebase Web3 Tutorial Outcome – What are You Working Toward?
This tutorial explores Moralis’ Firebase Web3 integration by teaching you how to create a Web3 Firebase login with MetaMask. In doing so, you will be utilizing Moralis’ Web3 Auth API and auth extension to build a React application allowing users to sign in with their Web3 wallets. Moreover, this section explores the app’s UI (user interface) to provide an idea of what you are working towards. Nevertheless, the image below shows the project’s landing page:
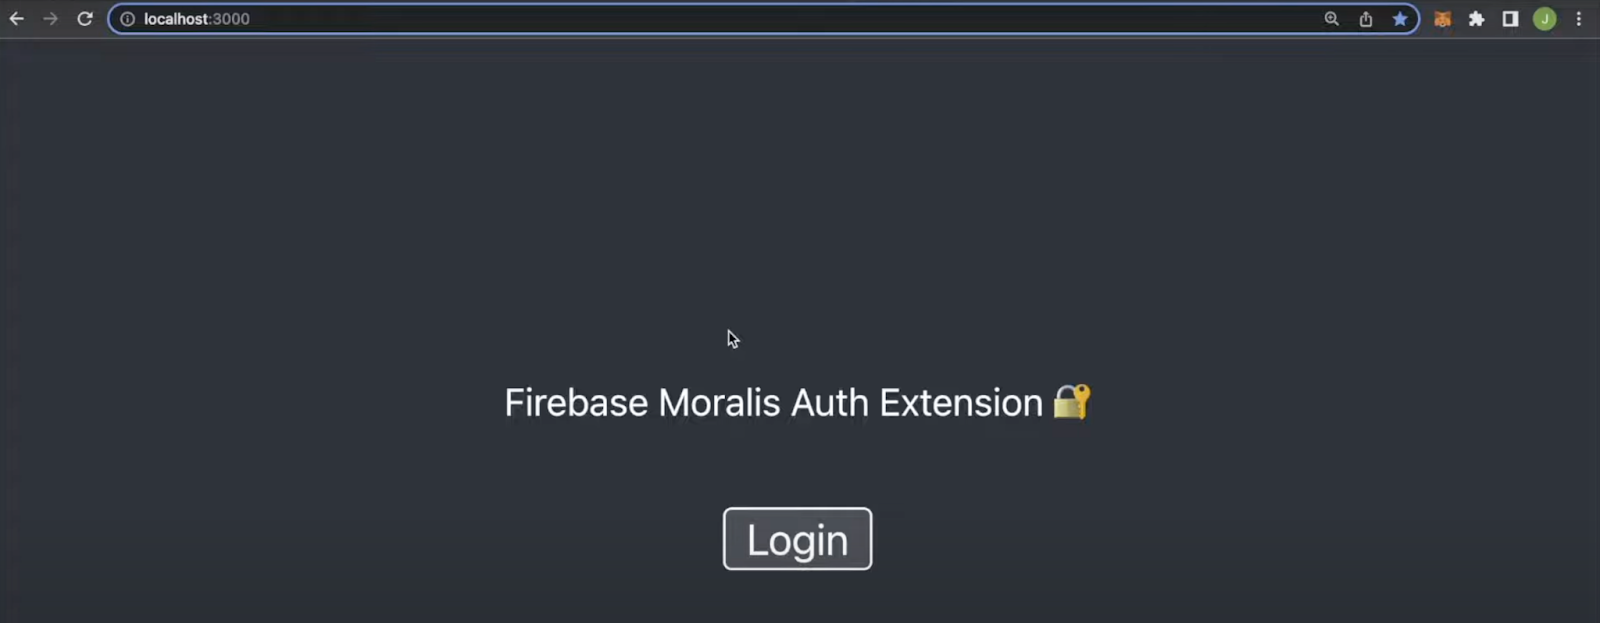
The landing page features a heading and a “Login” button. Pressing the button triggers your MetaMask wallet, allowing you to sign a new message. As soon as you sign the message and authenticate yourself, the React app displays a unique user ID. Moreover, the ID is directly interconnected to the wallet that signed the message:

In addition to displaying the user ID, the application further utilizes the unique identifier to create a new Firebase user, which you can find under the “Authentication” tab on the Firebase admin panel:

Furthermore, thanks to the Moralis auth extension, all users added to your app’s backend contain additional information. Consequently, you can integrate this data into your applications and other Firebase services, such as the database.
Nevertheless, if you want to learn how to add similar functionality to your future Web3 projects, follow along in this Web3 Firebase authentication tutorial as we break down the entire process from start to finish!
Firebase Web3 Authentication Tutorial – 5-Step Breakdown
It is now time for the central part of this Firebase Web3 authentication tutorial, where we will teach you how to create a Web3 sign-in with MetaMask using Moralis’ Firebase authentication extension. In combination with a walkthrough of Moralis’ Firebase integration, you will learn how to set up a React app to test the Web3 MetaMask sign-in feature!

To make this tutorial as straightforward as possible, it will be broken down into the following five steps:
- Firebase Setup
- Initializing the Firebase CLI
- Moralis’ Authentication Extension Setup
- Deploying the Authentication Extension
- Creating a React App
As such, if you follow the aforementioned steps, you will learn how to easily create a Web3 sign-in with MetaMask. As a result, you can add similar Web3 Firebase integrations to your future blockchain development endeavors to quickly create blockchain-based authentication mechanisms and stream on-chain data directly into your Firebase backend!
Moreover, if you prefer watching videos to learn, check out the clip below from the Moralis YouTube channel. This video provides a full breakdown of the entire process, where one of our talented engineers walks you through the entire tutorial step by step:
You can also follow along here as we will kick things off by showing you how to set up Firebase in this tutorial’s first step!
Step 1: Firebase Setup
To kick things off, this initial step of the Firebase Web3 authentication tutorial revolves around setting up Firebase. If you are already familiar with Firebase, feel free to skip this step and jump straight into the second part of the Firebase Web3 tutorial: “Step 2: Initializing the Firebase CLI“.
Nonetheless, if you have not already, head over to Firebase’s webpage and click on the “Get Started” button to create an account:

With an account at your disposal, log in to Firebase, hit the ”Create a project” button, and follow the instructions to set up a brand new Firebase project:

Once you choose the desired options suitable for your project and hit the ”Create project” button, it should take you straight to the Firebase admin panel. New Firebase projects are automatically set to the free ”Spark” plan. However, for this Firebase Web3 tutorial, you need to switch from ”Spark” to ”Blaze” to access the required Firebase features. To change the plan, click ”Upgrade” at the bottom left and select the ”Blaze” billing plan:

However, as the print screen above shows, the ”Blaze” alternative features a ”Pay as you go” payment model. Luckily, there is a free limit, and you are only required to pay once your app receives a lot of traffic. Consequently, you will not likely need to worry about this during this Firebase Web3 tutorial.
Lastly, all that remains is to set up Firebase with the “Authentication” feature. To do so, navigate to the ”Authentication” tab and click on ”Get Started”:

That covers the Firebase setup part of the tutorial! The following section shows you how to initialize the Firebase CLI!
Step 2: Initializing the Firebase CLI
The second step of this Firebase Web3 tutorial is to initialize the Firebase CLI and set up a new Firebase project. As such, you can go ahead and open your preferred IDE (integrated development environment) and create a new folder for your project. For this demo, we will be using Visual Studio Code (VSC). Accordingly, note that the process might differ slightly if you use another development environment.
With the IDE open and a new folder at your disposal, open a new terminal. If you, like us, are using VSC, you can do so by hitting the ”Terminal” tab at the top, followed by ”New Terminal”:

From there, install the Firebase tools on your local device. You can do so by running either of the commands below in your terminal:
For Windows:
npm install -g firebase-tools
For macOS:
sudo npm install -g firebase-tools
Once the tools have been installed, the next step is to log in with Firebase, which you can do if you run the following command:
firebase login
If this is your first time logging into Firebase, the terminal will prompt your browser, allowing you to sign in with Firebase!
Firebase Project Setup
Next up, you need to initialize a new Firebase project by running the command below in your terminal:
firebase init hosting
Moreover, note that by running the command above, you initialize the Firebase project with ”hosting”. As a result, you will now be able to test the application on a live server through Firebase. Consequently, you receive more options other than trying the application locally.
Nevertheless, running the ”firebase init hosting” command prompts your terminal, and you must make a few decisions. In this case, since you set up a Firebase project in the first step, go ahead and pick an already existing project and select the one you previously created:

From there, the terminal will ask you what you would like to use as your public directory. For this Firebase Web3 tutorial, input the following and hit enter:
frontend/build
Lastly, select ”No” for the two questions that follow:
That’s it for initializing the Firebase CLI and setting up a new Firebase project! If you followed along, you should now have a structure in your local repository similar to this:

Step 3: Moralis’ Authentication Extension Setup
In this third step of the Firebase Web3 tutorial, it is time to set up the Moralis authentication extension, which is how you easily establish the Web3 Firebase integration. Nevertheless, to set it up, return to your IDE and run the command below in your terminal:
firebase ext:install moralis/moralis-auth
For the initial prompts, pick ”Yes”, select ”Iowa (us-central1)”, and make sure to store the secrets on ”Google Cloud Secret Manager” (if an error appears during this stage, see the ”Potential Secret Manager API Error” subsection below):

After selecting where you would like to store your secrets, the terminal will prompt you for your Moralis API key. To get the API key, you need a Moralis account. As such, if you have not already, sign up with Moralis now!
With an account at hand, log in and fetch your Web3 API key by navigating to the ”Web3 APIs” tab:

After inputting the Web3 API key, the next prompt will ask you for a website URL, and in this instance, you can choose ”localhost” through the following command:
https://localhost
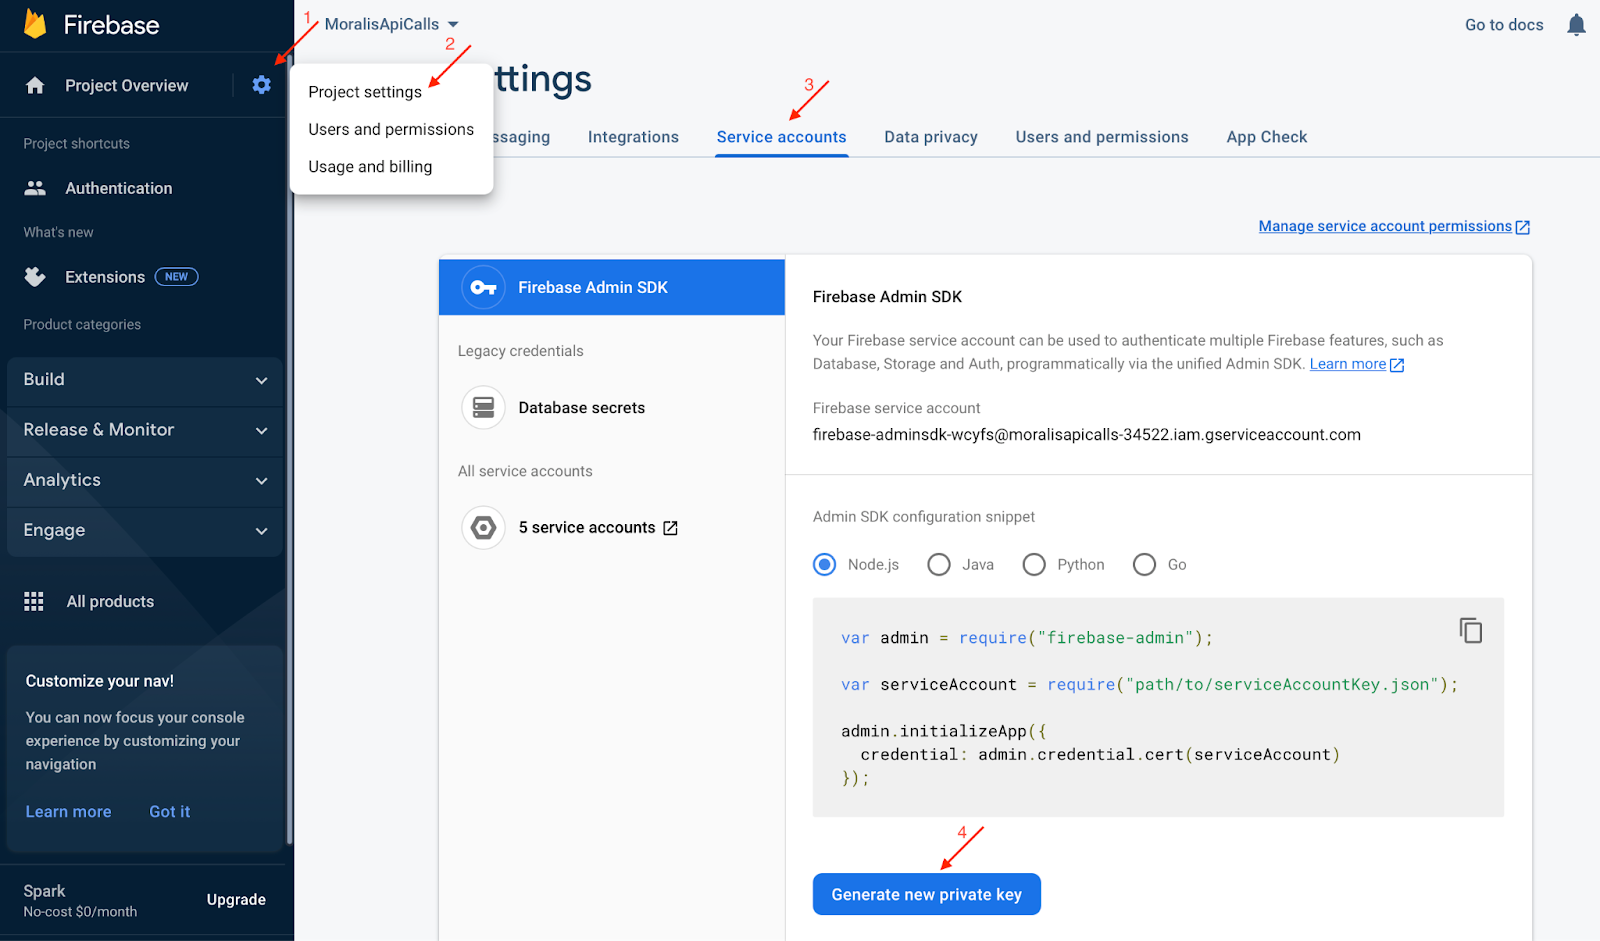
Lastly, you will need to add ”Project ID of Service Account”, ”Email of Service Account”, and ”Private Key of Service Account”. To get these three elements, you must first generate a new Firebase private key. As such, click on the cogwheel at the top left of our Firebase admin panel, hit ”Project settings”, choose ”Service accounts”, and click on the ”Generate new private key” button:
From there, you can now use the private key and Moralis’ Firebase Service Account Converter to acquire the extension parameters, which you can use as inputs for the terminal prompts:

Potential Secret Manager API Error
Earlier in this step, when selecting where to store your secrets, it is unfortunately not uncommon that the following error appears:

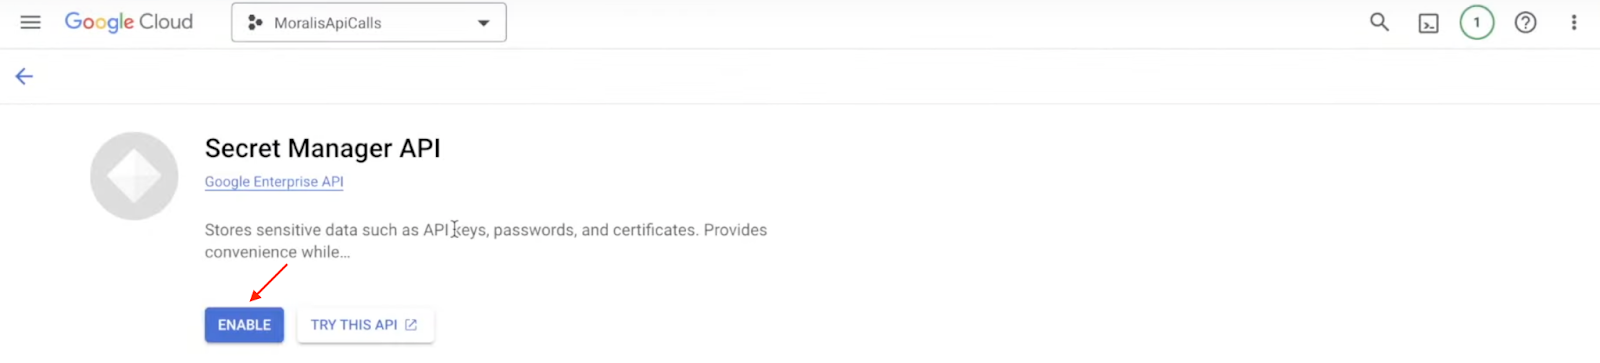
Since you might experience the same issue, this section will briefly show you how to resolve it. As the image above illustrates, the error message contains a link. If you click on the link in your terminal, you should arrive at a page looking similar to this:

To fix the issue, you need to disable and reenable the API, which you can do by clicking on the ”DISABLE API” button:

Once you click on the button above, it should redirect you to the ”Secret Manager API” page, where you can reenable it again:
That’s it! The issue should now be resolved! From here, wait a couple of minutes and re-do the third step of this Firebase Web3 tutorial; it should now work without any trouble!
Step 4: Deploying the Authentication Extension
Now that you are done setting up Moralis’ authentication extension, it is time to deploy it. To do so, open your terminal once again and run the command below:
firebase deploy --only extensions
When you run the command, you must answer a few questions in the terminal, and you can select ”Yes” for the lot. What’s more, deploying the extension might take a while; however, it should deploy shortly!
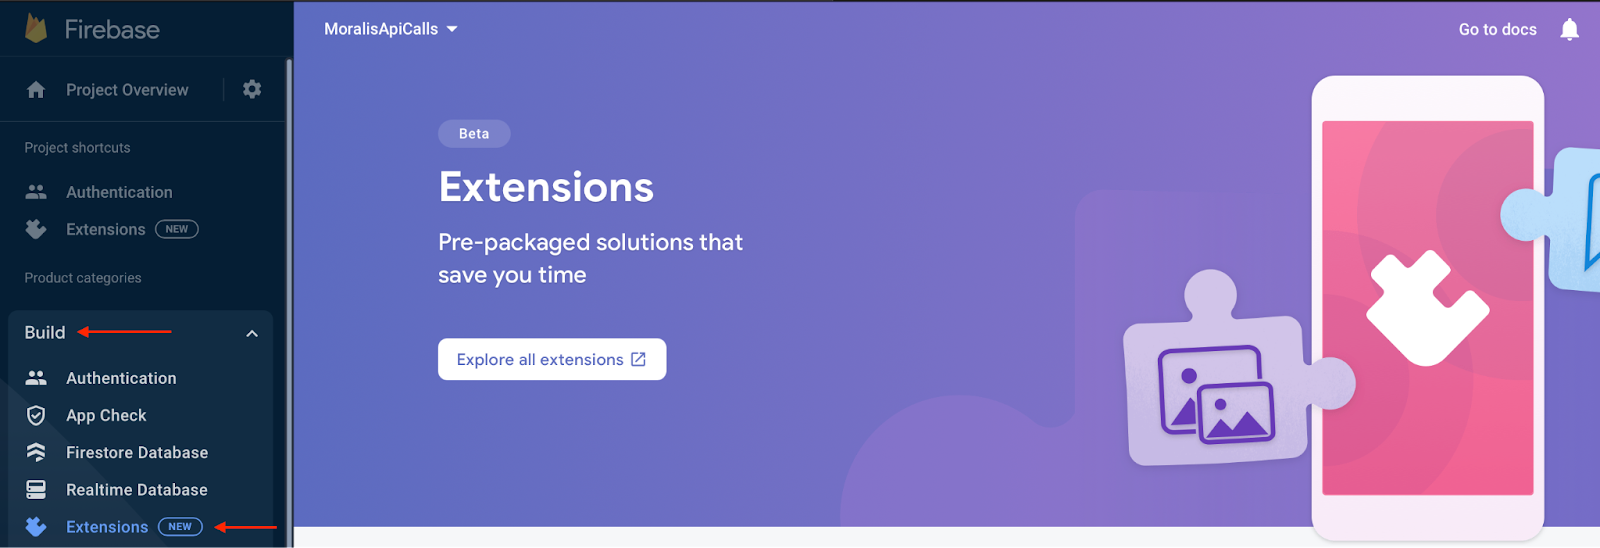
Once Moralis’ authentication extension deploys, you can find it on your Firebase admin panel. As such, to check that the extension deployed successfully, click on the ”Build” tab, followed by ”Extensions”:
That covers the entirety of the fourth step of this Firebase Web3 tutorial! From here, the only thing that remains is to test out the Firebase Web3 sign-in using a React application!
Step 5: Creating the React App
This final step of the Firebase Web3 tutorial demonstrates how to test your Firebase Web3 sign-in using a React app. To create the application, navigate to your IDE and inspect your local directory. If you remember from the second step, you chose to input ”frontend/build” when picking what to use as your public directory. Consequently, you should find a folder called ”frontend/build” in your repository.
This folder initially contains two files; however, you want to replace them with your React application. To make this process as straightforward as possible, you can use this GitHub repository as an already prepared template for the app. As such, all you need to do is copy the files from the repository and input them into the ”frontend/build” folder, leaving you with a directory similar to the one below:
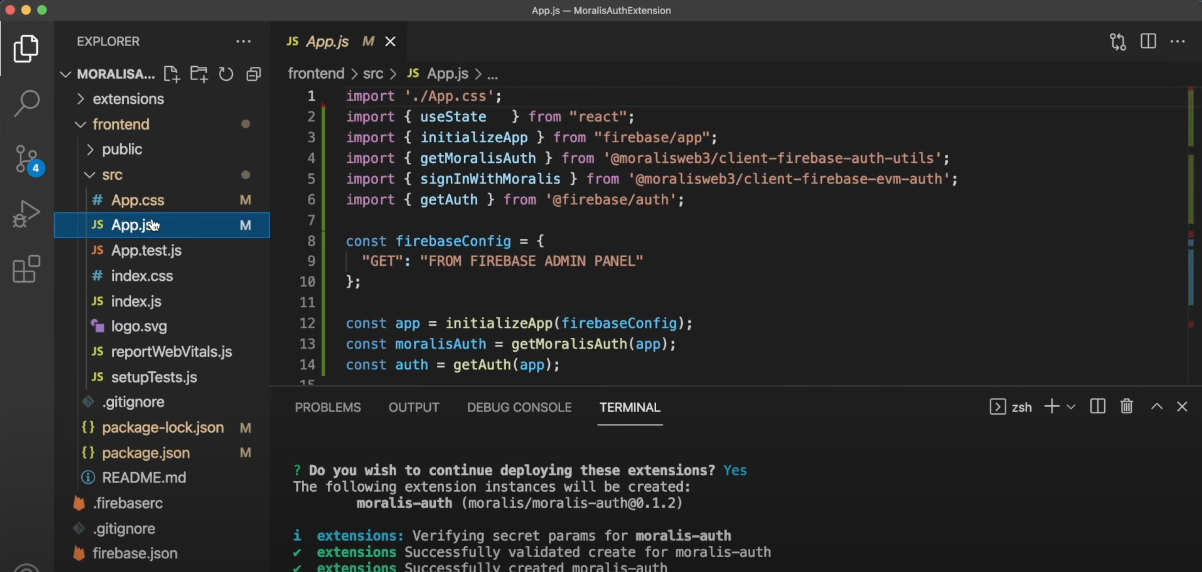
With the template code at your disposal, you need to make a few configurations to the ”App.js” file. Specifically, you need to add your Firebase configurations to the ”firebaseConfig” object. To get the required configurations, open the Firebase admin panel, click on ”Project Overview”, and create a new web application:

To set up the web app, you need to add a name and click on the ”Register app” button, which takes you to the second part of the registration process. It should look something like this, and you can copy this ”firebaseConfig” object and replace your local directory’s object with the same name:

Starting the App
With the application code in your local directory and the configurations added, all that remains is to start and test the application. However, before doing so, open a terminal and ”cd” into the ”frontend/build” folder with the command below:
cd frontend/build
You can then install the required dependency by running the ”npm i” command in the terminal. Finally, you can run the application locally by inputting ”npm run start” and hitting enter!
As a result, you should now be able to visit the following URL to launch the React application locally in your browser and test it out: “https://localhost3000”.
What’s more, since you originally initiated the project with ”hosting”, you can also deploy the application online so that anyone can access the app from anywhere. If you want more info on how to do so, check out the video from the ”Firebase Web3 Authentication Tutorial – 5-Step Breakdown” section at the ”11:10” timestamp!
Moreover, if you had trouble during the tutorial, join Moralis’ Discord channel and receive assistance from our talented community engineers!
Summary – Firebase Web3 Authentication
This tutorial took a deep dive into the intricacies of Firebase Web3 authentication. Specifically, the guide showed you how to create a Web3 sign-in with MetaMask and integrate Firebase services. Furthermore, thanks to the accessibility of Moralis and the Firebase authentication extension, you can do so in only five steps:
- Firebase Setup
- Initializing the Firebase CLI
- Moralis’ Authentication Extension Setup
- Deploying the Authentication Extension
- Creating a React App
Consequently, if you followed along, you now know how to create a Web3 sign-in with Moralis. What’s more, you can now use the same principles to add Firebase Web3 authentication to any future blockchain projects!
If you found this article helpful, consider checking out additional blockchain development content here at Moralis’ Web3 blog. For example, read our article on Web3 for business or learn how to build a Web3 multiplayer game using Unity!
You should also consider enrolling in Moralis Academy if you are looking to hone your Web3 development skills. If you are new to Web3, check out the following course on the fundamentals of the blockchain industry: ”Blockchain & Bitcoin 101”.

Nevertheless, if you want to harness the full power of blockchain technology, sign up with Moralis immediately. Creating your account is free, and you receive immediate access to the various tools supplied by Moralis!
