Before we show you how to run a smart contract with Unity, we want to remind you that Web3 development offers countless opportunities. Thus, those who focus on building Web3 applications will be the ones to come on top. Especially those who get involved early, when bridging Web2 and Web3 is just getting started. However, over the last couple of years, the Web3 stack came a long way. Hence, you no longer need to deal with the limitations or RPC nodes. This means that you do not have to run your own nodes, nor do you need to build your own backend infrastructure. As a matter of fact, you can use Moralis to run a smart contract with Unity. Thus, you get to create all sorts of decentralized applications (dapps). Essentially, Moralis lets you exploit the existing Web3 backend infrastructure. Hence, you can focus on creating the best frontend.
In today’s article, we will take on a simple example project to show you how to run a smart contract with Unity. With that knowledge, you’ll be able to take your Unity skills and start delivering killer Web3 games. However, before diving into the example project, we need to make sure that we are all caught up with the basics. As such, we will first tell you what a smart contract is. Moreover, for those of you who are not familiar with Unity, we will also quickly explain what Unity is. Furthermore, since there are several useful tools you need to run a smart contract with Unity, you’ll learn quite a lot if you decide to follow our lead. You’ll learn how to use Hardhat to compile, deploy, and verify smart contracts. In addition, you’ll find out how to start using Moralis and how to work on Polygon’s testnet.
What is a Smart Contract?
Smart contracts, also known as Web3 contracts, are basically pieces of software running on programmable blockchains. And, since Ethereum was the first programmable chain, it was the Ethereum chain that gave birth to these amazing programs. When it comes to Ethereum and other EVM-compatible chains (e.g.: Polygon, BNB Chain, Avalanche), Solidity is the programming language devs use to write smart contracts. On the other hand, in the case of Solana, smart contracts are called programs and devs write them in Rust.

Furthermore, smart contracts are there to ensure that things run properly – according to predefined rules. So, smart contracts execute predefined actions when predetermined conditions are met. By doing so, they emit so-called smart contract events. By listening to the smart contracts events, we can use them as triggers for other features and functionality within dapps. As such, it is obvious that smart contracts are the logic of programmable chains. Moreover, our projects can call functions from smart contracts to interact with the blockchain. And, that’s exactly how we run a smart contract with Unity. After calling the function from smart contracts, it communicates back using return values and events.
However, before we can use a smart contract (unless we are using an existing one), we need to deploy it. That means we need to execute an on-chain transaction that stores the contract in question to a particular chain. Of course, there are several ways to deploy smart contracts. Though, we believe Hardhat is one of the simplest and neatest ways to cover that aspect. As such, we will use this tool as we move forward. Now, before we look at a diagram of calling smart contracts from Unity, let’s ensure we all know what Unity is.

What is Unity?
Since its release back in 2005, Unity has come a long way. It is now one of the most popular game engines. Moreover, Unity is all about cross-platform, which means you can use it to develop all sorts of applications. Whether you are targeting desktops, mobile, console, or virtual reality (VR) platforms, Unity can help you get to the finish line.
The Unity’s interface enables you to get far without coding. However, when things get serious, scripts get things done. This is where C# and C++ skills come in handy. All-in-all, if you are interested in game development, Unity deserves your attention. Moreover, since Web3 game design has outstanding potential, using Unity to create killer Web3 games is a no-brainer.
Calling Smart Contracts from Unity
As promised above, let’s look at how calling smart contracts from Unity works using the following diagram:

Looking at the image above, you can see that we first need to deploy our smart contract. Then, you (as a Unity user) are able to run contract functions in read-only mode. In response to that function, the smart contract returns the desired type. Moreover, you can also execute contract functions, in which case you have read and write capabilities. Furthermore, there’s no return value in response to “ExecuteContractFunction”. Instead, in that case, the smart contract returns the transaction hash. Nonetheless, the contract itself is able to emit events if and when it wants to. And with Unity, you can subscribe to those events to observe and capture returned values.
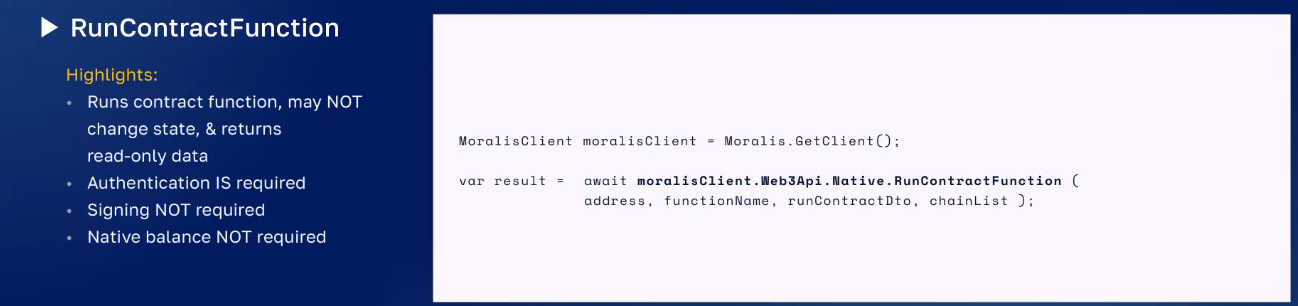
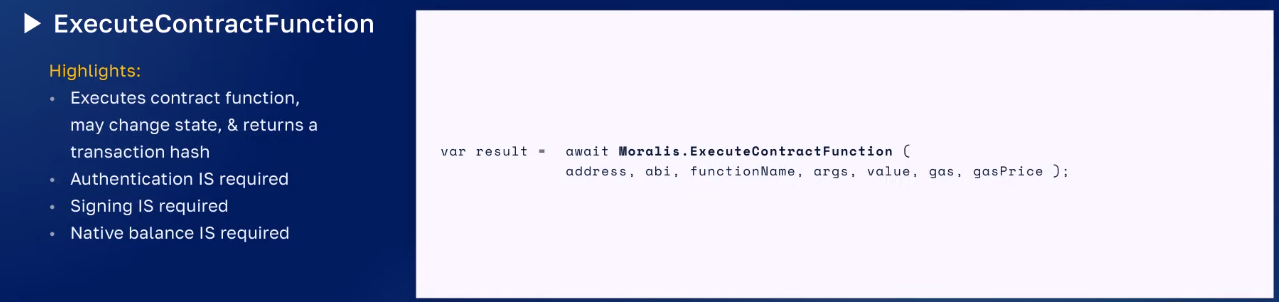
Now, the question is “how do we call “RunContractFunction” and “ExecuteContractFunction”?”. This is where Moralis enters the scene.
Calling smart contracts with Moralis:
- “RunContractFunction”:
- “ExecuteContractFunction”:
Run a Smart Contract with Unity – Example Project
With the basics of smart contracts and Unity under our belts, we can focus on an example Unity project. Moving forward, we will focus on two scenes – “RunContractFunction” and “ExecuteContractFunction”. We made that project available for you on GitHub. Furthermore, as the names of the scenes suggest, our example project is all about running an example smart contract with Unity. That means you will get to see the above-presented read-only and read/write features firsthand. Moreover, by this point, you know that executing contract functions requires native balance. Hence, we will also need to get some “test” MATIC to execute those transactions on the Mumbai network.
However, before we can run a smart contract with Unity, we need to deploy it first. As mentioned before, we will do this on the polygon’s testnet (Mumbai). Moreover, we will use Hardhat to complete that task. If this is the first time you are hearing about Polygon, make sure to watch the video below, starting at 3:45. This is also where you can learn more about Polygon Faucets, particularly about the Polygon Mumbai testnet faucet. The latter will help you obtain “test” MATIC, which you will need to deploy your smart contract and execute contract functions.

Smart Contract Workflow
The first step of the smart contract workflow is to write the smart contract. Luckily, there are open-source platforms, like OpenZeppeling that provide you with verified smart contract templates. As such, you rarely need to start from scratch. Moreover, in this case, you get to use our smart contract, which you can find inside the “Assets” folder:

When it comes to our smart contract, which you can see in the image above, the “setGreeting” and “geGreeting” methods are what we’ll focus on. Since we are providing you with the contract, you just need to copy the code. Then, you set up Hardhat and use a config file, and a deployment file to deploy the smart contract. It is the config file where you will need to enter some particular values. Once you run the deployment file, the contract will be up and running. Hence, you will be then able to run that smart contract with Unity.
To help you use Hardhat with minimum friction, use the step-by-step instructions below. In addition, you can help yourself with the video below, starting at 5:55.

Using Hardhat – Step-by-Step Instructions
- Install Node JS
- Create an empty folder outside of GIT. Open in a text editor (e.g.: VSC)
- Use your command line to install Hardhat. These are the commands you need to enter:
- npm i -D hardhat
- npx hardhat
- Use your command line to install Hardhat. These are the commands you need to enter:
- npm i -D @openzeppelin/contracts
- npm i -D @nomiclabs/hardhat-waffle
- npm i -D @nomiclabs/hardhat-etherscan
- Rename “./contracts/Greeter.sol” to “./contracts/{YourContractName}.sol” (without “{}” of course)
- Change “./scripts/sample_script.js” to “./scripts/deploy{YourContractName}.js” (again without “{}”)
- Inside “./scripts/deploy{YourContractName}.sol”, rename “Greeter” to {YourContractName} and “greeter” to {yourContractName} (respect existing letter-casing)
- In “./scripts/deploy{YourContractName}.sol”, ensure the “deploy()” function has the correct contract constructor parameters
- Inside “./scripts/deploy{YourContractName}.sol” add the code below (replace {YourContractName} with an actual name):
    await {YourContractName}.deployTransaction.wait(5);

    //verify the contract
    await hre.run("verify:verify", {
        address: {YourContractName}.address,
        constructorArguments: [],
    });
- In “./hardhat.config.js”, add this line of code at the top:
require("@nomiclabs/hardhat-etherscan");
- Inside “./hardhat.config.js”, add these fields before “module.exports” part:
const PRIVATE_KEY = "";
const MUMBAI_NETWORK_URL = "";
const POLYGONSCAN_API_KEY = "";
- In “./hardhat.config.js”, modify “module.exports”:
    module.exports = {
      solidity: "0.8.7",
      networks: {
        mumbai: {
          url: MUMBAI_NETWORK_URL,
          accounts: [PRIVATE_KEY]
        }
      },
      etherscan: {
        apiKey: POLYGONSCAN_API_KEY
      }
    };
- Use these commands to compile your smart contract:
- npx hardhat clean
- npx hardhat compile
- Deploy your smart contract with this command:
npx hardhat run scripts/deployProperty.js --network mumbai
Note: Make sure to enter the Mumbai network URL, your wallet’s private key, and your Polygonscan API key in step 12.
Initial Moralis Setup
Before moving on, make sure you open our project in Unity. Then enter your Moralis dapp’s credentials to gain access to the Moralis’ Web3 unity SDK. Here are the steps you need to complete:
- Visit Moralis’ official website and create your free account via the “Start for Free” button. In case you already have an active account, simply log in using your credentials:

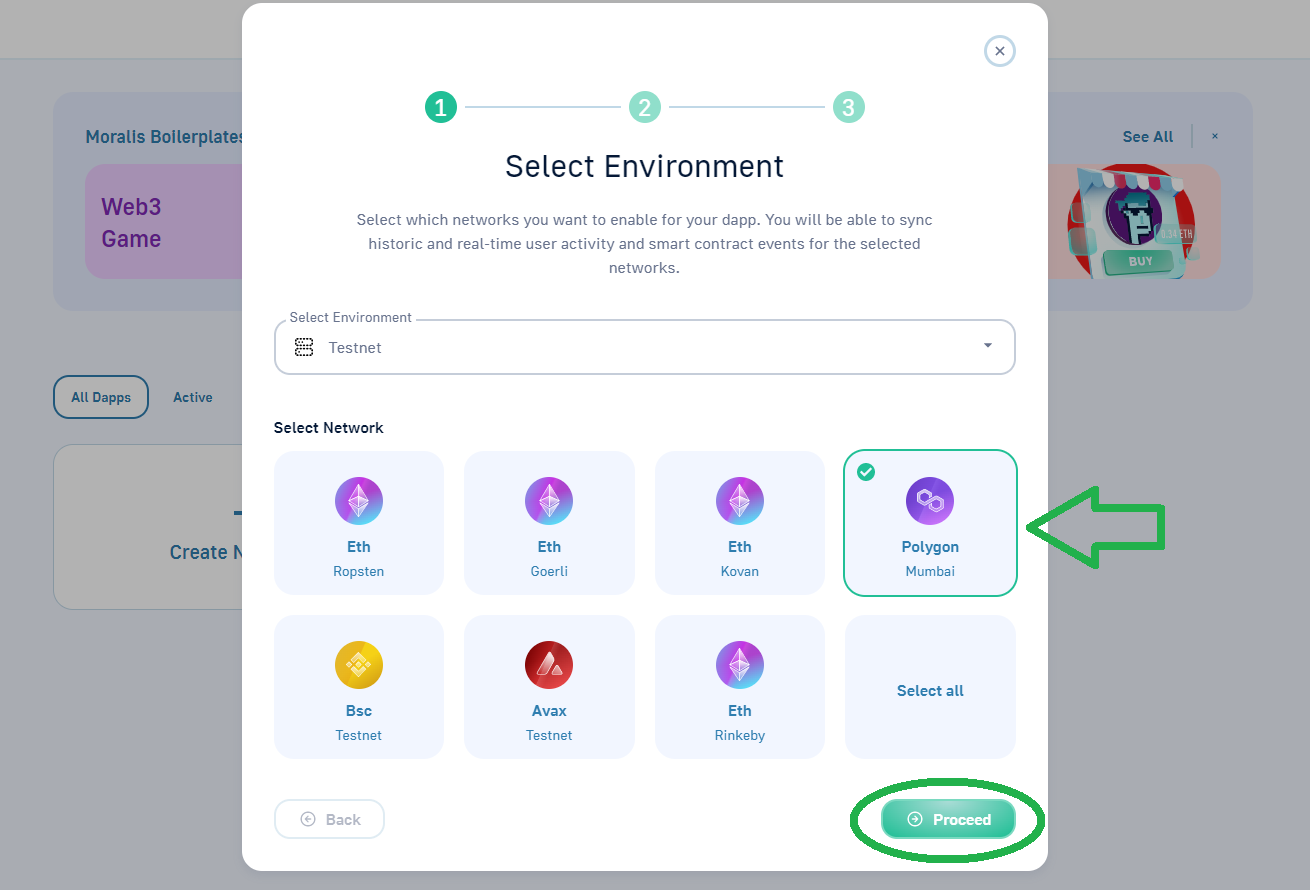
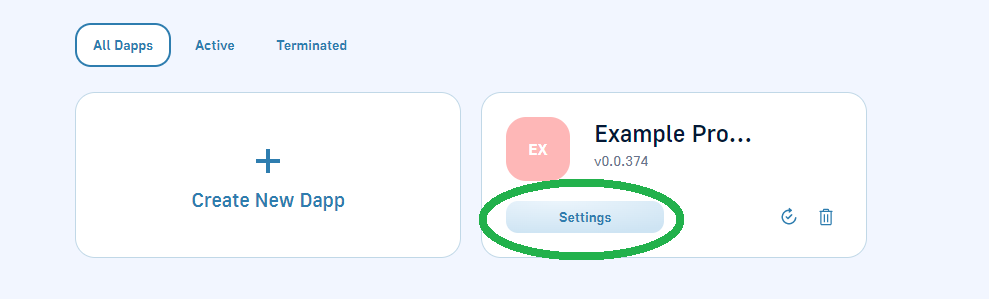
- Inside your Moralis admin area, click “Create New Dapp”:

- First, select the environment. Since this is an example project, select “Testnet”:

- Then, you need to select the chain you want to focus on. Herein, we will focus on “Polygon Mumbai”:
- Second, you need to select your region. Choose the city from the given options closest to your actual location:

- Third, you need to name your dapp and spin it by clicking the “Create Your Dapp” button:

- Now that your dapp is up and running, you get to obtain its credentials (URL and ID):
- Use the “copy” icons to copy your dapp’s credentials:

- Finally, paste the above-copied credential into Unity and click “Done”:

Note: In case you don’t see the “Moralis Web3 Setup” window in Unity, reopen it:

Run a Smart Contract with Unity
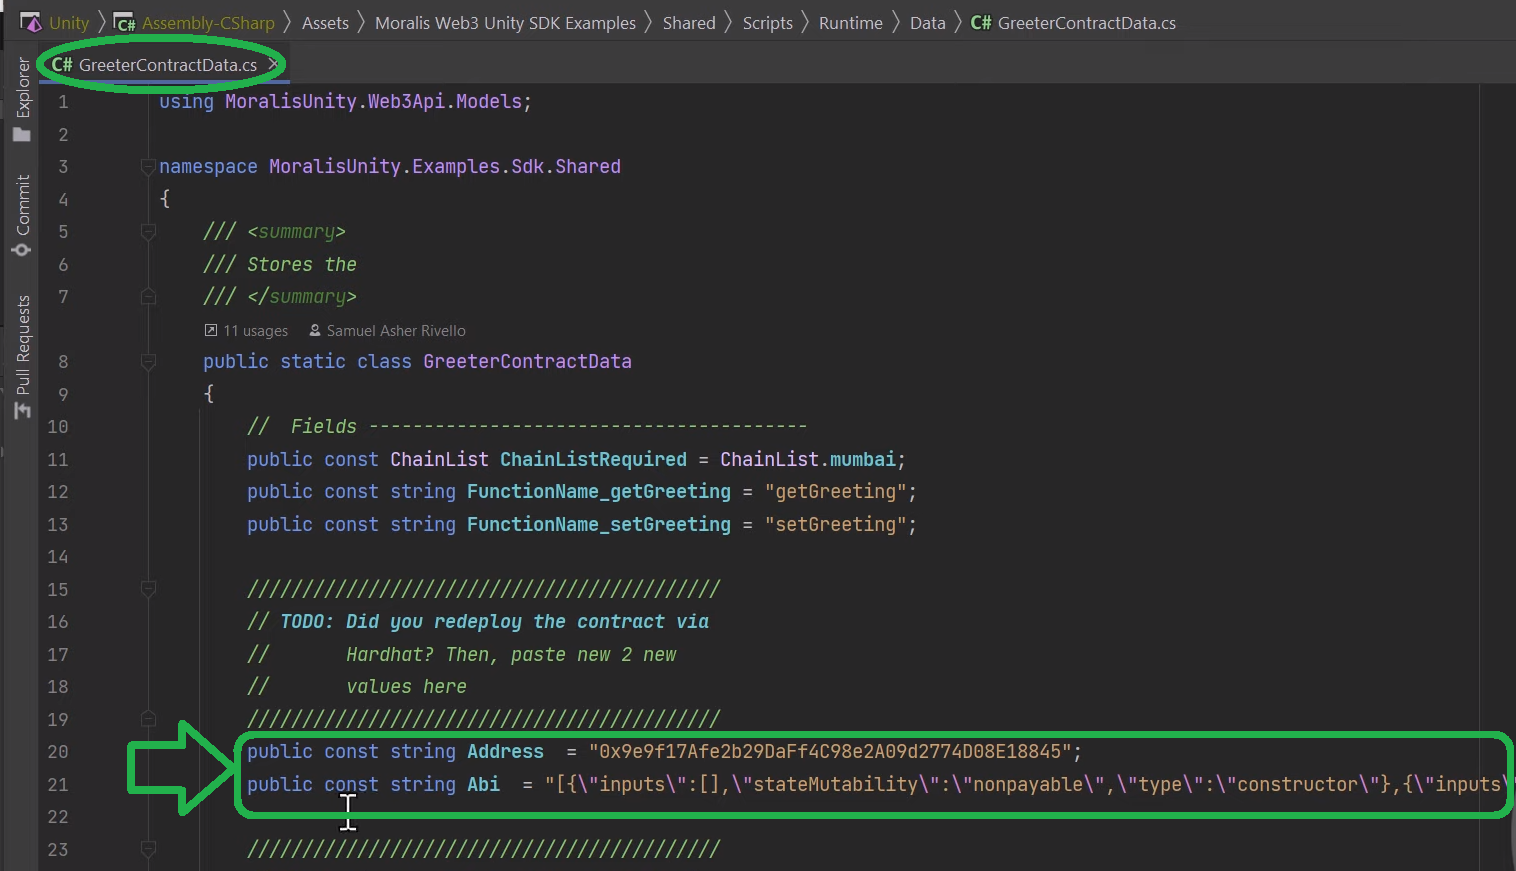
At this point, you’ve already successfully deployed your instance of our smart contract. That means that your terminal returned contract details (address and ABI). As such, you can copy these details:

You need to paste the above-copied lines of code into the “GreeterContractData” script (9:00):
Since “RunContractFunction” accepts the contract ABI in the string format, you can just paste what the terminal provides. However, “ExecuteContractFunction” requires the contract ABI in the object format. This means you need to recreate the string as objects (9:21).
At 9:35 of the video below, you can see the “ExecuteContractFunction” demo. When running this example scene, you will need to use some of the above obtained “test” MATIC. On the other hand, when you run a smart contract with Unity via the “RunContractFunction” scene (10:12), you don’t need any funds. If you remember, that’s because this is a read-only function.
Finally, starting at 10:25, you can also get a quick code walkthrough for both “run” and “execute” functions.
How to Run a Smart Contract with Unity – Summary
If you want to use Unity to develop Web3 games, knowing the basics of smart contracts sure helps. That’s exactly what today’s article covered. Aside from a simple definition of smart contracts, you also had a chance to learn how to use Hardhat to compile, deploy, and verify Web3 contracts. Moreover, if you took on the example project that we covered herein, you actually deployed our smart contract. In addition, you also learn about the difference between the “run” and “execute” functions. Furthermore, using our script and populating it with your smart contract’s details, you had a chance to test run a smart contract with Unity. Since you did that on Polygon’s testnet, you also learned how to obtain some “test” MATIC and how to add the Mumbai network to your MetaMask.
If this was your first rodeo with the Moralis’ Web3 Unity SDK, you might be overwhelmed. As such, we encourage you to go through the above steps again or start with our other Unity tutorials. You can find a ton of valuable resources about Unity Web3 programming on the Moralis’ YouTube channel and the Moralis’ blog. These are also the outlets that can help you expand your crypto horizons and even become a Web3 developer for free. However, in case you are interested in going full-time crypto, you ought to consider enrolling in Moralis Academy.
