Looking to mint Solana NFT tokens? This is still not as simple as minting Ethereum NFTs, where you can use Remix to do it in your browser. However, thanks to Metaplex you can mint Solana NFT tokens quite effortlessly. And this is exactly what we will show you in our example project herein. Moving forward, we will first explain the basics to get you all up to speed. After answering “what is a Solana NFT?” and “what is Metaplex?”, we’ll give you a chance to roll up your sleeves. Thus, we’ll guide you through the process of using Metaplex to create some example Solana NFTs (non-fungible tokens). Moreover, you will also learn how to use the ultimate Web3 development platform, Moralis, to create a simple dapp (decentralized application). The latter will be able to authenticate users and display Solana NFTs from users’ Web3 wallets.
Furthermore, here are the stages that we will cover as part of today’s example project:
- The initial setup for Candy Machine v2
- Create a Solana wallet on your local computer
- Candy Machine v2 configuration
- Prepare the assets (images and metadata)
- Create the Candy Machine and upload the assets to Arweave
- Produce Candy Machine collections
- Verify assets upload
- Mint Solana NFT tokens
These are also the stages that Metaplex documentation for Candy Machine v2 takes you through. In addition, we will also take a look at how to mint Solana NFT tokens in batches (batch minting). Last but not least, we will help you complete the initial Moralis setup and show you a quick demo of an example Solana token dashboard. Using our video tutorial, you’ll have a chance to create your own instance of that dapp. So, make sure to create your free Moralis account and follow our lead.

What is a Solana NFT?
If you want to mint Solana NFT tokens, it’s only suiting that you know what Solana NFTs are. As such, you need to know what Solana is and what NFTs are. Well, Solana is a popular programmable blockchain. However, unlike many other chains, it is not EVM-compatible, which means it’s not compatible with Ethereum. As such, it utilizes its own tools, such as crypto wallets. Moreover, Solana also has its own (sort of) equivalent of smart contracts, which are on-chain programs. They ensure that things run automatically and according to predefined rules. These Solana programs are what we use to mint Solana NFT tokens. Furthermore, Solana also has its own token standard (SPL). We encourage you to dive deeper into the “what is Solana?” topic. In addition, you can learn more about the Solana token standard by checking out the SPL vs ERC20 tokens comparison.

On the other hand, NFTs or non-fungible tokens are special kinds of crypto assets that have a set of unique properties. Hence, NFT utility offers many applications in both the digital and real world. These types of assets are great for ownership representations, certificates, ticketing, collectibles, digital art, Web3 gaming, and much more. If you want to learn more about NFTs, make sure to use the “non-fungible tokens” link in the introduction.

We can now put one and two together. Thus, it is quite obvious what a Solana NFT is – an NFT minted on the Solana network. With that covered, we can focus on how to mint Solana NFT tokens. And, this is where Metaplex makes a world of difference.

What is Metaplex?
According to the official Metaplex website, Metaplex is the fastest and most affordable NFT ecosystem for marketplaces, games, arts, and collectibles. The Metaplex protocol has provided standards and tools that many projects use. When using the Metaplex Standard, you get to own your NFT storefront, with no additional fees and no middlemen. As such, Metaplex enables you to create NFTs in a decentralized manner. Moreover, there are many big names supporting the project, including the great Michael Jordan.
Basically, Metaplex is a collection of tools and smart contracts designed to make the process of creating and launching NFTs easier. This is currently offered through two major projects: Metaplex Storefront and The Candy Machine v2. The former is a generalizable NFT selling standard and the latter is an NFT minting tool. And, as mentioned above, we will focus on using the Candy Machine v2 herein to mint Solana NFT tokens.
Mint Solana NFT Tokens with Metaplex
With the basics under your belt, you are ready to tackle today’s example project. As promised above, we will focus on each stage at the time, so you’ll be able to follow along even if the topic is new to you. We’ll first complete the initial Candy Machine v2 setup, where you will get to clone our code that awaits you on GitHub. Then, we’ll help you set up a Solana wallet on your local machine. Next, we’ll go through the Candy Machine v2 configuration. After that, we will prepare the assets and then create the Candy Machine and upload those assets to Arweave. Moreover, we will also show you how to create Candy Machine collections and how to verify uploads. Finally, you’ll learn how to mint Solana NFT tokens; both one token at a time and multiple tokens.
Furthermore, while we’ll be as explicit as possible, some steps are just much clearer when looking at a video tutorial. Hence, as we proceed, we will often refer to the video located at the bottom of the article.
The Initial Setup for Candy Machine v2
The tool you need to use The Candy Machine v2 are:
- Git – for cloning the repository
- Node – JavaScript runtime
- Yarn – a package manager to install the required dependencies
- TS-node – TypeScript execution environment
Note: If you are using an Apple M1 chip, you need to install some additional dependencies (“brew install pkg-config cairo pango libpng jpeg giflib librsvg”).
With the above tools in place, it’s time to clone and install Metaplex. However, instead of using the URL provided by the Metaplex docs, we recommend using our code. The latter is modified with some Moralis code and will enable you to easily follow this tutorial. Hence, use the “GitHub” link above, and clone our code:

Create a Solana Wallet
By this point, you already know that The Candy Machine operates on the Solana blockchain. As such, you need a Solana wallet with sufficient funds (SOL) to create and deploy this program. Luckily, the Solana Toll Suite makes it very easy to create a local wallet.
Note: Local wallets are not very safe, as such make sure to use them only for development purposes and not to store greater amounts of funds on them.
To create your local Solana wallet, use your terminal and enter “solana –version”. Next, enter the “solana address” command. Finally, enter “solana balance”. In case you don’t have your Solana address yet, use the Metaplex docs to set up your new devnet wallet.
Moreover, you also need to have some SOL in your wallet. Luckily, Solana makes it very simple to do this for the Solana devnet environment. Essentially, you just use the “solana airdrop 2” command to get 2 SOL.
Note: When working with the Solana mainnet, you will need to obtain some real SOL. As such, you’ll need to buy it on one of the reputable centralized exchanges and transfer it to your wallet.
Candy Machine v2 Configuration
Start by opening the project that you’ve cloned above. To easily follow our lead, we recommend using Visual Studio Code (VSC). The configuration is located inside the “example-candy-machine-upload-config.json” file:

As you can see in the screenshot above, we will use Arweave to store our assets. However, there are other options you can explore. For more detailed guidance regarding the Candy Machine v2 configuration, use the video below, starting at 4:39.
Prepare the Assets to Mint Solana NFT Tokens
When it comes to NFTs, no matter on which blockchain, they consist of two parts – files and metadata. The most common types of files are images, while metadata comes in the form of JSON files. Moreover, for the sake of this tutorial, we’ve prepared the example assets for you. They come in pairs of PNG and JSON files:
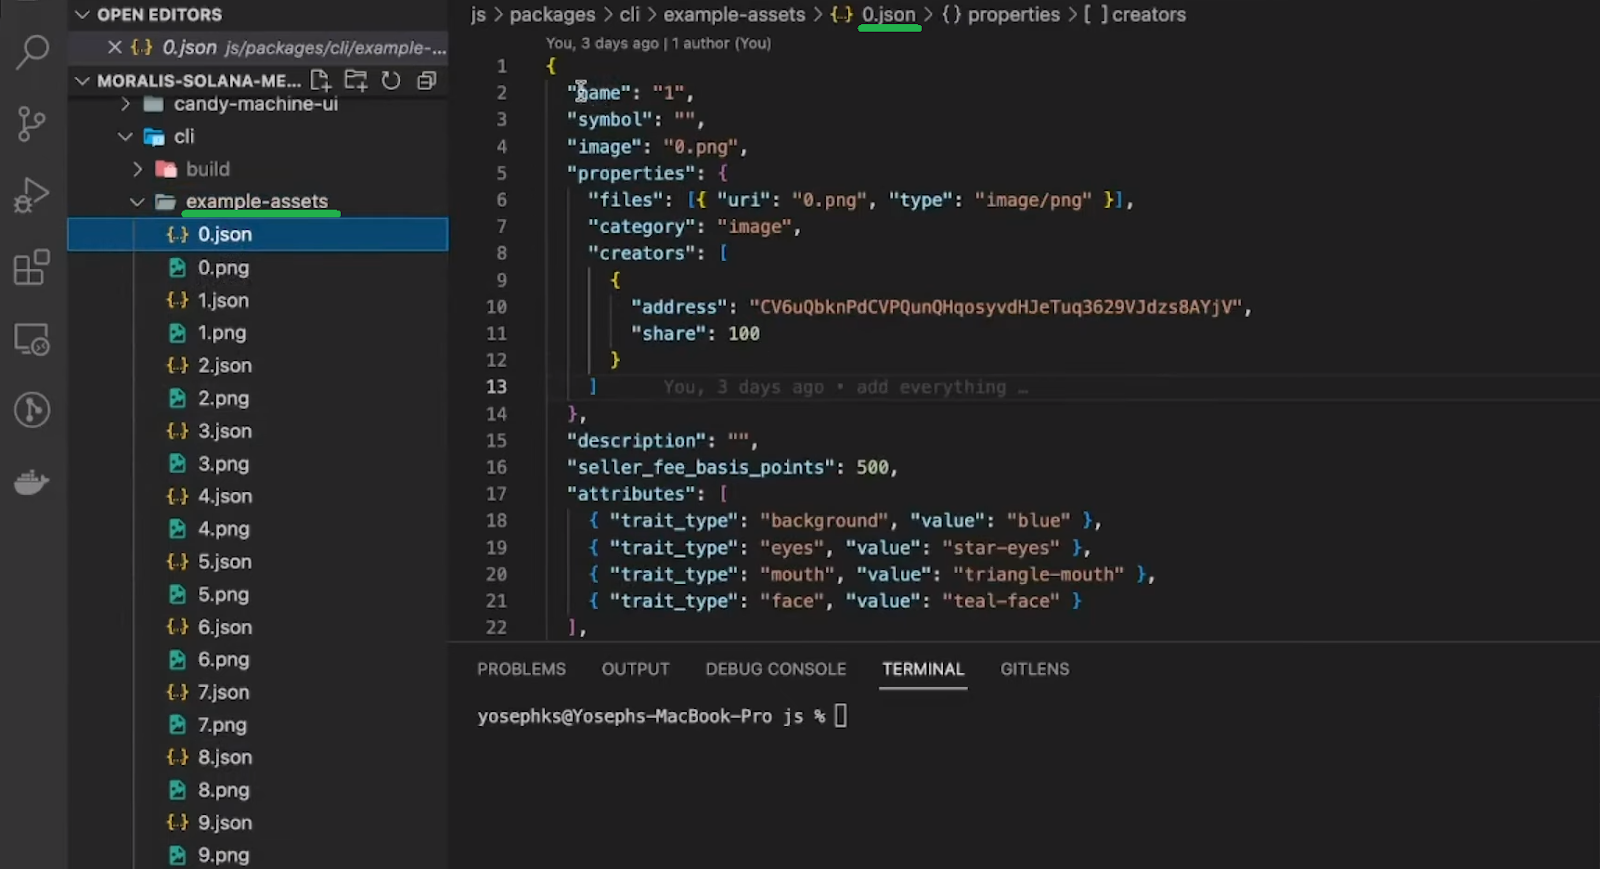
As you can see in the image above, we have prepared ten pairs of files, which means that we can mint ten Solana NFT tokens. Moreover, the right portion of the above image shows the details that our JSON files contain. For more detailed guidance use the video below (7:52). This is also where you will learn how to verify assets, which is a smart thing to do.
Create the Candy Machine and Upload the Assets to Arweave
Before proceeding with this stage, make sure that you have some SOL in your wallet. Starting at 12:27 of the video below, you will learn how to execute the “upload” command. Basically, you just copy the command provided by the Metaplex documentation:

Also, make sure to edit the paths to match our project. As you can see, we will deploy the Candy Machine on the Solana devnet. Once you apply all the tweaks, just hit “enter” and the code will upload all the assets and also create your Candy Machine program.
Produce Candy Machine Collections
Now that you’ve successfully uploaded your assets and created your Candy Machine program, it’s time to create Candy Machine collections (15:35). This stage follows a very similar path as the above one. Thus, you get to copy the command from the Metaplex docs and apply the necessary tweaks to match your file paths:

By running this command you will create an on-chain collection for your assets. This collection can be set during the mint process, which we will tackle shortly.
Verify Assets Upload
Just like verifying assets, verifying assets upload is also an optional step. However, we encourage you to do this in order to ensure that all your assets have been properly uploaded (in our case to Arweave):

For detailed instructions regarding this step, use the video below, starting at 17:23, or visit the Metaplex documentation.

Mint Solana NFT Tokens
Finally, we have everything ready to mint Solana NFT tokens based on the above-uploaded example assets (18:18). Just like all of the above steps, minting Solana NFTs with Metaplex will be very simple. Again, we get to copy the command from the Metaplex docs and implement the necessary tweaks to match our file paths. Moreover, you have two options – you can mint Solana NFT tokens one by one or in batches.
Once you’ve successfully minted your NFTs, you can use Solana Explorer to view the NFTs and their details. Just make sure to switch to devnet:

Taking the “Mint Solana NFT” Quest Further
As promised at the beginning of the article, we want to show you how you can use the best Web3 backend platform to easily create a Solana NFT portfolio tracking dapp:

And, this is how this dapp displays NFTs once you authenticate Solana users with the Phantom wallet:

Thanks to the Moralis’ SDK, you will be able to work with Solana NFT API and fetch users’ NFTs. However, to use this Firebase for crypto, you need to start with the initial Moralis setup. So, make sure to use the video tutorial below (24:50) to first create a Moralis dapp. Then, follow our in-house expert’s lead to create your own instance of the above-presented Solana NFT portfolio tracker.
Finally, here’s the video tutorial we’ve been referencing throughout the article:
How to Mint a Solana NFT with Metaplex – Summary
In today’s article, you had a chance to learn how to mint Solana NFT tokens with Metaplex. For starters, you learned the basics about Solana NFTs and Metaplex. Then, you had a chance to get your hands dirty by taking on our example project. Of course, we provided you with our code and detailed instructions, thus you didn’t need to break a sweat. Essentially, these are the stages you completed along the way:
- The initial setup for Candy Machine v2
- Create a Solana wallet on your local computer
- Candy Machine v2 configuration
- Prepare the assets
- Create the Candy Machine and upload the assets to Arweave
- Produce Candy Machine collections
- Verify assets upload
- Mint Solana NFT tokens
- Create your own Solana NFT portfolio tracker.
As such, you now know how to easily mint Solana NFTs and also how to work with Moralis to create killer dapps in minutes.
If you enjoyed today’s tutorial, make sure to visit the Moralis’ blog and the Moralis’ YouTube channel. These outlets offer a ton of value and can serve your continuous crypto education needs. For instance, some of the latest topics include Web3 syncing, Web3 webhooks, how to build on Web3 fast, full stack Web3 development, creating an AR metaverse NFT, building a Web3 augmented reality, and much more. On the other hand, if you want to become a Web3 developer fast and with confidence, you may want to consider enrolling in Moralis Academy.
