It’s fair to say NFTs have taken the world by storm, and it seems like everyone is launching a new NFT collection each week. Moreover, at the time, one couldn’t always just use a minting dapp to generate thousands of NFTs. Instead, this required some serious programming skills. Luckily, things came a long way in the last couple of years. Though, we have to admit that so far most of the hype has in fact revolved around NFT projects that do not add any significant value to the world. However, we like to think of these projects as proof of concept. The true utility of NFTs is yet to be implemented. This will revolutionize gaming, certificate issuance, and ownership across all major industries. As such, learning how to build an NFT minting dapp seems like a very smart move. Luckily, it is a lot simpler than most people think.
The trick lies in using the right tools, which is where Moralis enters the scene. This best Web3 backend platform provides you with the ultimate NFT API. Moreover, it also offers neat solutions for Web3 authentication, which is the entry point of all dapps (decentralized applications). In addition, Moralis also specializes in providing devs with Web3 syncs to easily index the blockchain. Furthermore, Moralis is cross-platform and cross-chain interoperable, which offers countless opportunities. And, probably the best thing about Moralis is that it makes bridging Web2 and Web3 seamless. After all, JavaScript or Unity proficiency in combination with some Web3 basics are all you need to get going. So, to build a minting dapp the easy way, create your free Moralis account and follow our lead. However, before we roll up our sleeves, let’s make sure you know what a minting dapp is.

What is a Minting Dapp?
Ethereum, which was the first programmable blockchain, gave birth to smart contracts. These on-chain programs are the core of minting. However, to understand what a minting dapp is, you need to know what a dapp and minting are. As indicated in the intro, “dapp” stands for “decentralized application”, which is an application that includes some sort of Web3 functionalities. In other words, dapps are applications that enable users to interact with blockchains in some way. A dapp can be read-only or can also enable users to execute transactions, which is the only way to store data on the blockchain. Moreover, dapps can be cross-chain, which means that users can switch between multiple blockchains or they can be limited to a single blockchain.

If we now focus on “minting”, you probably recognize the term in reference to issuing physical coins. Coins are minted (coining), when some sort of stamping is involved. On-chain mining adopted this term when tokens (non-native coins) came to life. For instance, in the case of Ethereum and other EVM-compatible chains, these are ERC-20 tokens. Moreover, as mentioned above, minting is done with smart contracts – code that defines conditions and actions when these conditions are met. To deploy smart contracts, devs need to execute blockchain transactions. Furthermore, the details of minting depend on the details of smart contracts. In some instances, the token minting can be executed as soon as the smart contract is deployed. On the other hand, minting can be executed at will by executing certain on-chain transactions. Moreover, when it comes to minting NFTs on EVM-compatible chains, the ERC1155 and ERC721 standards set the rules.
Let’s now put it all together: a minting dapp is a Web3 application that enables users to mint fungible or non-fungible tokens.

Build a Bulk Minting Dapp – Example Project
The two most popular NFT collections remain the Boar Ape Yacht Club (BAYC) and CryptoPunks. Both of these revolve around 10,000 uniquely generated characters (profile pics). As such, we want to focus on a minting dapp that does that sort of thing first.
One of our in-house experts created a three-part series that shows you all you need to know about generating NFTs. After all, you need something to mint. However, the technical part is the tricky one. As far as the PNG images go, you can always outsource or partner with a digital artist.
To complete this feat on your own, you will need the following tools:
- Moralis
- Code editor (we prefer Visual Studio Code [VSC])
- Photo editor (we prefer Adobe Photoshop)
- MetaMask
- Remix
Before you move any further, we also want to stress the importance of starting with the end goal in mind. You need to envision your NFTs in advance. After all, bulk minting usually revolves around layers of images being put together. Hence, it is important to determine which parts those images represent to have a sufficient number of different options and to stack them properly. Moreover, you also need to consider the total number or NFTs and whether or not you want certain NFTs to repeat themselves (their metadata would be unique, but their visual part would be the same). Thus, make sure you start with proper preparation:
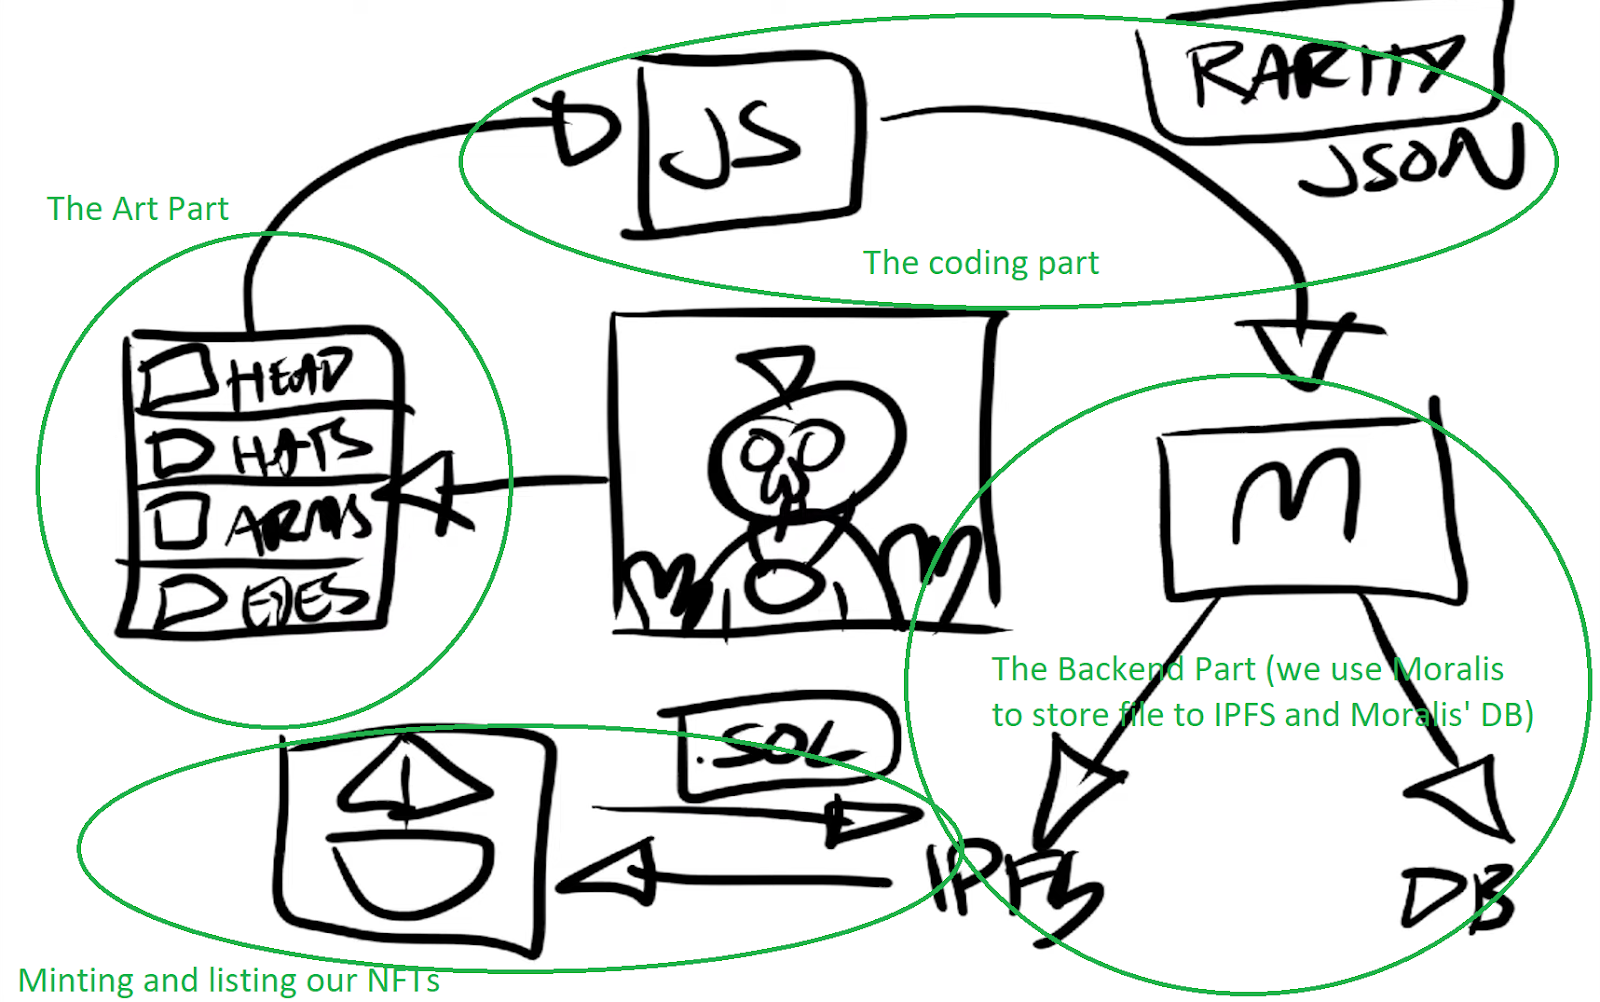
The above image indicates the key stages of the process of generating NFTs. Then, you need to build a minting dapp on top of that, which we cover in the “How to Create an NFT Minting Website” section at the bottom.
Generating 1,000s of NFTs – Layers and Components
As you can imagine, manually creating 1,000s of images would take a lot of time. In addition, people seem to appreciate the fact that computer code generates the art part of NFTs. However, you still need to prepare the individual components (e.g.: backgrounds, bodies, clothing, eyes, mouths, noses, accessories, etc.).
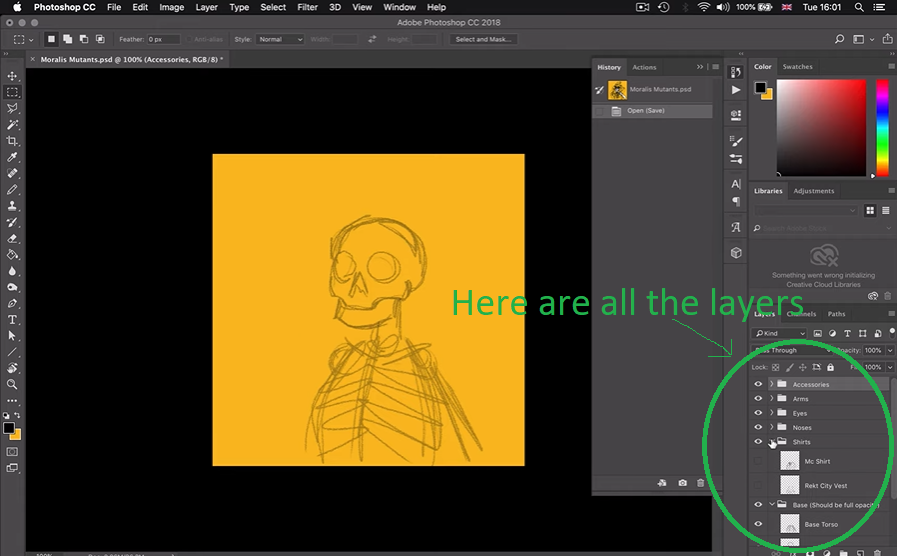
If you decide to create the components yourself, you can use Photoshop, which enables you to export layers as files:
On the other hand, you can always go to Fiverr or other freelancing platforms and hire someone to create the component for you. With that said, let’s move on to the coding part, which is what you as a dev want to focus on anyway.
Creating NFTs with Moralis – Three-Part Tutorial
As mentioned above, one of our in-house experts created very detailed video tutorials on that topic. Hence, we encourage you to use them. The videos listed below will show you exactly what it takes to generate your NFTs starting from scratch. Moreover, this is also where you’ll learn how to list generated NFTs on OpenSea. However, we hope you will take things further and even create a minting dapp.
Nonetheless, to save a lot of time, we encourage you to use our code. You can find all the links to GitHub in the video descriptions on YouTube. Moreover, we encourage you to use the video overviews below to determine if you want to commit to these tutorials.
How to generate NFTs video – part one:
How to generate NFTs video – part two:
How to generate NFTs video – part three (Q&A):
Creating a File Generating Machine – Part One Overview
Part one (2:14) starts by covering all the details of creating the art part with Photoshop. This is where you can learn to export each layer as a separate PNG file. Next, the video (4:48) shows you how to utilize our code with VSC. Essentially, you get to configure your own NFT generating engine. The latter takes the artistic components (PNG files) and generates unique and complete images. These images will be the visual part of your NFTs.
Starting at 6:00, you’ll see how to create a Moralis server, which is your gateway to accessing the power of Moralis.
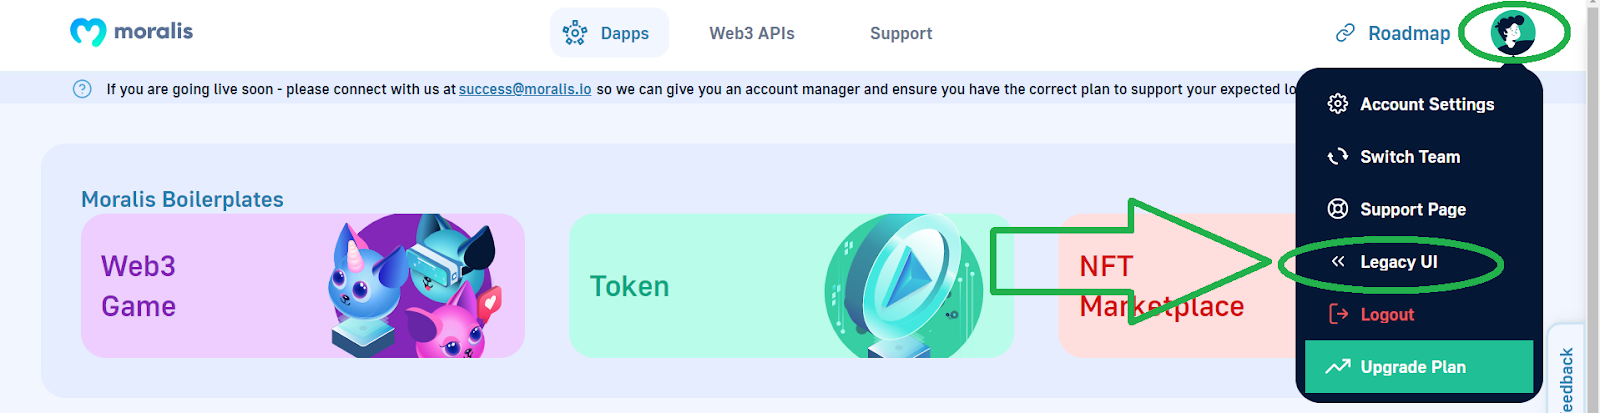
Note: The video tutorial was created before the new Moralis UI was released. However, you can still switch to the legacy UI:
Moving forward, you will learn how to adjust your edition size (6:28), which shows you how to define the total number of unique images to be generated. The “config.js” file is the one responsible for that:
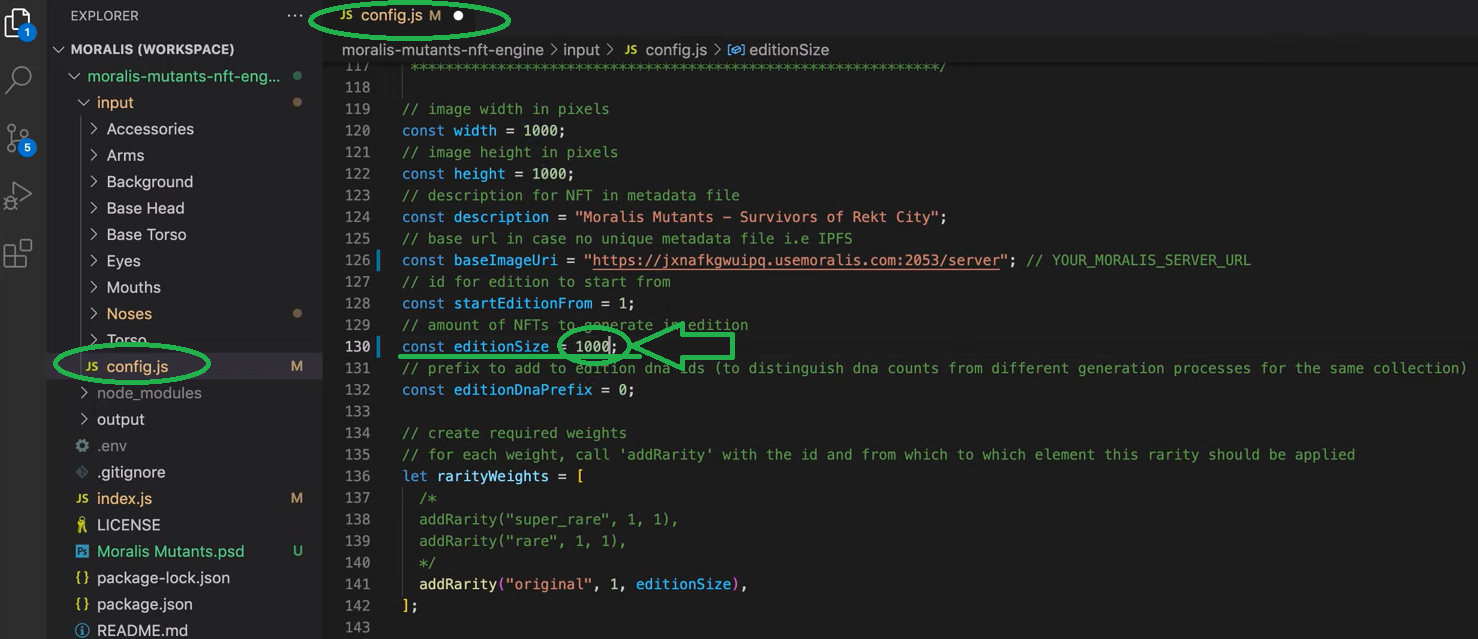
Note: The larger the total number of generated images, the more components you need to have to retain uniqueness. Also, the larger the number of images, the more time it will take to generate them.
One of the key components of an NFT generating engine is the proper arrangement of the layers and how they get inserted into an array (6:53):

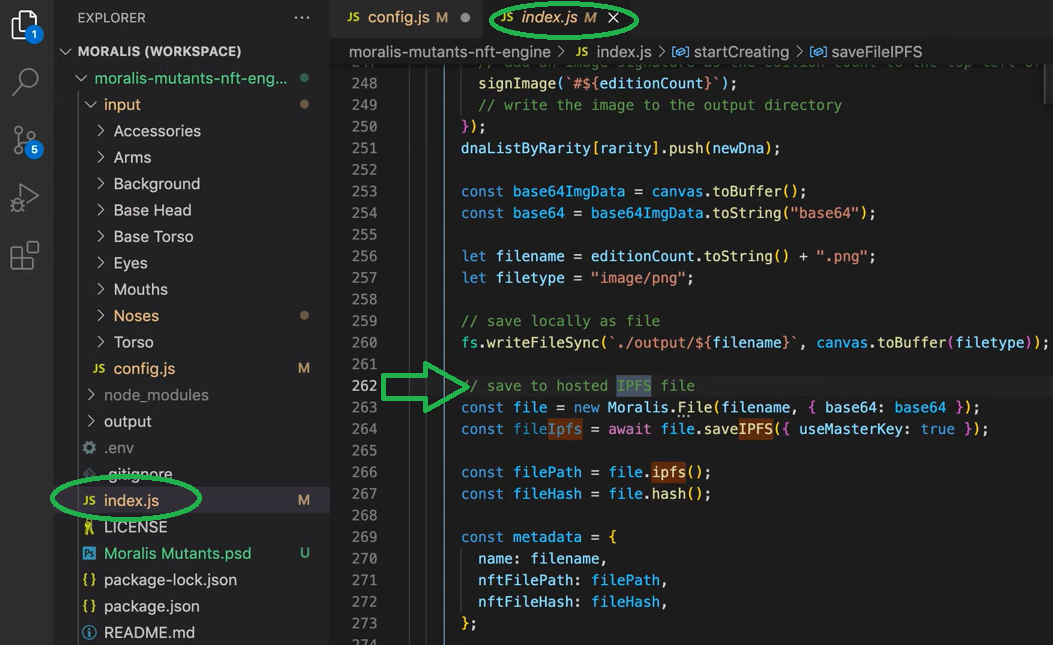
Starting at 7:38, you’ll shift your focus to the “index.js” file. This is basically your NFT generating engine. It will compile the layers and create final PNG files and metadata files (JSON files). “Index.js” also ensures that generated files get uploaded to IPFS. This is another aspect that Moralis covers with its IPFS integration and Moralis’ database:
Finally, you’ll get to execute the “node index.js” command, which will return the files’ paths.
Minting NFTs with Remix – Part Two Overview
If you’ve completed the steps covered in part one, you now have your images and corresponding metadata saved to IPFS. These files will be the core of your NFTs; however, until you mint your NFTs, these files are just files. And, if you remember correctly, you need a smart contract to do the minting. Moreover, this is also the part where you can set in place a proper minting dapp to enable users to mint their own NFTs. Essentially, the minting dapp just needs to trigger your smart contract, which will obtain the files from IPFS and generate an NFT.

Starting at 7:24 of the part two video above is where you’ll learn how to mint thousands of NFTs. This is where you’ll use MetaMask. Moreover, you’ll be focusing on Polygon’s testnet (Mumbai) (7:42). However, you could mint your NFTs on any other supported chain. You’ll learn how to obtain some “play” MATIC (8:04):

Starting at 8:54, you’ll go to Remix. There, you will get to paste our smart contract (code awaits you at GitHub) and apply some basic tweaks. You’ll need to replace the “INSERT_YOUR_CID_METAHASH” part with your uploaded folder’s CID (available in your Moralis dashboard). Furthermore, to mint 1,000 NFTs, you’ll need to replace the following code with a proper loop:
    {
        // account, token_id, number
        _mint(msg.sender, 1, 1, "");
        _mint(msg.sender, 2, 1, "");
        _mint(msg.sender, 3, 1, "");
    }
You want the loop to go through all your PNG and JSON files. With your code ready, you’ll get to compile the smart contract. Finally, starting at 12:15, you’ll learn how to deploy your contract and thus mint your NFTs:

How to Create an NFT Minting Website
As promised, we also want to show you how easy it is to create an NFT minting page when you use Moralis. Of course, using our code that awaits you on GitHub is also a huge shortcut. However, NFT minting website development is all about creating a neat way for users to execute on-chain transactions that take care of minting. Luckily, Moralis’ NFT API enables you to take care of the backend aspects effortlessly. As such, you get to devote your time and resources to creating the best UI and UX possible.

Of course, you also need to create and deploy a smart contract, which you now know is the core of minting. However, thanks to tools like OpenZeppelin, Remix, and Hardhat, you don’t need to be a Solidity expert to do this. In case you want to focus on Solana, which is not an EVM-compatible chain, Metaplex will be the tool to use if you are not Rust proficient. You can learn all you need to know about these tools on the Moralis’ blog. Then, you can use the tutorials on the Moralis’ YouTube channel to put the theory into practice.
Nonetheless, here’s a video tutorial that will show you how to create an NFT mining website, which is just a particular kind of a minting dapp:
How to Build a Minting Dapp – Summary
If you want to create a minting dapp, there’s a lot more to the process than just the UI. In fact, herein you were able to learn that a minting dapp is essentially just a cherry on top. Nonetheless, a very important cherry.
Essentially, we took you through the entire process behind collectible NFTs, where you usually need to generate thousands of NFTs.
Hence, you now know that you need to start with proper planning, which helps you determine the kind of NFTs you want to create. With that in mind, you are able to establish what components you need. Then you get to use Photoshop or similar programs to generate the necessary PNG files or you can outsource the art part. Once you have your PNG components ready, you need to create a machine that generates the final PNGs and the corresponding metadata. Moreover, that machine also uploads the generated files to a decentralized storage system. Another piece of the puzzle is a proper smart contract that will execute the minting and actually mint the NFTs. Only after you’ve successfully uploaded the files and deployed your smart contract, can you create a minting dapp. And, you now know that Moralis helps you tie it all together.
If you want to explore other blockchain development tutorials, make sure to visit the Moralis’ YouTube channel and the Moralis’ blog. This is also a great way to become a Web3 developer for free. However, if you want to go full-time crypto sooner rather than later, getting blockchain certified might be a smart move. If that interests you, make sure to check out Moralis Academy.
