In the video tutorial above, one of our experts demonstrates how to build a DAO (decentralized autonomous organization). While the instructions target the Goerli testnet, the principles are the same if you want to build on Ethereum’s mainnet or other EVM-compatible chains. If you’d like to get started with your DAO project immediately, you can dive into the video or follow along in the tutorial below!
To build a decentralized autonomous organization, you must create smart contracts, a reliable backend, and a user-friendly frontend. Now, there are various ways you can complete those tasks; however, in this article, we focus on using Solidity with Brownie for smart contracts, Python and Moralis for the backend, and JavaScript for the frontend. That said, we will mainly focus on smart contracts and the backend. After all, with your JavaScript proficiency and the above video, you should have no problems covering the frontend.
These are the four smart contracts that power our example DAO:
- Minting and managing governance tokens:
contract GovernanceToken is ERC20Votes {}
- Transferring governance power:
contract Box is Ownable {}
- Defining rules:
contract MoralisGovernor is
    Governor,
    GovernorSettings,
    GovernorCountingSimple,
    GovernorVotes,
    GovernorVotesQuorumFraction,
    GovernorTimelockControl
{}
- Enforcing rules:
contract TimeLock is TimelockController {}
Of course, these are just the first lines of our four smart contracts for our DAO. Each has specific lines of code within the curly brackets, which you will learn more about if you decide to build a decentralized autonomous organization by following along. Since the voting power in our DAO depends on the amount of governance tokens users hold, the backend needs a simple way to check that. This is where the “get_wallet_token_balances” endpoint does the trick:
result = evm_api.token.get_wallet_token_balances(
    api_key=api_key,
    params=params,
)
Now, to use all of the above code snippets, you need a Moralis account. Therefore, make sure to sign up with Moralis now!

Overview
DAOs can have various features. In today’s tutorial, we will show you how to build a DAO that incentivizes its members to hold a significant number of tokens for greater voting power. This kind of approach may lead to slightly more centralized governance. However, it still makes sense since the more invested a person is in a particular DAO, the more that person wants to see the DAO succeed. Although there are several DAOs utilizing off-chain voting, we believe on-chain voting is more transparent. Thus, we will focus on the latter herein.
To build this kind of DAO, we need a governance token that determines who can and can’t vote, which is what we’ll create. We will also deploy some additional smart contracts, starting with one that assigns which smart contract governs the DAO. Two additional smart contracts automate the governance of our example DAO. For the sake of this tutorial, we kept things as simple and universal as possible. Thus, you should be able to take our template contracts and easily tweak them to match your specific needs.
For the purpose of creating and deploying smart contracts, we will use Solidity and Brownie – a Python-based development and testing framework for smart contracts on Ethereum and other EVM-compatible chains. However, you can also deploy our smart contract scripts with Remix IDE or Hardhat.
Aside from creating smart contracts, to build a decentralized autonomous organization, we also need a proper frontend and backend dapp. For the former, we will use ReactJS, and for the latter, we will use Python. If you’d like, you can clone both parts of our DAO from our GitHub repo. Now, let’s do a quick demo of our example dapp.
How to Build a DAO – Demo
Before we lay out the steps to use our script and build a decentralized autonomous organization, you deserve to know what you will be building. Thus, a quick demo of our example DAO is in order.
The following screenshot shows the gist of our DAO’s frontend:
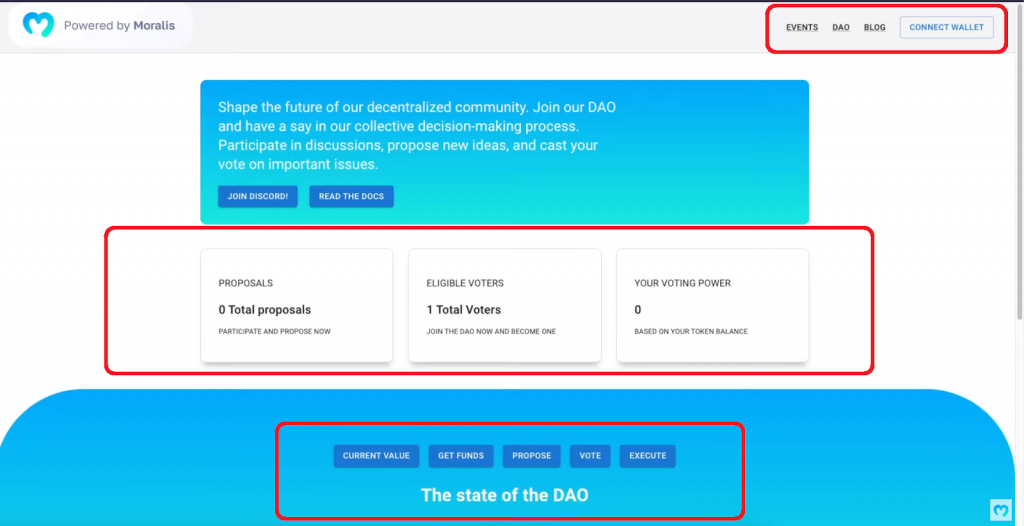
Looking at the above image, you can see that we marked three main sections. In the top-right corner of the dapp is the menu bar. The “Events”, “DAO”, and “Blog” options are just placeholders; however, the “Connect Wallet” button is fully functional. The latter enables visitors to connect with their MetaMask wallets and start participating by submitting proposals and voting on existing proposals. The middle section displays the number of total proposals, eligible voters, and the connected user’s voting power. At the bottom, users get to execute specific actions by utilizing the “current value”, “get funds”, “propose”, “vote”, and “execute” buttons. Of course, these buttons are only available to the connected users. So, let’s look at an example user:

In the above screenshot, you can see that once users connect their wallets, the “Connect Wallet” button changes into an inactive “connected” button. Plus, the middle section now displays the connected user’s stats. Moreover, connected users get to use the bottom section:
- Via the “Current value” option, users get to assign governance to one of our smart contracts:

- The “Get funds” button enables users to get governance tokens:

- Via the “Propose” button, users get to submit new proposals:

- The “Vote” button allows users to vote on existing proposals:

- Via the “Execute” option, users get to execute the proposal that received the majority of “in favor” votes:

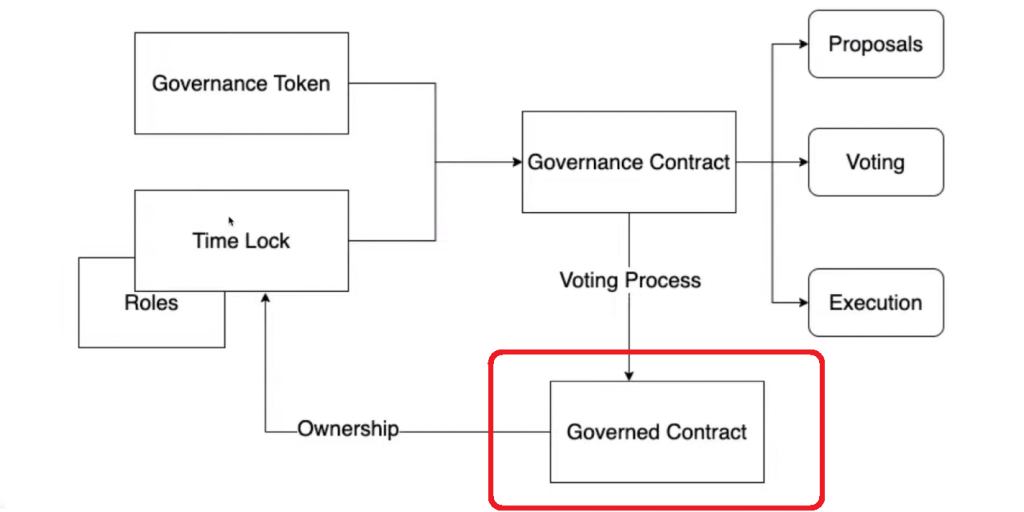
Here are also two diagrams that will help you understand the process flow of our example DAO:
- Our smart contracts:

- Proposal and voting:

Tutorial – How to Build a Decentralized Autonomous Organization the Easy Way
The simplest way to build a decentralized autonomous organization is to use our DAO smart contract template on GitHub and our backend and frontend scripts. That way, you’ll create your own instance of the above-presented DAO in a matter of minutes. If you choose this path, you just need to complete the following steps:
- Clone our code with the
git clonecommand for our repo link:

- Install all the required dependencies for the frontend. Then,
cdinto the “frontend” folder and use the following command:yarn. - In the main project directory, you’ll see the “.env.example” file containing environmental variables. In that file, you must store your wallet’s private key, Infura project ID, and Etherscan API key. Also, don’t forget to rename the file to “.env”.
- There’s another “.env.example” file in the backend/tokens” directory. In this one, you need to provide your Moralis Web3 API key that awaits you in your Moralis admin area. You can access that area with your Moralis account and copy your API key in two clicks:

With your API key in place, also rename this file to “.env”.
- For your backend to function properly, you also need to install Python dependencies for the “.env” file:
eth-brownie,django, andweb3. - Run the backend with the following command:
python manage.py runserver. - Start the frontend with npm:
npm start.
Play Around with Our DAO
Since our smart contracts are already live on the Goerli testnet, you can actually complete your own instance of our DAO with the seven steps above. You’ll need to obtain the governance tokens and use Goerli ETH to cover transaction fees. As such, make sure to use a vetted Goerli faucet, which awaits you on our crypto faucet list.
Code Along
You may also be eager to do some coding on your own instead of just cloning our final scripts. This is also one of the best ways to learn how to build a DAO. In that case, you should use our “Dao-Template” repo and follow along with the video above:

Whether you decide to code along by starting with our “Dao-Template” repo or using our final scripts, we encourage you to deploy your own instances of our four smart contracts. If that interests you, make sure to use the video at the top of the article, starting at 13:53. However, for our DAO smart contracts and main backend script code walkthrough, follow along in the following sections!
DAO Smart Contracts Code Walkthrough
To build a decentralized autonomous organization, you need proper smart contracts. They are the on-chain programs that will determine if your DAO runs correctly. As presented in the intro and in the diagram above, our example DAO utilizes four smart contracts. Their code comes in the following four Solidity scripts: “Box.sol“, “GovernanceToken.sol“, “MoralisGovernor.sol” and “TimeLock.sol“.
Governed DAO Smart Contract
“Box.sol” is our simple example smart contract executing specific functions to assign governance to another contract. Like all Solidity contracts, it starts with license and pragma lines:
//SPDX-License-Identifier: MIT
pragma solidity ^0.8.7;
Next, we use OpenZeppelin to import the verified Ownable smart contract:
import "@openzeppelin/contracts/access/Ownable.sol";
With the above import, we simply inherit that contract’s functions in our smart contract. Essentially, it ensures that our smart contract is able to use the onlyOwner function. With the above three lines in place, we can define the rest of this governed DAO smart contract:
contract Box is Ownable {
    uint256 private value;

    event ValueChanged(uint256 newValue);

    function store(uint256 newValue) public onlyOwner {
        value = newValue;
        emit ValueChanged(newValue);
    }

    function retrieve() public view returns (uint256) {
        return value;
    }
}
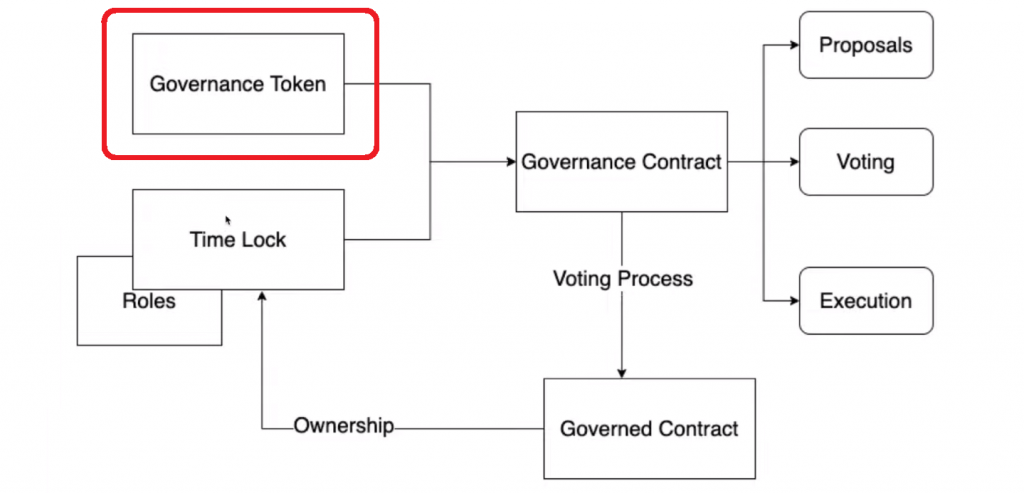
Governance Token Smart Contract
Behind every crypto token (fungible, non-fungible [NFT], or semi-fungible), there’s a smart contract. The latter controls and manages the supply and circulation of tokens. As such, to create DAO governance tokens, we need a governance token smart contract. In our case, we decided to use the ERC-20 token standard and create ERC-20 tokens. This process is pretty straightforward, thanks to OpenZeppelin. So, here are the license, pragma, and OpenZeppelin import lines:
//SPDX-License-Identifier: MIT
pragma solidity ^0.8.7;

import "@openzeppelin/contracts/token/ERC20/Extensions/ERC20Votes.sol";
Next, we declare our smart contract and events that register when tokens are transferred, minted, or burned:
contract GovernanceToken is ERC20Votes {

    event TokenTransfered(
        address indexed from,
        address indexed to,
        uint256 amount
    );

    event TokenMinted(address indexed to, uint256 amount);
    event TokenBurned(address indexed from, uint256 amount);
In a typical token smart contract, you want users to buy tokens on an exchange; however, in our example, we will allow each user to get 1,000 tokens for free. Plus, we want to set our maximum token supply to one million (Solidity has 18 decimals):
    uint256 constant TOKENS_PER_USER = 1000;
    uint256 constant TOTAL_SUPPLY = 1000000 * 10**18;
We also only want users to receive free tokens once. As such, we need to create an array of holders:
    mapping(address => bool) public s_claimedTokens;

    address[] public s_holders;
Then, we add the “constructor” function that defines the details of our governance tokens – the symbol and the name. Plus, we must ensure that each user can only mint a certain amount of the total supply:
    constructor(uint256 _keepPercentage)
        ERC20("MoralisToken", "MRST")
        ERC20Permit("MoralisToken")
    {
        uint256 keepAmount = (TOTAL_SUPPLY * _keepPercentage) / 100;
        _mint(msg.sender, TOTAL_SUPPLY);
        _transfer(msg.sender, address(this), TOTAL_SUPPLY - keepAmount);
        s_holders.push(msg.sender);
    }
We also need to define the function to allow users to claim the tokens:
    function claimTokens() external {
        require(!s_claimedTokens[msg.sender], "Already claimed tokens");
        s_claimedTokens[msg.sender] = true;
        _transfer(address(this), msg.sender, TOKENS_PER_USER * 10**18);
        s_holders.push(msg.sender);
    }
The following function enables the contract to know how many token holders there are:
    function getHolderLength() external view returns (uint256) {
        return s_holders.length;
    }
Finally, we add some overrides required for Solidity:
    function _afterTokenTransfer(
        address from,
        address to,
        uint256 amount
    ) internal override(ERC20Votes) {
        super._afterTokenTransfer(from, to, amount);
        emit TokenTransfered(from, to, amount);
    }

    function _mint(address to, uint256 amount) internal override(ERC20Votes) {
        super._mint(to, amount);
        emit TokenMinted(to, amount);
    }

    function _burn(address account, uint256 amount)
        internal
        override(ERC20Votes)
    {
        super._burn(account, amount);
        emit TokenBurned(account, amount);
    }
}
The two smart contracts above are necessary, but they aren’t governing our DAO. For that purpose, we need two other contracts, which are the heart of our example DAO. Furthermore, they are the core of this “build a decentralized autonomous organization” tutorial.

DAO Governance Smart Contract
When learning how to build a DAO, creating proper rules to be enforced automatically is extremely important. This is why your governance smart contract needs to follow all the latest contract standards. Fortunately, we can rely on OpenZeppelin to provide that. You can use the video at the top (24:35) to learn how to use OpenZeppelin’s contract wizard. The latter allows us to simply select the specific parameters and then copy the provided lines of code:
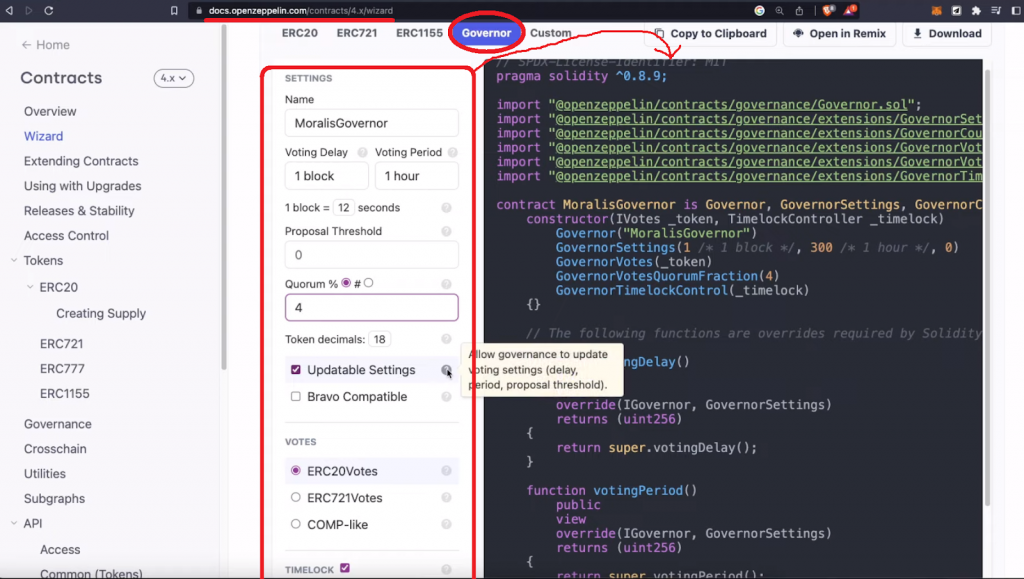
This amazing tool provides a complete governance smart contract without any coding. We tweaked the constructor of this smart contract to set certain parameters instead of using fixed values. We also add a variable to count proposals:
    constructor(
        IVotes _token,
        TimelockController _timelock,
        uint256 _votingDelay,
        uint256 _votingPeriod,
        uint256 _quorumPercentage
    )
        Governor("Governor")
        GovernorSettings(
            _votingDelay, /* 1 => 1 block */
            _votingPeriod, /* 300 blocks => 1 hour */
            0 /* 0 => Because we want anyone to be able to create a proposal */
        )
        GovernorVotes(_token)
        GovernorVotesQuorumFraction(_quorumPercentage) /* 4 => 4% */
        GovernorTimelockControl(_timelock)
    {
        s_proposalCount = 0;
    }
Of course, the contract includes all the required functions that govern the functionalities of our DAO, which are overrides required by Solidity. However, we did add s_proposalCount++; to the propose function:
    function propose(
        address[] memory targets,
        uint256[] memory values,
        bytes[] memory calldatas,
        string memory description
    ) public override(Governor, IGovernor) returns (uint256) {
        s_proposalCount++;
        return super.propose(targets, values, calldatas, description);
    }
In addition, we also added the getNumberOfProposals function at the bottom of the contract:
    function getNumberOfProposals() public view returns (uint256) {
        return s_proposalCount;
    }
The “MoralisGovernor.sol” contract ensures users can create proposals, vote, and execute accepted proposals in line with predefined rules.

DAO Time Lock Smart Contract
Aside from the license and pragma lines, this contract also utilizes one of OpenZeppelin’s verified contracts:
//SPDX-License-Identifier: MIT
pragma solidity ^0.8.9;

import "@openzeppelin/contracts/governance/TimelockController.sol";
The above OpenZeppelin import makes our work a lot simpler, and we can complete this contract with just a few lines of code:
contract TimeLock is TimelockController {
    constructor(
        uint256 minDelay,
        address[] memory proposers,
        address[] memory executors,
        address admin
    ) TimelockController(minDelay, proposers, executors, admin) {}
}
The above “TimeLock.sol” smart contract helps us set the minimum time delay that needs to pass before anyone can execute the proposal. This contract also specifies the roles: proposers, executors, and admin. Proposers are addresses that can create proposals, executors are addresses that can execute the accepted proposal, and the admin is the address that can set the time delay. However, when it comes to the admin role, for this to be a proper DAO, the admin role must not be an actual wallet address. As such, the admin role must be renounced once we deploy the contract. Additionally, TimelockController is the Owner of the “Box.sol” contract.
The time lock smart contract gives our DAO time for a proposal to be executed. Plus, it gives users time to vote.
How to Build a DAO – Walkthrough of the Main Backend Script
If you remember, the voting power in our example DAO depends on the number of governance tokens a user holds. Thus, we also need a simple way to fetch that info in the backend. Fortunately, Moralis makes that extremely simple with the “Get ERC20 token balances by wallet” endpoint. If you wish to test that endpoint, make sure to visit its API reference page in the Moralis docs:

This page also provides us with Python code to do all the heavy lifting. For our DAO, we basically copied those lines of code and created the “services.py” script. This script utilizes the Moralis Web3 API key stored in the backend “.env” file to initialize Moralis. Then it calls the get_wallet_token_balances endpoint to query the balance of governance tokens. At the top, we need to import evm_api and auth from Moralis, load_dotenv from dotnev, and os:
from moralis import evm_api, auth
from dotenv import load_dotenv
Next, we load dotenv and fetch our API key:
load_dotenv()

api_key = os.getenv("MORALIS_API_KEY")
Then, we define the get_token_balance method and use the code snippet from the intro:
def get_token_balance(address):
    params = {
        "address": address,
        "chain": "0x5",
        "token_addresses": ["0x761D630b3697a58B9c741b4D54B27226237792BC"],
    }

    result = evm_api.token.get_wallet_token_balances(
        api_key=api_key,
        params=params,
    )

    return result
Looking at the lines of code above, you can see that the script uses the address of a connected wallet and focuses on the Goerli testnet; its chain ID in HEX format is 0x5. As for the token address, this is the smart contract address of our “GovernanceToken.sol“.
Note: If you deployed your own instances of our smart contracts, make sure to use your contract’s address. Also, the above lines of code are the core of our backend. Of course, there are other utility scripts (“views.py” and “urls.py”) using the results that the above lines of code provide. To learn more about those scripts, use the video at the top, starting at 1:10:43.
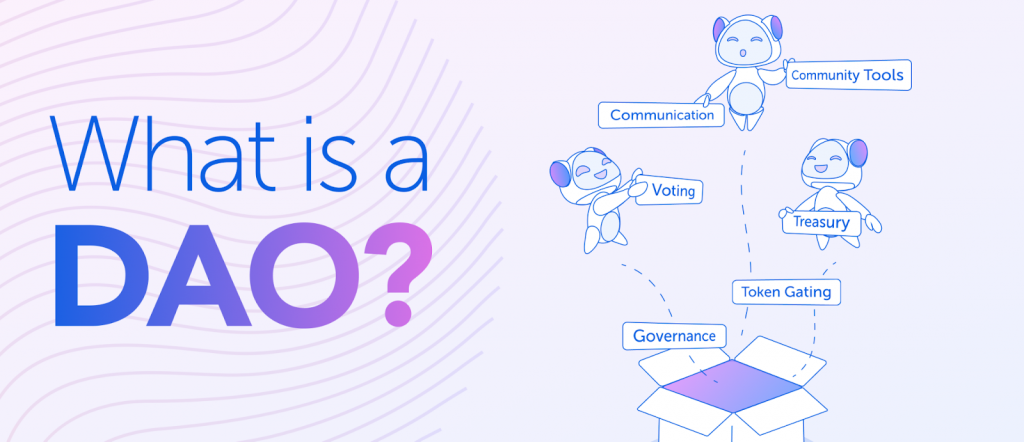
What is a Decentralized Autonomous Organization?
A decentralized autonomous organization, or DAO, is a decentralized governing body that allows an organization to run without central control. They are based on smart contracts that provide governance tokens, enabling token holders to participate in decision-making. DAOs provide on-chain governance, allowing anyone with tokens to participate and are free from geographical limitations. Transparency and community trust are the most significant benefits of DAOs, as decisions are made on-chain, and token holders have the power to make changes.

How to Build a Decentralized Autonomous Organization (DAO) – Summary
In today’s article, you had a chance to learn how to build a DAO using our template scripts in minutes. By cloning our code, you were able to create your instance of our DAO in seven simple steps. On the other hand, you might have decided on a more educational approach by cloning our starter code and following along with the video tutorial. In either case, you learned a lot about DAOs and their smart contracts that enforce the DAO rules and automate the governance. Nonetheless, you also learned how Moralis makes it simple to fetch on-chain data with just a few lines of code. With the knowledge and skills obtained herein, you can build a decentralized autonomous organization that matches your ideas.
On the other hand, you may wish to explore other blockchain development topics. Perhaps you wish to build a DEX, Web3 wallet, portfolio tracker, NFT marketplace, or some other type of dapp (decentralized application). In that case, make sure to explore the Moralis YouTube channel and the Moralis blog. The latter is also a great place to expand your crypto horizons as it covers a wide range of blockchain development topics. For instance, some of the latest articles explain Ethereum scaling solutions and the Arbitrum testnet.
In addition, Moralis provides you with other valuable resources, such as the ultimate gwei to ETH converter and vetted crypto faucets list. Aside from the already mentioned Goerli faucet, our list includes all the leading faucets, including an Arbitrum faucet and a BNB faucet. As such, you can build and test your dapps on all leading blockchains.
